
Measure Ring Size at Home: Expert Tips & Tools
Finding the perfect ring fit doesn’t require a trip to the jewelry store. Whether you’re shopping for an engagement ring, wedding band, or fashion statement piece, knowing how to measure your ring size at home is a practical skill that saves time and money. This comprehensive guide walks you through multiple methods, from using common household items to professional-grade techniques, ensuring you get an accurate measurement every time.
Getting your ring size wrong can lead to expensive resizing fees, uncomfortable wear, and the frustration of returns. The good news is that measuring your ring size at home is straightforward when you follow the right approach. We’ll explore proven techniques used by jewelers and DIY enthusiasts alike, plus expert tips to help you navigate the nuances of ring sizing.

Why Accurate Ring Sizing Matters
Ring sizing might seem like a minor detail, but it has significant implications for comfort, safety, and jewelry longevity. A ring that’s too tight can restrict blood circulation, cause discomfort during extended wear, and potentially damage delicate skin. Conversely, a ring that’s too loose risks falling off during daily activities, creating anxiety about loss.
Beyond comfort, an ill-fitting ring may require professional resizing, which can cost $50 to $150 depending on the metal and design complexity. Understanding how to size a ring properly before purchase eliminates this expense and ensures your jewelry investment is wearable from day one. Additionally, different fingers require different sizes—your ring finger may be a size 7, while your pinky is a size 4.
Temperature and time of day also affect finger size. Fingers swell slightly in warm weather and during evening hours, so measuring in the morning during cooler seasons provides the most conservative estimate. This knowledge helps you select a size that works across varying conditions.
Essential Tools for Measuring Ring Size
You likely have everything needed to measure your ring size using items already in your home. Here’s what works best:
- String or dental floss: Flexible, easy to wrap around your finger, and provides accurate circumference measurements
- Ruler or measuring tape: Essential for converting circumference to ring size; a flexible tape measure works better than rigid rulers
- Pen or marker: Marks the point where string overlaps for accurate measurement
- Paper: Can be cut into strips as an alternative to string
- Existing rings: If you already own rings that fit well, they serve as sizing templates
- Printer and ring size chart: Many jewelers offer free printable sizing guides
For the most accurate results, use a flexible measuring tool rather than a rigid ruler. Flexibility allows the measuring device to conform to your finger’s natural shape.
The String or Floss Method
This is the most popular at-home ring sizing technique and delivers reliable results when executed correctly.
Step 1: Prepare Your String
Cut a piece of string or dental floss approximately 6 inches long. Avoid stretchy materials like elastic, which distort measurements. Standard cotton string or unwaxed dental floss provides the best accuracy.
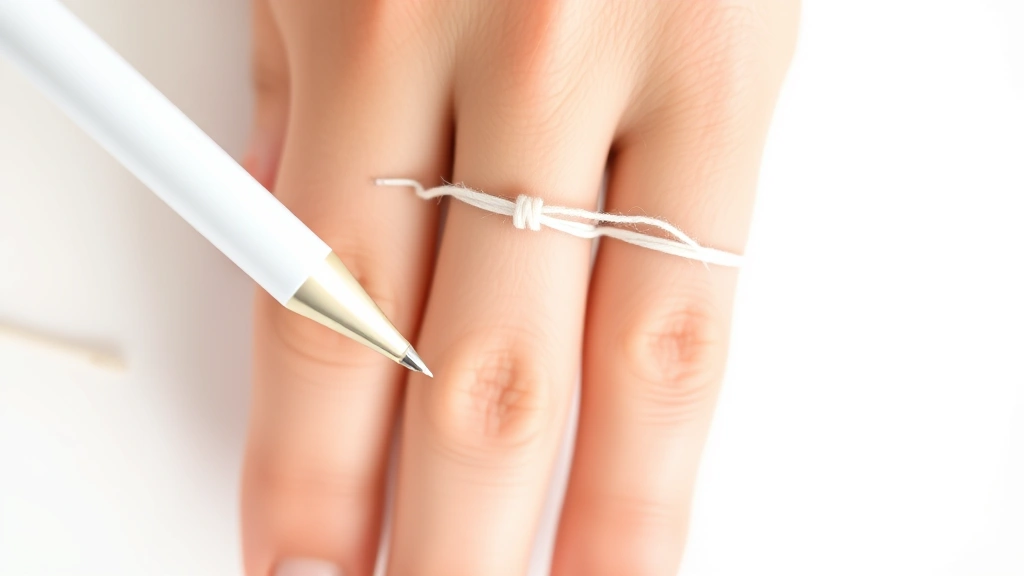
Step 2: Wrap Around Your Finger
Wrap the string snugly around the base of your ring finger, just below the knuckle where you’ll wear the ring. The string should be tight enough that you can’t slide it up and down, but loose enough to fit comfortably—you should be able to slide a thin piece of paper underneath. This mimics how a properly fitting ring should feel.
Step 3: Mark the Overlap Point
Using a pen, mark where the string overlaps itself. Make sure the mark is visible and precise. Some people prefer to make two small marks where the string crosses for added accuracy.
Step 4: Measure the String Length
Carefully remove the string from your finger without disturbing the marked section. Place it on a ruler and measure from the end to your mark in millimeters. Write down this measurement—it represents your finger’s circumference.
Step 5: Convert to Ring Size
Use the measurement to consult a ring size conversion chart. For example, a circumference of 53mm typically corresponds to a US size 6. We’ll cover conversion charts in detail in the next sections.
Pro tip: Repeat this process three times on different occasions to ensure consistency. If your measurements vary by more than 1mm, take the average of all three measurements.
The Paper Strip Technique
If you don’t have string or floss readily available, a paper strip works equally well for measuring ring size at home.
Prepare the Paper Strip
Cut a strip of paper approximately 0.5 inches wide and 6 inches long. Using standard printer paper provides consistent results. Avoid newspaper or tissue paper, which compress and give inaccurate readings.
Wrap and Mark
Wrap the paper strip around your ring finger at the base, just as you would with string. Ensure it’s snug but not tight—you should have minimal wiggle room but be able to breathe comfortably. Mark where the paper overlaps with a pen, making the line clear and dark.
Measure and Convert
Remove the paper strip and measure the marked section with a ruler. This measurement equals your finger’s circumference. Convert this number using a ring size chart to determine your size.
The paper method works particularly well because the paper’s thickness is negligible, and you can see marks clearly. However, some people find paper less comfortable than string when wrapping around their finger.
Using an Existing Ring
If you already own a ring that fits perfectly on the finger where you want to wear your new ring, this existing ring becomes your sizing reference.
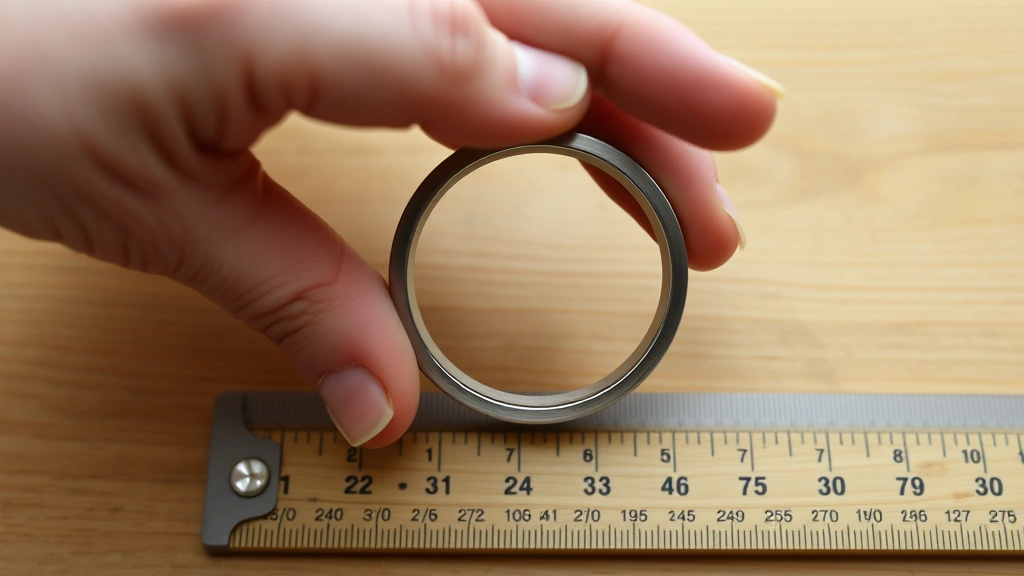
Measure the Inside Diameter
Place the existing ring on a ruler or measuring tape, measuring the interior width from one side to the opposite side. This is the ring’s inner diameter. Make sure to measure at the widest point of the ring’s interior.
Consult Diameter-to-Size Charts
Use the diameter measurement to cross-reference with a ring size chart that lists both diameter and size. Most jewelers’ websites provide these charts free of charge. This method is particularly useful when shopping online, as you can send the diameter measurement to the retailer for confirmation.
Account for Ring Design
Keep in mind that measuring ring size from an existing ring works best if that ring is a simple band. Wide bands or rings with stone settings may fit differently than standard bands, potentially affecting comfort.
The Water Displacement Method
For those who want a highly technical approach, the water displacement method provides mathematical precision.
Gather Materials
You’ll need a glass of water, your ring, and a ruler or measuring tape. This method works best with rings that are solid and won’t be damaged by water immersion.
Measure Initial Water Level
Fill a glass with water to a consistent level. Using a ruler held vertically against the glass, note the exact water level in millimeters.
Submerge the Ring
Carefully place your ring in the water. The water level will rise due to the ring’s displacement. Record this new water level.
Calculate Ring Volume
Subtract the initial water level from the final water level. This difference represents your ring’s volume in millimeters. Advanced users can convert this volume to diameter using mathematical formulas, though most home measurers find this step unnecessarily complex.
The water displacement method is most useful for vintage or antique rings where traditional measurement is difficult due to design complexity.
Ring Size Charts and Conversion
Ring sizes vary significantly by country. The US uses numerical sizes (typically 3-13, with half sizes), while other regions use letter systems or different numerical scales.
US Ring Size Chart
The US system is the most common in North America. Sizes increase numerically, with size 7 being average for adult women and size 10 being average for adult men. Each full size represents approximately a 3mm increase in circumference.
International Conversions
If you’re shopping internationally, conversion becomes necessary. A US size 7 equals approximately UK size M, European size 54, and Japanese size 15. Online conversion charts make these translations simple—sites like The Diamond Store and Brilliant Earth provide comprehensive conversion tables.
Circumference to Size Conversion
Once you have your finger’s circumference in millimeters, use this general guide:
- 49-50mm = US size 4
- 52-53mm = US size 6
- 55-56mm = US size 8
- 58-59mm = US size 10
- 61-62mm = US size 12
For precise conversions, consult a detailed chart from an authoritative source like James Allen’s ring sizing guide.
Tips for Accurate Measurements
Several factors influence ring sizing accuracy. Following these expert tips ensures reliable results:
Measure Multiple Times and Days
Finger size fluctuates throughout the day and across seasons. Measure in the morning when fingers are smallest, and repeat on different days. Average your results for the most representative size.
Account for Temperature
Cold temperatures cause fingers to shrink slightly, while heat causes them to swell. Measure during moderate room temperature conditions, ideally around 70°F. This provides a middle ground that works across seasons.
Consider Your Dominant Hand
Non-dominant hands are typically slightly smaller than dominant hands due to less muscle development. If you’re unsure which hand to measure, opt for the non-dominant hand—rings on this hand tend to fit more comfortably.
Account for Swelling Conditions
If you’re pregnant, have recently exercised, or are experiencing hormonal fluctuations, your fingers may be temporarily swollen. Wait until you’re in your normal state before measuring to avoid oversizing.
Use Multiple Measurement Methods
Don’t rely on a single technique. Use both the string method and the paper strip method, then compare results. If both methods yield the same size, you can confidently proceed with that size.
Consult Professional Resources
Many jewelers offer free ring sizing services or online consultations. Retailers like Blue Nile provide detailed sizing guides and customer support to verify your measurements.
Common Mistakes to Avoid
Even with good intentions, measurement errors happen. Knowing what to avoid prevents costly mistakes:
Measuring Over Clothing
Never measure your ring finger while wearing gloves or long sleeves that bunch up. These add bulk and distort your measurement. Always measure your bare skin directly.
Using Stretchy Materials
Elastic or stretchy string gives inaccurate results because it compresses under tension. Stick with non-elastic cotton string, dental floss, or paper.
Ignoring Knuckle Size
Your knuckle may be larger than your ring finger base. If you have large knuckles, you might need a size that fits over your knuckle comfortably, even if it’s slightly loose at the base. Test this with an existing ring before purchasing.
Measuring When Fingers Are Swollen
Hands swell after exercise, in hot weather, or during certain times of the menstrual cycle. Measure during your normal state to avoid oversizing. Similarly, avoid measuring when dehydrated or ill, as these conditions affect finger size.
Trusting a Single Measurement
One measurement isn’t enough. Variations in technique, time of day, and environmental factors mean you should measure at least three times and average the results.
Overlooking Ring Width
Wide bands may require a size larger than standard bands because they sit lower on the finger. If you’re purchasing a wide band, mention this to the jeweler or consider sizing up by half a size.
When you understand sizing principles from other applications, ring sizing becomes intuitive. The same attention to detail that applies to measuring chest size or measuring arm length applies here.
FAQ
What’s the average ring size for women?
The average US ring size for adult women is between 6 and 7. However, this varies significantly based on genetics, ethnicity, and body frame size. Never assume your size based on averages—always measure your individual finger.
Can ring size change over time?
Yes, ring size can change due to weight gain or loss, aging, arthritis, pregnancy, or hormonal changes. If you haven’t worn a ring in several years, remeasure before purchasing to ensure accuracy. Some people find their ring size increases by half to a full size after pregnancy.
What if my measurements keep varying?
Variations of 1-2mm are normal and usually fall within acceptable tolerance. If your measurements vary more than that, ensure you’re measuring at the same time of day, in the same temperature, and using the same technique each time. Take the average of your measurements and round to the nearest half size.
Should I size up or down if I’m between sizes?
If your measurement falls between two sizes, consider the ring’s width and your knuckle size. For standard bands, sizing down slightly is usually safer than sizing up, as a snug ring won’t fall off. For wide bands or if you have prominent knuckles, sizing up may be more comfortable. When in doubt, consult the jeweler.
Can I measure my ring size using a printable ring sizer?
Yes, many jewelers provide free printable ring sizers. Print the PDF to actual size (100% scale, no page scaling), then slide the provided rings onto your finger until you find your fit. This method is convenient but less precise than circumference measurement, so use it as a secondary verification.
What’s the difference between ring size and ring width?
Ring size refers to the circumference or diameter of the ring opening—the measurement that determines how snugly it fits your finger. Ring width refers to how wide the band is from side to side. Width affects comfort and may necessitate sizing adjustments, but it’s separate from the size designation.
Is it better to measure at a jewelry store?
Professional jewelers have specialized sizing tools and expertise, making their measurements highly accurate. However, at-home measurement using the methods described here provides equally accurate results when executed carefully. Many jewelers are happy to verify your measurements for free, even if you’re not purchasing from them.
Can I use the same size for all my rings?
Ideally, yes, but design considerations matter. Standard band rings should all be the same size, but wide bands, rings with large stone settings, or adjustable rings may fit differently. When purchasing multiple rings, measure each finger individually rather than assuming they’re all the same size.
Related Posts

Superscript in Google Docs: Expert Tips

Strikethrough in Excel: Easy Steps for Beginners
