

How to Remove Blank Rows in Excel: Expert Guide
How to Remove Blank Rows in Excel: Expert Guide
Nothing derails spreadsheet productivity quite like a sea of blank rows cluttering your data. Whether you’ve inherited a messy file from a colleague or your own data entry created gaps, blank rows are the digital equivalent of potholes in an otherwise smooth workflow. They throw off formulas, complicate sorting, and make your otherwise pristine dataset look like it needs a serious cleanup.
The good news? Removing blank rows in Excel doesn’t require any mystical knowledge or hours of manual deletion. With the right approach, you can eliminate these nuisances in minutes, leaving you with clean, organized data ready for analysis. This guide walks you through multiple methods—from the straightforward to the sophisticated—so you can choose the technique that best fits your situation.
Before we dive into the solutions, it’s worth understanding why blank rows exist in the first place. They often appear after data imports, when copying and pasting from different sources, or simply from inconsistent data entry practices. The key is tackling them systematically rather than one-by-one, which would be tedious and error-prone.
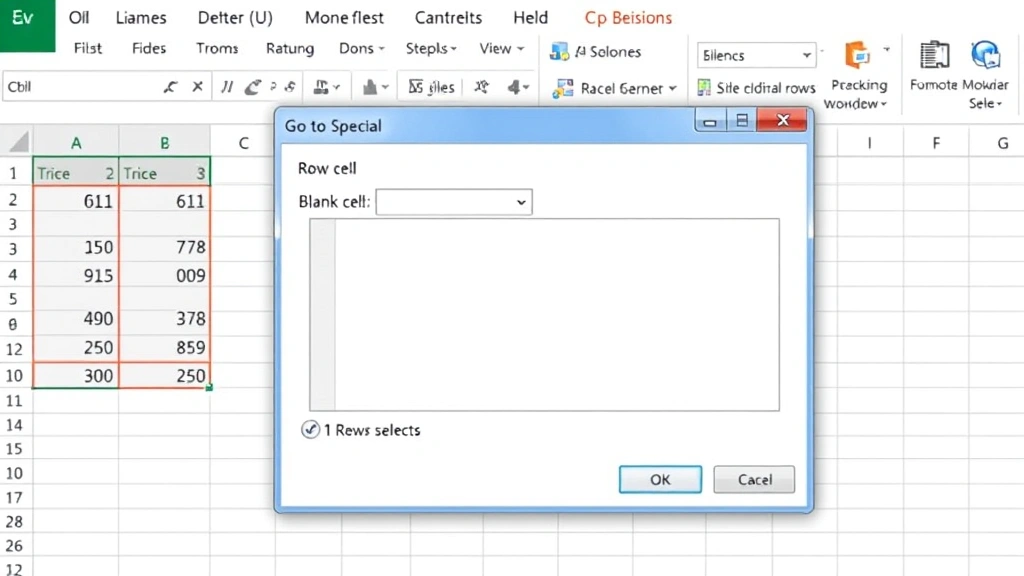
Method 1: Using Go To Special Feature
This is arguably the fastest method for most users, and it works beautifully when your blank rows are scattered throughout your dataset. The Go To Special feature is like having a bloodhound that sniffs out every empty cell in your selection, allowing you to select and delete them all at once.
Here’s how:
- Select the entire data range containing your spreadsheet (or press Ctrl+A to select all)
- Press Ctrl+H to open Find & Replace dialog, or go to the Home tab and click Find & Select
- Click on “Go To Special” (in newer Excel versions, this might be under “Find & Select” dropdown)
- Select “Blanks” from the dialog box
- Once all blank cells are highlighted, right-click and select “Delete”, then choose “Entire Row”
- Click OK and watch your blank rows vanish
The beauty of this method is its speed. You’re essentially telling Excel to identify every blank cell simultaneously, then delete them as a group. It’s particularly effective when you have sporadic blank rows scattered throughout your dataset rather than consecutive ones.
Method 2: Sorting to Group Blank Rows
Sometimes the simplest solution is the most elegant. By sorting your data, you can push all blank rows to the bottom of your spreadsheet, making them easy to select and delete in one go. This method also has the added benefit of organizing your data, which is never a bad thing.
Follow these steps:
- Select your entire data range including headers
- Go to the Data tab and click “Sort”
- In the Sort dialog, select any column that contains data
- Make sure “Header row” is checked if your first row contains headers
- Click OK
- All blank rows will now be grouped at the bottom
- Select these blank rows and delete them
This approach works particularly well if you don’t mind reorganizing your data order. If you need to maintain a specific sorting order, you might combine this with a helper column that preserves your original sequence. It’s also worth noting that if you’re working with data that needs alphabetical organization anyway—similar to when you might want to alphabetize in Excel—this method accomplishes two goals simultaneously.
Method 3: Using AutoFilter
AutoFilter is your friend when you want surgical precision. This method lets you hide blank rows and then delete only the visible ones, giving you fine-grained control over what gets removed.
The process:
- Select your data range
- Go to Data tab and click “AutoFilter”
- Click the dropdown arrow in any column header
- Uncheck “(Blank)” to hide all blank rows
- Select all visible rows (excluding the header)
- Right-click and select “Delete Rows”
- Remove the AutoFilter to see your cleaned data
The advantage here is that you’re only deleting rows where that particular column is blank. If you have scattered blank cells across different columns, you might need to repeat this process for each column. However, for datasets where blanks are concentrated in specific columns, this is incredibly efficient.
Method 4: Find & Replace Technique
This method uses Find & Replace with regular expressions—a bit more advanced, but incredibly powerful once you understand it. It’s particularly useful for removing rows that appear blank but actually contain spaces or formatting.
Here’s the approach:
- Select your data range
- Press Ctrl+H to open Find & Replace
- Leave the “Find what” field empty
- Leave the “Replace with” field empty
- Click “Options” and check “Regular Expressions”
- In the “Find what” field, enter: ^$ (this finds completely empty cells)
- Click “Replace All”
- Then manually delete the resulting blank rows, or use another method to clean up
This method is particularly useful when you need to verify that cells are truly empty and not just appearing empty due to formatting issues. If you’re dealing with data that’s been imported or manipulated extensively, this extra verification step can save you headaches later.
Method 5: Helper Column Approach
When you need maximum control and want to preserve your data integrity, the helper column method is your safety net. It’s slightly more involved but gives you complete visibility into what you’re deleting.
Steps to follow:
- Insert a new column at the end of your data
- In the first cell of this column, enter a formula: =COUNTA(A2:Z2) (adjust the range to match your data columns)
- Copy this formula down to all rows
- Rows with a “0” value in this column are completely blank
- Sort or filter by this column to identify blank rows
- Delete the blank rows
- Delete the helper column
This method is especially valuable when you’re working with important data and want a visual confirmation before deletion. You can see exactly which rows are being flagged as blank, reducing the risk of accidentally deleting rows that contain data you need. If you later need to organize this data, you can always alphabetize your results to present them in a more professional format.
Method 6: VBA Macro Solution
For those who regularly work with large datasets containing numerous blank rows, a VBA macro is a game-changer. Once created, you can use it repeatedly with a single click.
Here’s a basic macro:
- Press Alt+F11 to open the VBA editor
- Click Insert > Module
- Paste this code:
Sub DeleteBlankRows()
On Error Resume Next
Columns(“A:Z”).SpecialCells(xlCellTypeBlanks).EntireRow.Delete
End Sub - Close the editor and save your file as .xlsm (macro-enabled)
- Run the macro from the Macros menu whenever needed
This approach is best for power users or anyone processing similar datasets regularly. The macro runs almost instantaneously, even on massive spreadsheets with thousands of rows. Just ensure you’re working with trusted files and understand basic VBA before implementing this solution.
For more detailed information about Excel automation, Microsoft’s official macro documentation provides comprehensive guidance.
Pro Tips for Prevention
While knowing how to remove blank rows is essential, preventing them in the first place is even better. Here are some strategies to keep your spreadsheets clean from the start:
- Data Validation: Use drop down lists in Excel to ensure consistent data entry and reduce accidental blanks
- Consistent Formatting: Establish data entry standards before importing or beginning manual entry
- Regular Audits: Periodically review your data for blank rows before they accumulate
- Import Carefully: When importing from external sources, preview the data and clean it during the import process rather than after
- Freeze Important Rows: If you have header rows or important reference data, consider using freeze cells in Excel to keep them visible while scrolling
These preventative measures save time in the long run. Think of it as maintaining your spreadsheet rather than constantly repairing it.
Quick Method Comparison
Choosing the right method depends on your specific situation. Here’s a quick reference:
- Go To Special: Best for scattered blank rows, fastest execution
- Sorting: Best when you don’t mind reorganizing data
- AutoFilter: Best for targeted deletion in specific columns
- Find & Replace: Best for handling hidden spaces and formatting issues
- Helper Column: Best for verification and data integrity
- VBA Macro: Best for recurring tasks on large datasets
Most Excel users find themselves returning to the Go To Special method because it’s fast, reliable, and requires no special setup. However, keeping these alternatives in your toolkit means you’re prepared for any scenario.
If you work across multiple Microsoft Office applications, you might also want to familiarize yourself with similar cleanup techniques. For instance, if you’re managing documents in Word alongside your Excel work, understanding how to delete pages in Word can help you maintain consistency across your document management practices.
Additionally, if your blank rows are actually hidden rows that you need to restore, the process is different. You can learn more about unhiding all rows in Excel to ensure you’re not accidentally working with incomplete data.
For comprehensive Excel guidance, ExtendOffice’s Excel tutorials offer additional perspective on blank row removal. You might also find Ablebits’ detailed breakdown helpful for advanced scenarios.
Frequently Asked Questions
Can I undo blank row deletion if I make a mistake?
Absolutely. Excel’s undo function (Ctrl+Z) works perfectly for this. However, it’s only available immediately after deletion. If you’ve closed and reopened the file, undo won’t work. This is why creating a backup or using the helper column method for verification is wise when working with critical data.
What if my blank rows contain hidden data or formatting?
Use the Find & Replace method with regular expressions, or the helper column approach. These methods will help you identify whether cells are truly empty or just appear empty due to white text or other formatting tricks.
Will removing blank rows affect my formulas?
Only if those formulas reference the specific row numbers of the deleted rows. If your formulas use named ranges or relative references within a defined data range, they’ll adjust automatically. Always review critical formulas after bulk deletions.
How do I handle blank rows in the middle of my data that I want to keep?
If you intentionally have blank rows for formatting or organization purposes, you’ll need to manually identify and preserve them. The helper column method is excellent for this—you can mark intentional blanks differently and exclude them from deletion.
Is there a limit to how many blank rows Excel can process at once?
Modern versions of Excel can handle deletion of thousands of rows efficiently. However, if you’re working with extremely large datasets (100,000+ rows), you might want to work in sections or use VBA for better performance.
What’s the difference between empty cells and blank rows?
A blank row has empty cells across all columns. An empty cell is just one cell with no data. The methods described here primarily target blank rows, though some (like Go To Special) can be adapted for individual empty cells.
Can I remove blank rows from multiple sheets at once?
Not automatically. You’ll need to process each sheet individually, though a VBA macro could be written to iterate through multiple sheets and apply the deletion. For most users, processing sheets one at a time is the practical approach.
Related Posts

How Long to Boil Lobster Tails: Cooking Guide

How Long to Fly from New York to London? Travel Times
