
How to Remove Gel Varnish: Expert Step-by-Step Guide
How to Remove Gel Varnish: Expert Step-by-Step Guide
Gel varnish looks absolutely stunning on nails—that glossy, chip-resistant finish is hard to beat. But let’s be honest: removing it without damaging your natural nails can feel like defusing a bomb if you don’t know what you’re doing. The good news? It’s entirely manageable once you understand the right technique. Whether you’re dealing with a professional manicure or a DIY application gone slightly sideways, this guide will walk you through every step to safely remove gel varnish while keeping your nails healthy and strong.
The key to successful gel removal isn’t rushing the process or using aggressive force. Instead, it’s about patience, the right materials, and understanding what’s actually happening beneath that shiny surface. Gel polish is essentially a polymer that bonds to your nail plate through UV or LED light curing. Breaking that bond requires a solvent-based approach combined with gentle mechanical removal. Sounds technical, but the process is surprisingly straightforward once you get the hang of it.
Many people make the mistake of peeling or picking at gel varnish, which can lead to peeling nails, weakened nail beds, and months of regrowth struggles. That’s why having a proper removal strategy matters. Let’s dive into the methods, tools, and insider tips that will have your nails looking fresh and undamaged.
Understanding Gel Varnish Composition
Before diving into removal techniques, it helps to understand what you’re actually working with. Gel varnish is a polymer-based product that contains oligomers, monomers, photoinitiators, and various additives that create color, shine, and durability. When exposed to UV or LED light, these components cross-link and harden into that tough, glossy coating you see on your nails.
The reason gel polish is so durable is also why it requires specific solvents to remove. Unlike regular nail polish, which dissolves relatively easily in acetone, gel varnish has a much stronger molecular bond with the nail plate. This is why soaking your nails in regular acetone for five minutes won’t cut it—you need sustained contact with a high concentration of acetone, usually for 10-15 minutes, to break down that polymer structure effectively.
Understanding this chemistry helps explain why certain removal methods work better than others. The foil wrap technique, for instance, isn’t just about keeping acetone on your nails—it’s about creating an environment where the acetone can penetrate the gel layer consistently without evaporating.
Essential Tools and Materials You’ll Need
Successful gel varnish removal starts with having the right supplies on hand. Don’t skip this step—using subpar materials will make the process frustrating and potentially damaging to your nails.
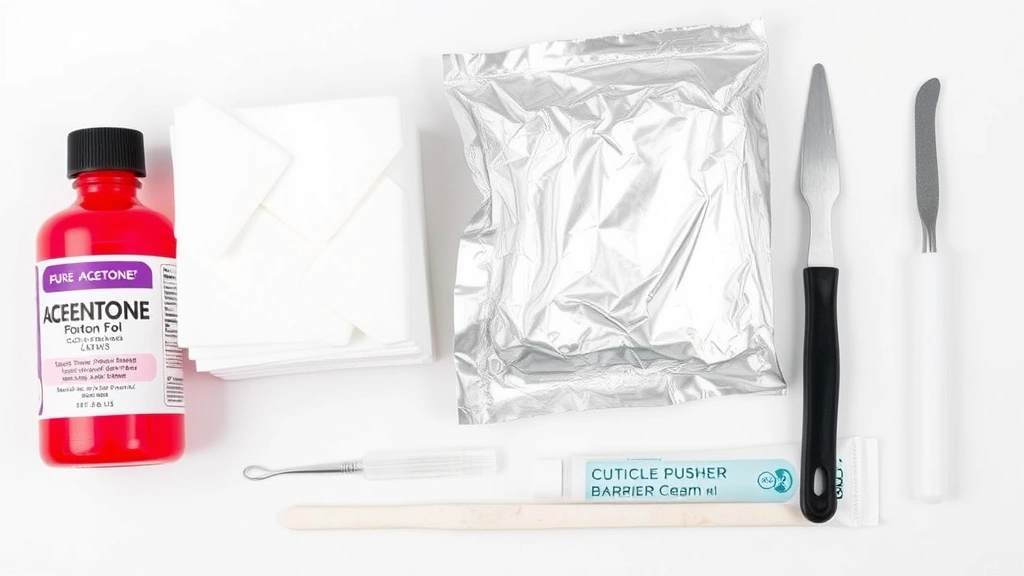
- 100% Pure Acetone: This is non-negotiable. Regular nail polish remover won’t work effectively because it’s usually diluted with water and other ingredients. You need pure acetone from a beauty supply store, hardware store, or online retailer.
- Nail File: A medium-grit file (180-220 grit) is perfect for gently buffing the shiny top layer of gel. This helps acetone penetrate more effectively.
- Nail Buffer: A soft buffer helps smooth the nail surface after gel removal and prepares nails for future polish applications.
- Cuticle Pusher: A wooden or plastic cuticle pusher is gentler than metal tools and helps lift gel edges without scratching the nail plate.
- Cotton Pads or Balls: Cut cotton pads into smaller pieces that fit directly on each nail for more efficient acetone application.
- Aluminum Foil: Cut into squares approximately 2×2 inches—one for each nail you’re treating.
- Nail Clippers: For trimming any loose edges before removal begins.
- Moisturizing Cuticle Oil: Essential for post-removal care to restore hydration to nails and surrounding skin.
- Barrier Cream or Petroleum Jelly: Protects skin around nails from acetone irritation during the removal process.
- Nail Strengthener: A treatment product to rebuild nail integrity after gel removal.
The Acetone Soak Method
The acetone soak method is the most straightforward approach and works well for most people. It requires patience but minimal special equipment beyond what we’ve already discussed.
Step 1: Prepare Your Work Area
Set up in a well-ventilated space. Acetone has strong fumes, so open windows, turn on a fan, or work outside if possible. Lay down paper towels or a protective surface to catch any spills. Acetone can damage some finishes, so be mindful of where you’re working.
Step 2: File the Gel Surface
Using your medium-grit nail file, gently file the shiny top layer of gel varnish. You’re not trying to remove all the gel—just buff away that glossy finish. This allows acetone to penetrate more effectively. Work in one direction rather than sawing back and forth, which can cause splitting.
Step 3: Apply Protective Barrier
Apply a thin layer of barrier cream or petroleum jelly around the skin surrounding each nail. This creates a protective buffer between your skin and the acetone, reducing irritation and dryness.
Step 4: Soak in Acetone
Pour acetone into a small bowl (glass or ceramic, not plastic—acetone can damage plastic). Soak your nails for 10-15 minutes. You’ll notice the gel starting to soften and lift at the edges. Resist the urge to rush this step. The longer you soak, the easier removal becomes.
Step 5: Gently Remove Loosened Gel
After soaking, use your wooden cuticle pusher to gently lift the softened gel from the nail edge. Work slowly and carefully. If the gel isn’t lifting easily, soak for another few minutes rather than forcing it. Forcing removal can damage the nail plate and cause peeling.
Step 6: Repeat as Necessary
Some gel may remain after the first removal attempt. Repeat the soak and gentle lifting process until all gel is gone. This typically takes 2-3 cycles depending on gel thickness.
Step 7: Clean and Moisturize
Once all gel is removed, wash your hands thoroughly with soap and water. Pat dry and immediately apply cuticle oil or hand cream to restore moisture that acetone has stripped away.
The Foil Wrap Technique
The foil wrap method is essentially an enhanced version of the acetone soak that prevents acetone evaporation and creates a more controlled environment. Many professionals prefer this technique because it’s more efficient and requires less acetone overall.
Step 1: Prepare Nails as Before
File the glossy top layer, apply protective cream around nails, and clip any loose edges.
Step 2: Saturate Cotton Pads
Soak small cotton pads or cut pieces of cotton balls in 100% acetone until thoroughly saturated. You want them dripping slightly—this ensures maximum acetone contact.
Step 3: Apply Cotton to Each Nail
Place a saturated cotton pad directly on each gel-covered nail, pressing it down firmly so it makes full contact with the gel surface.
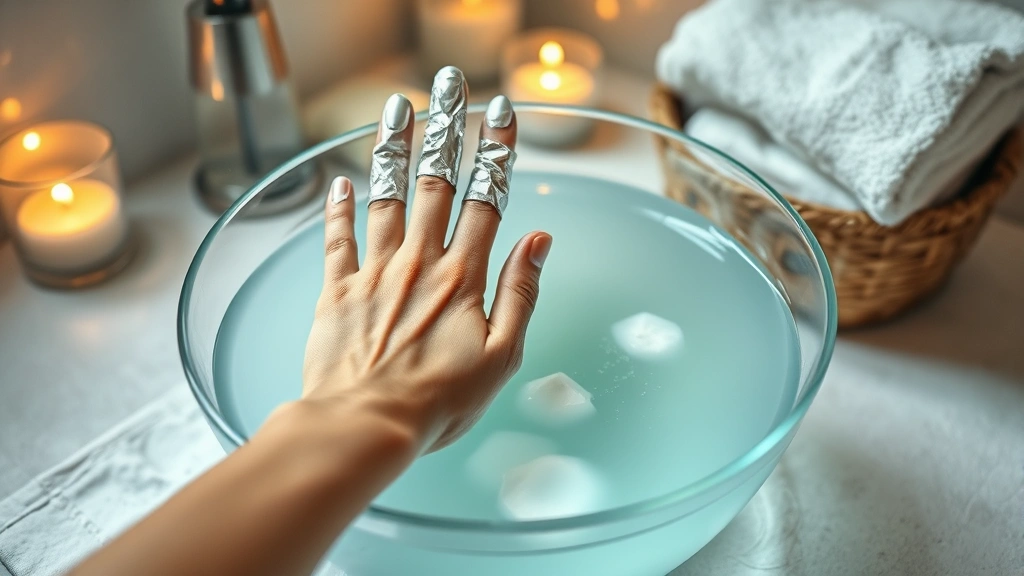
Step 4: Wrap with Aluminum Foil
Wrap each finger with aluminum foil, covering the cotton pad completely. The foil creates an airtight seal that prevents acetone from evaporating. Make sure the foil is snug but not painfully tight—you want good contact without cutting off circulation.
Step 5: Wait 10-15 Minutes
Leave the foil wraps on for 10-15 minutes. During this time, the acetone is continuously softening the gel varnish. You might feel some warmth—this is normal as the chemical reaction occurs.
Step 6: Remove Foil and Check Progress
Carefully unwrap one finger and check if the gel is lifting. You should see the gel starting to separate from the nail. If it’s still firmly adhered, rewrap and wait another few minutes.
Step 7: Lift Softened Gel Gently
Using your wooden cuticle pusher, gently lift the softened gel. Work from the edge toward the center, moving slowly and deliberately. Patience is crucial here—rushing causes damage.
Step 8: Repeat Wrapping if Needed
If gel remains after the first wrap cycle, repeat the process. Most gel varnish comes off completely in one wrapping session, but thicker applications may require a second round.
Alternative Removal Methods
While acetone soaking is the gold standard, a few alternative methods exist for people who prefer different approaches or have acetone sensitivity.
Isopropyl Alcohol Method
Some people use 91% isopropyl alcohol as a gentler alternative to acetone. This method works but requires longer soaking times (20-30 minutes) and is less effective on thick gel applications. It’s worth trying if you have sensitive skin, though results are mixed.
Gel Removal Products
Commercial gel removal products are available at beauty supply stores. These are typically acetone-based but may include additional conditioning agents. They work similarly to pure acetone but sometimes feel less harsh on skin. Follow product instructions carefully.
Professional Removal
If you’re uncomfortable removing gel yourself, or if your nails are particularly damaged, visiting a nail technician is always an option. They have experience and professional-grade tools that ensure minimal damage. This is especially recommended for your first few removals if you’re nervous about the process.
Electric Nail Drill Method
Some people use electric nail drills to buff away gel varnish, but this method requires significant skill and carries higher risk of damaging the nail plate. We don’t recommend this approach for beginners—it’s easy to cause permanent damage with improper technique.
Removing Gel Polish From Skin
Despite your best efforts, gel varnish inevitably gets on surrounding skin. The good news is that removing gel polish off skin is easier than removing it from nails.
Immediate Removal (Before Curing)
If you catch uncured gel on your skin, simply wipe it away with a lint-free wipe or paper towel. This is why many people use nail guides or liquid barrier products—they make cleanup much simpler.
Cured Gel on Skin
If gel has already cured on your skin, you have several options. The easiest is to apply acetone-soaked cotton and let it sit for a few minutes, then gently rub away the softened gel. Alternatively, you can use rubbing alcohol, which works slowly but is less harsh on delicate facial skin.
Prevention Strategies
Apply liquid latex or cuticle oil around nails before applying gel. This creates a barrier that prevents gel from sticking to skin. Alternatively, use nail guides or striping tape to keep gel neatly on the nail plate.
Post-Removal Nail Care
What you do after gel removal is just as important as the removal process itself. This is when your nails need the most care and attention.
Immediate Aftercare (First 24 Hours)
Keep nails moisturized by applying cuticle oil every few hours. Your nails are dehydrated after acetone exposure, and this treatment begins restoring that moisture. Avoid applying new polish for at least 24-48 hours—your nails need time to breathe and recover.
Strengthening Treatments
Use a nail strengthener product for the next week or two. These products contain ingredients that harden and protect nails while they recover. Apply as directed on the product packaging, typically daily or every other day.
Hydration and Nutrition
Drink plenty of water and ensure your diet includes biotin, iron, and protein—nutrients essential for healthy nail growth. Consider taking a biotin supplement if your nails are particularly weak or damaged.
When to Reapply Polish
Wait at least 48 hours before applying new gel varnish. Some professionals recommend waiting a full week between gel applications to allow nails to fully recover. If nails feel brittle or weak, extend this recovery period.
Managing Nail Peeling
Some nail peeling after gel removal is normal—you’re essentially shedding the outermost layer of nail that was compromised by gel adhesion. This typically resolves within a few days. If peeling is severe or persists beyond a week, consult a dermatologist or nail professional.
Common Mistakes to Avoid
Learning from others’ mistakes can save your nails significant damage. Here are the most common errors people make during gel removal.
Mistake 1: Picking or Peeling
This is the number one nail-damaging behavior. Picking at gel varnish removes not just the polish but layers of your actual nail. The result is weak, peeling nails that take months to recover. Always use proper removal methods rather than mechanical force.
Mistake 2: Using Diluted Acetone
Regular nail polish remover won’t effectively remove gel varnish because it’s diluted with water and other ingredients. You must use pure, 100% acetone for effective removal.
Mistake 3: Rushing the Process
Attempting to remove gel quickly leads to incomplete removal and damage. Give acetone adequate time to soften the gel—10-15 minutes is standard. Patience pays dividends in nail health.
Mistake 4: Skipping Protective Barriers
Not protecting skin around nails during acetone exposure causes unnecessary irritation and dryness. Always apply barrier cream before soaking or wrapping.
Mistake 5: Ignoring Post-Removal Care
Removing gel is only half the battle. Post-removal care determines whether your nails bounce back healthy or remain damaged. Don’t skip moisturizing and strengthening treatments.
Mistake 6: Using Improper Tools
Metal cuticle pushers can scratch and damage the nail plate. Stick with wooden or plastic tools that are gentler on delicate nail surfaces.
Mistake 7: Over-Filing
Filing too aggressively to remove gel can thin the nail plate dangerously. File gently in one direction, focusing just on the glossy top layer.
Now that you understand gel removal, you might be wondering about related processes. If you’ve used nail glue for extensions, removing nail glue follows similar principles. Additionally, understanding how to remove gel nail polish gives you comprehensive knowledge of the entire gel removal landscape. For those interested in the broader topic, detailed gel polish removal guides provide additional perspective on different techniques and products.
If you’re focused on nail health overall, proper nail cleaning and maintenance practices support the recovery process after gel removal. These complementary practices work together to keep nails strong and beautiful.
Frequently Asked Questions
How long does gel varnish removal typically take?
The entire process usually takes 30-45 minutes from start to finish. This includes filing, soaking or wrapping, gentle removal, and cleanup. Actual removal time (the soaking or wrapping phase) is typically 10-15 minutes, but total time accounts for all preparation and finishing steps.
Can I remove gel varnish without acetone?
While acetone is the most effective solvent for gel removal, alternatives like isopropyl alcohol or commercial gel removers exist. However, these require longer soaking times and are less effective on thick applications. Acetone remains the gold standard for efficient, effective removal.
Will removing gel varnish damage my nails permanently?
Proper removal using correct techniques causes minimal damage. Your nails may feel slightly thin or weak immediately after removal, but they recover within 1-2 weeks with appropriate care. Permanent damage typically only occurs with improper removal methods like picking or peeling.
How often can I safely wear gel varnish?
Most nail professionals recommend allowing 1-2 weeks between gel applications to let nails recover. If you wear gel continuously without breaks, nails become increasingly weak and prone to damage. Taking breaks between applications significantly extends nail health.
What should I do if my nails are peeling after gel removal?
Some peeling is normal and typically resolves within a few days. Keep nails moisturized with cuticle oil and avoid applying new polish for at least a week. If peeling persists beyond a week or is severe, consult a dermatologist or nail professional.
Is there a difference between removing gel polish and gel varnish?
The terms gel polish and gel varnish are essentially interchangeable—they refer to the same product. Both use the same removal techniques and require acetone for effective removal.
Can I use regular nail polish remover on gel varnish?
No. Regular nail polish remover is diluted acetone (usually 40-60% acetone) and won’t effectively remove gel varnish. You need 100% pure acetone for proper removal.
How do I know when all gel varnish has been removed?
Your nails should feel smooth and look uniform in color and texture when all gel is removed. There shouldn’t be any shiny spots or rough areas. If you see any remaining gel, continue the soaking and lifting process until completely gone.
Related Posts

How Long to Boil Lobster Tails: Cooking Guide

How Long to Fly from New York to London? Travel Times
