
Propagate Plants Easily: Expert Tips & Tricks
Propagate Plants Easily: Expert Tips & Tricks for Beginners
Plant propagation is one of the most rewarding and cost-effective ways to expand your indoor and outdoor garden. Whether you’re a seasoned gardener or just starting out, learning how to propagate plants opens up endless possibilities for creating new specimens from existing ones. Instead of purchasing expensive mature plants, you can multiply your favorites through simple propagation techniques that require minimal tools and expertise.
The beauty of plant propagation lies in its accessibility and versatility. From succulents to herbs, ferns to flowering plants, nearly every plant species can be propagated using one method or another. This guide will walk you through proven techniques, common mistakes to avoid, and professional tips that will transform you into a confident plant propagator. By the end, you’ll understand exactly how to propagate your favorite plants and watch them thrive in their new homes.
Understanding Plant Propagation Methods
Before diving into specific techniques, it’s essential to understand that propagation falls into two main categories: sexual reproduction (seeds) and asexual reproduction (cuttings, division, layering). Sexual propagation creates genetic variation, while asexual methods produce clones of the parent plant with identical characteristics. Most beginners find asexual propagation more forgiving and faster, making it an ideal starting point.
Different plants respond better to different propagation methods. Succulents and African violets thrive from leaf cuttings, while roses and gardenias prefer stem cuttings. Some plants like spider plants naturally produce runners with baby plants ready for propagation. Understanding your specific plant’s growth habits and preferences is crucial for success. Consult plant-specific guides or ask at your local nursery which method works best for your chosen species.
The timing of propagation matters significantly. Most plants propagate best during their active growing season—typically spring and early summer. During these months, plants have abundant energy and hormones that support root development. While you can propagate year-round indoors, respecting natural growth cycles dramatically increases your success rate. Temperature, humidity, and light conditions all play roles in successful propagation, which we’ll explore throughout this comprehensive guide.
Leaf and Stem Cutting Propagation
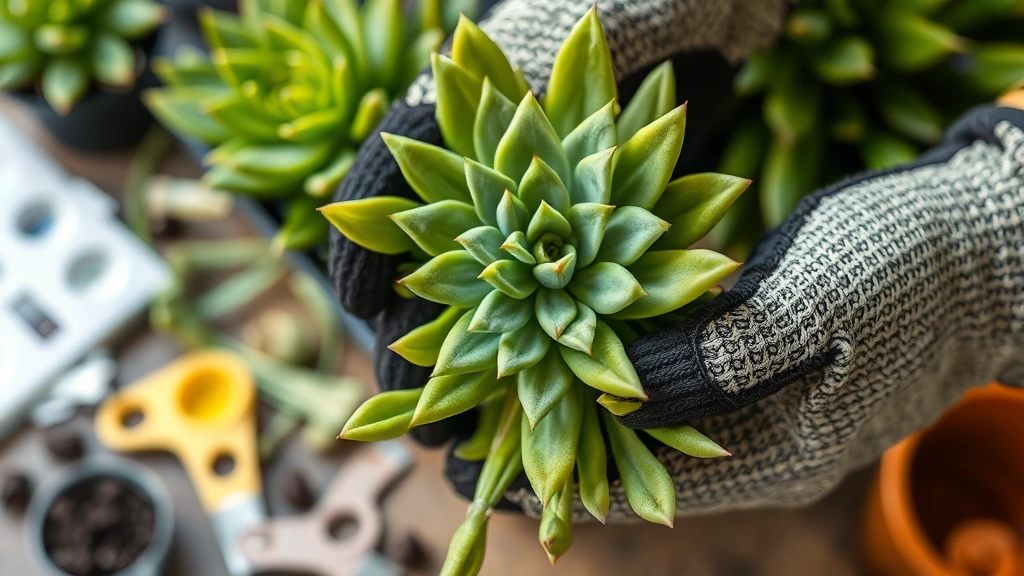
Leaf cutting propagation is perhaps the easiest method for beginners. Succulents like jade plants, echeveria, and aloe are perfect candidates. To start, gently remove a healthy leaf from the parent plant, ensuring you get the entire leaf without tearing it. Some plants require a clean cut at the base of the leaf where it connects to the stem. Allow the cut end to dry and callus over for several days before planting—this prevents rot and promotes root development.
For stem cuttings, select healthy green stems that are actively growing. Using clean, sharp scissors or pruning shears, cut a 3-6 inch section just below a node (the small bump where leaves emerge). Nodes contain growth hormones and are where roots will develop. Remove the lower leaves from your cutting, leaving only 2-3 leaves at the top. This reduces water loss and directs energy toward root formation rather than maintaining excess foliage.
The comprehensive guides available online often emphasize the importance of using rooting hormone powder to increase success rates. While not absolutely necessary, rooting hormone accelerates root development and improves success percentages, especially for difficult-to-propagate plants. Dip the cut end into rooting hormone powder, shake off excess, and plant immediately into moist propagation medium. Keep the soil consistently moist but not waterlogged for the next 2-4 weeks while roots develop.
Success with stem cuttings typically appears within 2-6 weeks, depending on the plant species and environmental conditions. You’ll notice new growth at the top and resistance when gently tugging the cutting—signs that roots have established. At this point, reduce watering frequency and gradually acclimate the young plant to normal care conditions. Patience during this rooting phase is essential; premature disturbance can damage delicate new roots.
Water Propagation Techniques
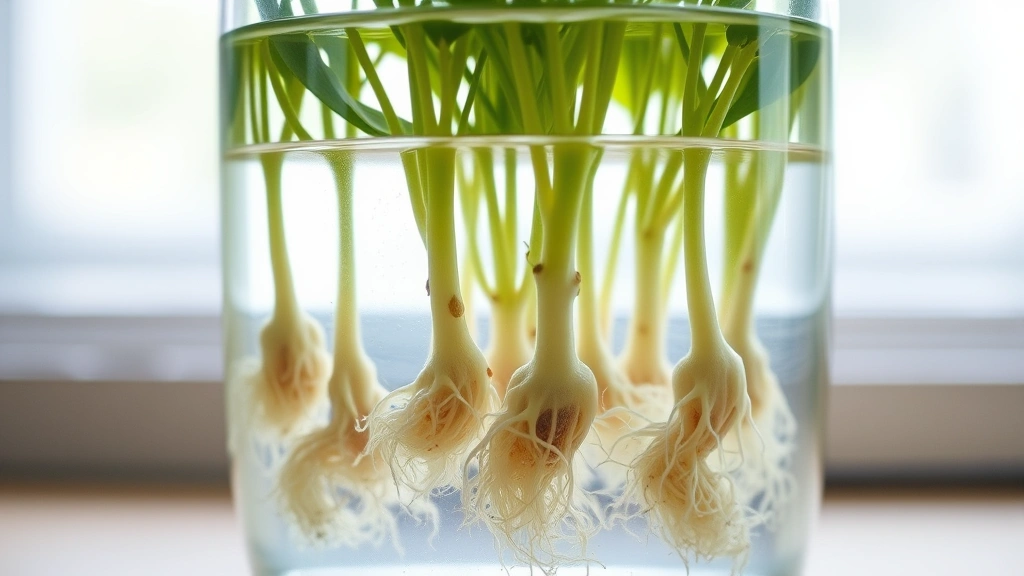
Water propagation is the most transparent and visually rewarding method, allowing you to observe root development daily. This technique works exceptionally well for philodendrons, pothos, coleus, mint, and many other houseplants. Simply place your stem cutting in a glass or jar of room-temperature, filtered water. Change the water every 3-5 days to prevent bacterial growth and maintain oxygen levels. Within 1-3 weeks, white root nodes should emerge from the cutting.
The beauty of water propagation lies in its simplicity and low failure rate. You don’t need special equipment—any clear glass works perfectly. Position your propagation vessel in bright, indirect light. Direct sunlight can cause algae growth in the water, which competes with developing roots for nutrients. Maintain room temperature around 65-75°F for optimal root development. Avoid placing water propagation vessels near heating vents, air conditioners, or drafty windows where temperature fluctuations stress the cutting.
Once roots reach approximately 1 inch in length, you have two options: continue growing in water indefinitely or transition to soil. Many plants adapt beautifully to permanent hydroponic growing, eliminating soil-related pests and diseases. If you prefer soil growing, acclimate the rooted cutting gradually by increasing soil contact over several days. Plant in moist, well-draining propagation mix and maintain humidity for 1-2 weeks during the transition. This gradual acclimation prevents shock and increases survival rates significantly.
Water propagation also works wonderfully for propagating herbs like basil, oregano, and parsley. Snip 4-6 inch stems, remove lower leaves, and place in water. These herb cuttings develop roots rapidly and can be transferred to soil or kept in water indefinitely in your kitchen. Fresh herbs grown from cuttings often taste superior to nursery-bought plants and cost a fraction of the price. Learn more about growing and using fresh herbs to maximize your propagation efforts.
Soil Propagation for Success
Soil propagation offers advantages over water propagation for plants that struggle with moisture sensitivity or prefer drier conditions. Creating the right propagation medium is crucial—use a lightweight, well-draining mix specifically formulated for propagation. Standard potting soil retains too much moisture and can cause rot. Look for mixes containing perlite, vermiculite, and peat moss or coco coir in equal proportions. Alternatively, pure perlite or a 50/50 perlite-peat mix works excellently.
Prepare your propagation containers by filling them with moist (not wet) propagation medium. Make a small hole with your finger or a pencil, insert the cutting, and gently firm soil around the base. Water lightly until water drains from the bottom, then allow the soil surface to dry slightly between waterings. Overwatering is the primary cause of propagation failure in soil—err on the side of slightly dry rather than too wet. The goal is moist, not soggy.
Creating a humid environment dramatically improves soil propagation success rates. Cover your propagation container with a clear plastic dome, plastic wrap, or place it inside a clear plastic bag. This creates a mini greenhouse that maintains moisture and warmth. Provide bright, indirect light and maintain temperatures between 65-75°F. Ventilate the cover for 5-10 minutes daily to prevent fungal issues. After 3-4 weeks, gradually remove the cover by increasing ventilation duration each day, acclimating cuttings to normal humidity levels.
Monitoring soil moisture is critical—the medium should remain consistently moist but never waterlogged. Stick your finger into the soil; if it feels dry more than a quarter inch down, water lightly. If you notice condensation inside your humidity dome but soil remains dry, reduce watering frequency slightly. Finding this balance takes practice but becomes intuitive quickly. Most soil-propagated cuttings develop visible roots within 4-8 weeks, at which point they’re ready for potting into regular potting soil.
Division and Layering Methods
Plant division is ideal for species that naturally form multiple crowns or clumps, such as snake plants, peace lilies, ferns, and many flowering perennials. Division is faster than cutting propagation since divided sections often have established root systems. Carefully remove the parent plant from its pot and examine the root structure. Look for natural separation points or areas where you can cleanly divide the plant into sections, each with several stems and roots attached.
Using clean, sharp tools, divide the plant by cutting through the root ball or gently separating naturally divided sections. Each division should have at least 2-3 stems and a healthy portion of roots. Pot each division into appropriately-sized containers with fresh potting soil. Water thoroughly and place in bright, indirect light. Keep soil consistently moist for 2-3 weeks while divisions establish. Avoid fertilizing newly divided plants for at least a month—focus energy on root recovery rather than new growth.
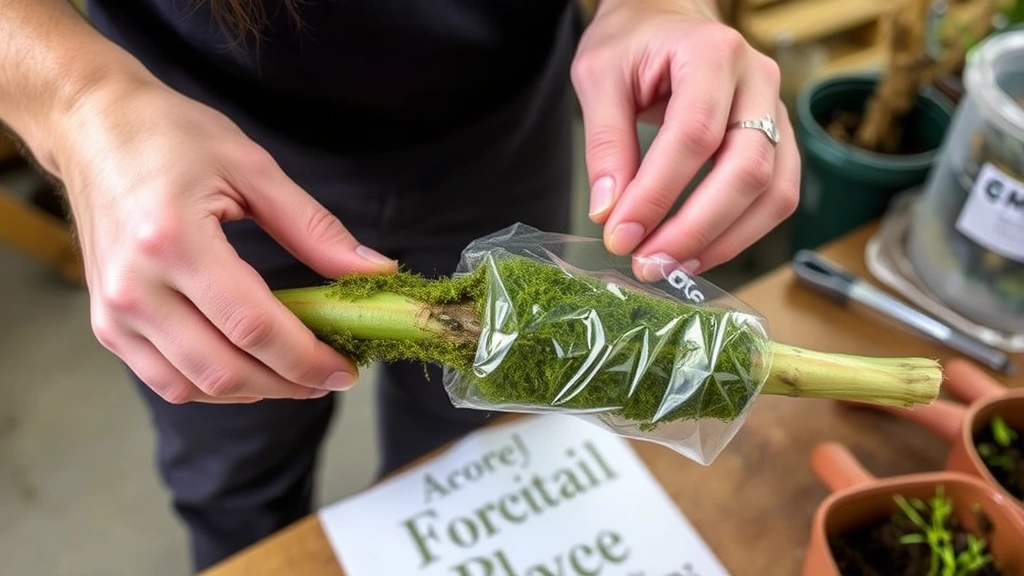
Air layering is an advanced propagation technique that works beautifully for woody plants like rubber trees, ficus, and dracaena. Select a healthy stem and make a small upward-angled cut about one-third through the stem. Insert a toothpick to keep the cut open, then wrap the wound with moist sphagnum moss. Cover the moss with plastic wrap, securing both ends with tape or string. Keep the moss consistently moist, checking weekly. After 4-8 weeks, roots develop within the moss ball. Cut below the rooted section and pot it as a new plant.
Ground layering involves bending a low-growing branch to the ground and covering a section with soil while still attached to the parent plant. Secure the buried section with a small stake or rock, keeping soil consistently moist. Once roots establish (usually within 4-12 weeks), sever the rooted section from the parent plant and pot independently. This method works exceptionally well for groundcovers, vines, and spreading shrubs. It’s less disruptive than other methods since the cutting remains connected to the parent plant’s resources during rooting.
Seed Propagation Basics
Seed propagation offers unmatched variety and the ability to grow rare plants. However, it requires more patience—seeds take weeks to germinate and months to develop into mature plants. Start with easy-to-grow seeds like herbs, sunflowers, or zinnias before attempting difficult species. Purchase seeds from reputable suppliers and check germination dates; old seeds have lower viability rates.
Prepare seed-starting mix, which is lighter and finer than regular potting soil, promoting better seed-to-soil contact. Fill seed trays or small pots with moistened seed-starting mix. Follow packet instructions for planting depth—most seeds should be planted at a depth equal to their diameter. Some seeds require light to germinate (sprinkle on surface), while others need darkness (cover completely). Temperature requirements vary; most seeds germinate best between 65-75°F.
Cover seed trays with plastic domes or wrap to maintain moisture and warmth. Check daily and mist if the surface appears dry. Most seeds germinate within 7-21 days, though some take longer. Once seedlings emerge, remove the cover and provide bright light—place under grow lights or in a sunny window. Keep soil consistently moist but not waterlogged. Water from below by placing pots in a tray of water, allowing soil to absorb moisture through drainage holes, preventing damping-off disease.
When seedlings develop their first true leaves (the second set of leaves that appear), thin crowded seedlings or transplant into individual small pots. Handle seedlings by their leaves, not stems, which bruise easily. Continue providing bright light and consistent moisture. After 4-6 weeks, begin fertilizing with diluted liquid fertilizer every 2-3 weeks. Gradually acclimate seedlings to outdoor conditions before transplanting by exposing them to increasing periods of outdoor light and air movement over 7-10 days.
Common Propagation Mistakes
The most frequent propagation mistake is overwatering, which causes rot and fungal diseases. Remember that propagating cuttings require less water than established plants since they lack extensive root systems to utilize moisture. Soil should be moist, not soggy. If you’re unsure, wait an extra day before watering. Most propagation failures result from too much water rather than too little.
Using non-sterile tools and containers introduces pathogens that kill delicate cuttings. Always sterilize pruning shears, knives, and containers with rubbing alcohol or a 10% bleach solution before propagating. This simple step prevents disease and dramatically improves success rates. Similarly, using old, depleted potting soil or propagation medium increases failure rates. Always use fresh, high-quality media for propagation projects.
Providing insufficient light is another common issue. Cuttings need bright, indirect light to develop strong roots and shoots. Low light causes weak, pale growth and slower root development. Position propagation vessels near a bright window or under grow lights providing 12-14 hours of light daily. Avoid direct sunlight, which can overheat water-propagated cuttings or scorch delicate leaves.
Disturbing cuttings before roots establish is tempting but counterproductive. Constantly checking for roots damages delicate developing structures and delays the process. Resist the urge to peek; instead, trust the timeline and observe from outside the container. Only gently tug after the recommended timeframe has passed. Premature potting of partially-rooted cuttings often results in failure.
Another mistake involves selecting unhealthy parent material. Always propagate from vigorous, disease-free plants. Cuttings from weak, stressed, or diseased plants rarely succeed and may introduce problems into your collection. If your parent plant struggles, nurse it back to health before propagating. Choosing the right propagation timing and method for your specific plant species also matters greatly—research individual plant requirements before starting.
FAQ
What’s the easiest plant to propagate for beginners?
Pothos (devil’s ivy) and philodendrons are among the easiest plants to propagate. Both root readily in water within 1-2 weeks and tolerate a wide range of conditions. Succulents like jade plants and echeveria are also excellent for beginners, especially using leaf propagation. Spider plants naturally produce propagation-ready plantlets that require minimal effort.
How long does plant propagation typically take?
Timeline varies by method and species. Water propagation typically shows roots within 1-3 weeks. Soil propagation takes 3-8 weeks. Division provides established plants immediately. Seed propagation takes 6-12 weeks minimum from seed to transplant-ready seedling. Patience and consistent care are essential throughout the process.
Can I propagate any plant?
While most plants can be propagated, some are easier than others. Tender perennials, tropical plants, and herbaceous species propagate most readily. Woody plants and some flowering species are more challenging. Some plants like orchids require specialized techniques. Research your specific plant’s propagation requirements for best results.
Do I need rooting hormone for successful propagation?
Rooting hormone isn’t absolutely necessary but significantly improves success rates, especially for difficult-to-propagate species. It’s inexpensive and worth having on hand. Natural alternatives include honey (antimicrobial properties) and cinnamon (fungicide properties), though commercial rooting hormone provides more consistent results.
What light conditions do propagating cuttings need?
Propagating cuttings need bright, indirect light for 12-14 hours daily. A north or east-facing window works well. Avoid direct sunlight, which can scorch delicate leaves or cause algae in water propagation. Grow lights positioned 6-12 inches above cuttings provide ideal light conditions. Insufficient light causes weak, pale growth and slower root development.
How do I know when propagated cuttings are ready to pot?
Roots should be at least 1 inch long before potting into soil. For water-propagated cuttings, wait until multiple roots develop. For soil-propagated cuttings, gently tug after the recommended timeframe—resistance indicates established roots. New top growth is another positive sign. Newly rooted plants are fragile, so handle them carefully during the transition to regular potting soil.
Related Posts

Superscript in Google Docs: Expert Tips

Strikethrough in Excel: Easy Steps for Beginners
