
How to Make Over Easy Eggs: Step-by-Step Guide
How to Make Over Easy Eggs: The Perfect Step-by-Step Guide
There’s something deeply satisfying about cracking an egg into a hot pan and watching it transform into breakfast gold. Over easy eggs—with their runny, golden yolks and just-set whites—are a breakfast staple that seems simple enough, yet somehow eludes perfection for many home cooks. The good news? Mastering this technique takes only a few minutes and a handful of fundamental skills.
Whether you’re looking to impress someone special at the breakfast table or simply want to elevate your morning routine, learning how to make over easy eggs is worth the effort. This isn’t just about cracking an egg into a pan; it’s about understanding heat control, timing, and the subtle nuances that separate a mediocre egg from a restaurant-quality one. The beauty of this cooking method is that once you nail the basics, you’ll be making perfect over easy eggs consistently, every single time.
Let’s dive into everything you need to know—from selecting the right ingredients to plating your finished dish with confidence.
Ingredients and Equipment You’ll Need
Before you fire up the stove, let’s talk about what goes into making over easy eggs. The ingredient list is refreshingly short, which means quality matters even more.
Ingredients:
- 2 large eggs (or however many you want to cook)
- 1-2 tablespoons of butter or cooking oil
- Salt and pepper to taste
- Optional: fresh herbs like chives or parsley
The eggs themselves deserve your attention. Fresh eggs have a better texture and a richer yolk color than older ones. If you’re unsure about your egg’s freshness, you might want to check out our guide on how to know if an egg is bad—it’s worth confirming before you start cooking.
Equipment:
- An 8 to 10-inch non-stick skillet or cast iron pan
- A spatula (preferably silicone or rubber to protect non-stick surfaces)
- A small bowl for cracking eggs
- Medium heat source
Choosing the right pan is crucial. A non-stick skillet is ideal for beginners because it prevents sticking and allows for easier flipping. Cast iron works beautifully too if it’s well-seasoned, though it requires a bit more finesse with heat management.
Understanding Over Easy Eggs
Before we get into the how, let’s clarify the what. Over easy eggs are cooked on one side until the whites are set, then flipped and cooked briefly on the other side. The result? Whites that are fully opaque and firm, with a yolk that’s still completely liquid and jiggles when you move the plate.
This differs from sunny side up eggs, where you never flip at all and the yolk remains raw. It also differs from scrambled eggs, where the entire egg gets broken up and mixed together during cooking. Over easy sits in that perfect middle ground—it’s the Goldilocks of egg preparation.
The cooking time is typically about 3-4 minutes per side, though this varies based on heat level and pan type. The key is knowing when the whites have set enough to flip without the yolk breaking through.
Step-by-Step Guide to Perfect Over Easy Eggs
Step 1: Prep Your Pan and Heat It Properly
Place your skillet on the stove over medium heat. Let it warm for about 1-2 minutes. You’ll know it’s ready when a drop of water sizzles gently on the surface—not explosively, just a pleasant sizzle. This indicates you’re at the ideal temperature range.
Step 2: Add Your Fat
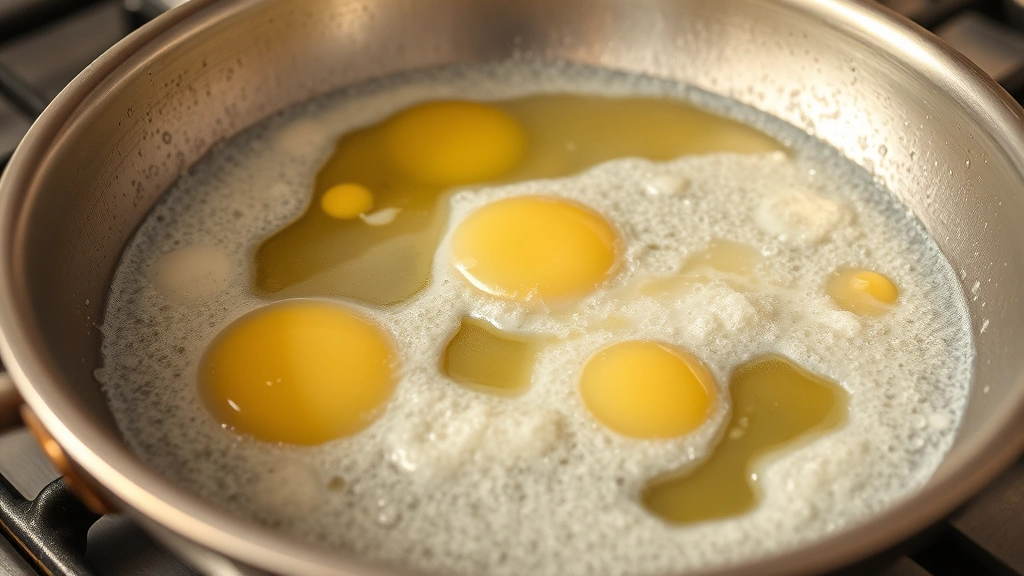
Once the pan is hot, add your butter or oil. If using butter, let it melt and foam slightly—that foaming action means the water content is evaporating and the milk solids are beginning to brown, which adds incredible flavor. If using oil, just let it coat the pan evenly. Tilt the pan to distribute the fat across the cooking surface.
Step 3: Crack Your Eggs
This is where many home cooks stumble. Crack each egg into a small bowl first, rather than directly into the pan. This serves two purposes: it allows you to check for shell fragments, and it gives you better control when sliding the egg into the hot pan. Gently slide the egg from the bowl into the center of the pan. Do this carefully to avoid splashing.
If you’re cooking multiple eggs, crack them simultaneously and slide them in one after the other, working quickly so they cook at the same pace.
Step 4: Let the Whites Set
Now comes the hardest part—patience. Don’t touch the eggs. Let them cook undisturbed for about 2-3 minutes. You’ll see the whites gradually turn from translucent to opaque, starting from the edges and working toward the center. The yolk should remain completely untouched and liquid.
Watch carefully. When the whites are about 90% opaque but still have a tiny bit of translucency around the yolk, you’re ready to flip. The whites should jiggle slightly when you gently shake the pan, but they shouldn’t slosh around like water.
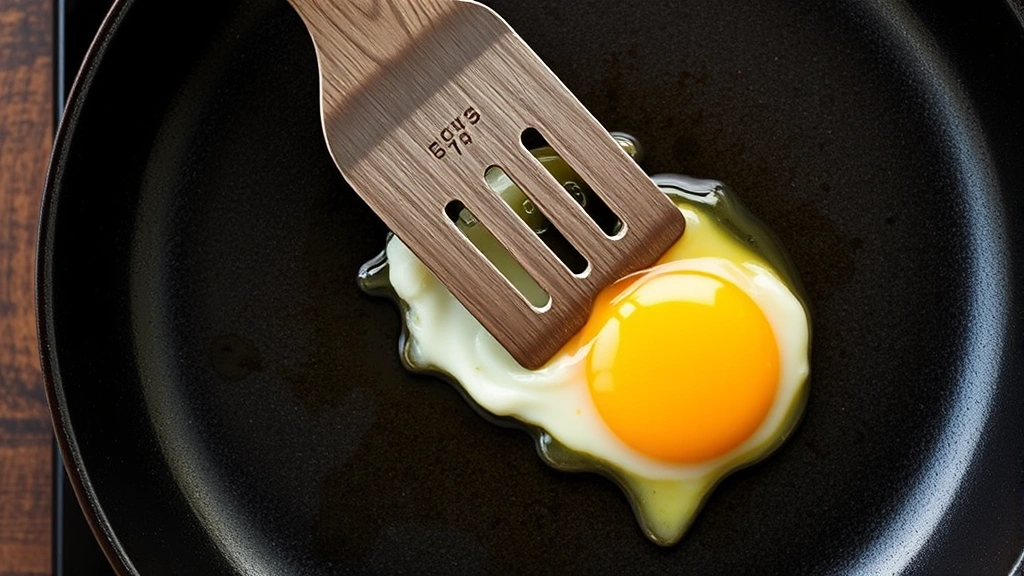
Step 5: The Flip
This is the moment of truth. Slide your spatula under the egg, supporting as much of the white as possible. With a confident but controlled motion, flip the egg. If you’re nervous, flip it slowly and deliberately rather than attempting some dramatic high-flip. A steady flip is a successful flip.
Once flipped, you’ll see the white side is now down and the yolk is exposed on top. The underside should be a light golden-brown color.
Step 6: Cook the Other Side
Let the flipped egg cook for just 20-30 seconds. This is just enough time to set the underside while keeping the yolk perfectly liquid. You’re not trying to cook the yolk at all—just the whites on this second side.
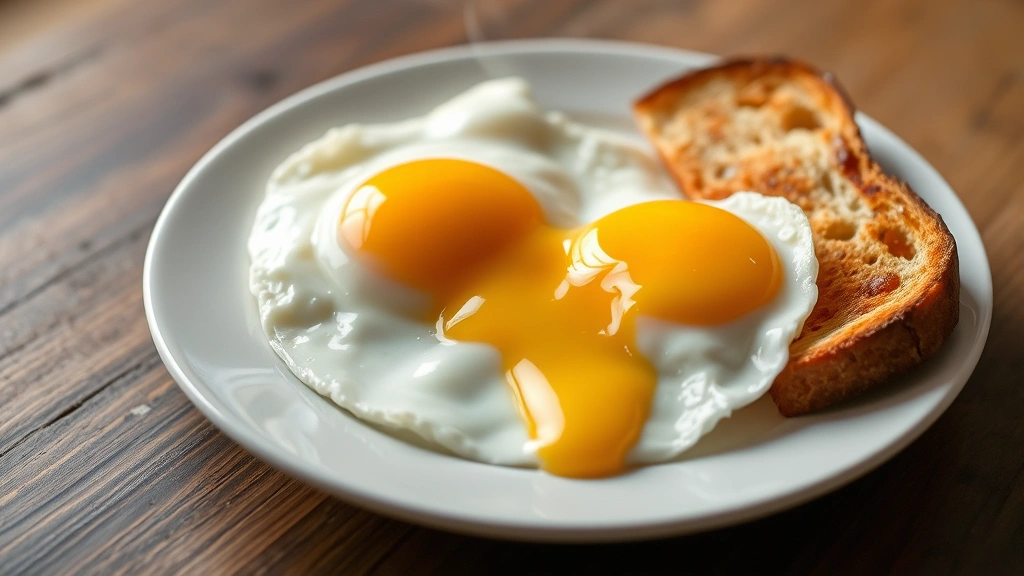
Step 7: Season and Serve
Slide the egg onto your plate immediately. Add a pinch of salt and pepper while it’s still hot, so the seasonings stick to the yolk. Serve right away.
The Critical Role of Heat Control
Heat is the silent partner in egg cookery, and it’s where most people go wrong. Too much heat and your whites will brown and toughen before the yolk is even visible. Too little heat and you’ll end up with a rubbery, overcooked mess.
Medium heat is your sweet spot. This typically translates to about 350-375 degrees Fahrenheit if you’re using an electric skillet, though most home cooks work with visual cues rather than thermometers.
The butter test is your friend. When you add butter to the pan, it should foam and sizzle gently, not pop and splatter aggressively. If it’s smoking, your heat is too high—turn it down and let the pan cool for a moment before adding your eggs.
Pan material affects heat distribution significantly. Stainless steel pans heat unevenly and can create hot spots, making them trickier for beginners. Non-stick pans distribute heat more evenly. Cast iron retains heat exceptionally well, which means you need to be more conservative with your flame to avoid overcooking.
Common Mistakes to Avoid
Mistake 1: Using Cold Eggs Straight from the Fridge
Eggs cook better when they’re closer to room temperature. Cold eggs are more prone to sticking and cook unevenly. Take them out of the fridge 5-10 minutes before cooking, or run them under warm water briefly.
Mistake 2: Overcrowding the Pan
If you’re cooking more than two eggs, use a larger pan or cook in batches. Overcrowding drops the pan temperature and creates steam, which leads to unevenly cooked eggs.
Mistake 3: Flipping Too Early
The whites need time to set. Flipping before they’re ready results in a broken yolk and a messy situation. Wait until you see that opaque coating on the whites before attempting the flip.
Mistake 4: Cooking the Yolk Side Too Long
After flipping, you only need 20-30 seconds. Any longer and you risk a partially cooked yolk, which defeats the entire purpose of ordering over easy.
Mistake 5: Neglecting to Rest the Pan
If your first egg didn’t turn out perfectly, resist the urge to immediately cook the next one in the same pan. Let it cool slightly, wipe it down if needed, and reheat. A pan that’s too hot from the previous cook will burn your next egg.
Serving Suggestions and Pairings
A perfect over easy egg is a blank canvas for culinary creativity. The runny yolk is essentially a sauce waiting to coat whatever you serve it with.
Classic Breakfast Plate: Serve your over easy eggs with freshly made toast for dipping, crispy bacon or sausage, and a simple green salad. The yolk soaks into the toast beautifully, creating something greater than the sum of its parts.
Breakfast Sandwich: Slide your over easy egg onto a toasted English muffin or bagel with cheese and a slice of ham. The runny yolk acts as a natural condiment.
Savory Rice Bowl: Serve over a bed of warm jasmine or basmati rice with sautéed vegetables. Drizzle with a bit of soy sauce or fish sauce for an Asian-inspired breakfast.
With Gravy: For a heartier option, serve your eggs alongside homemade brown gravy and biscuits. The gravy and yolk together create an incredibly rich, comforting meal.
Avocado Toast Upgrade: Spread mashed avocado on toasted sourdough, then top with your over easy egg. Add a sprinkle of fleur de sel and cracked pepper. This is Instagram-worthy and genuinely delicious.
Hash and Eggs: Serve over a bed of crispy hash browns or home fries. The yolk will cascade down and coat everything.
The key to any pairing is ensuring your eggs are the star. Don’t overwhelm them with competing flavors. Simple, quality accompaniments let the egg shine.
Frequently Asked Questions
Q: What’s the difference between over easy, over medium, and over hard?
A: The main difference is how long you cook the second side. Over easy has a completely runny yolk and takes 20-30 seconds on the flip side. Over medium has a yolk that’s partially set with a small runny center (30-45 seconds on the flip side). Over hard has a completely cooked, solid yolk (45-60 seconds on the flip side).
Q: Can I make over easy eggs without flipping?
A: Yes! You can cover the pan with a lid and let steam cook the top side instead of flipping. This method, called “over easy with a lid,” produces similar results with less risk of breaking the yolk. Add a tablespoon of water to the pan, cover, and cook for 2-3 minutes until the whites are set but the yolk is still runny.
Q: Why does my egg stick to the pan even with non-stick coating?
A: This usually happens because either the pan isn’t hot enough, there isn’t enough fat, or the pan’s non-stick coating is damaged. Try using more butter, ensuring the pan is properly preheated, and consider replacing the pan if it’s old.
Q: Can I use olive oil instead of butter?
A: Absolutely. Extra virgin olive oil adds wonderful flavor. However, regular cooking oil (like vegetable or canola) works just fine and is more neutral in taste. Avoid extra virgin olive oil if you’re cooking at higher temperatures, as it has a lower smoke point.
Q: How do I prevent the whites from browning too much?
A: Lower your heat. You might need to experiment with your specific stove, but medium heat is usually the answer. You can also reduce the amount of butter slightly—less fat means less browning.
Q: Is it safe to eat runny yolks?
A: For most people, yes. However, pregnant women, young children, elderly people, and those with compromised immune systems should avoid raw or undercooked eggs. Use pasteurized eggs if you fall into these categories and still want over easy eggs.
Q: How do I know if my eggs are done without cutting into them?
A: The whites should be completely opaque and firm to the touch (gently poke the white, not the yolk). The yolk should jiggle slightly when you move the plate but shouldn’t feel soft or mushy around the edges.
Q: Can I cook over easy eggs in the oven?
A: While it’s unconventional, you can. Preheat your oven to 350°F, heat an oven-safe skillet on the stovetop, add butter, crack your eggs, then transfer to the oven for 8-10 minutes. It’s less controlled than stovetop cooking, but it works.
Q: Why is my yolk breaking when I flip?
A: Either you’re flipping too early (whites aren’t set enough), using too much force, or your pan is too hot. Make sure at least 90% of the white is opaque before flipping, use a gentle motion, and ensure your heat is at medium.
Mastering over easy eggs is a fundamental cooking skill that opens doors to countless breakfast possibilities. Once you understand the principles—proper heat, timing, and technique—you’ll find yourself making perfect eggs consistently. The beauty of this skill is that it transfers to other cooking methods and builds your overall kitchen confidence. Start practicing today, and soon you’ll be making restaurant-quality over easy eggs in your own home.
For more detailed egg cooking techniques, check out This Old House’s egg cooking guide, or explore Family Handyman’s comprehensive egg preparation methods. If you want to explore different egg types and recipes, Home Depot’s kitchen guides offer additional inspiration. For scientific insights into egg cooking, Serious Eats provides detailed egg science, and Bon Appétit offers professional cooking techniques.
Related Posts

How Long to Boil Lobster Tails: Cooking Guide

How Long to Fly from New York to London? Travel Times
