
How to Make Limoncello? Expert Recipe Inside
How to Make Limoncello: Expert Recipe Inside
Limoncello is a vibrant, intensely flavored Italian liqueur that captures the bright essence of fresh lemons in a bottle. This traditional digestif has been enjoyed for centuries in Southern Italy, particularly in the Campania region around the Amalfi Coast, where the finest lemons grow. Making limoncello at home is surprisingly simple—requiring just three basic ingredients and patience—yet the results rival expensive store-bought versions. Whether you’re planning to serve it as an elegant after-dinner drink or gift it to friends, homemade limoncello brings authentic Italian charm to your home bar.
The beauty of this recipe lies in its simplicity and the quality of your starting ingredients. Unlike complicated cocktails or infusions, limoncello relies entirely on premium lemons, high-proof alcohol, and time to develop its characteristic smooth, sweet, and intensely citrus flavor. In this comprehensive guide, we’ll walk you through every step of the process, from selecting the perfect lemons to bottling your finished product. You’ll discover why this traditional liqueur deserves a permanent place in your kitchen, and how easy it is to become a limoncello expert yourself.
Essential Ingredients and Supplies
Before you begin making limoncello, gather all necessary ingredients and equipment. The ingredient list is refreshingly short: you’ll need fresh lemons, vodka or grain alcohol, sugar, and water. The quality of these components directly impacts your final product, so invest in the best options available to you.
Ingredients needed:
- 10-12 large, firm, unblemished lemons (preferably organic)
- 1 liter (33.8 oz) of 80-100 proof vodka or grain alcohol
- 800 grams (3.5 cups) of granulated sugar
- 500 milliliters (2 cups) of filtered water
Equipment required:
- Sharp vegetable peeler or microplane
- Glass jars with tight-fitting lids (1-2 quart capacity)
- Fine mesh strainer or cheesecloth
- Coffee filters or paper towels
- Glass bottles for storage
- Measuring cups and spoons
- Funnel
- Labels for dating your batch
When selecting lemons, look for varieties known for their aromatic qualities and juice content. Meyer lemons are excellent if available, though Eureka or Lisbon lemons work beautifully. Avoid any lemons with soft spots, mold, or blemishes. Organic lemons are preferable since you’ll be using the peel extensively and won’t need to worry about pesticide residues. The alcohol you choose matters significantly—avoid cheap vodka with harsh flavors, as these imperfections become more pronounced during the infusion process. Similarly, if you’re exploring how to make coffee without a coffee maker, quality ingredients matter; the same principle applies here.
Preparing Your Lemons
Proper lemon preparation is crucial for creating premium limoncello. You want to extract only the fragrant yellow zest while avoiding the bitter white pith underneath. The pith contains compounds that create unpleasant flavors and cloudiness in your final product.
Step-by-step preparation:
- Wash all lemons thoroughly under cool running water, gently rubbing them to remove any dirt or debris
- Pat lemons completely dry with a clean kitchen towel—any moisture can dilute your infusion
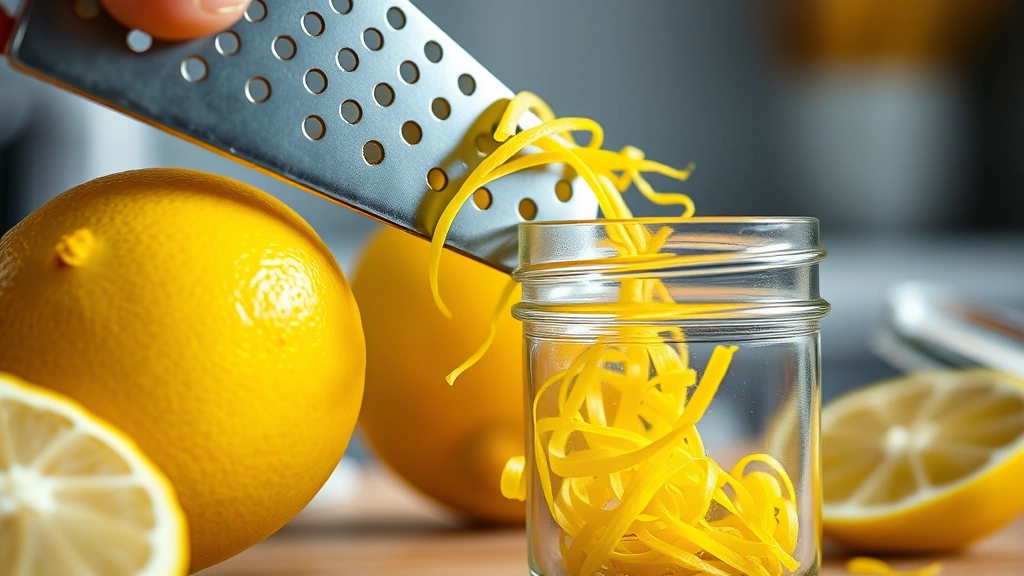
- Using a sharp vegetable peeler or microplane, carefully remove only the yellow zest from each lemon, working slowly to avoid catching the white pith
- Place all zest strips in your clean glass jar
- Reserve the lemon bodies for juice, tea, or other culinary uses
If you accidentally remove some white pith, carefully trim it away with a sharp knife before adding the zest to your jar. Some recipes suggest using a channel knife or zester, which creates thin strips ideal for infusion. The thinner and more uniform your zest pieces, the faster and more evenly the flavors will extract into the alcohol.
Take your time with this step—rushing leads to pith inclusion, which compromises your final product. Many experienced limoncello makers recommend peeling lemons over a bowl to catch any oils that escape during the process, then pouring these oils directly into the jar with the zest. These oils contain concentrated lemon flavor and shouldn’t be wasted.
The Infusion Process
Once your lemon zest is prepared and in the glass jar, pour the entire liter of vodka over it. The alcohol will immediately begin extracting the aromatic compounds and oils from the peel. This is where patience becomes your greatest asset—proper infusion requires time and minimal intervention.
Infusion guidelines:
- Pour vodka over zest until completely covered, with about 1 inch of liquid above the solids
- Seal the jar tightly with a lid
- Store in a cool, dark place away from direct sunlight—a kitchen cabinet or pantry works perfectly
- The infusion period ranges from 2-6 weeks, depending on desired intensity
- After the first week, gently shake or invert the jar every few days to redistribute the zest
- The mixture will gradually turn from clear to pale yellow to deep golden yellow
The timing of your infusion is flexible based on personal preference. A 2-3 week infusion produces lighter, more delicate limoncello with subtle lemon notes. A 4-6 week infusion creates deeper, more intense flavor that truly showcases the lemons. Some purists extend infusion to 8 weeks for maximum extraction, though diminishing returns occur beyond 6 weeks.
During infusion, you might notice the zest changing color or texture—this is completely normal and indicates successful flavor extraction. The alcohol will take on an increasingly golden hue as lemon oils dissolve into it. Avoid opening the jar unnecessarily, as this exposes the infusion to air and can cause unwanted oxidation.
Straining and Filtering

After your desired infusion period, it’s time to separate the solids from the liquid. This process requires care and patience to achieve the crystal-clear appearance characteristic of quality limoncello. Cloudy limoncello tastes fine but lacks the visual appeal that makes this liqueur special.
Straining process:
- Line a fine mesh strainer with cheesecloth or several layers of paper towels
- Place the strainer over a large glass bowl
- Carefully pour the infused vodka through the strainer, allowing it to drip slowly
- Don’t squeeze or press the solids—this forces bitter pith particles into your liquid
- Let gravity do the work; this may take 30-60 minutes
- Once initial straining completes, pour the liquid through a fresh coffee filter into another clean container
- This secondary filtration removes fine particles and cloudiness
- If cloudiness persists, repeat the coffee filter process
The filtered liquid should now be clear and pale to golden yellow, depending on infusion length. Some recipes suggest adding the filtered infusion directly to simple syrup, while others recommend letting it rest for several days before proceeding. Resting allows any remaining fine particles to settle to the bottom, making the final product even clearer.
This filtering step separates amateur attempts from professional-quality limoncello. Take time with it rather than rushing. The effort invested here directly impacts the visual appeal and smoothness of your finished product. Think of it like how to clean a coffee maker—thorough attention to detail produces superior results.
Creating the Simple Syrup
The simple syrup component transforms the intense infusion into balanced, drinkable limoncello. This syrup must cool completely before combining with your infusion to avoid damaging the delicate flavors that developed during the infusion period.
Simple syrup preparation:
- Measure 500 milliliters (2 cups) of filtered or distilled water into a saucepan
- Add 800 grams (3.5 cups) of granulated sugar
- Heat over medium heat, stirring occasionally until sugar completely dissolves
- Once dissolved, increase heat to medium-high and bring to a gentle boil
- Maintain a light boil for exactly 1-2 minutes
- Remove from heat and let cool to room temperature—this takes 1-2 hours
- Once cooled, you can proceed to combine with your infusion
The sugar-to-water ratio is important for proper balance. Too little sugar leaves limoncello harsh and overly alcoholic, while too much creates an overly sweet, syrupy drink. The ratio provided here is traditional and produces limoncello that’s pleasantly sweet without cloying.
Some recipes suggest using fewer sugar and more water, creating a lighter, less sweet version. Others advocate additional sugar for a dessert-like liqueur. Feel free to adjust slightly based on your taste preferences, though the traditional ratio is an excellent starting point.
Bottling and Storage

Once your simple syrup has cooled completely, it’s time to combine it with your filtered infusion and bottle your limoncello. This final step requires clean bottles and careful attention to prevent contamination.
Bottling procedure:
- Ensure all bottles are impeccably clean and completely dry
- Pour the filtered lemon infusion into a large, clean glass container
- Slowly add the cooled simple syrup, stirring gently to combine
- Taste a small sample and adjust sweetness if desired by adding more syrup or infusion
- Using a funnel, carefully pour the combined limoncello into clean glass bottles
- Seal bottles tightly with caps or corks
- Label each bottle with the date and contents
- Store in a cool, dark place or refrigerator
The bottling process is your final opportunity to adjust the flavor profile. Some people prefer slightly sweeter limoncello, while others want more pronounced lemon intensity. Trust your palate and make adjustments before final bottling.
Proper storage significantly extends your limoncello’s shelf life. When stored in a cool, dark place, homemade limoncello remains fresh and flavorful for 2-3 years. Many aficionados prefer storing it in the freezer, which serves dual purposes: it prevents spoilage and chills the liqueur to the ideal serving temperature. The high alcohol content prevents freezing, so your limoncello will remain pourable even when frozen solid.
Glass bottles are essential for long-term storage. Plastic containers can interact with the high-alcohol content and affect flavor over time. Dark glass provides additional protection from light degradation. If you’re interested in preserving other homemade goods, check out our guide on how to freeze strawberries—preservation techniques matter across all food and beverage preparation.
Serving Your Limoncello
Serving limoncello properly enhances the drinking experience and showcases your homemade creation. This Italian digestif is traditionally enjoyed ice-cold, either neat or in creative cocktails.
Traditional serving methods:
- As a digestif: Serve in small chilled glasses straight from the freezer, typically 1-1.5 ounces per serving
- Frozen shot: Chill small glasses in the freezer for 30 minutes before pouring and serving immediately
- Over ice: Pour into a rocks glass filled with ice cubes for a refreshing aperitif
- In cocktails: Mix with prosecco for a Limoncello Spritz, or combine with vodka and soda for a modern twist
- With dessert: Serve alongside panna cotta, lemon cake, or other citrus-forward desserts
The ideal serving temperature is extremely cold—ideally around 32°F (0°C). This cold temperature prevents the alcohol from overwhelming your palate and allows the delicate lemon flavors to shine. Many Italian restaurants serve limoncello in glasses that have been in the freezer for hours, creating an almost slushy texture that’s incredibly refreshing.
For entertaining, consider preparing a homemade menu featuring limoncello in various forms. Offer it as an aperitif before dinner, incorporate it into cocktails, or serve it as a palate cleanser between courses. Your guests will be impressed by the quality and flavor of your homemade creation.
The shelf life of opened limoncello is essentially indefinite when stored properly. The high alcohol content prevents bacterial growth and spoilage. Flavor may gradually diminish over years of storage, but the product remains safe to consume. Many people find that limoncello actually improves slightly during the first year of storage as flavors continue to meld and develop.
FAQ
How long does it take to make limoncello?
The total time depends on your infusion preference. Quick versions take 2-3 weeks, while traditional recipes require 4-6 weeks of infusion time. Add a few hours for preparation and straining. Most of this is passive waiting time—active work involves about 30-45 minutes of hands-on effort.
Can I use bottled lemon juice instead of fresh lemons?
No. Bottled lemon juice lacks the aromatic oils and fresh flavor compounds that make limoncello special. These products also contain preservatives that negatively affect the final product. Fresh lemons are essential for authentic limoncello.
What type of alcohol should I use?
Vodka is traditional and works beautifully because its neutral flavor allows lemon notes to dominate. Grain alcohol (95-100 proof) creates a more intense version. Avoid flavored vodkas or lower-proof options. The alcohol content should be at least 80 proof for proper preservation and extraction.
Why is my limoncello cloudy?
Cloudiness typically results from incomplete filtering or pith particles in the infusion. Strain through fresh coffee filters multiple times until completely clear. Cloudiness doesn’t affect taste but impacts visual appeal.
Can I reduce the sugar content?
Yes. Start by reducing sugar to 600 grams (2.5 cups) and adjust based on taste. Remember that less sugar creates a more intensely alcoholic drink. The traditional ratio balances sweetness with lemon intensity.
How should I store my finished limoncello?
Store in glass bottles in a cool, dark place or in the freezer. The high alcohol content prevents freezing. Proper storage extends shelf life to 2-3 years, though it remains safe indefinitely. Avoid direct sunlight and temperature fluctuations.
Can I make limoncello with other citrus fruits?
Absolutely. Orange zest creates arancello, grapefruit creates pompelmocello, and lime creates limecello. Use the same recipe and techniques with your preferred citrus fruit. Some people even create blended versions using multiple citrus varieties.
Is homemade limoncello safe to drink?
Yes, completely. The high alcohol content (approximately 30-40% ABV in the finished product) prevents bacterial growth and spoilage. The infusion process extracts flavors without creating fermentation. Ensure all equipment is clean and bottles are properly sealed.
How much limoncello should I drink?
Limoncello is a digestif meant to be enjoyed in small quantities—typically 1-1.5 ounces per serving. Its high alcohol content and concentrated flavor make it unsuitable for large-volume consumption. Serve it as an after-dinner drink to aid digestion.
Related Posts

Superscript in Google Docs: Expert Tips

Strikethrough in Excel: Easy Steps for Beginners
