
DIY Black Food Coloring: Easy Homemade Recipe
DIY Black Food Coloring: Easy Homemade Recipe
Creating black food coloring at home is easier than you might think, and it’s a fantastic way to customize your baking and cooking projects without relying on artificial dyes. Whether you’re decorating a gothic-themed cake, making dramatic cocktails, or adding depth to your culinary creations, homemade black food coloring offers a natural, cost-effective alternative to store-bought options. Many home bakers and chefs are discovering that making their own coloring gives them greater control over the final product while avoiding synthetic additives.
The beauty of DIY black food coloring lies in its simplicity and the variety of methods available. From activated charcoal to vegetable-based options, you have multiple pathways to achieve that perfect jet-black hue. This guide walks you through each method with detailed instructions, ingredient lists, and pro tips to ensure your homemade black coloring works beautifully in any recipe. We’ll explore natural ingredients you likely already have in your kitchen, along with techniques that professional bakers use to get consistent, vibrant results.
Natural Methods for Making Black Food Coloring
Before diving into specific recipes, it’s important to understand what makes an effective black food coloring. True black is actually a combination of multiple colors working together to absorb light and create that deep, dark appearance. When you’re learning how to make black colouring at home, you’re essentially mixing or concentrating ingredients that naturally contain dark pigments.
The most accessible natural methods involve ingredients you can find at grocery stores, health food shops, or online retailers. These methods avoid synthetic dyes like FD&C Black No. 1, which some people prefer to avoid for dietary or health reasons. Natural black coloring is also excellent for themed parties, special occasion baking, and creating visually striking food presentations.
One popular approach combines multiple natural ingredients to achieve the darkest possible result. Black cocoa powder, when mixed with other dark ingredients, can create surprisingly deep black tones. Another method involves using concentrated food reductions similar to making au jus, where you reduce dark liquids to intensify their color-producing properties.
The key to success is understanding that natural black coloring often requires more product volume than synthetic alternatives. You’ll need patience and a willingness to experiment with ratios until you achieve your desired shade. Many home cooks find that having multiple methods in their arsenal gives them flexibility for different recipes and applications.
Activated Charcoal Method
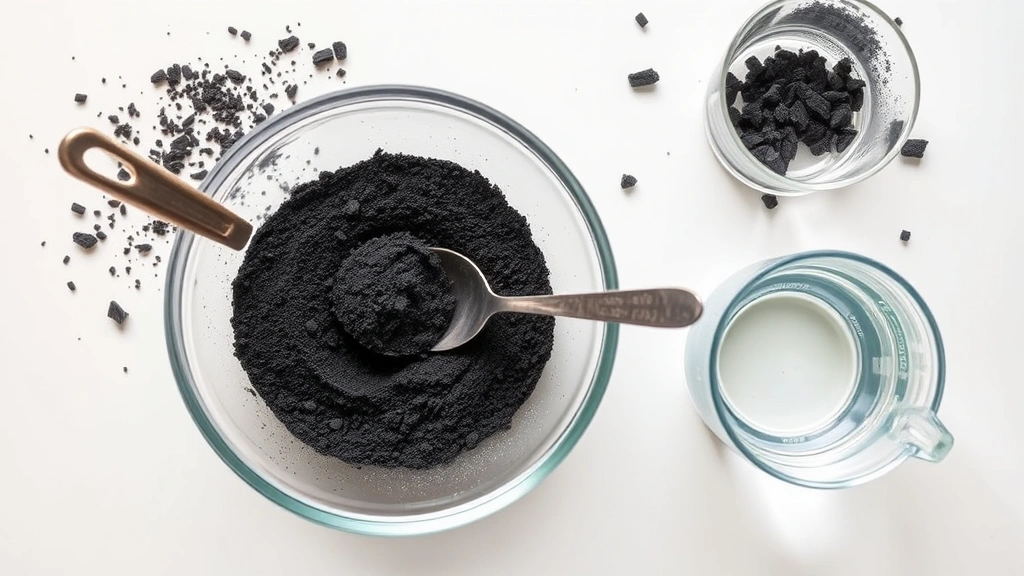
Activated charcoal is one of the most popular methods for creating black food coloring at home. Food-grade activated charcoal is safe for consumption and creates an intensely dark black color that’s perfect for cakes, frostings, and beverages. This method is straightforward and requires minimal ingredients.
Ingredients You’ll Need:
- Food-grade activated charcoal powder (available from health retailers or specialty cooking suppliers)
- Liquid component (water, milk, or clear alcohol like vodka)
- Optional: powdered sugar or corn syrup for gel consistency
Step-by-Step Instructions:
- Measure your charcoal: Start with 1/4 teaspoon of food-grade activated charcoal powder for every 1 tablespoon of liquid you’re using.
- Prepare your liquid: Pour your chosen liquid into a small bowl or container. If you’re making a gel coloring, use less liquid and add cornstarch or powdered sugar.
- Mix thoroughly: Add the activated charcoal to your liquid and stir vigorously for at least one minute. Use a whisk or electric mixer for smoother results and to break up any clumps.
- Strain if necessary: If you notice any fine particles floating, pour the mixture through a fine-mesh strainer to ensure even color distribution.
- Test the color: Apply a small amount to white paper or a white plate to see the true black color. Adjust the charcoal ratio if needed.
- Store properly: Keep your activated charcoal coloring in an airtight container away from light.
Pro Tips: Activated charcoal can have a slightly bitter taste, so it works best in strongly flavored recipes like chocolate cakes or dark beverages. For delicate desserts, use sparingly. When mixing into frosting, add the charcoal mixture gradually while beating to ensure even distribution and avoid making your frosting too thin.
This method is particularly effective for creating gel food coloring that has a consistency similar to commercial products. The resulting black is true and deep, making it ideal for detailed decorating work. Many professional bakers prefer this method because it doesn’t significantly alter the flavor profile of most recipes.
Squid Ink Technique
Squid ink is a natural coloring agent that chefs have used for centuries, particularly in Mediterranean and Asian cuisines. It produces an authentic, deep black color that’s both beautiful and edible. This method is perfect if you’re already familiar with making dishes like rich sauces and reductions.
Obtaining Squid Ink:
You can purchase squid ink in several forms: fresh (extracted from squid), frozen packets, or bottled liquid. Most specialty grocery stores and seafood markets carry it, and it’s readily available through online retailers. Check the label to ensure it’s food-grade and free from additives.
Creating Your Coloring:
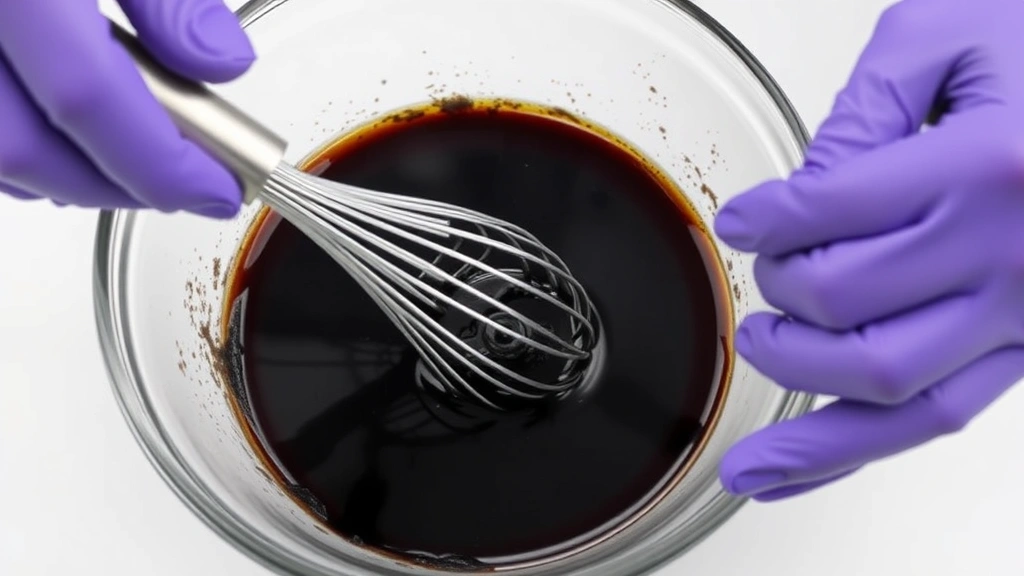
- Start with squid ink: If using fresh squid ink, extract it carefully and strain through cheesecloth to remove any impurities.
- Mix with liquid: Combine one part squid ink with two parts of your chosen liquid (water, milk, or clear spirits).
- Blend thoroughly: Use an immersion blender or whisk to create a smooth, uniform mixture.
- Adjust consistency: Add more liquid for thinner coloring or reduce by simmering for thicker applications.
- Taste test: Squid ink adds a subtle briny, oceanic flavor, so test it in your recipe first.
The advantage of squid ink is that it produces the most naturally black color without any chemical additives. It works beautifully in pasta dough, seafood dishes, risottos, and dramatic cocktails. The flavor complements savory dishes especially well, making it ideal for gourmet presentations.
Vegetable-Based Black Coloring
For a completely plant-based approach to making black food coloring, combining multiple dark vegetables and fruits creates an excellent natural alternative. This method takes longer but produces a truly organic product with no synthetic ingredients whatsoever.
Ingredients for Vegetable-Based Coloring:
- 1 cup fresh blueberries (or frozen)
- 1/2 cup red cabbage, finely chopped
- 2 tablespoons cocoa powder (unsweetened)
- 1 tablespoon activated charcoal (optional, for deeper black)
- 1/4 cup water
- 1 tablespoon lemon juice
Preparation Method:
- Cook the vegetables: Combine blueberries and red cabbage in a saucepan with 1/4 cup water. Bring to a boil, then reduce heat and simmer for 15-20 minutes until the vegetables break down completely.
- Strain the mixture: Pour through a fine-mesh strainer, pressing the solids to extract all the liquid. This liquid will be dark purple or dark blue.
- Add cocoa powder: Whisk the cocoa powder into the strained liquid until fully dissolved. This shifts the color from purple toward black.
- Optional charcoal: If desired, add activated charcoal for an even darker result.
- Acidify slightly: Add lemon juice to enhance color stability and prevent fading.
- Reduce if necessary: Simmer gently for 10-15 minutes to concentrate the color and reduce excess water.
- Cool completely: Allow the mixture to cool before using or storing.
This vegetable-based method works wonderfully for baking, smoothies, and beverages. The natural sugars from the blueberries help the coloring blend smoothly into batters and frostings. While it requires more preparation time than other methods, many home bakers appreciate knowing exactly what goes into their food coloring.
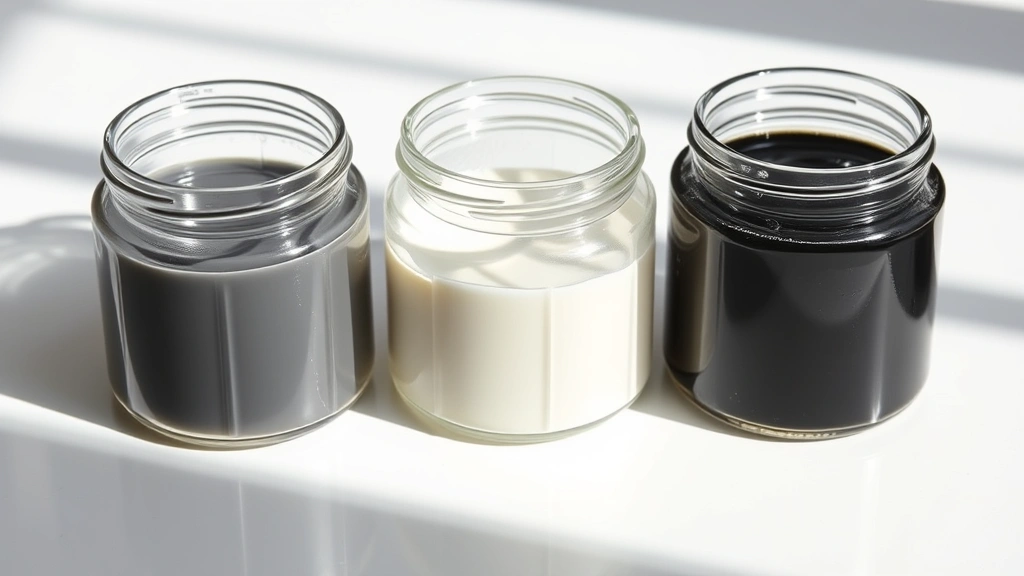
Gel vs. Liquid Black Coloring at Home
Understanding the difference between gel and liquid coloring helps you choose the right consistency for your specific application. Both can be made at home using the methods described above, with slight modifications to the preparation process.
Liquid Black Coloring:
Liquid coloring works best when you want to tint batters, doughs, or beverages without adding significant volume. It’s thinner, spreads more easily, and blends quickly into wet mixtures. Create liquid coloring by following the basic recipes above and keeping the ratio of liquid to coloring ingredient higher. Liquid coloring is ideal for cakes, cookies, and cocktails where you don’t want to affect the recipe’s moisture balance.
Gel Black Coloring:
Gel coloring is thicker and more concentrated, making it perfect for frosting, icing, and decorative work. It doesn’t thin out your frosting as much as liquid coloring does. To make gel coloring, reduce the liquid component significantly and add thickening agents like:
- Cornstarch (1-2 teaspoons per tablespoon of coloring)
- Powdered sugar (2-3 teaspoons per tablespoon)
- Gum arabic (available from specialty baking suppliers)
- Xanthan gum (a small pinch for very thick consistency)
For gel coloring using the activated charcoal method, start with 1 tablespoon of water instead of 1 tablespoon of liquid, then add your thickening agent of choice. Stir until you achieve a consistency similar to commercial gel food coloring.
Storage and Shelf Life
Proper storage extends the life of your homemade black food coloring and maintains its potency. Unlike commercial products with preservatives, homemade coloring requires more careful handling.
Storage Guidelines:
- Container choice: Use dark glass bottles or opaque plastic containers to protect from light exposure, which can degrade color quality.
- Refrigeration: Store vegetable-based and squid ink colorings in the refrigerator, where they’ll keep for 2-3 weeks.
- Freezing: For longer storage, freeze homemade coloring in ice cube trays. Thaw at room temperature before use. Frozen coloring lasts 2-3 months.
- Activated charcoal: Dry activated charcoal powder lasts indefinitely in an airtight container away from moisture.
- Label everything: Mark your containers with the preparation date and method used.
- Keep sealed: Always seal containers tightly between uses to prevent contamination and color oxidation.
Signs that your homemade coloring has gone bad include separation, mold growth, off odors, or significant color fading. When in doubt, discard and make a fresh batch. This is especially important for vegetable-based colorings, which can develop mold if stored improperly.
Application Tips for Best Results
Successfully using your homemade black food coloring requires understanding how it interacts with different recipes and ingredients. These application tips help you achieve professional-looking results.
For Buttercream Frosting:
When adding black coloring to buttercream, start with a small amount and gradually increase until you reach your desired shade. Homemade black coloring often requires more product than commercial alternatives. Add coloring while beating the frosting at medium speed to ensure even distribution. If your frosting becomes too thin, add more powdered sugar to restore the correct consistency. Allow the frosting to sit for a few hours to let the color fully develop and deepen.
For Cake Batters:
Add black coloring to your dry ingredients first if using powder forms like activated charcoal or cocoa-based mixes. For liquid colorings, add them with your wet ingredients. Mix thoroughly before combining wet and dry ingredients to avoid streaking. Remember that baked goods often look darker when they come out of the oven than when you mix the batter, so don’t be alarmed by the color shift.
For Beverages:
Black coloring in drinks should be added just before serving to prevent settling or separation. Stir well and taste test, as some natural colorings can impart subtle flavors. Squid ink works particularly well in dramatic cocktails, while activated charcoal suits smoothies and trendy health drinks. Cold beverages may require slightly more coloring than hot ones to appear equally dark.
For Fondant and Modeling Chocolate:
Knead gel coloring into fondant or modeling chocolate gradually, working it in thoroughly to avoid dark streaks. Use gloves to protect your hands from staining. These applications benefit from gel colorings since they won’t add excess moisture to your medium.
If you’re working on elaborate cake decorating projects, consider checking out the FixWise Hub Blog for additional creative baking techniques. For related cooking methods, our guide on making apple sauce demonstrates similar reduction techniques that apply to creating concentrated natural colorings.
Color Mixing Strategies:
True black is difficult to achieve with natural ingredients alone. If your homemade coloring appears dark gray or dark brown, try these adjustments:
- Mix black coloring with a tiny amount of purple or blue coloring to deepen the shade
- Add a pinch of activated charcoal to vegetable-based colorings
- Increase the concentration of dark cocoa powder in your mixture
- Allow the coloring to sit overnight; many natural colorings deepen as they age
FAQ
Is homemade black food coloring safe to eat?
Yes, when made with food-grade ingredients like activated charcoal, cocoa powder, vegetables, or squid ink, homemade black food coloring is completely safe to consume. Always ensure you’re using food-grade activated charcoal, not the type used for aquariums or air purification. If you have specific dietary restrictions or allergies, homemade coloring gives you complete control over ingredients.
Can I use regular charcoal or charcoal briquettes?
Absolutely not. Regular charcoal, charcoal briquettes, and non-food-grade activated charcoal contain additives and chemicals that are toxic if ingested. Always purchase activated charcoal specifically labeled as food-grade from reputable suppliers like home improvement and specialty retailers.
Why is my black coloring not dark enough?
Natural black coloring often requires more product than synthetic dyes. Increase the concentration of your coloring ingredient, add activated charcoal to existing colorings, or combine multiple methods. Some recipes benefit from allowing the coloring to develop overnight, as the color often deepens with time. Test on a small batch before committing to a full recipe.
Does homemade black coloring taste like anything?
This depends on the method. Activated charcoal has a subtle mineral taste that’s barely noticeable in strongly flavored recipes. Cocoa-based colorings add a subtle chocolate note. Squid ink imparts a briny, oceanic flavor. Vegetable-based colorings have minimal taste. Always test your coloring in a small amount of your recipe first to ensure the flavor works with your dish.
How much homemade coloring should I use compared to commercial coloring?
Homemade coloring is typically less concentrated than commercial products, so you’ll need to use 1.5 to 3 times more product to achieve the same darkness. Start with small amounts and gradually add more until you reach your desired shade. Keep notes on ratios that work for your favorite recipes.
Can I make black coloring without activated charcoal?
Yes, you have several options. Vegetable-based colorings using blueberries, red cabbage, and cocoa powder create very dark results. Squid ink produces natural black coloring. Black cocoa powder mixed with other dark ingredients works well. Experiment with different combinations to find the method that works best for your specific application and flavor preferences.
What’s the best method for black coloring in royal icing?
Gel-based black coloring works best in royal icing since liquid coloring can affect the consistency and drying time. Mix your gel coloring thoroughly into the egg whites before adding powdered sugar. Royal icing with black coloring may take slightly longer to dry than white icing, so allow extra time before stacking decorated cookies or cakes.
Where can I buy food-grade activated charcoal?
Food-grade activated charcoal is available from health food stores, specialty baking supply shops, and online retailers. Specialty cooking retailers and home improvement centers often carry it, along with dedicated baking supply websites. Always verify the product is labeled as food-grade before purchasing.
Can I mix different black coloring methods together?
Absolutely. Combining methods often produces superior results. For example, mixing vegetable-based coloring with a small amount of activated charcoal creates a deeper, more stable black. Experiment with small batches to find combinations that work well for your recipes and preferences.
How do I prevent black coloring from staining my hands or equipment?
Wear disposable gloves when working with black coloring, especially squid ink and vegetable-based versions. Use glass or plastic utensils and bowls rather than wooden implements, which can absorb and retain staining. Wipe up spills immediately with damp cloths. If staining occurs, lemon juice or vinegar can help remove discoloration from skin and surfaces.
Related Posts

Superscript in Google Docs: Expert Tips

Strikethrough in Excel: Easy Steps for Beginners
