
How to Make Apple Cider: A Step-by-Step Guide
How to Make Apple Cider: A Step-by-Step Guide
There’s something genuinely magical about pressing fresh apples into cider. Maybe it’s the aroma that fills your kitchen, or perhaps it’s the satisfaction of transforming whole fruit into something you’ve created with your own hands. Whatever draws you to it, making apple cider at home is far more achievable than you might think—and honestly, it’s one of those projects that feels luxurious precisely because it’s so grounded in simplicity.
The beauty of homemade apple cider lies in its versatility. You can drink it fresh and sweet, let it ferment into hard cider, or simmer it down into a concentrated syrup that tastes like autumn in a jar. Whether you’re working with apples from your backyard, a local orchard, or the farmers market, this guide will walk you through everything you need to know to make cider that’ll make you wonder why you didn’t start sooner.
What makes this process special isn’t that it requires fancy equipment or years of experience. It simply requires good apples, a bit of patience, and the willingness to get your hands dirty—quite literally. Let’s dive in.
Choosing the Right Apples
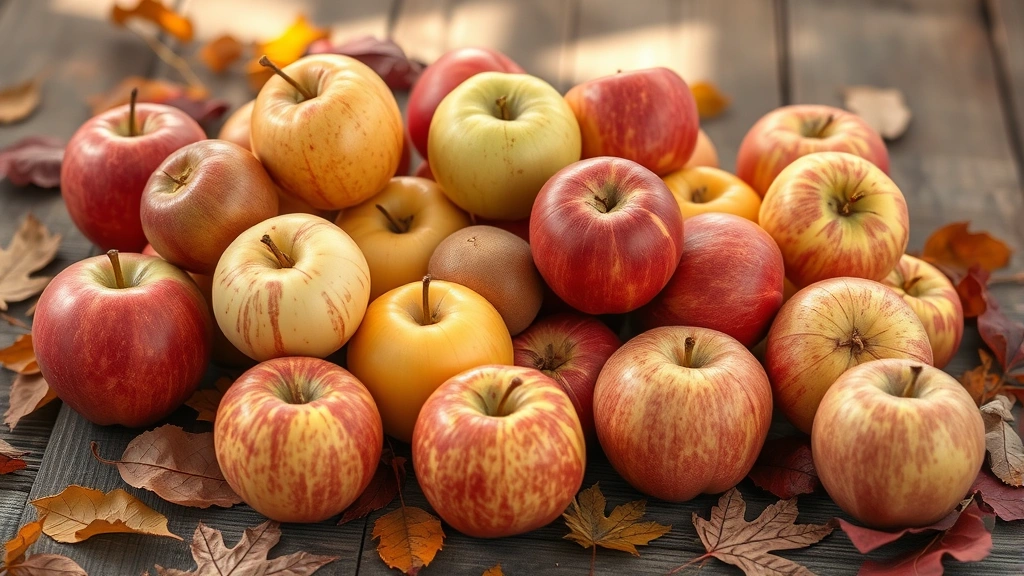
The foundation of exceptional cider starts with selecting apples that actually taste good. This might sound obvious, but many people default to whatever’s on sale at the grocery store without considering whether those apples will produce something worth drinking. That’s the first mistake to avoid.
The ideal cider blend typically combines three apple types: tart apples for acidity, sweet apples for body and flavor, and aromatic apples for complexity. Think about mixing varieties like Granny Smith (tart), Honeycrisp (sweet), and Pink Lady (aromatic). A classic combination uses about 30% tart apples, 50% sweet apples, and 20% aromatic varieties, but this isn’t a strict formula—it’s more of a starting point for experimentation.
Look for apples that are ripe but firm. Soft apples can work, but they often produce a cloudier cider with less vibrant flavor. If you’re using apples from your own tree, harvest them when they’ve reached full maturity and have developed their characteristic color. If you’re concerned about how to keep apples from turning brown during your prep work, you’ll want to work efficiently once you start cutting them.
One crucial detail: avoid using apples that have been treated with fungicides or pesticides if possible. Since you’re consuming the entire fruit (skin and all), organic or untreated apples are worth seeking out. A local orchard is often your best bet, and many will sell seconds or drops at discounted prices—perfect for cider-making.
Equipment You’ll Need
Here’s where things get interesting. You don’t need to invest in expensive commercial pressing equipment to make excellent cider. That said, having the right tools makes the process significantly easier and more efficient.
Essential Equipment:
- A large, clean bucket or food-grade container (at least 5-gallon capacity)
- A cutting board and sharp knife
- A colander or large strainer
- Cheesecloth or a fine mesh strainer
- Glass jars for storage (mason jars work perfectly)
- A food mill, blender, or mortar and pestle for breaking down apples
Optional but Helpful:
- A cider press (hand-operated models are affordable and durable)
- A large stockpot for heating and pasteurizing
- A thermometer for monitoring temperature
- A hydrometer if you’re planning to ferment
- Sanitizing solution for fermenting equipment
If you’re just starting out, a simple food mill or even a sturdy blender can work beautifully for breaking down apples. You’ll then strain the resulting pulp through cheesecloth to extract the liquid. It’s more labor-intensive than a press, but it produces genuine results.
Preparing Your Apples
Once you’ve selected your apples, the preparation phase is straightforward but requires attention to detail. Start by rinsing all your apples thoroughly under cold running water. Even if they look clean, a good wash removes dust, debris, and any residual pesticide residue.
Next, you’ll need to break down the apples into smaller pieces. Cut them into quarters or eighths, removing any sections that show significant damage or rot. Small blemishes are fine—they won’t affect your final product. If you’re worried about oxidation during this process, work in batches and keep prepared apples submerged in water until you’re ready to process them.
Here’s a pro tip that separates good cider from mediocre cider: don’t remove the seeds or skin. Everything gets pressed together. The seeds contain tannins that add depth and complexity, while the skin provides color, aroma, and additional nutrients. This is the philosophy behind proper cider-making—you’re using the whole apple.
If you’re making a large batch, you might want to prepare your apples in stages rather than all at once. Processing apples is labor-intensive, and spreading it over a couple of hours prevents fatigue from affecting your technique. Plus, working with smaller batches often yields better results than trying to tackle a hundred pounds of fruit in one afternoon.
The Pressing Process
This is where the magic actually happens. Whether you’re using a press, a food mill, or improvised equipment, the goal is the same: extract as much juice as possible while maintaining quality.
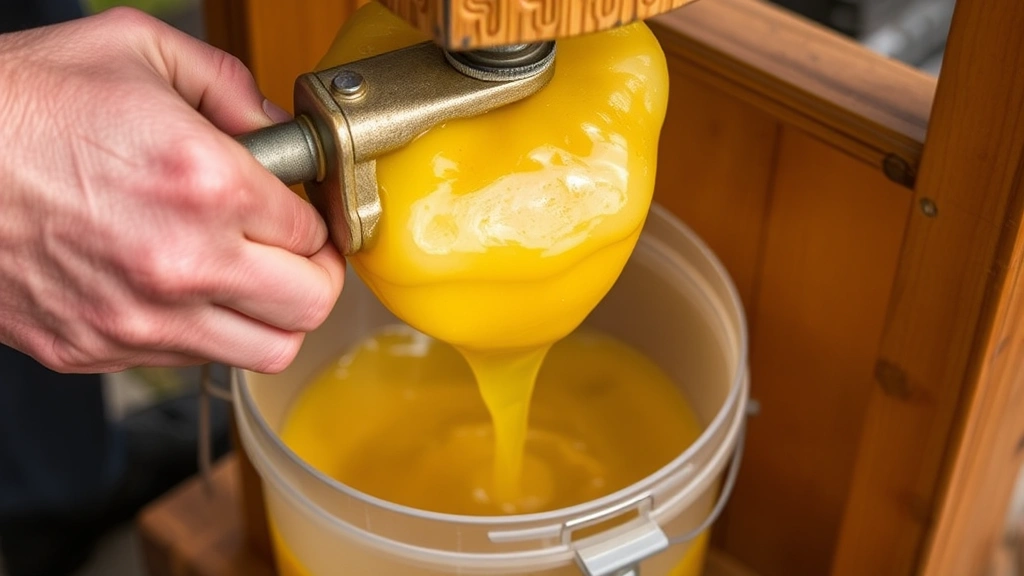
Using a Cider Press:
If you’ve invested in a cider press, the process becomes almost meditative. Feed your prepared apple pieces into the hopper, engage the press mechanism, and watch the golden liquid flow into your collection bucket. Most hand-operated presses require you to fill the barrel with apple pieces, then gradually increase pressure by turning the handle. Start gently—you want to extract juice without crushing seeds excessively or creating excessive heat.
A single press cycle typically yields a surprising volume of juice. You might be amazed at how much liquid is hiding inside all that fruit. Once the flow slows to a trickle, you’ve extracted most of the available juice. The remaining pomace (pulp and solids) can be composted or pressed again for a second pressing of lighter cider.
Using a Food Mill or Blender:
If you’re working without a dedicated press, a food mill produces excellent results. Process your prepared apples through the mill in batches, collecting the output in a large bowl or bucket. This breaks down the fruit into a fine pulp. You’ll then need to strain this pulp through cheesecloth to extract the liquid. Gather the corners of the cheesecloth and hang it over a bucket for several hours, allowing gravity to do the work. You can gently squeeze the cloth to extract the final bit of juice, but don’t overdo it—excessive squeezing can introduce sediment and cloudiness.
A blender works similarly, though it creates a finer, more consistent pulp. Blend your apples in batches with just enough water to keep the blades moving freely, then strain through cheesecloth.
Filtering Your Cider:
Once you’ve extracted your juice, you’ll want to filter it at least once to remove small particles and sediment. Pour your fresh cider through a fine mesh strainer lined with cheesecloth into a clean bucket. This first filtering removes most large particles. For a clearer final product, you can repeat this process, though fresh cider naturally contains some sediment—it’s actually a sign of quality and nutrition.
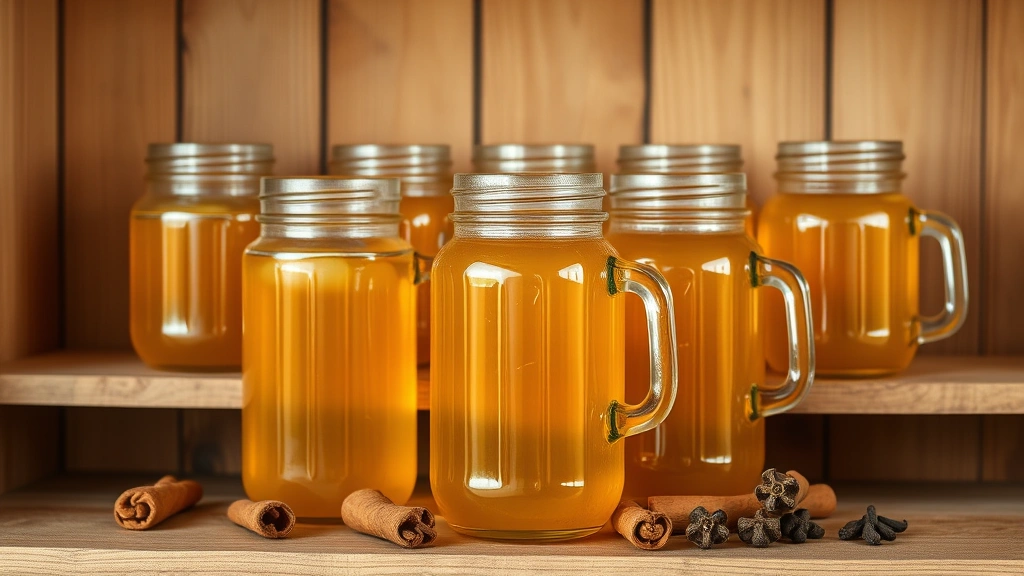
Storage and Serving
Fresh apple cider has a limited shelf life, which is precisely why it’s so special. Unlike apple juice, which is pasteurized and shelf-stable for months, fresh cider typically lasts about two weeks in the refrigerator before fermentation begins or flavors decline.
Refrigeration:
Store your fresh cider in glass jars or food-grade containers in the coldest part of your refrigerator. The cold temperature slows natural fermentation and microbial activity, extending freshness. Keep containers sealed to prevent oxidation. If you notice bubbles forming or the cider beginning to fizz, fermentation has started—it’s still safe to drink, but the flavor profile is changing.
Pasteurization:
If you want your cider to last longer without fermentation, pasteurization is the answer. Heat your cider to 160°F (71°C) and maintain that temperature for 30 seconds, then cool it quickly. This kills the wild yeast and bacteria that would otherwise continue fermenting the cider. You can use distilled water to dilute your cider if you’re adjusting sweetness before pasteurizing. Pasteurized cider will last several weeks in the refrigerator, though it loses some of the fresh, vibrant quality that makes homemade cider special.
Serving Suggestions:
Fresh cider is wonderful simply chilled and served straight from the bottle. But it’s also spectacular warmed with cinnamon sticks, star anise, cloves, and a splash of honey—essentially creating mulled cider that fills your home with autumn aromas. Some people enjoy it mixed into warm beverages or as a base for cocktails. Others simmer it down into a concentrated syrup for drizzling over desserts or pancakes.
Fermentation Basics
If you want to transform your fresh cider into hard cider, fermentation is the next step. This is where things get genuinely interesting, and where your cider evolves into something entirely different.
Natural fermentation happens on its own—the wild yeast present on apples and in your environment will begin converting the sugars in your cider to alcohol. However, for more predictable and controlled results, many cider makers pitch commercial yeast. Champagne yeast, cider yeast, or wine yeast all produce excellent results with slightly different flavor profiles.
Basic Fermentation Setup:
Pour your fresh cider into a clean, sanitized glass carboy or large jar. Add your chosen yeast according to package directions. Fit an airlock to the top—this allows carbon dioxide to escape while preventing outside air from entering. Store your fermentation vessel in a cool, dark place (around 60-70°F is ideal) and let the magic happen.
Fermentation typically takes anywhere from two weeks to several months, depending on yeast type, temperature, and how dry you want your final cider. Check on it occasionally, but resist the urge to constantly open it and disturb the process. Once fermentation appears complete (bubbling has stopped), you can rack the cider into clean bottles for storage and aging. A properly fermented hard cider can age for years, developing increasingly complex flavors.
Troubleshooting Common Issues
Problem: Cloudy Cider
Solution: Cloudiness typically comes from fine particles and sediment. Try filtering through finer cheesecloth or allowing the cider to sit undisturbed for several days so particles settle to the bottom. You can then carefully pour off the clear liquid, leaving sediment behind. Some people prefer cloudy cider for its rustic appeal and slightly richer mouthfeel.
Problem: Weak or Bland Flavor
Solution: This usually indicates too high a proportion of mild-flavored apples in your blend. For your next batch, increase the percentage of tart and aromatic varieties. You can also try concentrating flavors by simmering your cider down slightly before serving, though this changes the character of the drink.
Problem: Unwanted Fermentation
Solution: If you want fresh cider that doesn’t ferment, pasteurization is your answer. Heat to 160°F for 30 seconds, then cool rapidly. Alternatively, store at very cold temperatures and consume within two weeks.
Problem: Mold or Off-Odors
Solution: Mold or vinegary smells indicate contamination. Unfortunately, this batch should be discarded. Going forward, ensure all equipment is thoroughly sanitized before use, and work in the cleanest environment possible. Keep your cider covered and stored properly to prevent exposure to contaminants.
Problem: Fermentation Won’t Start
Solution: If you’re relying on natural fermentation and nothing’s happening after a week, the temperature might be too cold, or the wild yeast population might be low. Try moving your cider to a slightly warmer location or pitch commercial yeast to get things moving.
Many experienced cider makers recommend keeping detailed notes about your process—apple varieties used, weather conditions, fermentation timeline, and final results. This creates a personal reference guide that helps you refine your technique with each batch. You’ll quickly discover what works best in your specific environment and with your particular taste preferences.
Frequently Asked Questions
Can I use store-bought apple juice to make cider?
Technically, you can, but it won’t produce true cider in the traditional sense. Store-bought juice is pasteurized, which kills the wild yeast that contributes to cider’s character. You’d need to add commercial yeast for fermentation. Fresh cider made from whole apples simply has more complexity and authenticity. If you’re experimenting, fresh juice from a local cider mill is a much better starting point than conventional grocery store juice.
How much cider do I get from a bushel of apples?
A bushel of apples (roughly 42-48 pounds) typically yields about 3-4 gallons of cider. The exact amount depends on apple variety, ripeness, and how thoroughly you press. Softer, juicier apples yield more liquid than firmer varieties. This is why blending apple types is smart—you get a good balance of juice extraction and flavor complexity.
Do I need special equipment to ferment cider?
Not necessarily. While a proper fermentation vessel with airlock is ideal, you can ferment in a large glass jar with a cloth cover secured with a rubber band, or even use a balloon fitted over the opening as a makeshift airlock. That said, investing in proper equipment prevents contamination and gives you better control over the fermentation process.
Is homemade cider safe to drink?
Yes, when made with proper sanitation and storage practices. Fresh cider should be refrigerated and consumed within two weeks, or pasteurized for longer storage. If you’re fermenting, ensure all equipment is sanitized and follow standard fermentation protocols. The acidic nature of cider (pH around 3.5-4.0) makes it naturally resistant to harmful bacteria.
Can I make cider from just one apple variety?
You can, and many people do, but single-variety ciders often lack the complexity and balance that comes from blending. That said, some apple varieties—particularly heritage cider apples—produce excellent single-varietal ciders. If you’re starting out, blending is the safer approach for achieving a well-rounded final product.
What’s the difference between apple cider and apple juice?
The main difference is processing and pasteurization. Apple juice is typically pasteurized, filtered until clear, and often contains additives or preservatives. Apple cider is fresh-pressed, unpasteurized, and retains more of the apple’s natural compounds. Cider is closer to the whole fruit experience, while juice is a more refined, shelf-stable product. For rapid results in the kitchen, juice is convenient, but for genuine flavor and nutrition, fresh cider wins.
How do I know when my fermented cider is ready to bottle?
Fermentation is complete when the airlock stops bubbling (usually no activity for several days) and a hydrometer reading shows the specific gravity has stabilized. At that point, you can rack the cider into clean bottles for storage and aging. The cider will continue to slowly age and develop flavor in the bottle over months or even years.
Can I add sour cream or other ingredients to my cider?
Traditional cider is just apples and water, but creative variations exist. Some people add spices during fermentation for flavored ciders, or incorporate other fruits. However, adding dairy like sour cream isn’t typical and could introduce unwanted bacteria. Stick with ingredients that complement cider’s natural character—spices, honey, other fruits, or additional apple varieties.
Related Posts

How Long to Boil Lobster Tails: Cooking Guide

How Long to Fly from New York to London? Travel Times
