

How to Clean Vinyl Records? Expert Tips Inside
How to Clean Vinyl Records: Expert Tips Inside
Vinyl records have experienced a remarkable resurgence in popularity over the past decade, with audiophiles and casual listeners alike appreciating their warm, rich sound quality. However, maintaining your collection requires proper care and cleaning techniques to preserve both the vinyl’s longevity and audio fidelity. Dust, dirt, and debris accumulate on record surfaces during storage and playback, potentially causing permanent damage to the grooves that produce sound.
Learning how to clean vinyl records properly is essential for anyone serious about their music collection. Whether you’re dealing with newly purchased vintage records or protecting your current collection from deterioration, understanding the right cleaning methods and materials will help you maintain pristine playback quality for years to come. This comprehensive guide covers everything from basic dry cleaning to advanced wet cleaning techniques, equipment recommendations, and preventative maintenance strategies.
Why Cleaning Vinyl Records Matters
The grooves on vinyl records are incredibly precise, with microscopic dimensions that directly translate vibrations into sound through your turntable’s stylus. When dust and dirt particles settle into these grooves, they create friction that degrades audio quality, introduces crackling and pops, and can actually wear down the vinyl material itself over time. A stylus dragging across contaminated grooves experiences increased resistance, which accelerates wear on both the record and your turntable’s needle.
Unlike digital formats, vinyl records are physical media that deteriorate with each play. Proper cleaning removes contaminants that amplify this natural wear process, effectively extending your record’s playable lifespan. Additionally, maintaining your collection protects your investment—rare or valuable records require extra attention to preserve their resale value and collectibility. Many record collectors report that properly cleaned records sound noticeably better, with improved clarity, reduced surface noise, and enhanced bass response.
Environmental factors like humidity, temperature fluctuations, and airborne particles all contribute to record degradation. Establishing a regular cleaning routine, similar to how you might approach cleaning delicate items, prevents buildup and maintains optimal sound quality. Records stored in basements or attics are particularly vulnerable to dust accumulation and require more frequent cleaning than those kept in climate-controlled environments.
Essential Cleaning Supplies and Equipment
Before beginning any cleaning project, gathering the right materials ensures you won’t damage your records. The most important principle is using only materials designed specifically for vinyl or approved alternatives—household cleaners and abrasive materials can cause irreversible damage.
Basic Dry Cleaning Supplies:
- Anti-static record brush with soft bristles (carbon fiber or goat hair)
- Microfiber cloths specifically for vinyl
- Record cleaning mat to prevent slipping
- Soft-bristled brush for sleeve cleaning
- Anti-static sleeve protectors
Wet Cleaning Supplies:
- Distilled water (never tap water, which contains minerals)
- Isopropyl alcohol (90% concentration minimum)
- Specialized vinyl record cleaning solution from reputable manufacturers
- Lint-free cleaning cloths or paper towels
- Clean, lint-free applicator pads
- Spray bottle for even liquid distribution
Advanced Equipment Options:
- Record cleaning machine (vacuum or spin-clean type)
- Stylus cleaner and brush
- Turntable maintenance kit
- pH-neutral cleaning solution specifically formulated for vinyl
Quality matters significantly when selecting cleaning tools. Cheap brushes with synthetic bristles can scratch records, while low-quality cloths leave lint residue. Family Handyman recommends investing in proper equipment as preventative maintenance that pays dividends over time. For those just starting their collection, a basic brush and microfiber cloth combination provides excellent results without significant investment.
Dry Cleaning Methods
Dry cleaning should be your first approach for records that aren’t heavily soiled. This method removes loose surface dust and particles without introducing moisture, making it ideal for regular maintenance between deeper cleanings.
The Anti-Static Brush Technique:
Hold your record firmly on a flat surface with the label side up. Using an anti-static brush, gently stroke from the center toward the outer edge, following the direction of the grooves. The anti-static properties prevent dust from jumping back onto the record after removal. Make overlapping passes across the entire surface, applying light pressure—let the brush do the work rather than scrubbing forcefully. Complete the entire record, then flip it and repeat on the other side. This method works best when performed regularly, ideally before each play session.
Microfiber Cloth Method:
Fold a microfiber cloth into a pad and gently wipe the record surface using radial motions from center to edge. The cloth’s structure traps dust particles without scratching vinyl. For best results, use a clean section of cloth for each record to avoid transferring dirt between records. This method complements brush cleaning and provides additional dust removal when combined with the anti-static technique.
Turntable-Based Cleaning:
Some enthusiasts use their turntable itself for dry cleaning. Place the record on the platter and slowly rotate it while gently holding a brush against the surface. This method requires a steady hand and careful pressure control to prevent the stylus from contacting the record during the process. Never attempt this with the stylus in playing position—always lift the tonearm completely away from the platter.
” alt=”Vinyl record being gently cleaned with an anti-static brush using radial motions from center to outer edge on a cleaning mat”>
Wet Cleaning Techniques
When dry cleaning isn’t sufficient, wet cleaning methods remove embedded dirt, oils, and stubborn contaminants. This approach requires more careful execution to prevent water damage and ensure proper drying.
The Isopropyl Alcohol Solution:
Mix isopropyl alcohol with distilled water in a 1:1 ratio, creating a solution that effectively dissolves oils and removes contaminants without leaving residue. Apply the solution sparingly using a lint-free cloth, working in radial motions from center to edge. Allow the solution to sit for 30 seconds to penetrate stubborn dirt, then gently wipe with a clean, damp cloth using the same radial pattern. This approach balances cleaning effectiveness with safety, as pure isopropyl alcohol can sometimes affect certain vinyl formulations.
Specialized Vinyl Cleaning Solutions:
Manufacturers like This Old House recommend using pH-neutral cleaning solutions specifically formulated for vinyl records. These professional-grade products contain surfactants that lift dirt from grooves without damaging the vinyl material. Apply according to manufacturer instructions, typically using a spray bottle to mist the solution onto a cloth rather than directly onto the record. This prevents oversaturation and ensures controlled application.
The Spin-Clean Method:
Dedicated spin-clean machines provide thorough wet cleaning without requiring expensive vacuum equipment. These devices work by rotating the record through a bath of cleaning solution and brushes, then through a rinse bath. The spin action removes dirty solution while brushes agitate the surface to dislodge contaminants. This method proves particularly effective for heavily soiled records or large collections requiring regular maintenance.
Vacuum Cleaning Machines:
Professional vacuum record cleaners represent the ultimate cleaning solution, using suction to remove moisture and contaminants after wet cleaning. While expensive (typically $300-$1000+), these machines provide superior results and are popular among serious collectors. The vacuum action removes virtually all residual moisture, preventing water spots and ensuring rapid drying. If your collection exceeds 500 records, investing in a vacuum cleaner often proves worthwhile.
Deep Cleaning Solutions
Heavily soiled records, vintage finds, or records stored in poor conditions may require more intensive cleaning approaches. These methods should be used judiciously, as they involve extended contact with cleaning solutions.
Extended Soak Cleaning:
For extremely dirty records, prepare a shallow bath of distilled water mixed with a small amount of specialized vinyl cleaning solution. Submerge the record briefly (never for extended periods), then use a soft brush to gently agitate the surface and dislodge stubborn dirt. This technique works well for records with surface grime but requires careful drying afterward to prevent water damage. Always ensure the record is fully dried before playing to prevent stylus damage and potential mold growth.
Targeted Problem Area Treatment:
Some records develop sticky residue from old label glue or tape adhesive. Apply a small amount of isopropyl alcohol directly to the affected area using a cotton swab, gently working the residue loose. Wipe immediately with a dry cloth to prevent the alcohol from spreading to unaffected areas. This precision approach allows you to address specific problems without exposing the entire record to moisture.
Mold and Mildew Removal:
Records stored in damp environments may develop mold or mildew, identifiable by white or greenish spots and musty odors. Clean affected records using a solution of equal parts white vinegar and distilled water, applied with a soft cloth. The vinegar’s acidity inhibits mold growth while the solution cleans the vinyl surface. After treatment, ensure thorough drying and store records in a climate-controlled environment with moderate humidity levels (30-50% is ideal).
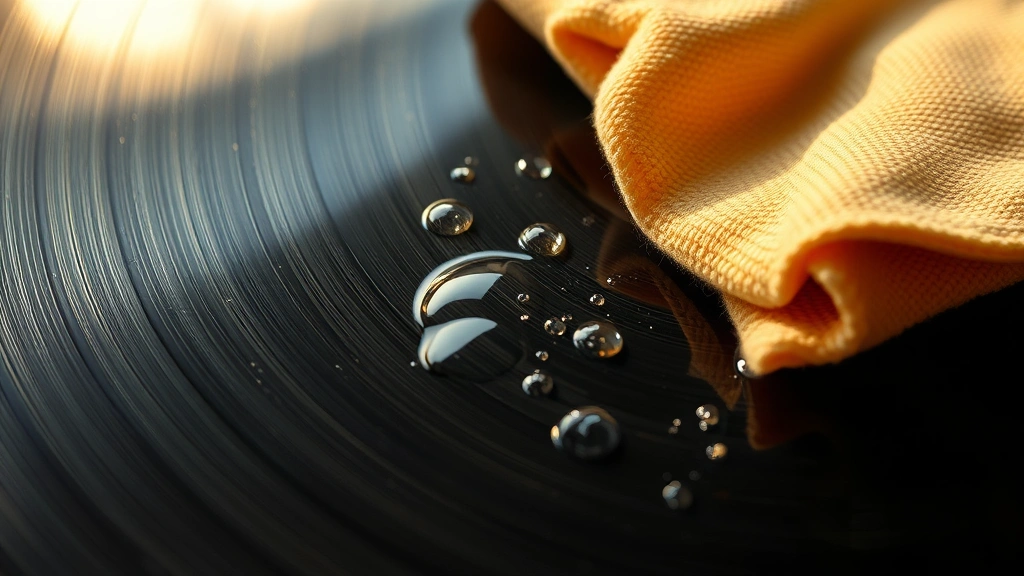
” alt=”Close-up of vinyl record surface showing proper radial groove pattern with moisture droplets being carefully removed by lint-free cloth”>
Drying and Storage Best Practices
Improper drying causes as much damage as inadequate cleaning, making this step equally critical to your record maintenance routine. Water left on vinyl surfaces can warp the material, create water spots that interfere with playback, and promote mold growth.
Air Drying Techniques:
After wet cleaning, stand records vertically in a record rack in a warm, dry environment with good air circulation. Avoid direct sunlight, which can cause warping and damage the vinyl over time. Allow records to air dry completely before playing—typically 2-4 hours depending on humidity levels and the amount of moisture used during cleaning. Never use heat sources like hair dryers or heating pads, as rapid moisture evaporation can cause warping.
Preventing Water Spots:
Water spots form when mineral deposits remain after moisture evaporates. This is why distilled water is essential—it contains no minerals to leave residue. If water spots do develop, use a cloth slightly dampened with distilled water to gently wipe the affected area, then dry immediately with a lint-free cloth. This prevents spot expansion and maintains clear playback quality.
Storage Environment Optimization:
Store cleaned records in acid-free sleeves to prevent deterioration and dust accumulation. Keep records upright rather than stacked flat, which can cause warping under their own weight. Maintain consistent temperature between 60-70°F and humidity between 30-50%, similar to conditions you’d maintain for protecting leather furniture. Avoid basements and attics prone to temperature fluctuations or moisture problems. A climate-controlled closet or bookshelf in a living area typically provides ideal storage conditions.
Sleeve Protection:
Original sleeves add value to vintage records but can shed paper particles that contaminate the vinyl. Consider using outer protective sleeves while keeping original sleeves intact. When cleaning your storage area, do so gently to avoid disturbing records and creating dust clouds that settle on your collection.
Preventative Maintenance Tips
Consistent preventative care reduces the frequency and intensity of deep cleaning required, protecting your collection and maintaining optimal sound quality.
Pre-Play Inspection and Cleaning:
Before playing any record, perform a quick dry cleaning with an anti-static brush. This 30-second ritual removes dust accumulated since the last play and prevents stylus contamination. Many audiophiles make this a habit, similar to how you might inspect equipment before performing routine home maintenance. This simple step dramatically extends record lifespan and maintains consistent audio quality.
Stylus Maintenance:
Your turntable’s stylus picks up debris from records and transfers it to future plays. Clean your stylus regularly using a dedicated stylus cleaner or a soft brush, moving from back to front (the direction it moves during playback). A contaminated stylus causes more damage than dirty records, so this maintenance step proves equally important as record cleaning.
Environmental Controls:
Maintain stable temperature and humidity levels in your storage area. Fluctuations cause vinyl to expand and contract, potentially warping records or opening small cracks that spread during playback. Use a hygrometer to monitor humidity and a dehumidifier if necessary. This preventative approach eliminates many potential problems before they develop.
Handling Best Practices:
Always hold records by the edges and label area, never touching the playing surface with bare hands. Skin oils transfer to vinyl and accumulate in grooves, requiring more frequent cleaning. Develop good habits when handling your collection to minimize contamination and reduce cleaning frequency.
Regular Inventory Rotation:
Playing records in rotation rather than repeatedly playing favorites distributes wear evenly across your collection. Highly played records require more frequent cleaning due to increased dust attraction and stylus contact. If you have favorite records you play regularly, maintain them with extra care and consider purchasing backup copies of truly irreplaceable recordings.
FAQ
Can I use regular water to clean vinyl records?
No, tap water contains minerals and chemicals that leave residue on vinyl surfaces, causing water spots and degrading sound quality. Always use distilled water, which lacks these contaminants and dries cleanly without leaving deposits. Mineral water or filtered water may still contain trace minerals—distilled water is the only acceptable option.
How often should I clean my vinyl records?
Perform light dry cleaning before each play session to remove loose dust. More thorough wet cleaning depends on storage conditions and usage frequency—typically every 6-12 months for regularly played records or when you notice increased surface noise. Records stored in poor conditions may require more frequent cleaning.
Will cleaning my records damage them?
Proper cleaning with appropriate materials and techniques does not damage vinyl records. Damage occurs from using wrong materials (harsh chemicals, abrasive cloths), applying excessive pressure, or improper drying. Follow the techniques outlined in this guide and use recommended products to ensure safe, effective cleaning.
What’s the difference between isopropyl alcohol and specialized vinyl cleaning solutions?
Isopropyl alcohol effectively removes oils and light contamination but may affect certain vinyl formulations at high concentrations. Specialized solutions are pH-neutral and formulated specifically for vinyl, making them safer for all record types. For regular cleaning, isopropyl alcohol works well; for valuable or vintage records, use specialized solutions.
Can I use a record cleaning machine instead of hand cleaning?
Yes, record cleaning machines provide thorough, consistent results. Vacuum machines offer superior cleaning and drying but require significant investment. Spin-clean devices offer good results at moderate cost. Hand cleaning remains effective and requires only basic supplies, making it ideal for casual collectors or small collections.
How do I know if my record is clean enough to play?
Clean records should have no visible dust or debris on the surface. Hold the record up to a light source and inspect the grooves—any visible particles indicate more cleaning is needed. Listen for surface noise during playback; excessive crackling or popping suggests the need for deeper cleaning.
Should I clean new records straight from the store?
Yes, even new records often accumulate dust during manufacturing and storage. A light dry cleaning before first play removes factory dust and prepares the record for optimal sound. This initial cleaning sets a good foundation for long-term maintenance.
Related Posts

Superscript in Google Docs: Expert Tips

Strikethrough in Excel: Easy Steps for Beginners
