
Perfect Boiled Shrimp: Chef-Approved Method
Perfect Boiled Shrimp: Chef-Approved Method
Boiling shrimp might seem like one of the simplest cooking tasks, yet countless home cooks struggle to achieve that perfect tender texture with vibrant pink color. The difference between rubbery, overcooked shrimp and succulent, perfectly cooked seafood often comes down to timing, temperature, and technique. Whether you’re preparing appetizers for a dinner party or creating a casual weeknight meal, mastering the art of boiling shrimp will elevate your cooking game and impress your guests.
This comprehensive guide walks you through every step of the process, from selecting quality shrimp to achieving that restaurant-quality result in your own kitchen. You’ll learn professional secrets that chefs use daily, troubleshooting tips for common mistakes, and variations that allow you to customize your shrimp to match any cuisine or preference. By the end, you’ll have the confidence to boil shrimp perfectly every single time.
Selecting Quality Shrimp for Boiling
The foundation of perfectly boiled shrimp starts at the market. Fresh or frozen shrimp both work beautifully, but understanding the differences helps you make the best choice for your needs. When shopping for shrimp, look for those labeled as “wild-caught” or “sustainably farmed” from reputable sources. The size matters significantly when boiling—shrimp are categorized by count per pound, ranging from colossal (under 10 per pound) to tiny (over 60 per pound).
For boiling, medium to large shrimp (16-20 or 21-25 per pound) work best because they cook evenly and develop excellent texture. Avoid pre-cooked shrimp if you’re planning to boil them, as they’ll become mushy. Fresh shrimp should smell briny and oceanic, never fishy or ammonia-like. If buying frozen shrimp, thaw them in the refrigerator overnight or under cold running water for 15-20 minutes. Check out our FixWise Hub Blog for more kitchen preparation techniques.
Deveining shrimp is optional but recommended for appearance and texture. The dark vein running along the back is the digestive tract and completely harmless, but many people prefer removing it. You can devein before or after boiling—post-boiling deveining is often easier since the shell helps you grip the shrimp.
Essential Equipment and Ingredients
Boiling shrimp requires minimal equipment, making this an accessible cooking method for everyone. You’ll need a large pot—at least 4-5 quarts—with a lid. A colander for draining is essential, and an ice bath container (or large bowl filled with ice water) helps stop the cooking process immediately. A slotted spoon or spider strainer makes removing cooked shrimp easier and safer than pouring directly into a colander.
The ingredient list is beautifully simple: water, salt, and optional seasonings. For every pound of shrimp, use approximately 2 quarts of water and 2 tablespoons of salt. This creates a brine similar to ocean water, which seasons the shrimp from the inside out. Many chefs add Old Bay seasoning, bay leaves, lemon slices, garlic, or peppercorns to the cooking liquid for enhanced flavor. Some prefer adding vinegar or beer for complexity.
Having a kitchen thermometer ensures you maintain proper water temperature throughout cooking. A timer is crucial—even 30 seconds of overcooking can transform tender shrimp into rubbery disappointments. Many professional kitchens use ice baths prepared before cooking begins, ensuring immediate cooling when shrimp reach perfect doneness.
Step-by-Step Boiling Process
Step 1: Prepare Your Setup Before heating water, prepare your ice bath by combining ice with cold water in a large bowl. Set it nearby where you can quickly access it. Measure and prepare any seasonings you plan to use. This preparation prevents scrambling once the water reaches a boil.
Step 2: Fill and Heat Your Pot Fill your pot with the calculated amount of water—approximately 2 quarts per pound of shrimp. Bring the water to a rolling boil over high heat. Once boiling, add your salt (about 2 tablespoons per quart) and any other seasonings like bay leaves, peppercorns, or lemon slices. Allow the seasoned water to return to a vigorous boil for 1-2 minutes, ensuring flavors distribute evenly.
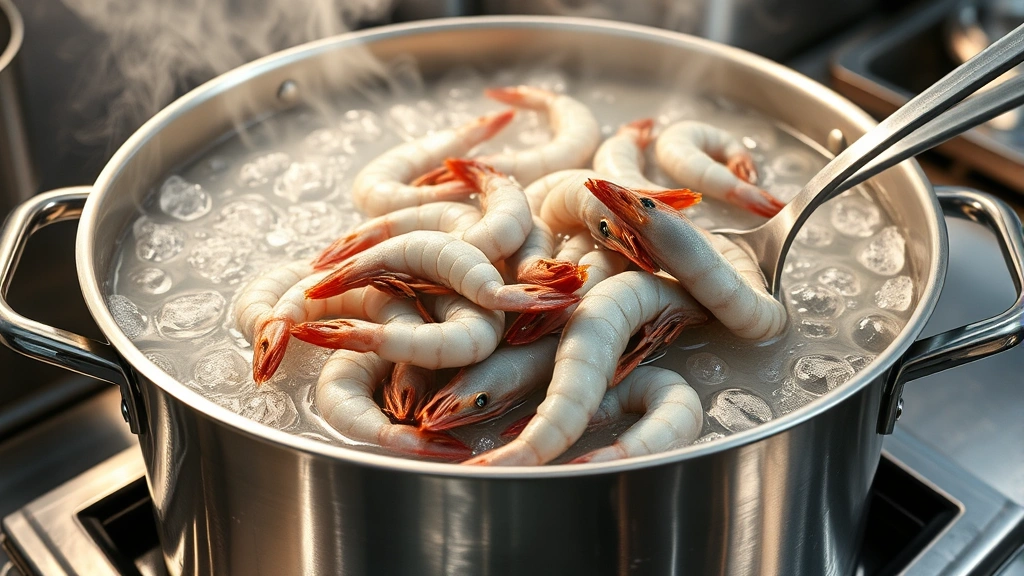
Step 3: Add Shrimp Carefully Gently lower your shrimp into the boiling water using a slotted spoon or by carefully pouring them in. Avoid dropping them from height, which can cause splashing and uneven cooking. Stir gently with a wooden spoon to ensure all shrimp are submerged and cooking evenly. The water temperature will drop when cold shrimp enter the pot—this is completely normal.
Step 4: Monitor Cooking Time Start your timer immediately after adding shrimp. The water will return to a boil within 2-3 minutes. Once boiling resumes, your timer for actual cooking begins. This is where precision matters most. Set a timer based on shrimp size: medium shrimp (21-25 per pound) typically need 3-4 minutes, while large shrimp (16-20 per pound) need 4-5 minutes. Colossal shrimp may require 5-7 minutes.
Step 5: Check for Doneness Perfectly cooked shrimp have a firm, opaque pink color throughout, with tails that have turned from gray to bright pink. The flesh should be opaque and slightly firm when gently pressed. Remove one shrimp and cut it lengthwise to verify the center is opaque—no translucent sections should remain. If unsure, remove shrimp slightly early rather than risk overcooking.
Timing and Temperature Guidelines
Temperature control separates amateur cooks from professionals when boiling shrimp. Maintain a gentle rolling boil—not a violent, aggressive boil that can cause shrimp to bounce around and cook unevenly. If your water is boiling too vigorously, reduce heat slightly to maintain steady bubbling. The ideal water temperature hovers around 212°F (100°C) at sea level.
Timing varies based on several factors: shrimp size, whether they’re fresh or frozen, and how many shrimp you’re cooking. When cooking large quantities, the water temperature drops more significantly, potentially extending cooking times by 1-2 minutes. Here’s a reliable timing guide:
- Tiny shrimp (51-60 per pound): 1-2 minutes
- Small shrimp (41-50 per pound): 2-3 minutes
- Medium shrimp (31-40 per pound): 3-4 minutes
- Large shrimp (16-30 per pound): 4-5 minutes
- Colossal shrimp (under 15 per pound): 5-7 minutes
If using frozen shrimp that haven’t been thawed, add 1-2 minutes to these times. For a batch of frozen shrimp, you might want to review our guide on proper food preparation techniques. The moment shrimp turn uniformly pink and opaque, they’re done. Overcooking by even 30 seconds transforms them from tender to rubbery—this is not an exaggeration.
Cooling and Storage Methods
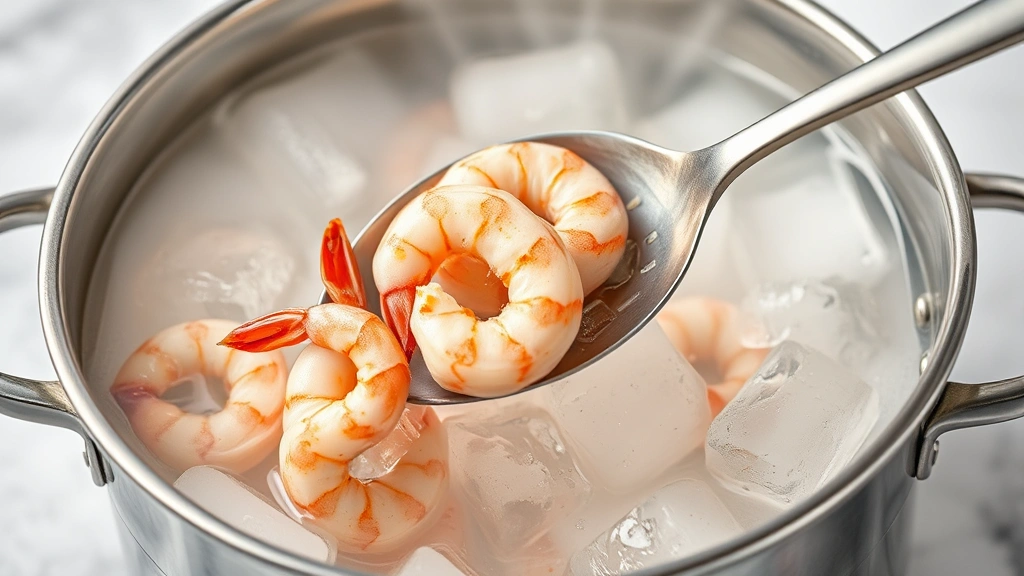
The cooling process is as important as cooking itself. The moment your shrimp reach perfect doneness, remove them immediately using a slotted spoon and plunge them into your prepared ice bath. This stops the cooking process instantly, preventing carryover heat from overcooking them. Gently stir the shrimp in the ice bath for 30-60 seconds to ensure even cooling.
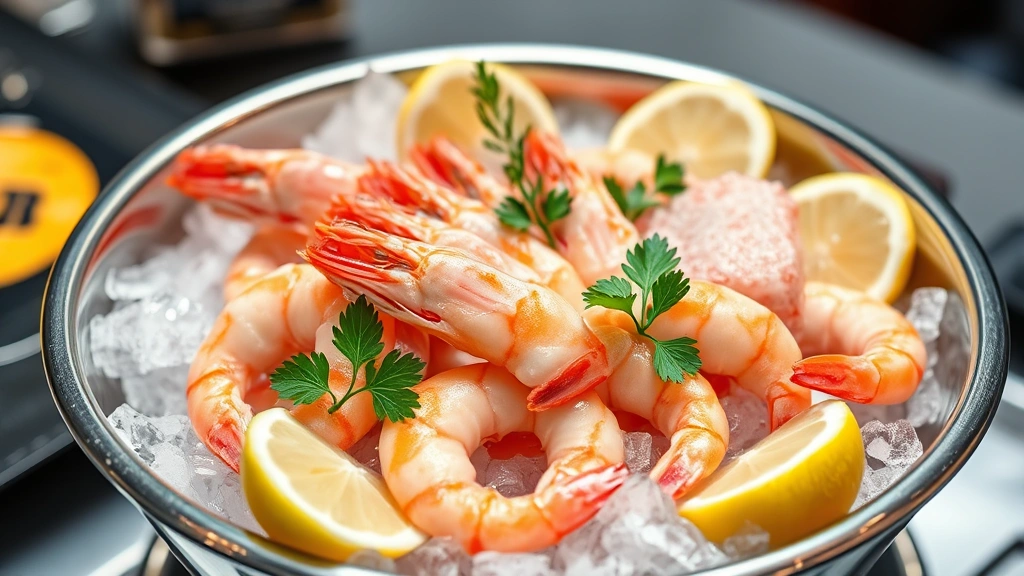
Once cooled, drain the shrimp in a colander and pat dry with paper towels. Excess moisture can lead to bacterial growth during storage. For immediate use, arrange cooled shrimp on a serving platter with ice underneath to keep them chilled. For longer storage, place cooled shrimp in an airtight container with a damp paper towel on top to prevent them from drying out.
Properly stored boiled shrimp keep refrigerated for 3-4 days. You can also freeze cooked shrimp for up to 3 months—place them on a baking sheet to freeze individually first, then transfer to freezer bags to prevent clumping. When thawing frozen cooked shrimp, do so in the refrigerator overnight or under cold running water, never at room temperature.
Flavor Variations and Seasoning Ideas
While simple salt boiling produces delicious shrimp, creative seasoning elevates the dish to restaurant-quality. The most famous seasoning blend is Old Bay, which includes paprika, celery salt, mustard seed, and other spices. Add 2-3 tablespoons to your cooking water for classic Chesapeake Bay flavor. This pairs beautifully with kitchen preparation for entertaining guests.
Cajun Boil: Add 2 bay leaves, 1 tablespoon peppercorns, 1 tablespoon coriander seeds, 1 teaspoon cayenne pepper, 4 crushed garlic cloves, and 2 sliced lemons to the water. This creates bold, spicy shrimp perfect for traditional Low Country boils.
Mediterranean Style: Include 3-4 sprigs fresh thyme, 2 bay leaves, 1 teaspoon fennel seeds, 4 crushed garlic cloves, and 1 sliced lemon. This approach yields shrimp with subtle herbal notes.
Asian-Inspired: Add 3 slices fresh ginger, 4 crushed garlic cloves, 2 star anise, 1 cinnamon stick, and a splash of soy sauce to the cooking water. Finish cooked shrimp with a drizzle of sesame oil.
Spicy Garlic: Combine 8-10 crushed garlic cloves, 1-2 teaspoons red pepper flakes, 2 bay leaves, and 1 sliced lemon. Perfect for shrimp served with garlic aioli or cocktail sauce.
Common Mistakes to Avoid
Understanding what goes wrong helps you avoid costly mistakes. The most common error is overcooking—shrimp cook remarkably quickly, and just 30 seconds too long transforms them irreversibly. Use a timer, set it early, and check frequently as the time approaches.
Another mistake is using insufficiently salted water. Shrimp need that salty brine to season properly from the inside. Undersalted cooking water results in bland shrimp that no amount of post-cooking seasoning can fix. Aim for water that tastes noticeably salty, similar to ocean water.
Skipping the ice bath allows carryover cooking to continue, ruining your perfectly timed batch. Even sitting at room temperature for a few minutes can overcook shrimp. Always prepare your ice bath before cooking begins and plunge shrimp immediately upon reaching doneness.
Overcrowding the pot is a frequent issue, especially when cooking for groups. Too many shrimp in the water causes temperature drops that extend cooking times unpredictably. Work in batches if necessary—it’s better to cook twice than ruin a large batch. For entertaining tips, check out our guide to hosting.
Using pre-cooked shrimp when you plan to boil them results in mushy, unappetizing texture. Always verify your shrimp are raw before starting. Raw shrimp appear gray or translucent; cooked shrimp are already pink.
Serving Suggestions
Perfectly boiled shrimp are versatile enough for countless applications. Serve them chilled as appetizers with cocktail sauce, lemon wedges, and fresh herbs. The simplicity of properly cooked shrimp allows quality ingredients to shine.
Create a shrimp platter by arranging cooled shrimp around a bowl of sauce on crushed ice. Offer multiple sauce options: classic cocktail sauce, spicy remoulade, garlic aioli, or cilantro lime dressing. This presentation works beautifully for parties and special occasions.
Incorporate boiled shrimp into salads for protein-packed meals. Toss chilled shrimp with mixed greens, cherry tomatoes, cucumber, avocado, and a light vinaigrette. The tender shrimp add luxurious texture without overwhelming delicate greens.
Use boiled shrimp in pasta dishes, risottos, or grain bowls. Since they’re already cooked, simply toss them in at the end to warm through and prevent overcooking. This approach works well with pairing shrimp with complementary beverages.
Make shrimp rolls by combining cooled shrimp with mayo, celery, and fresh herbs, then serving on toasted buns. This classic preparation celebrates the shrimp’s natural sweetness without competing flavors.
FAQ
How do I know when boiled shrimp are done?
Perfectly cooked shrimp are uniformly pink throughout with opaque flesh. They should curl slightly and feel firm (not mushy) when gently pressed. Cut one shrimp in half—the center should be completely opaque with no translucent sections remaining. If you see any gray or transparent areas, cook for another 30-60 seconds.
Can I boil frozen shrimp without thawing?
Yes, you can boil frozen shrimp directly, though thawing first produces more even cooking. If boiling frozen, add 1-2 minutes to standard cooking times and stir occasionally to prevent clumping. Thawed shrimp cook more predictably and achieve better texture.
Why did my boiled shrimp turn out rubbery?
Rubbery shrimp result from overcooking. Shrimp cook very quickly—even 30-60 seconds too long causes this problem. Set a timer, check frequently as it approaches the end time, and remove shrimp the moment they turn completely pink. Using an ice bath immediately after cooking also prevents carryover heat from extending cooking time.
Should I devein shrimp before or after boiling?
Both methods work, but deveining after boiling is often easier. The shell helps you grip the shrimp, and the vein is more visible on cooked shrimp. However, if appearance matters for your dish, devein before cooking. The vein’s contents are harmless—this is purely a texture and appearance preference.
How long can I store boiled shrimp?
Properly stored boiled shrimp last 3-4 days in the refrigerator in an airtight container. For longer storage, freeze them for up to 3 months. Freeze individually on a baking sheet first, then transfer to freezer bags. Thaw in the refrigerator overnight before using.
What’s the best way to season boiling water?
Use approximately 2 tablespoons of salt per quart of water—this creates a brine similar to ocean water that seasons shrimp from the inside. Add Old Bay seasoning, bay leaves, lemon slices, garlic, or peppercorns for additional flavor. Bring seasoned water to a boil before adding shrimp to ensure flavors distribute evenly.
Can I reuse boiling water for multiple batches?
Yes, but add fresh salt and seasonings for each batch. If using the same water for multiple batches, strain it first to remove any debris or sediment. However, starting with fresh water ensures consistent seasoning and cleaner results.
How many shrimp per person should I boil?
Plan for 1/2 to 3/4 pound of shrimp per person as an appetizer or 3/4 to 1 pound per person as a main course. This provides approximately 8-12 large shrimp per person for appetizers or 12-15 for main courses, depending on size.
Related Posts

Superscript in Google Docs: Expert Tips

Strikethrough in Excel: Easy Steps for Beginners
