
How to Propagate Snake Plant: Expert Tips
How to Propagate Snake Plant: Expert Tips for Thriving Indoor Gardens
Snake plants are the overachievers of the houseplant world. They’re nearly indestructible, require minimal fussing, and somehow manage to look effortlessly elegant in any corner of your home. But here’s the real magic: propagating them is so straightforward that even first-time plant parents can succeed. Whether you want to multiply your collection, gift cuttings to friends, or simply explore the rewarding process of growing new plants from existing ones, learning how to propagate snake plant opens up a whole new dimension of indoor gardening.
The beauty of snake plant propagation lies in its simplicity and reliability. Unlike finicky tropical plants that demand perfect humidity and lighting conditions, snake plants are forgiving partners in this botanical adventure. With just a few basic materials and a bit of patience, you’ll have new plants ready to brighten up your space in just a few weeks. This guide walks you through every method, from water propagation to soil techniques, ensuring you have all the knowledge needed to succeed.
Understanding Snake Plant Basics
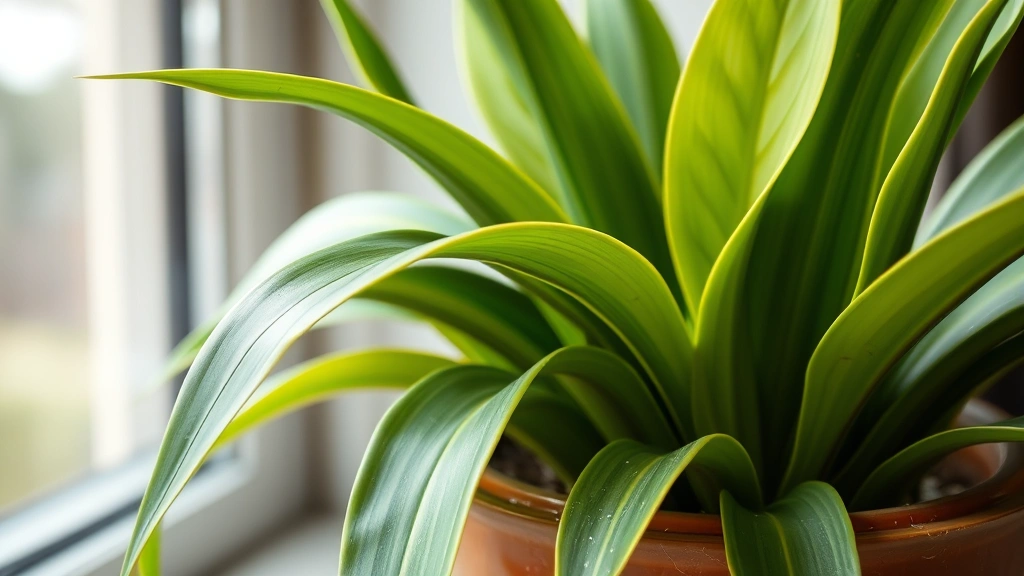
Before diving into propagation techniques, it’s worth understanding what makes snake plants tick. These architectural beauties, scientifically known as Sansevieria trifasciata, are native to West African tropical forests. They’ve evolved to thrive in dry conditions with minimal water and light—a survival strategy that translates perfectly to our modern homes and apartments.
Snake plants store water in their thick, waxy leaves, which is why they can go weeks without watering. This same water-storage capability means they’re remarkably resilient during propagation. A single leaf cutting can develop roots and eventually grow into a completely independent plant. Understanding this natural resilience is key to approaching propagation with confidence rather than anxiety.
The plant’s structure includes both above-ground foliage and underground rhizomes—thick, horizontal stems that spread beneath the soil. These rhizomes are essentially the plant’s storage and reproduction center. Some propagation methods leverage the leaves, while others work directly with the rhizome system. Both approaches work brilliantly; your choice depends on your timeline and preferred method.
When to Propagate Your Snake Plant
Timing matters, though snake plants are forgiving enough that they’ll cooperate almost year-round. Spring and early summer represent the ideal window for propagation. During these seasons, your mother plant is naturally entering a growth phase, producing new leaves and generating energy. This vigor translates to faster root development in your propagations and more successful establishment overall.
That said, snake plants aren’t strict about scheduling. Winter propagation works too; it just takes a bit longer. If you’re propagating in colder months, expect an additional 2-4 weeks compared to spring propagation. The key is providing adequate light and warmth, which we’ll discuss in the aftercare section.
Before propagating, ensure your mother plant is healthy and mature. Young plants less than a year old may struggle to share resources for propagation. A well-established plant with multiple mature leaves is your ideal candidate. If you’re uncertain whether your plant is ready, observe it for a full growing season—you’ll quickly recognize when it’s thriving and ready to share.
Water Propagation Method
Water propagation is the most visually rewarding method and offers the advantage of watching root development in real-time. Here’s the step-by-step process:
What You’ll Need:
- Clean, sharp knife or pruning shears
- Glass jar or clear container
- Filtered or distilled water
- Small pebbles or glass beads (optional but helpful)
- Bright, indirect light location
The Process:
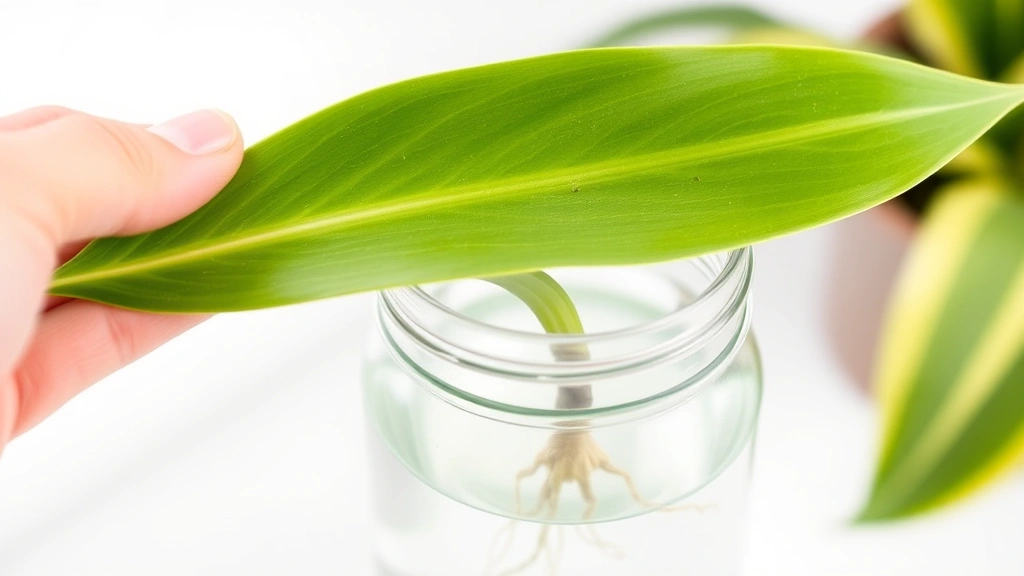
- Select and cut: Choose a healthy leaf from the outer part of your plant. Using a sterilized knife, cut the leaf as close to the base as possible. You want the maximum length of leaf material since this provides more resources for root development. If you’re working with a very long leaf, you can cut it into 2-3 inch segments, though longer pieces root more reliably.
- Prepare your container: Fill a clean glass jar with filtered water. The container should be tall enough to support your cutting without it touching the bottom. Some people add a few pebbles to the bottom to help stabilize the cutting, but this is entirely optional.
- Position the cutting: Place your leaf cutting in the water, cut-end down. About one-third to one-half of the leaf should be submerged. The key is keeping the cut end in contact with water while allowing the upper portion to remain dry. This prevents rot while promoting root development at the submerged end.
- Provide light: Position your jar in a location with bright, indirect light. A windowsill that receives morning sun or a spot near a grow light works beautifully. Avoid direct afternoon sun, which can cause algae growth in the water.
- Change water regularly: Every 3-5 days, replace the water with fresh filtered water. This prevents bacterial growth and ensures adequate oxygen for developing roots. You’ll notice tiny root buds forming along the submerged end within 2-3 weeks.
- Wait for robust roots: Once roots are 1-2 inches long and clearly established, your propagation is ready for the next phase. This typically takes 4-8 weeks depending on conditions and season.
Water propagation creates an ideal environment for root development because roots can access oxygen directly from the water and water medium simultaneously. However, roots developed in water are slightly different from soil roots, so transitioning them to soil requires a gentle touch—we’ll cover this in the aftercare section.
Soil Propagation Technique
If you prefer to skip the water phase and go straight to soil, soil propagation works wonderfully too. Many experienced propagators actually prefer this method because it eliminates the transition shock that sometimes occurs when moving water-rooted cuttings to soil.
Materials Needed:
- Well-draining potting mix (cactus or succulent mix is ideal)
- Small pot with drainage holes
- Sterilized knife
- Perlite or sand (optional, for added drainage)
- Spray bottle for misting
Step-by-Step Instructions:
- Prepare your soil: Fill a small pot with well-draining potting mix. Snake plants prefer lean, gritty soil over rich, moisture-retentive mixes. If your standard potting soil feels dense, mix in 25-30% perlite or coarse sand to improve drainage. This prevents the most common propagation killer: soggy soil leading to rot.
- Create a planting hole: Using a pencil or your finger, make a small hole in the soil about 1-2 inches deep. This prevents your cutting from rubbing against the soil as you insert it, which can damage delicate tissue.
- Insert the cutting: Place your leaf cutting into the hole, cut-end down. Gently firm the soil around it so the cutting stands upright. About one-third of the leaf should be buried in soil.
- Initial moisture: Lightly mist the soil and cutting with water. The soil should be slightly moist but never soggy. This is crucial—overwatering is the primary reason soil propagations fail.
- Provide warmth and light: Position the pot in a warm location (65-75°F is ideal) with bright, indirect light. A heating mat can accelerate root development if your home is cool.
- Minimal watering: Here’s where patience becomes essential. Water only when the soil feels completely dry to the touch—typically every 10-14 days. Mist lightly rather than pouring water directly onto the cutting. Many propagators mist every few days instead of traditional watering, which maintains moisture without creating waterlogged conditions.
- Root development timeline: Expect roots to develop within 3-6 weeks. You’ll know roots are established when new growth appears at the base of the cutting or when you gently tug the cutting and feel resistance.
Soil propagation often feels slower initially compared to water propagation, but roots that develop in soil from the start are immediately adapted to their permanent medium. This translates to faster, stronger growth once roots are established.
Leaf Cuttings vs. Rhizome Division
Snake plant propagation offers two distinct approaches, each with advantages. Understanding the differences helps you choose the method that best suits your goals and timeline.
Leaf Cuttings (What We’ve Discussed)
Leaf cuttings are the most popular propagation method because they’re accessible and visually satisfying. A single leaf can become a complete plant. However, there’s one important caveat: if your snake plant is a variegated variety (like the popular yellow-bordered cultivars), leaf cuttings will produce solid green plants. The variegation patterns are determined by the rhizome, not the leaf. If you want to maintain variegation, you’ll need to use rhizome division instead. If you’re working with solid green varieties, leaf cuttings are perfect.
Leaf cuttings take longer—typically 2-3 months before you have a recognizable young plant—but they require minimal intervention and rarely fail if you follow basic care guidelines.
Rhizome Division
Rhizome division is the method to use if you want faster results or need to preserve variegation. Here’s how it works:
- Remove the mother plant: Gently remove your mature snake plant from its pot and examine the root system. You’ll see thick, horizontal stems beneath the soil—these are the rhizomes.
- Identify division points: Look for natural separation points or areas where the rhizome has multiple growing points. These are ideal places to divide.
- Divide carefully: Using a sterilized knife, cut the rhizome so each section has at least one growing point (a spot where leaves emerge) and some roots attached. Each division should be 2-3 inches long.
- Plant immediately: Place each rhizome section into its own pot with well-draining soil. Bury it about half an inch deep. Water lightly and position in bright, indirect light.
- Faster growth: Because rhizome divisions already have an established root system and growing points, new leaves typically emerge within 2-4 weeks. This is significantly faster than leaf propagation.
Rhizome division is more invasive to the mother plant, so it’s best reserved for situations where you want multiple plants quickly or need to preserve variegation. For casual propagators, leaf cuttings offer a less disruptive approach.
Aftercare and Growth Timeline
Propagation success doesn’t end when roots develop. The transition from propagation vessel to independent plant requires thoughtful aftercare. Here’s what to expect and how to support your new plants through each phase.
Transitioning Water-Rooted Cuttings to Soil
Once your water-propagated cutting has developed 1-2 inch roots, it’s ready to transition to soil. This step is important because roots developed in water are slightly different from soil roots. To ease the transition:
- Prepare a small pot with moist (not wet) well-draining soil
- Gently plant the cutting, keeping the water-developed roots intact
- Maintain slightly higher moisture for the first week—mist daily or water every 2-3 days
- Gradually reduce watering frequency as the plant adjusts
- By week two, return to normal snake plant watering (every 10-14 days)
Some propagators skip the water phase entirely and move directly to soil propagation, which eliminates this transition. Both approaches work; choose based on your preference.
Timeline Expectations
Understanding realistic timelines prevents disappointment and helps you know when to investigate potential problems:
- Weeks 1-2: No visible changes. Roots are developing below the soil or in the water. Patience is essential.
- Weeks 2-4: Tiny root buds appear (water propagation) or soil remains stable (soil propagation). Continue consistent care.
- Weeks 4-8: Robust roots develop. New growth may appear at the base. Your propagation is succeeding.
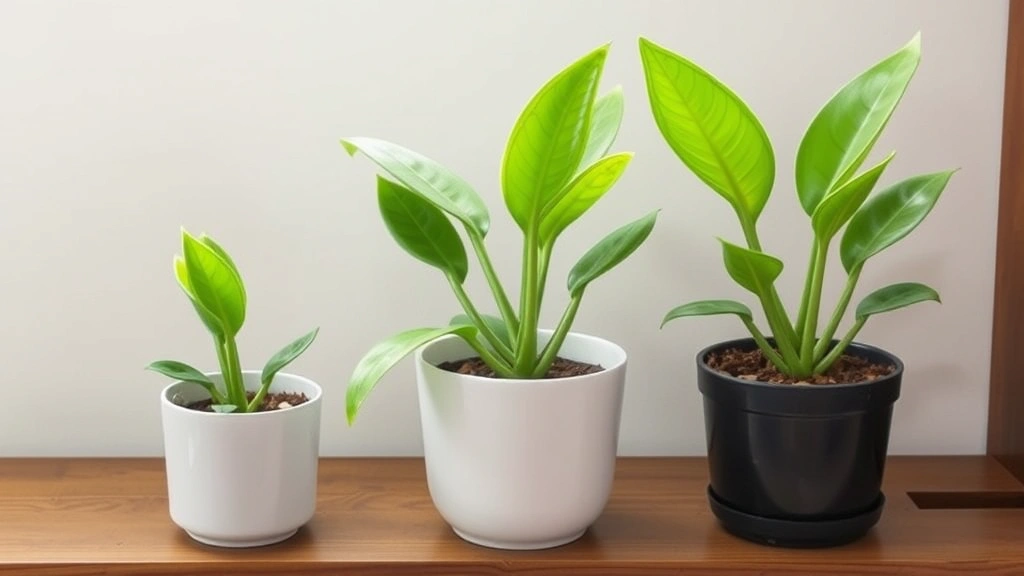
- Weeks 8-12: New leaves emerge from the base of the cutting. Your propagation is now clearly a young plant.
- 3-6 months: The young plant establishes itself and begins growing more vigorously. It’s ready for a larger pot or can remain in its current home for another season.
Rhizome divisions follow a faster timeline, typically showing new growth within 2-4 weeks rather than 6-12 weeks for leaf cuttings.
Ongoing Care for Young Plants
Once your propagation has established leaves and a healthy root system, treat it like a young snake plant:
- Light: Bright, indirect light is ideal. Snake plants tolerate lower light, but propagations benefit from strong light to build vigor.
- Watering: Allow soil to dry completely between waterings. In winter, reduce frequency further.
- Temperature: Keep temperatures between 60-80°F. Avoid cold drafts.
- Humidity: Snake plants don’t require high humidity. Normal household humidity is perfect.
- Fertilizing: Wait until the plant is 3-4 months old before fertilizing. Use a diluted, balanced fertilizer during the growing season.
Troubleshooting Common Issues
Even with careful attention, propagation sometimes encounters obstacles. Here’s how to diagnose and address common problems:
No Root Development After 8 Weeks
If your propagation shows no signs of rooting, investigate these factors:
- Temperature: Snake plants root slowly in cold conditions. If your space is below 65°F, roots develop more slowly. Consider a heating mat to accelerate the process.
- Insufficient light: Propagations in dim conditions develop roots very slowly. Move your cutting to a brighter location.
- Overwatering (soil propagation): Soggy soil prevents root development. Ensure soil dries out between waterings.
- Poor water quality (water propagation): If you’re using heavily chlorinated water, try switching to filtered or distilled water.
Mushy, Translucent Leaves
This indicates rot, usually from overwatering or poor air circulation. Remove the affected cutting immediately. If you’re propagating in water, change the water daily until the cutting recovers or discard it and start fresh. If in soil, allow it to dry out completely and improve air circulation with a small fan.
Yellowing or Browning Leaves
Minor yellowing at the base of a cutting is normal as it redirects energy to root development. However, widespread yellowing or browning suggests issues:
- Overwatering: The most common culprit. Reduce watering frequency significantly.
- Poor drainage: Ensure your soil mix is well-draining. Add perlite if needed.
- Temperature stress: If your space is cold or has temperature fluctuations, move the propagation to a more stable location.
Slow Growth After Rooting
If your propagation roots successfully but grows very slowly afterward:
- Ensure it’s receiving adequate light—at least 6-8 hours of bright, indirect light daily
- Check that you’re not overwatering, which can cause root issues
- Confirm the pot has adequate drainage
- Wait a bit longer—young propagations naturally grow slowly in their first months
If you’re interested in expanding your propagation skills beyond snake plants, you might explore how to propagate pothos, another incredibly rewarding houseplant. Or if you’re looking to expand your gardening beyond houseplants, learning how to grow ginger introduces you to edible propagation, or how to grow onions offers another engaging gardening project. For those interested in preserving plant materials in different ways, how to dry flowers provides beautiful preservation techniques, and understanding how to store ginger complements your broader gardening knowledge.
Frequently Asked Questions
How long does it take to propagate a snake plant?
Leaf cuttings typically take 2-3 months to develop into recognizable young plants with established roots and new growth. Rhizome divisions are faster, showing results within 4-8 weeks. The exact timeline depends on temperature, light, and season—spring propagations move faster than winter ones.
Can you propagate a snake plant from a single leaf?
Absolutely. A single leaf is all you need. The leaf will develop roots and eventually produce a complete new plant. This is the most popular and accessible propagation method for beginners.
Will variegated snake plant propagations stay variegated?
No, leaf cuttings from variegated plants will produce solid green plants. The variegation pattern is determined by the rhizome system, not the leaf. To maintain variegation, use rhizome division instead of leaf cuttings.
What’s the best soil mix for propagating snake plants?
Use a well-draining cactus or succulent mix, or create your own by combining standard potting soil with 25-30% perlite or coarse sand. Snake plants absolutely require excellent drainage—this is non-negotiable for successful propagation.
Can you propagate snake plants in water indefinitely?
Water-propagated snake plants can survive long-term in water, but they’re not optimized for it. Roots developed in water are different from soil roots. Most propagators transition water-rooted cuttings to soil once roots are established. If you prefer water propagation long-term, change the water frequently and consider adding liquid fertilizer since water doesn’t provide nutrients like soil does.
How often should you water snake plant propagations?
This depends on your propagation method. For soil propagations, water only when soil is completely dry—typically every 10-14 days. For water propagations, change the water every 3-5 days. Overwatering is the most common cause of propagation failure, so err on the side of less rather than more.
Do snake plant propagations need special lighting?
Bright, indirect light is ideal but not absolutely required. Snake plants tolerate lower light, but propagations benefit from strong light (6-8 hours daily) to build vigor and encourage faster growth. A south or west-facing window or positioning near a grow light works beautifully.
What temperature is best for propagating snake plants?
Snake plants root best between 65-75°F. They’ll propagate in cooler temperatures but much more slowly. Avoid temperatures below 50°F, which essentially stops root development. If your home is cool, a heating mat beneath your propagation vessel accelerates the process significantly.
Related Posts

How Long to Boil Lobster Tails: Cooking Guide

How Long to Fly from New York to London? Travel Times
