
How to Make Cottage Cheese: Expert Guide
How to Make Cottage Cheese: Expert Guide
There’s something deeply satisfying about making your own cottage cheese at home. Unlike many dairy products that seem shrouded in culinary mystery, cottage cheese is surprisingly straightforward to create with just a handful of ingredients and basic kitchen equipment. You’ll be amazed at how quickly fresh, creamy curds transform from simple milk into a delicious homemade staple that tastes nothing like the store-bought version sitting on supermarket shelves.
The beauty of making cottage cheese yourself lies in complete control. You decide the texture, the richness, the salt content, and the freshness level. Whether you prefer large, chunky curds or a smoother consistency, the process remains flexible and forgiving, making it an excellent project for both kitchen novices and experienced food enthusiasts. Plus, homemade cottage cheese costs a fraction of premium store varieties while delivering superior flavor and nutrition.
This comprehensive guide walks you through every step, from selecting the right milk to troubleshooting common issues. By the end, you’ll have restaurant-quality cottage cheese made entirely in your own kitchen.
Understanding the Cottage Cheese Process
Cottage cheese production hinges on a simple chemical reaction: acid causes milk proteins to coagulate and separate from whey. When you introduce an acidic element—either through culturing or direct acid addition—the milk’s casein proteins bond together, forming curds. This fundamental principle has remained unchanged for centuries, though modern methods have refined the technique considerably.
The process begins with milk, which contains about 87% water and various proteins, fats, and lactose. When acid is introduced, the pH drops, triggering protein molecules to unfold and link together into networks. These networks trap fat and water, creating the characteristic curd texture. The remaining liquid—whey—contains mostly water, lactose, and some proteins.
What distinguishes cottage cheese from other fresh cheeses like ricotta or cream cheese is the curd size and the cream dressing added afterward. Cottage cheese curds are deliberately left larger and looser, then coated with a creamy mixture that gives the finished product its distinctive appearance and mouthfeel. This combination of technique and finishing touch creates the cottage cheese we recognize and love.
Understanding this basic science helps you troubleshoot issues and customize your results. Different temperatures, acid types, and timing produce different outcomes, giving you remarkable flexibility in achieving your ideal cottage cheese.
Essential Ingredients and Equipment
Before diving into production, gather your ingredients and tools. The beauty of cottage cheese is that you need surprisingly few components to succeed.
Ingredients:
- Whole milk (1 gallon for a standard batch) – Use the freshest milk available, preferably not ultra-pasteurized, as ultra-heat treatment can affect curd formation
- Liquid rennet or rennet tablets – This enzyme coagulates the milk; liquid rennet is easier to measure and distribute evenly
- Citric acid or white vinegar – Creates the acidic environment necessary for curd development
- Salt – For seasoning and controlling moisture
- Heavy cream (optional but recommended) – Creates the creamy dressing layer that defines cottage cheese
- Water – For diluting rennet and adjusting cream consistency
Equipment:
- Large stainless steel pot (at least 4-quart capacity)
- Accurate thermometer (preferably dairy or candy thermometer)
- Long knife for cutting curds into consistent pieces
- Cheesecloth or butter muslin for draining
- Colander or large strainer
- Measuring cups and spoons
- Slotted spoon or spider skimmer
- Glass jars for storage
Investing in quality equipment, particularly a reliable thermometer, makes the process significantly easier and more successful. Temperature control is absolutely critical, so don’t skip this investment.
For sourcing specialty items like rennet and cheesecloth, check local cheese-making supply shops or reputable online retailers. Many grocery stores now carry rennet in their baking sections, making this easier than ever.
Step-by-Step Instructions
Step 1: Prepare Your Ingredients
Begin by measuring out your milk and bringing it to room temperature if it’s been refrigerated. Pour the milk into your large pot. If you’re using rennet tablets, crush them finely and dissolve them in cool, non-chlorinated water (about 1/4 cup water per tablet). Liquid rennet requires no preparation, though you should have it ready for quick addition.
Step 2: Add Citric Acid
Dissolve 1 1/2 teaspoons of citric acid in 1/4 cup cool water. Stir this mixture thoroughly into your milk, ensuring even distribution. This step is crucial for proper curd development. If using vinegar instead, add about 2 tablespoons directly to the milk. The milk will appear slightly curdled and may smell slightly tangy—this is normal and expected.
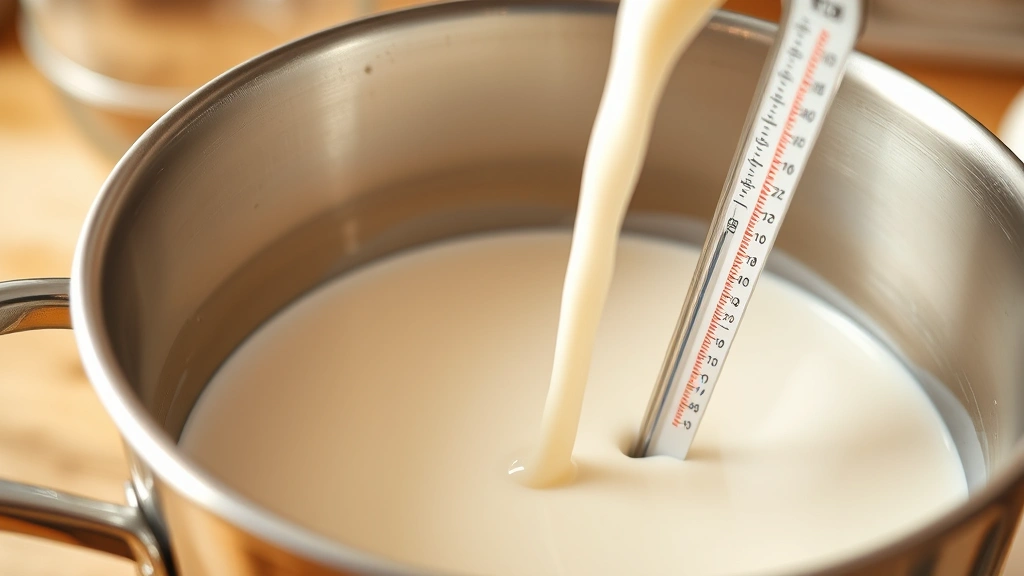
Step 3: Heat the Milk
Slowly heat the milk to 90°F (32°C), stirring occasionally to maintain even temperature. This typically takes 15-20 minutes. Avoid rapid temperature increases, as they can shock the milk and prevent proper curd formation. Use your thermometer constantly, checking temperature every few minutes as you approach the target.
Step 4: Add Rennet
Once the milk reaches 90°F, add your prepared rennet solution. Stir thoroughly for 1-2 minutes to distribute the rennet evenly throughout the milk. The rennet will begin coagulating the milk proteins immediately, though the change won’t be visually obvious at first.
Step 5: Let Milk Set
Cover the pot and let it sit undisturbed for 5-10 minutes. During this time, the milk will transform into a custard-like consistency. To test if it’s ready, insert a knife at a 45-degree angle and lift gently. If the curd breaks cleanly, you’re ready to proceed. If it’s still too soft, wait another 2-3 minutes.
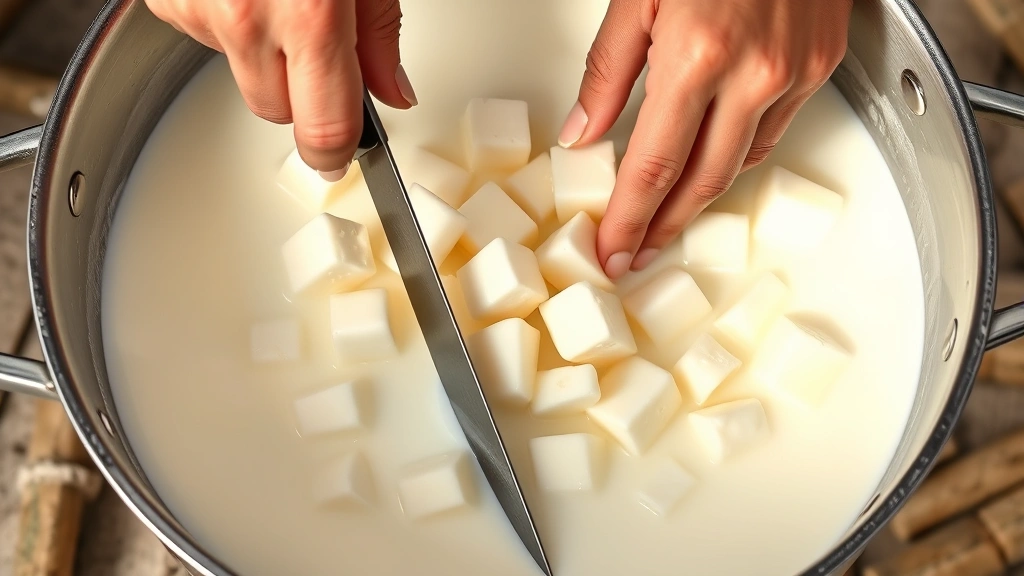
Step 6: Cut the Curds
Using a long, thin knife, cut the curds into 1/4-inch cubes. Make horizontal cuts first, then angled cuts to create cube shapes. Work slowly and deliberately—rough cutting releases too much whey and creates mushy curds. After cutting, let the curds rest for 5 minutes before proceeding.
Step 7: Cook the Curds
Gradually heat the curds to 110°F (43°C) over approximately 30 minutes, stirring gently every few minutes. This slow, steady temperature increase causes the curds to firm up and shrink slightly. Maintain consistent heat—rapid temperature spikes will result in tough, rubbery curds.
Step 8: Test for Doneness
When curds reach 110°F, perform a texture test. Take a few curds and squeeze them gently. They should hold together briefly then break apart. If they’re still too soft, continue cooking for another 5-10 minutes, then retest.
Step 9: Drain the Whey
Line your colander with cheesecloth and carefully pour the curds and whey through it. Reserve the whey for now—you may need it for rinsing. Let the curds drain for a few minutes, then gather the corners of the cheesecloth and hang it to drain further for 10-15 minutes.
Step 10: Rinse the Curds
Rinse the curds under cool water while still in the cheesecloth, gently moving them around to remove excess whey. This stops the cooking process and removes lactose, resulting in milder-tasting cottage cheese. Rinse until the water runs clear.
Step 11: Make the Cream Dressing
While curds drain, combine 1/2 cup heavy cream with 1/4 cup milk and salt to taste (start with 1/2 teaspoon). This creates the characteristic creamy coating. You can adjust the ratio depending on how rich you prefer your cottage cheese.
Step 12: Combine and Finish
Once curds have drained thoroughly, transfer them to a clean bowl and gently fold in the cream dressing. Taste and adjust salt as needed. Your homemade cottage cheese is now ready to eat immediately or store for later.

Achieving the Perfect Texture
Texture is what separates exceptional cottage cheese from mediocre batches. Understanding the variables that affect texture helps you dial in your preferred consistency.
Curd Size
The size of your initial cuts directly determines final curd size. Smaller cuts (1/8 inch) create a finer, smoother texture, while larger cuts (1/2 inch) produce chunky cottage cheese. Most commercial varieties use 1/4-inch cuts as a middle ground, but home production gives you complete control. Experiment with different sizes to discover your preference.
Cooking Temperature and Duration
Higher final temperatures and longer cooking times create firmer, drier curds. If you prefer creamy, delicate curds, stick to 110°F and avoid extended cooking. For firmer texture, continue heating to 115°F, though be cautious not to exceed 120°F, as this creates rubbery results.
The heating rate matters as much as the final temperature. Gradual heating allows whey to escape evenly, creating uniform texture. Rapid temperature increases cause uneven cooking, with some curds remaining soft while others become tough.
Cream Dressing Ratio
The proportion of cream to curds dramatically affects the final texture. More cream creates a rich, wet product, while less cream produces a drier, more delicate texture. Start with the suggested ratio, then adjust according to preference. Some people add up to 1 cup cream for an ultra-luxurious version, while others prefer just a light coating.
Drainage Time
Insufficient drainage leaves excess whey, resulting in runny cottage cheese. Conversely, over-draining creates dry, crumbly curds. The sweet spot typically involves draining until curds are just moist but not wet. For thicker cottage cheese, extend draining time by 5-10 minutes.
Storage and Shelf Life
Proper storage ensures your homemade cottage cheese remains fresh and delicious for as long as possible.
Refrigeration
Store finished cottage cheese in clean, airtight glass containers in the coldest part of your refrigerator, ideally at 35-40°F. Glass containers are superior to plastic, as they don’t absorb odors and allow you to monitor contents easily.
Shelf Life
Homemade cottage cheese typically lasts 5-7 days when properly refrigerated, though some batches may remain fresh for up to 10 days. The exact duration depends on the freshness of your starting milk and the cleanliness of your equipment. Always trust your senses—if it smells off or shows any mold, discard it immediately.
Freezing
While you can freeze cottage cheese, the texture changes noticeably upon thawing, becoming slightly grainy. Frozen cottage cheese works better in cooked applications like casseroles than eaten fresh. If you choose to freeze, use airtight containers and consume within 3 months.
Extending Freshness
Keep the surface of your cottage cheese clean by using dedicated spoons for serving and avoiding contamination. Store it away from strong-smelling foods, as cottage cheese readily absorbs odors. Some people add a thin layer of cream on top as a protective barrier against oxidation.
Troubleshooting Common Problems
Curds Won’t Form
If your milk doesn’t coagulate after adding rennet, the issue usually stems from ultra-pasteurized milk, which has been heated to such high temperatures that the proteins won’t properly coagulate. Solution: Use standard pasteurized milk instead. Additionally, ensure your rennet hasn’t expired and that you’ve allowed adequate setting time.
Curds Are Too Soft
Soft, mushy curds typically result from insufficient cooking temperature or inadequate cooking time. Ensure you’re gradually heating to the full 110°F and maintaining that temperature for the recommended duration. Also verify that your thermometer is accurate by testing it in boiling water (should read 212°F).
Curds Are Too Tough or Rubbery
Excessive cooking temperature or duration causes this issue. If you’ve cooked past 110°F or cooked for significantly longer than recommended, you’ve over-coagulated the proteins. In future batches, stop heating at exactly 110°F and avoid extended cooking times.
Cottage Cheese Is Too Salty
Reduce the salt in your cream dressing. Start with 1/4 teaspoon instead of 1/2 teaspoon and taste before adding more. Remember that salt distribution isn’t always uniform, so mix thoroughly after adding.
Cottage Cheese Is Too Bland
Increase salt gradually, or add other seasonings like fresh herbs, pepper, or a touch of honey. Additionally, ensure you’re using quality milk—inferior milk produces inferior cottage cheese regardless of technique.
Excessive Whey Separation
If liquid pools at the bottom of your container, the cream dressing ratio was too high or the curds were over-drained. For your next batch, use slightly less cream or drain the curds less thoroughly before adding the dressing.
Creative Variations and Flavors
Once you’ve mastered basic cottage cheese, experiment with variations that transform it into different products or enhance it with complementary flavors.
Herb-Infused Cottage Cheese
Add fresh herbs like dill, chives, parsley, or basil to your cream dressing. Fresh herbs add brightness and sophistication. Finely chop them before folding into the cottage cheese to ensure even distribution.
Honey and Fruit Version
Drizzle finished cottage cheese with quality honey and top with fresh berries or stone fruit. This creates a sophisticated breakfast or dessert option. If you’re interested in preserving fruits for year-round use, consider how to freeze bananas or other produce to use in your cottage cheese creations.
Savory Cheese Blend
Fold in grated cheddar, gruyere, or other aged cheeses along with cracked pepper and sea salt. This transforms cottage cheese into a more substantial, protein-rich dish perfect for lunch.
Spiced Sweet Version
Add cinnamon, nutmeg, and a touch of vanilla extract to create a sweet cottage cheese perfect for breakfast. Top with granola and nuts for textural contrast.
Cultured Cottage Cheese
For a more complex, tangy flavor, use mesophilic or thermophilic cultures instead of citric acid. This requires additional equipment and time but produces cottage cheese with sophisticated, fermented notes. This technique is more advanced but opens entirely new flavor possibilities.
If you’re interested in expanding your homemade dairy repertoire beyond cottage cheese, explore how to make sour cream or how to make heavy cream for complementary products. You might also appreciate learning how to make milk butter to complete your dairy-making journey. For those interested in plant-based alternatives, how to make almond milk provides an excellent non-dairy option to explore.
Frequently Asked Questions
Can I use non-dairy milk to make cottage cheese?
Traditional cottage cheese requires animal milk because the proteins in non-dairy alternatives don’t coagulate the same way. However, some people experiment with soy milk, which has higher protein content than other plant-based options. The results are generally less satisfactory than dairy-based versions, but it’s worth experimenting if you’re interested in exploring possibilities.
What’s the difference between my homemade cottage cheese and store-bought versions?
Homemade cottage cheese typically has larger, more distinct curds and a fresher, more delicate flavor. Commercial versions often contain stabilizers, thickeners, and preservatives that create a uniform texture and extended shelf life. Many people find homemade versions noticeably creamier and more flavorful, though the texture is less uniform than mass-produced alternatives.
How long does the entire process take?
From start to finish, making cottage cheese takes approximately 1.5 to 2 hours. The actual hands-on time is only about 30 minutes, with most time spent waiting for milk to set, curds to cook, and whey to drain. It’s an excellent project for weekend cooking when you’re not rushed.
Can I scale this recipe up or down?
Absolutely. The basic proportions remain consistent whether you’re making a single gallon or five gallons. Simply multiply all ingredients and equipment accordingly. However, larger batches require more attention to temperature control, as heat distribution becomes more challenging in bigger pots.
Why is my thermometer reading different temperatures in different parts of the pot?
Temperature gradients are common in large pots, especially during heating phases. Always stir gently while taking temperature readings to ensure you’re measuring an average temperature rather than a hot or cool spot. Position your thermometer in the center of the pot for the most accurate reading.
What if I don’t have cheesecloth?
While cheesecloth is ideal, you can substitute butter muslin, a clean kitchen towel, or even several layers of paper towels. The key is choosing a material that allows whey to drain while catching curds. Avoid materials that are too fine, as they’ll impede drainage and extend the process significantly.
Is homemade cottage cheese safe for pregnant women?
Yes, homemade cottage cheese made with pasteurized milk is safe during pregnancy. In fact, it’s an excellent protein source. However, always ensure your milk is pasteurized and that all equipment is thoroughly cleaned. If you have specific health concerns, consult your healthcare provider.
Can I use the leftover whey for anything?
Absolutely! Whey is nutrient-rich and useful in many applications. Use it to make ricotta cheese, add it to smoothies for extra protein, use it in baking instead of water, or feed it to garden plants as a nutrient boost. Some people use whey as a starter culture for fermented foods.
For more detailed scientific information about cheese making, consult Cultures for Health’s comprehensive cheese guide, which provides in-depth explanations of the fermentation and coagulation processes. This Old House occasionally features food preservation techniques that complement cheese making. Family Handyman offers practical DIY food production guides, while Home Depot provides supplies for food preservation equipment. For professional-grade guidance, check the National Dairy Council’s educational resources on dairy science.
Related Posts

How Long to Boil Lobster Tails: Cooking Guide

How Long to Fly from New York to London? Travel Times
