
How to Make Cannabutter: Expert Guide
How to Make Cannabutter: Expert Guide
Cannabutter—infused butter that carries the essence of cannabis—has become a staple in the culinary world, transforming everything from baked goods to savory dishes into something special. Whether you’re a seasoned cook or stepping into this territory for the first time, mastering the art of making cannabutter opens up a world of creative possibilities. Unlike other infusion methods, cannabutter offers precise dosing control and versatility that few other ingredients can match.
The beauty of making your own cannabutter lies in the simplicity of the process combined with the impressive results. With just a few essential ingredients and some patience, you’ll create a product that rivals anything you’d purchase from a specialty retailer. This guide walks you through everything you need to know, from selecting quality materials to troubleshooting common mistakes.
If you’re already comfortable with basic cooking techniques like how to make garlic butter, you’ll find that cannabutter follows similar infusion principles, just with a few crucial adjustments for optimal results.
Understanding Cannabutter Basics
Cannabutter is essentially butter infused with cannabinoids, the active compounds found in cannabis. The infusion process works because cannabinoids are fat-soluble, meaning they bind readily to butter’s lipid content. This creates a homogeneous product where the cannabis compounds are evenly distributed throughout the butter.
What makes cannabutter particularly appealing is its versatility. Unlike smoking or vaping, which deliver effects immediately, cannabutter products provide a longer-lasting, more gradual experience. The onset typically takes 30 minutes to 2 hours, depending on individual metabolism and whether it’s consumed with food.
The potency of your finished product depends on several variables: the quality of your starting cannabis, the decarboxylation temperature and duration, the ratio of cannabis to butter, and the infusion method you choose. Understanding these variables gives you control over your final product’s strength.
Much like learning how to make heavy cream requires understanding fat emulsification, cannabutter demands respect for the science behind infusion. The more you understand the chemistry, the better your results will be.
Essential Materials and Equipment
Before diving into the process, gather your tools. You’ll need:
- High-quality butter – Use unsalted butter for better control over flavoring
- Cannabis – Ground or broken into small pieces
- Oven – For decarboxylation
- Baking sheet – Lined with parchment paper
- Thermometer – Preferably digital for accuracy
- Saucepan or slow cooker – For the infusion process
- Cheesecloth or fine mesh strainer – For filtering
- Glass jars – For storage
- Grinder – For breaking down cannabis evenly
- Spatula or wooden spoon – For stirring
Having the right equipment makes the process smoother and more reliable. A slow cooker is particularly valuable because it maintains consistent, low temperatures without requiring constant monitoring.

Selecting Quality Cannabis
The quality of your starting material directly impacts your final product. Look for cannabis that’s properly dried and cured, with a pleasant aroma and intact trichomes (the tiny crystals containing cannabinoids). Avoid material that’s moldy, excessively dry, or has an off-putting smell.
When grinding your cannabis, aim for a consistency similar to coarse sand. You want pieces small enough to maximize surface area but not so fine that they slip through your strainer. A dedicated grinder works best for this purpose.
Consider the strain’s characteristics. Some strains are better suited for savory applications, while others complement sweet dishes. However, the infusion process will mellow out most strain-specific flavor profiles, so focus primarily on cannabinoid content rather than terpene profiles.
The Decarboxylation Process
Decarboxylation is absolutely critical and often misunderstood. This chemical process converts THCA (tetrahydrocannabinolic acid) into THC, and CBDA into CBD. Without decarboxylation, your cannabutter will be significantly less potent because these acidic forms aren’t psychoactive.
Here’s the proper method:
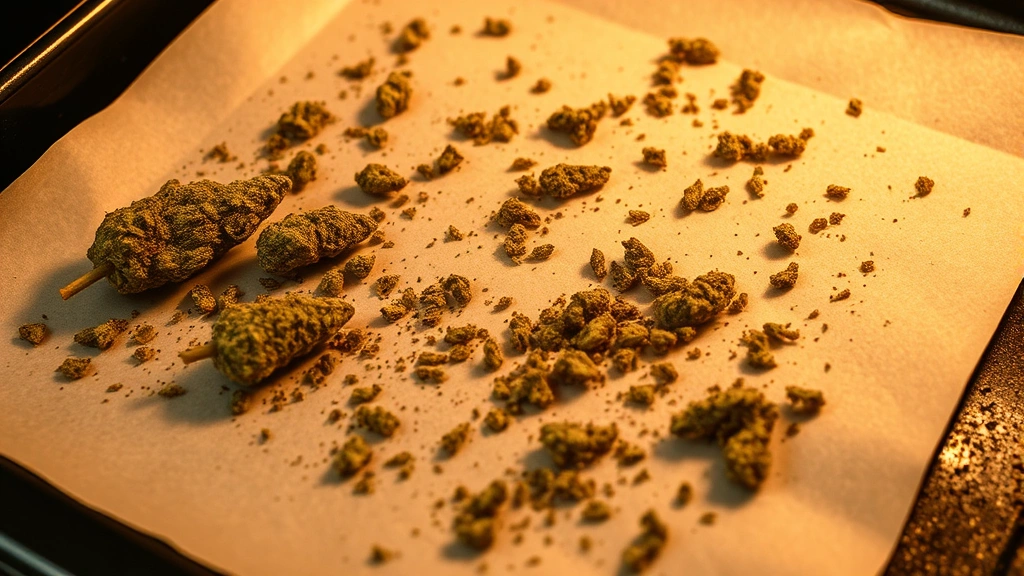
- Preheat your oven to 240°F (115°C)
- Break cannabis into small pieces and spread evenly on a parchment-lined baking sheet
- Place in the oven for 30-40 minutes, stirring halfway through
- The cannabis should be dry and slightly darker but not brown
- Remove and let cool completely before grinding
Temperature control is paramount. Too low and you won’t fully activate the cannabinoids; too high and you’ll vaporize the compounds you’re trying to preserve. Using an oven thermometer ensures accuracy since many household ovens run hot or cold.
Some people use an oven bag to contain the aroma during this step, which many find considerate. The smell will be noticeable regardless, so plan accordingly.
Step-by-Step Infusion Methods
The Slow Cooker Method (Recommended for Beginners)
This is the most foolproof approach for consistent results:
- Add your decarboxylated cannabis to the slow cooker
- Pour in your butter (use a 1:1 ratio by weight as a starting point)
- Set to LOW and let simmer for 2-3 hours, stirring occasionally
- The mixture should never boil; maintain a gentle simmer
- You’ll notice the butter taking on a greenish tint as cannabinoids infuse
- After infusion time, turn off the slow cooker and let cool slightly
The Stovetop Method
For those without a slow cooker:
- Melt butter in a saucepan over very low heat
- Add decarboxylated cannabis
- Maintain a temperature between 160-200°F (71-93°C) for 2-3 hours
- Stir frequently to ensure even infusion
- This method requires more attention but works effectively
The Double Boiler Method
This prevents scorching and provides excellent temperature control:
- Fill the bottom pot with water and bring to a gentle simmer
- Place the top pot containing butter and cannabis over it
- Maintain this setup for 2-3 hours, stirring occasionally
- The water prevents direct heat from damaging cannabinoids
Regardless of method, never let the mixture boil. High heat degrades cannabinoids and can create an unpleasant burnt flavor. The gentle simmer is your friend here.
Straining and Storage
Once infusion is complete, straining properly is essential for a clean final product:
The Straining Process
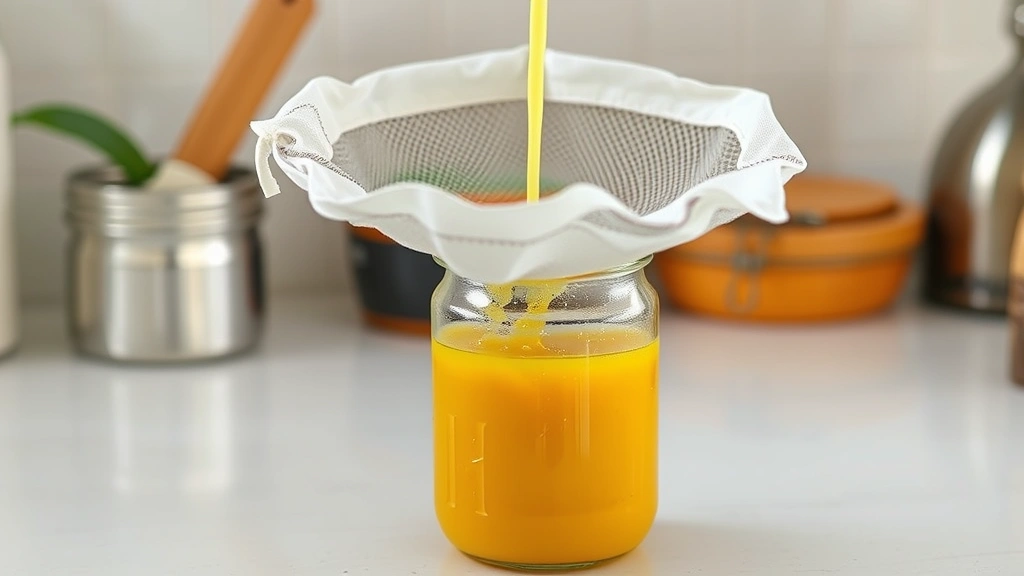
- Line a fine mesh strainer with cheesecloth, layering it 2-3 times
- Slowly pour the mixture through the cheesecloth into a glass container
- Let gravity do the work—don’t squeeze the cheesecloth as this forces plant material through
- Once drained, gather the cheesecloth corners and gently press to extract remaining butter
- Let the strained mixture cool to room temperature
After straining, your cannabutter will likely contain a layer of water beneath the solidified butter. This is normal. Once fully cooled and hardened, you can separate the butter from the water layer by carefully lifting or pouring it away.
Storage Guidelines
Properly stored cannabutter maintains potency and quality for extended periods. Keep it in airtight glass containers in the refrigerator for up to 2 months, or freeze for up to 6 months. The cold environment prevents degradation of cannabinoids and inhibits bacterial growth.
Label your containers clearly with the date, approximate cannabinoid content, and batch information. This documentation proves invaluable when tracking consistency and effects.
Dosing and Safety Considerations
Determining the potency of your cannabutter requires some calculation. If you know the percentage of cannabinoids in your starting material, you can estimate the final concentration. For example, if you used 7 grams of 20% THC cannabis with 1 pound (454 grams) of butter, you’d have approximately 1.4 grams of THC total, or about 0.35mg per gram of butter.
Start low and go slow—this golden rule applies whether you’re a first-timer or experienced user. A typical starting dose is 5-10mg THC for beginners. Effects can vary dramatically based on individual tolerance, metabolism, and whether the product is consumed with food.
Safety Reminders
- Keep cannabutter clearly labeled and stored away from children and pets
- Never operate heavy machinery after consumption
- Be aware that edible effects differ from smoking—onset is slower but effects last longer
- Understand local laws regarding cannabis possession and use
- If new to cannabis, consult with a healthcare provider about potential interactions with medications
The potency of edibles can be unpredictable if not properly infused, so consistency in your process matters tremendously for safety.
Creative Uses in the Kitchen
With your cannabutter ready, the culinary possibilities expand considerably. Use it as you would regular butter in virtually any application. Think beyond brownies—cannabutter excels in sophisticated applications.
Savory Applications
Incorporate cannabutter into compound butters for steaks, vegetables, or seafood. Create a luxurious sauce base similar to how you’d prepare how to make brown gravy, but with cannabutter as your fat foundation. Toss it with pasta, melt it over roasted vegetables, or use it to make gourmet popcorn seasoning.
Sweet Creations
Cannabutter works beautifully in cookies, brownies, cakes, and pastries. The key is ensuring even distribution throughout your batter. For recipes requiring multiple ingredients like how to make sour cream, integrate your cannabutter carefully to maintain consistent dosing across portions.
Advanced Techniques
Create cannabutter-based emulsions for hollandaise or béarnaise sauces. Make clarified cannabis ghee for high-heat cooking applications. Combine it with herbs to create flavored compound butters that elevate simple dishes into something memorable.
The versatility of cannabutter means you’re limited only by your culinary imagination. Many professional chefs now incorporate it into fine dining preparations, proving that it’s a legitimate ingredient deserving respect and proper technique.
Frequently Asked Questions
What’s the ideal ratio of cannabis to butter?
A 1:1 ratio by weight serves as an excellent starting point. This means 7 grams of cannabis to 7 grams of butter. You can adjust based on desired potency, but this ratio typically produces reliably potent cannabutter without waste.
Can I reuse the leftover plant material?
Technically yes, but the cannabinoid content will be significantly depleted after the first infusion. Many people compost it or discard it rather than waste time on a second extraction that yields minimal results.
Why is my cannabutter green instead of yellow?
Green coloration indicates successful infusion—the chlorophyll from the plant material has transferred to the butter. If you prefer a lighter color, use a finer strainer or repeat the straining process with fresh cheesecloth.
How do I know if my cannabutter is properly decarboxylated?
The cannabis should appear slightly darker and dry after decarboxylation. If it looks the same as before, you likely didn’t reach the proper temperature or duration. Test by creating a small batch and noting the effects.
Can I use cannabutter in recipes that require high-heat cooking?
Yes, but be cautious. Cannabinoids begin degrading around 350°F (175°C). For high-heat applications, finish dishes with cannabutter rather than cooking with it, or use it in recipes with lower cooking temperatures.
What if my cannabutter turned out too weak or too strong?
If too weak, you can infuse it again with fresh decarboxylated cannabis. If too strong, simply blend it with regular butter to dilute it to your preferred potency. Keep detailed notes for future batches.
How long does decarboxylation take?
The standard timeframe is 30-40 minutes at 240°F (115°C). Factors like oven accuracy, cannabis moisture content, and piece size can affect timing. Start checking around 25 minutes and adjust based on appearance.
Is there a difference between using trim versus flower?
Flower contains more cannabinoids than trim, resulting in more potent cannabutter. However, trim is more economical and works well if you’re using larger quantities. Mix them for a balance of cost and potency.
Can I make cannabutter without decarboxylation?
Technically yes, but your final product will be significantly less potent. The raw cannabis contains mostly THCA, which doesn’t produce the desired effects. Decarboxylation is the crucial step that activates cannabinoids.
For additional guidance on infusion techniques and food preparation, consult This Old House cooking resources, which offers foundational knowledge applicable to specialized infusions. The Family Handyman kitchen guide provides excellent information on kitchen equipment and food safety. For butter-specific information, review Home Depot’s kitchen guide collection. Additionally, Serious Eats offers comprehensive cooking science explanations, and Cuisinart provides manufacturer guidance on kitchen equipment use.
Related Posts

How Long to Boil Lobster Tails: Cooking Guide

How Long to Fly from New York to London? Travel Times
