
How to Add a Line in Word: Step-by-Step Guide
How to Add a Line in Word: Step-by-Step Guide
Microsoft Word is one of the most versatile document creation tools available, and knowing how to add lines can significantly enhance your document’s visual organization and professional appearance. Whether you’re creating a formal report, designing a form, or simply wanting to separate sections of text, adding lines in Word is a fundamental skill that opens up countless formatting possibilities.
Lines serve multiple purposes in document design. They can draw attention to important information, create visual breaks between sections, help organize content hierarchically, and add polish to otherwise plain documents. The beauty of Word’s line features is that they’re surprisingly flexible—you can insert simple horizontal lines, create decorative borders, or build complex dividers that match your document’s aesthetic.
This comprehensive guide walks you through every method for adding lines in Word, from the simplest techniques to more advanced customization options. By the end, you’ll have complete control over line placement, style, and appearance in your documents.
Understanding Line Options in Word
Before diving into the technical steps, it’s helpful to understand what Word offers when it comes to adding lines. Word provides several distinct methods, each suited to different scenarios and design needs. Some methods are quick and straightforward, while others offer more granular control over appearance and positioning.
The most common line types you’ll work with include horizontal lines that span across the page, vertical dividers for creating columns, decorative borders around text or paragraphs, and freeform lines for custom designs. Understanding when to use each method will save you time and help you achieve the exact look you’re aiming for.
Word also distinguishes between lines that are part of text formatting and lines that are independent objects. This distinction matters because it affects how the lines behave when you edit or move content around your document. Text-based lines stay with their associated paragraphs, while object lines maintain fixed positions on the page.
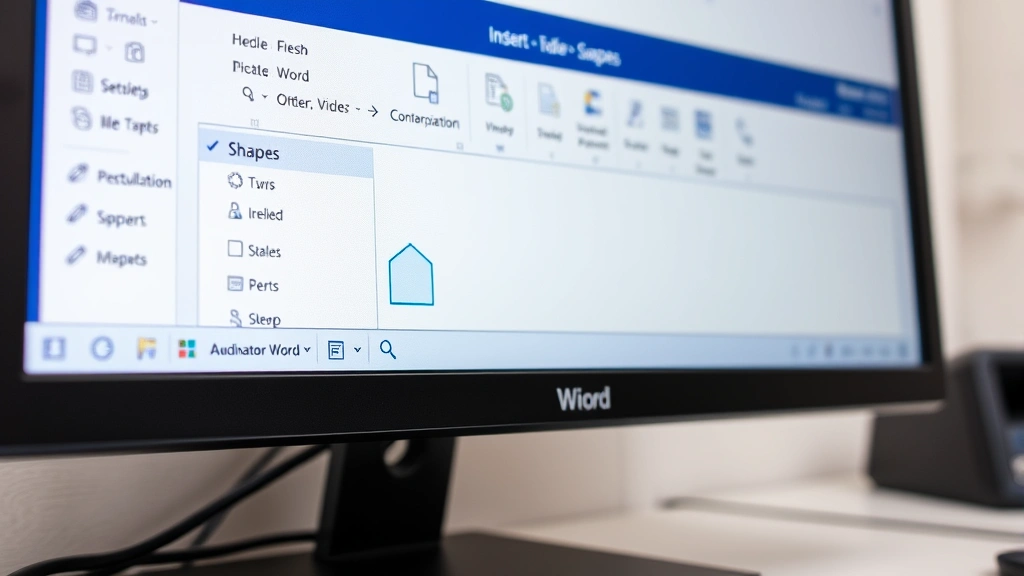
Method 1: Using the Shapes Tool
The Shapes tool is one of the most straightforward ways to add a line to your Word document. This method gives you immediate visual feedback and precise control over placement. Here’s how to do it:
- Click on the Insert tab in the ribbon menu at the top of your screen
- Look for the Shapes button in the Illustrations group
- Click the dropdown arrow next to Shapes to reveal the shape gallery
- Under the Lines section, select the Line option (the simplest straight line)
- Click and drag on your document where you want the line to appear
- Hold Shift while dragging to create perfectly horizontal or vertical lines
This method is particularly useful when you need precise placement because you have complete control over where the line starts and ends. The visual feedback as you drag makes it easy to position the line exactly where you want it. If you’re not satisfied with the placement, simply click the line and drag it to a new location.
You can also use this method to insert other line styles from the Shapes gallery, such as arrows, connectors, or curved lines. These variations allow you to create more sophisticated document designs when standard straight lines aren’t sufficient for your needs.

Method 2: Inserting Lines with Borders
Creating lines through paragraph borders is an excellent approach when you want your lines to remain connected to specific text content. This method is particularly useful when you’re formatting spacing in documents, as the lines will move with your paragraphs if you edit or reorganize your content.
Here’s the step-by-step process:
- Select the paragraph or text where you want to add a line
- Go to the Home tab and find the Borders button (usually represented by a box icon with lines)
- Click the dropdown arrow next to Borders
- Choose from preset border options or select Borders and Shading for more customization
- In the Borders and Shading dialog, select your preferred line style, color, and width
- Choose which sides of the paragraph should have borders (top, bottom, left, right, or all)
- Click OK to apply
This approach is particularly valuable when you’re creating forms or documents where you want lines to serve as writing spaces. The borders will expand or contract with your text, maintaining their relationship to the content. This makes it ideal for professional templates and structured documents.
When working with borders, you can also specify the distance between the border and the text, giving you fine-tuned control over the visual appearance. This is especially useful when you want breathing room between your text and the border line.
Method 3: Creating Horizontal Lines with Keyboard Shortcuts
If you need a quick horizontal line and don’t need extensive customization, Word has a built-in shortcut that’s incredibly fast. This method creates an automatic border line across the full width of the page:
- Position your cursor on a blank line where you want the horizontal line to appear
- Type three hyphens: —
- Press Enter
Word automatically converts this into a full-width horizontal line. This AutoFormat feature is incredibly convenient for quick document formatting, though it offers less customization than other methods. If you want the line to be thicker or styled differently, you can follow up by selecting the line and using the border formatting options.
You can also create variations of this shortcut using different characters. For example, typing === creates a thicker line, while *** creates a dotted line effect. These variations give you quick options for different visual styles without needing to access formatting menus.
One important note: if this automatic formatting doesn’t trigger, it might be disabled in your Word settings. You can enable it by going to File > Options > Proofing > AutoCorrect Options > AutoFormat As You Type, then checking the box for border lines.
Method 4: Using the Line Drawing Tool
For those who want complete creative freedom, the Pen tool offers freeform drawing capabilities. While primarily designed for drawing, it’s equally useful for creating custom lines:
- Click the Insert tab
- Select Shapes and look for the Freeform or Pen tool
- Click once to start your line and click again to end it
- Double-click to finish drawing
This method is less commonly used for simple lines but becomes invaluable when you’re creating complex designs or custom shapes. The freeform approach gives you pixel-level precision if you need it, though it requires a steadier hand or more precise mouse control than the standard line tool.
The drawing tools integrate seamlessly with Word’s formatting capabilities, so you can adjust colors, line weights, and effects after drawing. This flexibility makes the drawing tools a powerful option for document designers who want complete creative control.
Customizing Your Lines
Once you’ve inserted a line using any of the above methods, you’ll likely want to customize its appearance to match your document’s design. Word offers extensive customization options that let you fine-tune every aspect of your lines.
When you have a line selected (you’ll see selection handles around it), right-click to access formatting options. You can adjust the line’s:
- Color: Choose from a palette of colors or create custom colors
- Weight: Adjust the thickness from hairline thin to bold
- Style: Select from solid, dashed, dotted, or combination patterns
- Transparency: Make lines semi-transparent for subtle effects
- Effects: Add shadows, glows, or 3D effects for visual interest
To access these options, right-click your selected line and choose Format Shape or Format Line. This opens a comprehensive formatting panel where you can experiment with different combinations until you achieve your desired look.
For those working with text-based lines through borders, similar customization is available through the Borders and Shading dialog. This includes options for line style, width, and color. You can even create custom patterns if you want something truly unique.
Advanced Line Formatting Techniques
Beyond basic customization, Word offers several advanced techniques that can elevate your document design. These methods combine multiple elements to create sophisticated visual effects.
When you’re creating multiple documents with consistent formatting, consider saving your line styles as part of a template. This ensures consistency across all your documents and saves time on formatting.
Another advanced technique involves layering lines with other shapes to create decorative elements. For example, you might combine a thick line with a thin line of a different color to create a two-tone effect. You can also group multiple lines together to move them as a single unit, which is helpful when designing complex layouts.
For those working on forms or structured documents, combining lines with text boxes creates professional-looking fillable sections. This is particularly useful when you’re designing documents that will be printed and filled in by hand, or when creating digital forms for others to complete.
Understanding how lines interact with text wrapping is also important for advanced formatting. You can control whether text wraps around lines, flows over them, or maintains specific spacing relationships. These options are found in the Wrap Text settings when you right-click a line object. If you’re working with text wrapping in other Office applications, you’ll find similar logic applies.
For users who frequently work with structured documents, exploring features like cell protection in Excel or dropdown lists in Excel can provide insights into document protection and organization strategies that complement your Word line formatting skills.
One particularly useful advanced technique involves using lines to create visual hierarchy in documents. By varying line thickness, color, and style, you can guide readers’ eyes through your content in a specific order. This is especially effective in newsletters, reports, and marketing materials where visual organization enhances comprehension.
Frequently Asked Questions
Can I make a line span only part of a paragraph?
Yes, absolutely. When using the Shapes tool, you have complete control over where the line starts and ends. Simply drag from your starting point to your ending point. If you’re using borders, you can apply borders to only a portion of text by selecting just that text before applying the border formatting.
How do I remove a line I’ve added to my document?
Click on the line to select it (you’ll see selection handles appear), then press Delete. If you’ve added a line through paragraph borders, select the paragraph and remove the border through the Borders menu or Borders and Shading dialog.
Can I make diagonal lines in Word?
Yes, using the Shapes tool. When you select the Line option from the Shapes gallery, you can drag at any angle to create diagonal lines. You don’t need to hold Shift for diagonal lines—only hold Shift if you want perfectly horizontal or vertical lines.
What’s the difference between a line and a shape?
In Word, a line is technically a shape with only two points. Lines are simpler and more lightweight, while shapes like rectangles or circles have filled areas. Lines are ideal for creating dividers and borders, while shapes are better for creating filled boxes or complex designs.
Can I adjust line transparency in Word?
Yes. Select your line, right-click, and choose Format Shape or Format Line. In the formatting panel, look for transparency or opacity settings. These are usually found under the Fill or Line properties, depending on your Word version.
How do I create a dotted or dashed line?
Select your line, right-click, and access the format options. Look for line style or dash style settings. You’ll find various preset patterns like dotted, dashed, or dash-dot combinations. Choose the style that best fits your needs.
Will lines I add to my document print correctly?
Yes, lines added through any of these methods will print. However, always do a print preview before printing important documents to ensure lines appear as intended. Sometimes screen appearance can differ slightly from print output depending on your printer settings.
Can I use lines in headers and footers?
Yes. You can add lines to headers and footers just as you would in the main document body. Click in the header or footer area first, then insert your line using any of the methods described. This is particularly useful for creating professional letterhead designs.
Related Posts

How Long to Boil Lobster Tails: Cooking Guide

How Long to Fly from New York to London? Travel Times
