
How to Layer Lasagna: Expert Guide
How to Layer Lasagna: Expert Guide to Perfect Pasta Perfection
There’s something almost meditative about building lasagna, layer upon layer, creating edible architecture that’ll have everyone at your table asking for seconds. But here’s the thing—most people approach lasagna like they’re just stacking ingredients, when really, it’s an art form that deserves respect and a solid game plan.
The difference between a lasagna that impresses and one that falls apart comes down to one simple word: layering. Get this right, and you’re serving up restaurant-quality comfort food. Get it wrong, and you’re dealing with a watery mess that slides across the plate like it’s on ice skates. Let’s make sure you nail it every single time.
Whether you’re making a classic Bolognese-style lasagna, a creamy béchamel version, or something entirely your own, understanding the foundational principles of layering will transform your kitchen game. This guide breaks down everything you need to know, from sauce ratios to pasta placement, so you can build lasagna with confidence.
Understanding the Lasagna Foundation
Before you start layering, you need to understand what makes lasagna structurally sound. Think of it like building a house—you wouldn’t skip the foundation, right? Your lasagna foundation consists of three essential elements: pasta sheets, sauce, and cheese. But it’s the ratio and arrangement that separate amateurs from pros.
The bottom layer is absolutely critical. Many home cooks make the mistake of starting with pasta, but that’s actually a recipe for sticking and burning. Instead, begin with a thin layer of sauce—about a quarter-inch spread across the bottom of your baking dish. This acts as a buffer between the hot pan and your pasta, preventing that burnt, crispy bottom that nobody wants. Use a spatula or the back of a wooden spoon to spread it evenly.
Your pasta sheets need to be pliable but not falling apart. If you’re using dried lasagna noodles, follow proper boiling times to achieve the right texture. Fresh pasta sheets, on the other hand, can often be used straight from the package without pre-cooking, though this depends on the brand. Check the package instructions—they’re there for a reason.
The cheese layer is where things get interesting. Most traditional lasagnas use a combination of ricotta, mozzarella, and Parmesan. The ricotta provides creaminess and structure, the mozzarella melts beautifully and creates that gorgeous stretch, and the Parmesan adds depth and a slightly sharp bite. Don’t skimp on quality here—the difference between good cheese and great cheese is immediately noticeable.
Choosing Your Sauces and Fillings
This is where you can really make lasagna your own. Your sauce choices determine the entire character of the dish. Are you going traditional meat sauce, vegetarian, seafood, or something completely unexpected? Each choice requires a slightly different approach to layering.
A robust meat sauce—whether you’re making a proper Bolognese or something simpler—needs to be thick enough to support the layers without turning everything soggy. If your sauce is too watery, it’ll weep through the pasta and create a mushy lasagna. The solution? Simmer your meat sauce longer than you think you need to. Let it reduce until it coats the back of a spoon. If you’re looking to elevate your meat sauce game, consider incorporating brown gravy techniques for added depth and richness.
Vegetarian lasagnas require special attention because vegetables release moisture as they cook. If you’re using fresh vegetables, salt them beforehand and let them sit for 10-15 minutes to release their water, then pat them dry. This prevents your lasagna from becoming a vegetable soup situation.
For creamy lasagnas, many people use béchamel sauce as a layer instead of ricotta, or sometimes in combination with it. This white sauce made from butter, flour, and milk creates an incredibly luxurious texture. Some recipes also call for sour cream or similar dairy components to add tanginess and richness to your filling layers.
If you’re working with shredded chicken, make sure it’s well-seasoned and mixed with your sauce or ricotta mixture before layering. Dry chicken in lasagna is a tragedy waiting to happen.
The Perfect Layering Sequence
Now we get to the heart of the matter: the actual order of operations. There are a few established methods, and honestly, the best one is the one that works for your specific recipe. However, there’s a classic sequence that works beautifully for most traditional lasagnas.
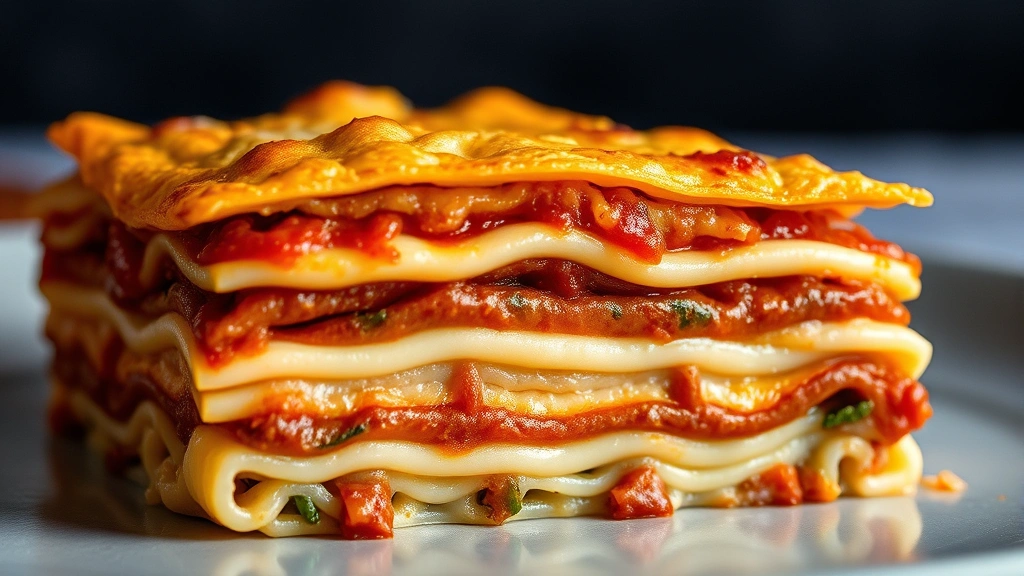
The most reliable pattern goes like this: sauce, pasta, ricotta mixture, mozzarella, repeat. This creates a balanced structure where each layer supports the next. The sauce keeps everything moist, the pasta provides structure, the ricotta mixture adds creaminess and substance, and the mozzarella binds everything together while creating those beautiful browned spots on top.
Some Italian nonnas swear by a slightly different approach: sauce, pasta, sauce, ricotta mixture, mozzarella, repeat. This method ensures every pasta sheet is protected by sauce, reducing the chance of dry spots. The downside? You use more sauce overall, which some people consider wasteful.
Then there’s the béchamel method, popular in regions like Emilia-Romagna. Here, you alternate between meat sauce and béchamel, layering pasta sheets in between. It’s richer, creamier, and absolutely decadent. If you go this route, you typically don’t use ricotta at all.
The key principle across all methods: never let pasta touch pasta directly without something in between. That something should be moist—either sauce, ricotta mixture, or béchamel. Dry pasta layers will stick together and create a gluey mess rather than individual, distinct layers.
Step-by-Step Layering Instructions
Let’s get practical. Here’s exactly how to layer a classic lasagna, assuming you’re using a 9×13 inch baking dish:
Step 1: Prepare Your Workspace
Have all your components ready before you start. Line up your sauce, pasta sheets, ricotta mixture (ricotta combined with egg, salt, pepper, and sometimes nutmeg), shredded mozzarella, and grated Parmesan. If you have to stop mid-layer to find something, your momentum breaks and you’re more likely to make mistakes. Also, ensure your oven is clean so you don’t have smoke or debris affecting your baking process.
Step 2: The First Layer—Sauce Only
Spread a thin layer of sauce on the bottom of your dish—roughly 1/4 inch. Use about 3/4 cup of sauce. This is your foundation, so make it even. No pasta yet. The goal is to prevent sticking and burning.
Step 3: The First Pasta Layer
Place your pasta sheets in a single layer. If you’re using standard dried lasagna noodles, they probably won’t cover the entire dish perfectly—there will be gaps. That’s fine. Don’t overlap them too much, as this creates thick, doughy spots. Slightly overlapping is okay, but aim for minimal overlap.
Step 4: The Ricotta Layer
Dollop your ricotta mixture across the pasta layer. Use about 1.5 cups per layer. Instead of trying to spread it perfectly, use a small offset spatula or the back of a spoon to gently spread it into an even layer, roughly 1/4 inch thick. Leave a tiny bit of pasta showing around the edges—this helps you see your layers and ensures the pasta isn’t completely buried.
Step 5: The Mozzarella Layer
Sprinkle mozzarella over the ricotta layer. Use about 1 cup of shredded mozzarella per layer. Don’t go crazy here—you want coverage, not a mountain of cheese. Remember, you’re building multiple layers, so cheese will accumulate as you go up.
Step 6: The Sauce Layer
Now add another layer of sauce—about 1 cup this time. This is thicker than your first layer because now you have more components underneath. The sauce holds everything together and adds moisture.
Step 7: Repeat
Now you repeat steps 3-6. Pasta, ricotta, mozzarella, sauce. Most 9×13 dishes accommodate 3-4 layers comfortably, depending on how thick each component is.
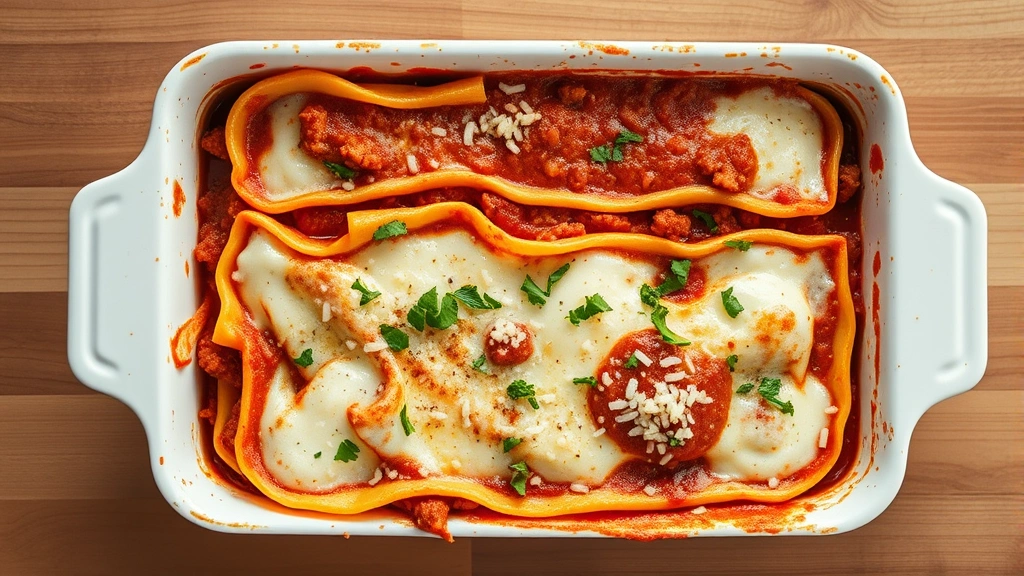
Step 8: The Top Layer
Your final layer should be visible and beautiful because it’s what people see. Tradition dictates your top layer should be primarily cheese. After your last sauce layer, add a final pasta layer, then top with remaining ricotta mixture (if you have it), a generous amount of mozzarella, and a sprinkle of Parmesan. This creates that gorgeous golden-brown top that makes lasagna so appealing.
Common Layering Mistakes to Avoid
Even with the best intentions, certain mistakes can derail your lasagna. Being aware of them means you can actively avoid them.
Mistake 1: Too Much Sauce
This is the most common problem. An oversauced lasagna becomes more of a casserole soup. Remember, your pasta will release moisture as it cooks, and your cheese will release moisture too. You don’t need as much sauce as you think. A good rule of thumb is one pound of pasta should use about 3-4 cups of sauce total. If your sauce is thinner (like a tomato-based sauce without much meat), use less. If it’s thicker, you can use more.
Mistake 2: Insufficient Cheese Between Layers
Some people try to economize on cheese, which is honestly a tragedy. You need enough cheese in each layer to create structure and bind ingredients together. Skimping on cheese results in layers that slide around and don’t hold together properly.
Mistake 3: Not Seasoning Individual Layers
Many cooks season their sauce adequately but forget to season the ricotta mixture. Each component should be properly seasoned on its own. Your ricotta mixture especially should have salt, pepper, and perhaps some Italian herbs or nutmeg. Don’t rely on the sauce to provide all the seasoning.
Mistake 4: Using Cold Components
If your ricotta mixture and sauce are cold when you assemble, the baking time increases and you risk uneven cooking. Let components come to room temperature before assembling, or at least don’t pull them straight from the refrigerator.
Mistake 5: Overcrowding the Layers
Resist the temptation to pack in more layers than your dish can handle. When you compress too many layers, the bottom ones get squished and you lose the distinct layer structure. Stick to what fits comfortably—usually 3-4 layers.
Mistake 6: Pasta Sheets Touching Each Other
This creates thick, gluey spots. Always have a moist component between pasta layers. Never put pasta directly on top of pasta.
Baking and Resting Your Masterpiece
You’ve done the layering work—now don’t sabotage yourself in the final steps.
Cover your assembled lasagna tightly with aluminum foil. This traps steam and ensures the pasta cooks through without the top burning. Bake at 375°F for about 25 minutes covered. Then remove the foil and bake an additional 15-20 minutes, until the cheese on top is bubbly and lightly browned. The total baking time is usually 40-45 minutes, though this varies based on how cold your components were and your oven’s quirks.
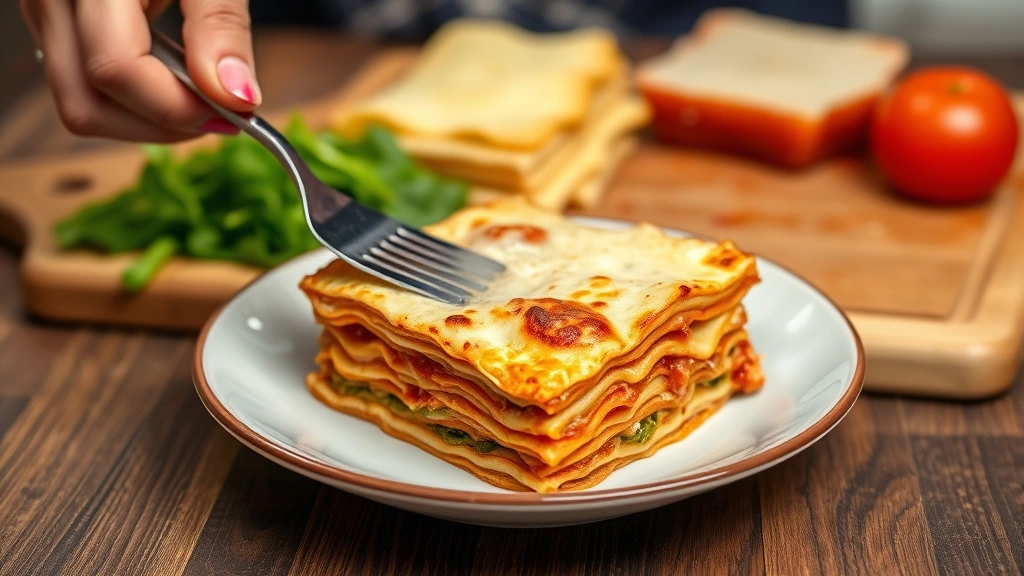
Here’s the part most people skip but absolutely shouldn’t: let your lasagna rest for 10-15 minutes after removing it from the oven. This is crucial. The layers need time to set up, and the cheese needs to cool slightly so it doesn’t all melt and slide off when you cut into it. If you cut into lasagna straight from the oven, you’ll end up with a molten mess that’s beautiful but impossible to serve neatly.
When you do cut, use a sharp knife and a spatula. Cut into squares, then use the spatula to slide underneath and support the piece as you lift it onto the plate. Clean your knife between cuts for clean edges.
For more detailed baking techniques and oven management, check out This Old House’s comprehensive lasagna guide and Family Handyman’s lasagna instructions.
Frequently Asked Questions
Can I assemble lasagna the day before and bake it the next day?
Absolutely. In fact, many people prefer this method. Assemble your lasagna, cover it tightly with plastic wrap and then aluminum foil, and refrigerate overnight. The flavors actually meld and improve. When you’re ready to bake, add 10-15 minutes to your baking time since you’re starting with cold ingredients. Some people even bake it partially, let it cool completely, refrigerate it, then finish baking later. Just cover it well to prevent it from drying out.
Should I use no-boil noodles or regular dried lasagna noodles?
Both work, but they require different approaches. No-boil noodles are convenient and designed to soften during baking. However, they work best when you have plenty of moisture in your layers. Regular dried noodles give you more control over texture since you cook them to your preferred doneness. Fresh pasta sheets are the gold standard if you can find them—they require no pre-cooking and create incredibly tender lasagna. For most home cooks, regular dried noodles boiled until just barely al dente work beautifully.
What’s the best cheese combination for lasagna?
The classic combination is ricotta, mozzarella, and Parmesan. Use whole milk ricotta if possible—it’s creamier than part-skim. For mozzarella, low-moisture mozzarella is your friend for baking; it melts better and browns beautifully. Some people use a mix of whole milk and low-moisture mozzarella. Parmesan adds sharpness and helps create that golden top. Avoid pre-shredded cheese with anti-caking agents if possible; fresh-shredded melts more smoothly. Visit Home Depot’s cooking section for quality cheese options.
Can I make lasagna in a different shaped dish?
Yes, but adjust quantities accordingly. A round baking dish might need slightly less of each component. A smaller rectangular dish will be taller and might need more sauce to keep layers moist. The key is maintaining the same principle: adequate moisture between layers and proper cheese distribution.
How do I prevent lasagna from being watery?
Use sauce that’s been reduced and thickened. Avoid vegetables that haven’t been properly salted and dried. Don’t use too much ricotta—it releases moisture as it cooks. Bake covered for the first portion to trap steam, then uncover to allow some moisture to escape. If your lasagna still seems watery, let it rest longer before cutting—sometimes moisture redistributes as it cools.
Can I freeze lasagna after assembling it?
Yes! Freeze it before baking. Wrap it well in plastic wrap and aluminum foil. It will keep for up to three months. When ready to bake, you can bake it from frozen, adding 15-20 minutes to your baking time (keep it covered longer to ensure the pasta cooks through). Alternatively, thaw it overnight in the refrigerator, then bake as normal. Many people actually prefer the texture of frozen-then-baked lasagna because the freezing process breaks down cell walls slightly, creating a more tender final product.
What’s the ideal thickness for each layer?
Aim for about 1/4 inch for sauce and ricotta layers, and about 1/8 inch for cheese layers. This might seem precise, but it’s not an exact science—you’re looking for visual consistency. Each component should be visible and distinct, with nothing too thin or too thick. As you practice, you’ll develop an intuition for what looks right.
Should I cover lasagna while it bakes?
Yes, for the first 25 minutes or so. Covering it with foil traps steam and ensures the pasta cooks through. Remove the foil for the last 15-20 minutes to allow the top to brown and the cheese to bubble. If the top is browning too quickly before the pasta is done, keep it covered longer.
Layering lasagna is genuinely a skill that improves with practice. Your first attempt might be slightly imperfect, but it’ll still taste delicious. By your third or fourth time, you’ll be layering like a pro, and you’ll develop your own preferences and techniques. The beauty of lasagna is that it’s forgiving—even if something isn’t absolutely perfect, the final result is still comforting, delicious, and absolutely worth the effort. Now get in that kitchen and build something amazing.
Related Posts

How Long to Boil Lobster Tails: Cooking Guide

How Long to Fly from New York to London? Travel Times
