
How to Wash Fresh Eggs? Farmer’s Method Explained
How to Wash Fresh Eggs: Farmer’s Method Explained
Fresh eggs from your backyard flock or local farm come with a natural protective coating called the bloom or cuticle. This waxy layer seals the porous shell and prevents bacteria from entering. However, eggs often arrive with dirt, feathers, and other debris that needs careful removal. Understanding the proper technique for washing fresh eggs is essential for food safety and maintaining egg quality.
Whether you’re a homesteader collecting eggs daily or purchasing fresh eggs from a farmer’s market, knowing how to clean them correctly ensures your family enjoys safe, delicious eggs. This guide walks you through the farmer’s proven method, addressing common mistakes and best practices that will help you preserve the egg’s natural defenses while removing contaminants effectively.
Why Fresh Eggs Need Washing
Fresh eggs collected from nesting boxes contain natural dirt, bedding material, and potential bacteria on their shells. Unlike commercially produced eggs that are washed and sanitized at processing facilities, farm-fresh eggs arrive in their natural state. The visible debris isn’t just unsightly—it can harbor harmful pathogens like Salmonella that might transfer to your hands or kitchen surfaces during cooking.
However, the goal of washing fresh eggs differs significantly from industrial cleaning. You’re not trying to sterilize the egg; you’re removing visible contamination while preserving the protective bloom layer. This balance is crucial for food safety without compromising the egg’s natural defenses. Farmers have refined this technique over generations, developing methods that clean effectively without damaging the shell’s integrity.
The timing of washing also matters. Many experienced farmers recommend washing eggs just before cooking rather than immediately after collection. This approach minimizes the time bacteria have to penetrate the shell after the bloom is disturbed. However, heavily soiled eggs should be cleaned sooner to prevent debris from drying and becoming harder to remove.

Understanding the Egg Bloom
The egg bloom is nature’s packaging system—a microscopic protective layer that seals approximately 7,000 tiny pores in the eggshell. This cuticle prevents air and bacteria from entering while allowing the egg to maintain proper moisture levels. Once this layer is compromised, the egg becomes vulnerable to contamination and has a shorter shelf life.
When you wash an egg with hot water or harsh scrubbing, you can damage or remove the bloom entirely. This is why the farmer’s method emphasizes gentle handling and appropriate water temperature. The goal is to remove surface contamination without stripping away this vital protective coating. Understanding this principle guides every decision in the washing process.
Commercial egg operations wash eggs with water warmer than the egg itself, which causes the shell to contract and pull away from the membrane inside, effectively sealing the pores. Home farmers typically use room-temperature water to avoid this aggressive approach while still achieving cleanliness. This gentler method respects the bloom while removing dirt and debris effectively.
Essential Tools and Supplies
You don’t need expensive equipment to wash fresh eggs properly. The farmer’s method relies on simple, readily available supplies that most households already possess. Gathering these items before you begin ensures a smooth, efficient process.
- Room-temperature water: Fill a basin or sink with water between 68-75°F. Water that’s too hot damages the bloom; water that’s too cold won’t remove dirt effectively
- Soft cloths or sponges: Use non-abrasive materials like soft cotton cloths, microfiber cloths, or gentle sponges. Avoid steel wool or rough scrubbers that can scratch shells
- Mild dish soap: Optional but helpful for heavily soiled eggs. Use minimal amounts—plain water often suffices for lightly soiled eggs
- Dry towels: Have clean, lint-free towels ready for drying eggs immediately after washing
- Egg carton or basket: Prepare a clean container for storing washed eggs. Never reuse old cartons without sanitizing them first
- Optional: vinegar solution: Some farmers add one tablespoon of white vinegar per gallon of water for additional sanitation without the harshness of hot water
Consider keeping dedicated washing supplies separate from general kitchen cleaning items. This prevents cross-contamination and ensures you’re using appropriate materials specifically for egg cleaning. Many farmers maintain a small corner of their kitchen or mudroom with these supplies readily accessible.
Step-by-Step Washing Method
The farmer’s method follows a straightforward process that prioritizes both cleanliness and egg quality. Follow these steps carefully to achieve optimal results:
- Prepare your workspace: Fill a basin with room-temperature water. Have your soft cloth, towel, and carton nearby. Ensure all surfaces are clean before beginning
- Inspect the egg: Examine each egg for the extent of soiling. Lightly soiled eggs need minimal attention; heavily soiled eggs require more careful cleaning
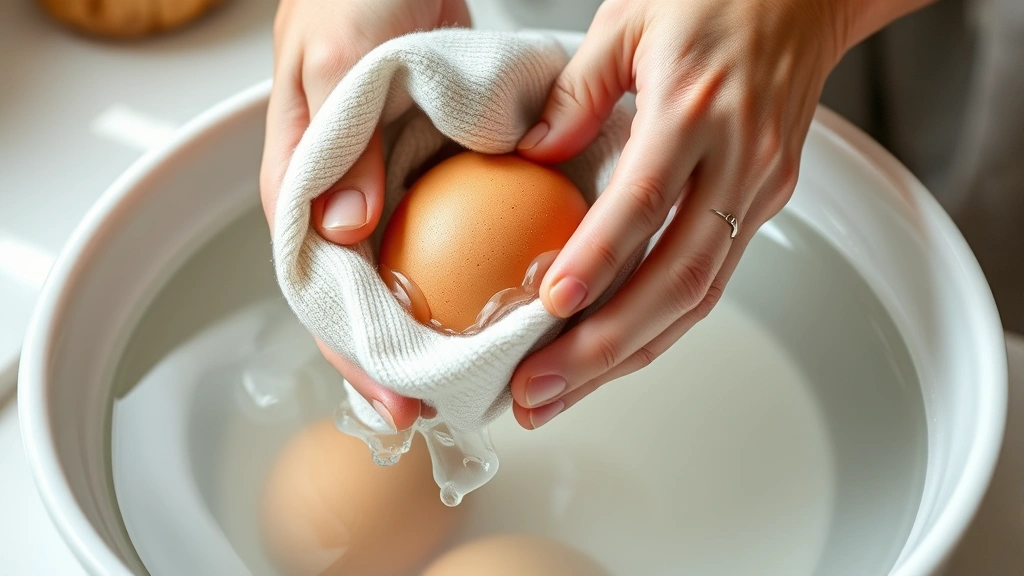
- Wet the egg gently: Submerge the egg in water or dampen your cloth and gently wipe the surface. Don’t hold it under running water for extended periods, as this increases bloom damage
- Apply gentle friction: Using your soft cloth, gently rub away dirt and debris. Work in small circular motions rather than scrubbing aggressively. Focus on visibly soiled areas
- Use minimal soap if needed: For stubborn dirt, dampen your cloth with a tiny amount of mild dish soap mixed with water. Rub gently, then rinse thoroughly with clean water
- Final rinse: Give the egg a final gentle rinse with clean room-temperature water to remove any soap residue
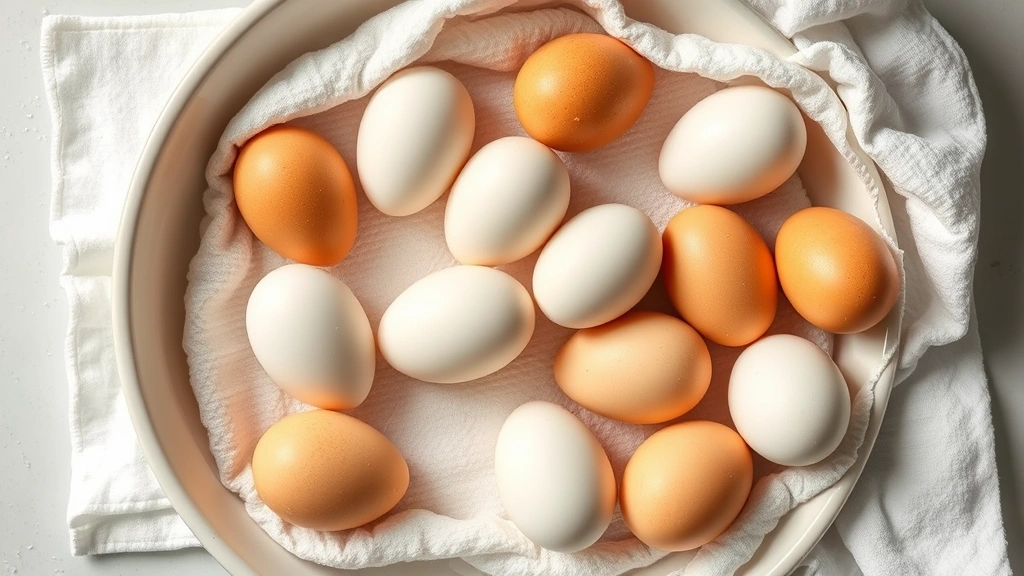
- Dry immediately: Pat the egg dry with a clean towel right away. Don’t leave wet eggs sitting, as moisture can promote bacterial growth
- Store properly: Place dried eggs in a clean carton, pointed end down, in a cool location. Refrigerate if desired, though fresh eggs with intact blooms store well at room temperature
This entire process typically takes just a few seconds per egg. Speed is actually beneficial—the less time the egg spends wet, the better for preserving the bloom. Many experienced farmers develop a rhythm where washing becomes almost automatic, processing dozens of eggs efficiently.
Water Temperature Matters
Water temperature is perhaps the most critical factor in the farmer’s washing method. This single variable affects both cleanliness and bloom preservation. Understanding why temperature matters helps you make informed decisions about your own egg-washing approach.
Room-temperature water (68-75°F) is ideal for home egg washing. It removes most dirt effectively without damaging the bloom. This temperature range allows you to clean the surface while maintaining the shell’s natural protective mechanisms. It’s the sweet spot between effectiveness and preservation.
Cold water below 60°F is less effective at removing debris and may shock the egg, potentially causing cracks. Hot water above 90°F can damage or remove the bloom entirely, leaving eggs vulnerable to bacterial contamination. Never use water hotter than the egg itself, as this creates pressure differences that compromise the shell’s integrity.
Some farmers use slightly warm water (around 80°F) for heavily soiled eggs, staying below the critical threshold where bloom damage occurs. This warmer-but-not-hot approach provides additional cleaning power for particularly dirty eggs while still respecting the protective layer. Test this temperature carefully with a few eggs before committing to this method.
The principles of gentle cleaning apply to eggs just as they do to delicate fabrics. Respect the material you’re working with, and results improve dramatically. Temperature control is fundamental to this respect.
Drying and Storage
Proper drying and storage are just as important as the washing process itself. Eggs that remain wet create an environment where bacteria can multiply. Effective drying prevents this risk and extends shelf life significantly.
Immediate drying is essential. Pat each egg dry with a clean, lint-free towel as soon as you finish rinsing. Don’t stack wet eggs or leave them sitting in the basin. The few seconds it takes to dry each egg pays dividends in food safety and longevity.
After drying, store eggs in a clean carton with the pointed end facing down. This positioning protects the air cell at the larger end and keeps the yolk centered. Store in a cool location—either refrigerated or in a cool room between 55-65°F. Fresh eggs with intact blooms can last 3-4 weeks at room temperature or 4-5 weeks refrigerated.
Never wash eggs and then store them immediately in sealed containers. Allow them to air-dry completely first to prevent moisture buildup. Some farmers place washed eggs on a clean towel for 15-20 minutes before placing them in cartons, ensuring complete dryness.
If you’re storing eggs for an extended period, consider leaving them unwashed until just before use. This preserves the bloom completely and extends storage life even further. However, heavily soiled eggs should always be cleaned before storage to prevent debris from attracting bacteria.
Common Mistakes to Avoid
Even with good intentions, common mistakes can compromise egg quality or create food safety risks. Learning from these pitfalls helps you develop better habits:
- Using hot water: This is the most frequent mistake. Hot water damages the bloom and creates conditions for bacterial penetration. Stick firmly to room-temperature water
- Aggressive scrubbing: Rough sponges or hard brushes scratch shells and damage the protective coating. Gentle pressure with soft materials is always sufficient
- Extended soaking: Leaving eggs submerged for long periods allows water to penetrate the shell. Quick dips and gentle wipes are far superior
- Storing wet eggs: Moisture promotes bacterial growth and shortens shelf life dramatically. Always dry eggs completely before storage
- Using harsh chemicals: Bleach, strong detergents, and antibacterial soaps are unnecessary and can leave residues. Mild dish soap or plain water is sufficient
- Reusing contaminated cartons: Old egg cartons may harbor bacteria from previous contents. Always use clean cartons for storing fresh eggs
- Ignoring visible cracks: If washing reveals cracks in the shell, use that egg immediately for cooking. Never store cracked eggs, as bacteria can enter easily
- Washing eggs immediately before storage: While this seems logical, it’s actually counterproductive. Wash eggs just before use, or wash heavily soiled eggs and allow them to dry completely before storage
The principles of effective cleaning often involve understanding what not to do as much as what to do. Avoiding these common mistakes puts you ahead of most home egg handlers.
FAQ
Should I wash fresh eggs immediately after collection?
Not necessarily. If eggs are only lightly soiled, waiting until just before use preserves the bloom better. However, heavily soiled eggs should be cleaned within a few days to prevent debris from attracting bacteria. Many farmers use a middle approach: clean visibly dirty eggs immediately and lightly soiled eggs just before cooking.
Can I use vinegar to wash eggs?
Yes, vinegar is an excellent gentle sanitizer. Mix one tablespoon of white vinegar per gallon of room-temperature water. The acidity helps eliminate bacteria without the harshness of hot water or strong chemicals. Some farmers prefer this method for regular egg washing.
What if an egg has dried-on poop?
Soak the egg briefly in room-temperature water to soften the debris, then gently wipe with a soft cloth. Avoid scrubbing hard, as this damages the shell. If debris won’t come off easily, it’s better to leave slight residue than to risk shell damage. Alternatively, use a very soft toothbrush with minimal pressure.
How long do washed eggs last?
Properly washed and dried eggs last 3-4 weeks at room temperature or 4-5 weeks refrigerated. Unwashed eggs with intact blooms last 4-5 weeks at room temperature or 5-6 weeks refrigerated. The bloom’s preservation directly impacts longevity.
Is it safe to eat eggs without washing them?
Light debris on the outside isn’t necessarily unsafe if you’re careful during cooking. However, visible dirt can harbor Salmonella and other pathogens. It’s best practice to wash eggs, especially if they’re visibly soiled. The farmer’s gentle method removes contamination without creating risk.
Can I use a dishwasher to wash eggs?
No. Dishwashers use hot water and aggressive cycles that damage the bloom severely. Always hand wash eggs using the farmer’s method with room-temperature water and gentle pressure. The time investment is minimal compared to the benefit of preserving egg quality.
What’s the difference between washing and sanitizing eggs?
Washing removes visible dirt and debris. Sanitizing kills bacteria on the surface. The farmer’s method focuses on washing—removing contamination through gentle cleaning. For additional sanitation without harsh methods, add vinegar to your water. True sanitization requires heat or chemicals that damage the bloom, so it’s generally unnecessary for home use.
Should eggs be stored point-down or on their side?
Point-down is ideal. This position keeps the yolk centered and protects the air cell at the larger end. Storing eggs on their side or point-up can cause the yolk to shift and the air cell to enlarge, reducing freshness and potentially allowing bacteria to penetrate.
Related Posts

Superscript in Google Docs: Expert Tips

Strikethrough in Excel: Easy Steps for Beginners
