
How to Teach Hurdle Techniques: Expert Guide
How to Teach Hurdle Techniques: Expert Guide for Coaches and Athletes
Teaching hurdle techniques is both an art and a science. Whether you’re coaching a track team or helping an athlete refine their form, understanding the mechanics of hurdling can transform performance dramatically. The difference between a clumsy, inefficient hurdler and a smooth, powerful one often comes down to proper instruction and deliberate practice.
Hurdling isn’t just about running fast and jumping high—it’s a complex skill that requires coordination, timing, and body awareness. Athletes need to maintain their sprint velocity while clearing barriers that demand precision and athleticism. This guide breaks down everything you need to know to teach hurdle techniques effectively, from fundamental mechanics to advanced drills that build championship-level performance.
The beauty of hurdling is that it’s teachable. With the right approach, even beginners can develop solid fundamentals that serve as a foundation for improvement. We’ll explore the key technical elements, proven teaching progressions, and practical strategies that work in real training environments.
Understanding Hurdle Mechanics: The Foundation
Before you can teach hurdling effectively, you need to understand the biomechanics at play. Hurdling is essentially sprinting interrupted by obstacles. The goal is to maintain horizontal velocity while clearing each hurdle with minimal time in the air and maximum efficiency.
The stride pattern in hurdling differs significantly from flat sprinting. Between hurdles, athletes take specific numbers of steps—typically three steps for 110m hurdles and five steps for 400m hurdles. This rhythm is crucial. When teaching, emphasize that consistency in stride length and frequency between hurdles is just as important as the hurdle clearance itself.
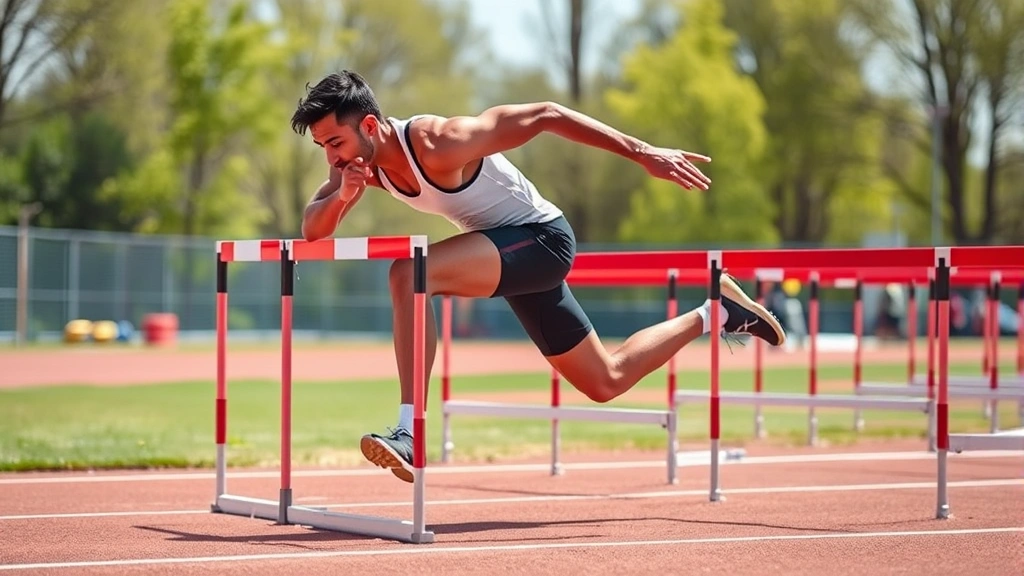
Body position during flight matters tremendously. The lead leg should drive up and out, while the trail leg tucks underneath the body. This isn’t a jump; it’s a controlled, athletic movement that propels the athlete forward while clearing the barrier. The center of gravity should remain as low as possible throughout the entire motion.
One often-overlooked element is the relationship between horizontal and vertical forces. Hurdlers aren’t trying to jump high—they’re trying to move forward quickly while clearing an obstacle. This distinction shapes everything about proper technique. If you want to improve your athlete’s speed overall, understanding how to run faster provides valuable context for the sprint portions of hurdling.
The Approach and Acceleration Phase
The first eight strides before the first hurdle set the tone for the entire race. This approach phase determines whether your athlete reaches the first hurdle in an optimal position, both in terms of distance and velocity. Proper acceleration creates momentum that carries through the entire race.
Teach athletes to accelerate aggressively from the blocks or starting position. They should be thinking about driving hard, not worrying about the hurdle yet. Many beginners make the mistake of slowing down or shortening their stride as they approach the first hurdle—this is a critical error that undermines everything that follows.
The stride count to the first hurdle varies based on the athlete’s height and speed. Taller athletes typically take longer strides and might reach the first hurdle in fewer steps than shorter athletes. Work with each athlete individually to find their optimal rhythm. This is where video analysis becomes invaluable—recording athletes during practice lets you count steps and identify inconsistencies.
Focus on maintaining an upright posture during the approach. The upper body should stay tall and composed, with a slight forward lean from the ankles. Arms should pump naturally, driving forward and back rather than side to side. Think about maintaining a sprinting position right up to the moment of takeoff.
Takeoff Technique and Clearance
The takeoff is where many hurdlers struggle, especially beginners. The distance from the hurdle during takeoff dramatically affects the trajectory and clearance efficiency. Most coaches teach the “1-meter rule”—the athlete should take off approximately one meter before the hurdle. This distance allows for a powerful drive while still clearing the hurdle safely.
The lead leg should drive explosively upward and outward. This isn’t a passive lift; it’s an aggressive knee drive that propels the athlete up and over the hurdle. The drive leg (the back leg) should extend powerfully, contributing to both vertical and horizontal momentum. The timing of these two movements must be synchronized.
Many athletes make the mistake of reaching forward with their lead leg instead of driving up. Teach them to think “up and over” rather than “out and up.” The lead leg should clear the hurdle by at least 12-18 inches, depending on the hurdle height and the athlete’s size.
The trail leg presents a different teaching challenge. As the lead leg drives up, the trail leg should tuck underneath the body, with the knee coming up toward the chest. This creates a compact position that minimizes air time and allows for a quick transition to the next stride. Many beginners leave their trail leg extended too long, which increases flight time and wastes energy.
The arm action during clearance should be natural and balanced. The arm opposite the lead leg drives forward, helping to pull the athlete over the hurdle. Avoid excessive arm movement or crossing the midline of the body. Think of the arms as supporting the leg action rather than driving it.

Landing and Drive Mechanics
The landing phase is often overlooked in hurdle instruction, but it’s absolutely critical. A poor landing can disrupt rhythm, waste energy, and set up a weak start to the next stride. The athlete should land on the lead leg with a slight forward lean, immediately transitioning into the next stride.
Teach athletes to land actively, not passively. The landing should feel like a continuation of the running motion, not a sudden impact. The foot should land relatively close to the body (directly under the hips), not too far out in front. Landing too far forward increases braking forces and slows horizontal velocity.
Immediately after landing on the lead leg, the athlete should drive the opposite leg forward, re-establishing the sprinting rhythm. The transition from hurdle to hurdle should feel like a seamless flow, not a series of separate movements. This is where the importance of consistent stride patterns becomes evident—the athlete needs to quickly regain their running rhythm and approach the next hurdle at full speed.
The number of steps between hurdles is fundamental. For 110m hurdles, athletes typically take three steps between hurdles. For 400m hurdles, the rhythm is five steps. These patterns aren’t arbitrary—they’re designed to optimize velocity maintenance and hurdle clearance efficiency. When teaching, have athletes count their steps between hurdles during practice. Consistency in step count leads to consistency in performance.
Core stability during landing is essential. A strong core helps athletes absorb the impact of landing, maintain posture, and transition smoothly into the next stride. Include core strengthening exercises in your training program to support this aspect of technique.
Teaching Progressions and Drills
Effective teaching requires a structured progression that builds skills systematically. Start with fundamental movements before introducing hurdles, then gradually increase the complexity and intensity.
Phase 1: Fundamental Movement Patterns
Begin with basic drills that develop the specific movement patterns required for hurdling. High knees, bounding, and skipping drills build coordination and leg strength. Have athletes perform these drills over short distances, focusing on form rather than speed. Exaggerate the knee drive and emphasize the rhythm.
Teach the lead leg drive separately from the trail leg tuck. Have athletes practice driving one leg up while the other leg tucks underneath. This can be done statically or while walking, then progressing to light jogging. Video your athletes during these drills—seeing themselves perform the movement often provides valuable feedback.
Phase 2: Low Hurdles and Technique Development
Introduce low hurdles (12-18 inches) or even cones and tape barriers. Start with walking through the barrier, then light jogging, then faster running. The low hurdle allows athletes to focus on technique without the fear or difficulty of clearing a full-height hurdle. Many athletes gain confidence and understanding at this stage.
Practice approaching the low hurdle in a controlled manner. Have athletes focus on maintaining their stride pattern and taking off at the appropriate distance. Don’t worry about speed yet—rhythm and consistency are the priorities. When teaching athletes to develop better form, remember that even seemingly unrelated skills like knowing how to read tabs can help with understanding instructional materials and video analysis techniques.
Phase 3: Progressive Height Increases
Gradually raise the hurdle height as athletes demonstrate consistent technique at lower heights. Move from 18 inches to 24 inches to 30 inches, eventually reaching the competition height. This progression reduces injury risk and allows athletes to build confidence systematically.
Phase 4: Multi-Hurdle Work
Once athletes can clear individual hurdles consistently, introduce consecutive hurdles. Start with two or three hurdles, focusing on maintaining rhythm between them. Gradually increase to full-distance workouts. During this phase, the emphasis should shift from individual hurdle clearance to maintaining consistency across multiple hurdles.
Specific Drills for Technique Development
The “high knees over cones” drill develops lead leg drive. Set cones or low barriers in a line and have athletes jog through them, exaggerating knee height. This builds the muscle memory for the aggressive knee drive required in hurdling.
The “skip and drive” drill combines skipping with explosive leg drive. Athletes skip forward, then explosively drive one leg high while tucking the other. This develops the coordination between the lead and trail legs.
The “rhythm steps” drill helps athletes practice their stride count between hurdles. Mark distances appropriate for the athlete’s step count and have them run through without hurdles, focusing on hitting their marks consistently. This builds the consistency that’s crucial for success.
The “hurdle bounds” drill involves taking one or two steps, then bounding over a hurdle, then continuing with steps before the next hurdle. This develops power and rhythm while maintaining the hurdle-specific movement pattern.
Common Mistakes and How to Correct Them
Every coach encounters similar mistakes repeatedly. Recognizing these patterns and knowing how to correct them makes you more effective.
Reaching Forward Instead of Driving Up
This is probably the most common mistake. Athletes try to reach the hurdle instead of driving their lead leg up and over it. Correct this by having athletes focus on knee height rather than horizontal distance. Use drills that emphasize vertical drive, and provide immediate feedback when you see the reaching pattern.
Overstriding on Approach
Some athletes lengthen their stride as they approach the first hurdle, trying to get closer to it. This actually makes takeoff more difficult and less powerful. Teach athletes to maintain their approach stride length and let their natural speed carry them to the optimal takeoff point.
Poor Trail Leg Mechanics
The trail leg staying extended too long is a classic error. This increases flight time and disrupts rhythm. Use slow-motion video to show athletes what’s happening, then drill the tucking motion separately. Have them practice bringing the trail knee up toward the chest explosively.
Inconsistent Step Counts Between Hurdles
If an athlete takes three steps, then four, then three again between hurdles, their rhythm is disrupted. Use step-counting drills and mark distances on the track to help athletes develop consistency. This is fundamental to success in hurdling.
Landing Too Far Forward
Athletes who land with their foot far in front of their body experience braking forces that slow them down. Teach them to land under their hips with a slight forward lean. Video analysis is particularly helpful for correcting this mistake.
Upper Body Tension
Some athletes tense up as they approach hurdles, losing the relaxation and fluidity of their sprint mechanics. Encourage athletes to stay relaxed and composed. Remind them that hurdling is sprinting interrupted by obstacles, not a series of separate jumping movements.
Equipment and Training Setup
Proper equipment and training environment support effective teaching and skill development.
Hurdle Selection
Adjustable hurdles allow you to progress athletes from low heights to full height. Invest in quality hurdles that won’t tip over easily and that are stable during use. Standard competition heights are 42 inches for men’s 110m hurdles, 39 inches for women’s 100m hurdles, and 48 inches for 400m hurdles.
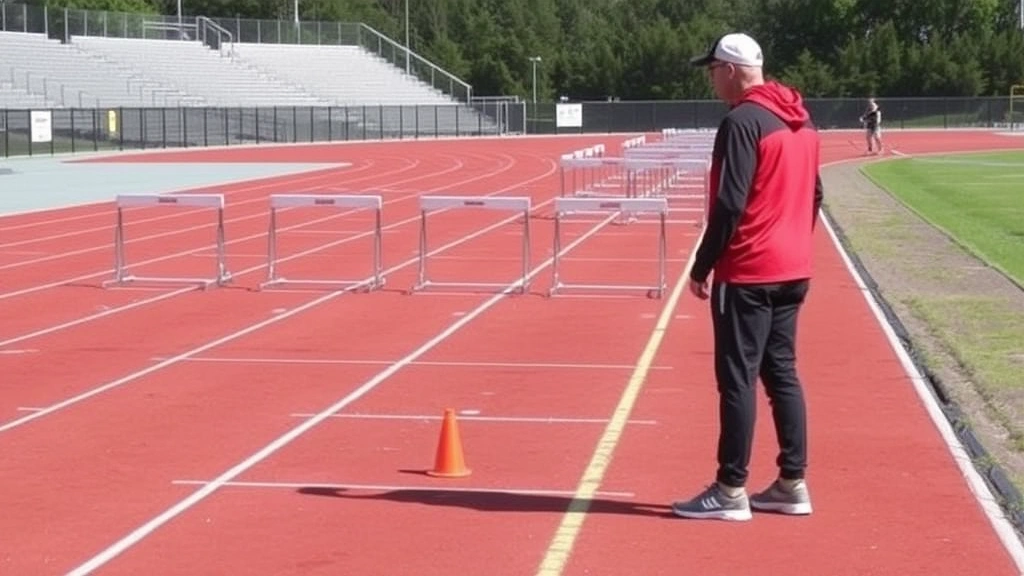
Training Track Setup
Use a proper running surface for hurdle training. Grass can work for some drills but isn’t ideal for consistent, repetitive hurdle work. A track or rubberized surface provides consistent feedback and reduces injury risk. Mark your distances carefully so athletes can practice their specific stride counts.
Video Analysis Equipment
A smartphone camera or dedicated video camera is invaluable for analyzing technique. Record athletes from the side during hurdle work, then review the footage together. Slow-motion replay is particularly helpful for identifying specific technical errors. Many coaches find that athletes respond better to visual feedback than verbal coaching alone.
Training Journal
Have athletes keep training journals noting their workouts, how they felt, and any technical adjustments. This helps them develop self-awareness and provides a record of progress over time. When athletes are ready to understand more about personal development and consistency, knowing how to tie a bow with a tie teaches the importance of precision and practice—principles that apply to all skill development.
Strength and Conditioning Support
Hurdling requires explosive power, flexibility, and core stability. Incorporate plyometrics, strength training, and flexibility work into your program. Single-leg exercises are particularly valuable for developing the unilateral strength needed for hurdling.
Coaching Tips for Maximum Effectiveness
Teaching hurdle techniques goes beyond understanding the mechanics. How you communicate and organize training significantly impacts athlete development.
Individualize Your Approach
Athletes have different body types, speeds, and learning styles. What works for one athlete might not work for another. Spend time with each athlete to understand their specific needs and challenges. Tall athletes might need different guidance than shorter athletes. Faster athletes might need different cues than slower ones.
Use Clear, Specific Cues
Instead of saying “clear the hurdle better,” give specific cues like “drive your knee higher” or “land under your hip.” Clear, actionable feedback helps athletes understand what to focus on and how to improve.
Create a Positive Learning Environment
Hurdling is challenging. Athletes will make mistakes and experience frustration. Create an environment where mistakes are learning opportunities rather than failures. Celebrate progress and improvement, not just perfect performances. Your attitude as a coach sets the tone for how athletes approach challenges.
Implement Progressive Overload Carefully
Increase difficulty gradually—higher hurdles, faster speeds, longer distances. Rushing progression leads to injury and discouragement. Let athletes build confidence at each level before moving to the next.
Build Mental Skills Alongside Technical Skills
Hurdling requires confidence and mental toughness. Help athletes develop visualization skills, manage pre-race nerves, and maintain focus during competition. The mental game is often the difference between good hurdlers and great ones.
For those interested in strategic thinking and decision-making under pressure, understanding how to play spades demonstrates the importance of planning and adapting strategy—skills that transfer to competitive hurdling situations.
Monitor Training Load and Recovery
Hurdle training is intense and can lead to overtraining injuries if not managed properly. Ensure athletes get adequate recovery time between high-intensity sessions. Include lighter recovery workouts and rest days in your program. Watch for signs of overtraining like persistent fatigue or declining performance.
For athletes focused on proper equipment fit, understanding how to measure inseam helps ensure they’re wearing properly fitting training gear that supports rather than hinders their performance.
Frequently Asked Questions
What’s the best age to start teaching hurdle techniques?
Most athletes begin hurdle training around age 14-15, though they can start with basic movement patterns earlier. Young athletes should focus on fundamental running mechanics and coordination before introducing hurdles. Avoid full-height hurdles with very young athletes; start with lower barriers and progress gradually.
How long does it typically take to develop competent hurdling technique?
Basic competence can develop within a few months of consistent training, but true mastery takes years. Most athletes need 1-2 years of dedicated training to develop solid technique and begin achieving competitive times. Elite-level technique development typically spans several years of focused training.
Should I teach lead leg and trail leg techniques separately or together?
Start by teaching them separately through drills and low-hurdle work, then integrate them together as athletes develop competence. This approach allows athletes to master each component before coordinating them into a smooth, integrated movement.
How important is strength training for hurdlers?
Strength training is essential. Hurdlers need explosive power, single-leg strength, and core stability. Include plyometrics, weight training, and bodyweight exercises in your program. However, technique should remain the priority—a strong athlete with poor technique will still struggle.
What’s the most common injury in hurdlers?
Hamstring injuries are unfortunately common in hurdling due to the extreme range of motion required. Proper warm-up, adequate strength training, and gradual progression help prevent these injuries. If an athlete experiences hamstring pain, address it immediately rather than pushing through it.
How do I help athletes who are afraid of hurdles?
Fear is natural. Start with very low barriers and progress gradually. Use positive reinforcement and celebrate small victories. Let athletes work at their own pace and never force them over higher hurdles before they’re ready. Building confidence takes time, but it’s crucial for long-term success.
What’s the difference between teaching 110m and 400m hurdle technique?
While the basic mechanics are similar, the rhythm and strategy differ. 110m hurdlers typically take three steps between hurdles and emphasize speed and power. 400m hurdlers take five steps and must manage fatigue over the longer distance. The teaching progression is similar, but the specific focus areas adjust based on the event.
How often should athletes practice hurdles?
Most competitive hurdlers train hurdles 2-3 times per week during the competitive season, with additional work during off-season training. Beginners might start with once or twice weekly to allow for adequate recovery and technique development. Quality matters more than quantity—focused, technical work beats high-volume, low-quality training.
Related Posts

How Long to Boil Lobster Tails: Cooking Guide

How Long to Fly from New York to London? Travel Times
