

How to Take a Screenshot on HP Notebook: Easy Steps
How to Take a Screenshot on HP Notebook: Easy Steps
Taking a screenshot on your HP notebook might seem like a basic task, but there’s more than one way to capture what’s on your screen. Whether you need to save an important email, document a software issue, or share something with a colleague, knowing the fastest and most efficient methods can save you valuable time. HP notebooks come equipped with several built-in screenshot tools that work seamlessly with Windows, and we’re going to walk you through each one so you can choose the method that works best for your workflow.
The beauty of HP notebooks is that they offer flexibility in how you capture your screen. You’re not limited to a single method—instead, you have access to multiple options ranging from simple keyboard shortcuts to more sophisticated built-in applications. Understanding these different approaches means you’ll always have a screenshot solution ready, regardless of your situation or preferences. Let’s dive into the practical methods that will make screen capturing second nature.
Using the Print Screen Button
The Print Screen (PrtScn) button is the most traditional method for capturing your entire screen on an HP notebook. Located in the upper right area of your keyboard, this button has been the go-to solution for decades, and it remains incredibly reliable. When you press PrtScn, your HP notebook captures the entire display and copies it to your clipboard—though you won’t see any visual confirmation that this happened, which can be a bit confusing for first-time users.
Here’s how to use it effectively: Simply press the Print Screen button once, and your entire screen is captured. The image is now stored in your clipboard, ready to be pasted. Open any image editing software like Paint, or even Microsoft Word, and paste your screenshot using Ctrl+V. This method captures everything visible on your monitor, including the taskbar and any open windows. If you only want to capture the active window, press Alt+Print Screen instead, which captures only the window that’s currently selected.
One thing to remember: the Print Screen method doesn’t automatically save your screenshot as a file. You’ll need to paste it into an application and manually save it. This extra step might seem inconvenient, but it actually gives you control over file format and location. Understanding how to copy and paste on your laptop becomes essential when using this method, as you’re working directly with clipboard operations.
Windows Snip & Sketch Tool
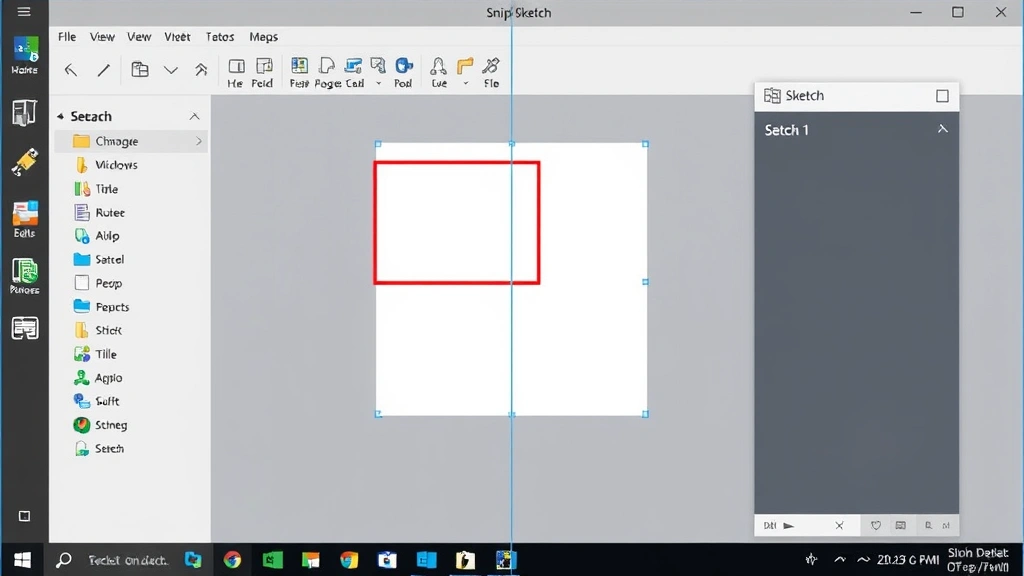
If you’re running Windows 10 or later on your HP notebook, the Snip & Sketch tool is your secret weapon for taking screenshots with precision and style. This application gives you far more control than the basic Print Screen method, allowing you to select specific areas, draw annotations, and save files directly. To access it, press Windows key + Shift + S, and your screen will dim with a toolbar appearing at the top.
The toolbar offers several capture modes: you can capture a rectangular area, freeform shape, window, or full screen. Most users prefer the rectangular selection because it lets you precisely choose what to capture. Simply click and drag to select your desired area, and the screenshot is automatically copied to your clipboard and opens in the Snip & Sketch editor. From there, you can crop, rotate, annotate with pen or highlighter tools, and save directly to your computer. This built-in application has become incredibly popular because it streamlines the entire process into one cohesive workflow.
The annotation features in Snip & Sketch are particularly useful for professionals who need to mark up screenshots for presentations or documentation. You can use different pen colors, thickness options, and even an eraser tool to refine your markup. When you’re satisfied with your edited screenshot, click the save icon and choose your file location and format. This method is significantly more efficient than the traditional Print Screen approach because everything happens within one application.
Built-in Screenshot Tool for HP Notebooks
HP notebooks sometimes come with their own dedicated screenshot utility, particularly on premium models. Check your application menu or search for “HP Capture” or similar HP-branded screenshot tools. These specialized applications often provide additional features tailored specifically for HP users, such as cloud storage integration or enhanced editing capabilities. If your HP notebook includes this tool, it’s worth exploring because it may offer features you won’t find in the standard Windows tools.
To find your HP screenshot tool, click the Start menu and type “screenshot” or look in your applications folder for anything labeled “HP Capture” or “Screenshot.” If you find it, pin it to your taskbar for quick access. These HP-specific tools often include options for scheduling screenshots, capturing video, and integrating with HP’s cloud services. The advantage of using manufacturer-specific tools is that they’re optimized for your exact hardware configuration.
However, if your HP notebook doesn’t include a dedicated screenshot tool, don’t worry—the Windows built-in options are more than adequate for any task. Many newer HP models rely entirely on Windows’ native screenshot functionality, which has become increasingly robust with each Windows update.
Keyboard Shortcuts Explained
Mastering keyboard shortcuts transforms your screenshot workflow from tedious to lightning-fast. On HP notebooks, several key combinations will become your best friends. The most essential shortcut is Windows key + Print Screen, which automatically saves a full-screen screenshot directly to your Pictures folder without requiring you to paste it anywhere. This is perhaps the fastest way to capture your screen if you want the file saved immediately.
Another powerful shortcut is Windows key + Shift + S, which opens the Snip & Sketch tool we discussed earlier. This gives you the flexibility to select exactly what you want to capture before saving. For quick clipboard captures, Alt + Print Screen captures only your active window, which is perfect when you have multiple windows open and only need one. Understanding the relationship between right-click functionality on different devices helps you navigate various screenshot options and context menus more efficiently.
Here’s a quick reference guide for HP notebook screenshot shortcuts:
- Print Screen: Captures entire screen to clipboard
- Alt + Print Screen: Captures active window only to clipboard
- Windows key + Print Screen: Captures entire screen and saves to Pictures folder
- Windows key + Shift + S: Opens Snip & Sketch tool for selective capturing
- Windows key + V: Opens clipboard history to access recent screenshots
Experiment with these shortcuts to find which ones fit your workflow best. Most users find themselves using Windows key + Shift + S for most tasks because it provides the perfect balance between speed and control.
Saving and Organizing Screenshots
Once you’ve captured your screenshot, proper file management ensures you can find it later. Windows automatically saves screenshots taken with Windows key + Print Screen to your Pictures folder in a subfolder called Screenshots. This default location works well for most users, but you might want to establish a more organized system if you take screenshots frequently.
Create a dedicated folder structure for different project types or clients. For example, you might have folders for “Client Documentation,” “Software Issues,” “Design References,” and “Meeting Notes.” When saving screenshots using Snip & Sketch, you can navigate to these folders and save directly there. Consistent naming conventions also help tremendously—consider using descriptive names like “Homepage-Error-2024-01-15” rather than “Screenshot1,” which tells you exactly what the image contains and when it was taken.
If you take screenshots as part of your professional work, consider using cloud storage solutions. Services like OneDrive, Google Drive, or Dropbox can automatically sync your screenshot folder, ensuring you never lose important captures. This also makes it easy to access screenshots from other devices. Learning how to manage files and system organization on your notebook applies equally to screenshot management, as you’re essentially managing digital assets on your computer.
For enhanced organization, many professionals use screenshot tagging systems or metadata. Some applications allow you to add keywords or descriptions to screenshots, making them searchable later. This becomes invaluable when you’re trying to locate a specific screenshot from months ago without remembering the exact filename.
Troubleshooting Common Issues
Sometimes screenshot methods don’t work as expected, and understanding common issues helps you resolve them quickly. If Print Screen isn’t working, first check that your keyboard isn’t in a special mode—some HP notebooks have function keys that require the Fn key to be held simultaneously. Try pressing Fn + Print Screen instead. If that doesn’t work, your Print Screen key might be mapped to something else through software settings.
If Snip & Sketch isn’t responding to the Windows key + Shift + S shortcut, update your Windows installation through Settings > Update & Security > Windows Update. Microsoft frequently improves these tools with updates, and an outdated system might have bugs. You can also access Snip & Sketch manually by searching for it in the Start menu if the shortcut isn’t working.
When screenshots appear blurry or low-quality, check your screen resolution and scaling settings. Some HP notebooks with high-resolution displays may have scaling enabled, which can affect screenshot quality. Additionally, ensure you’re not taking screenshots of compressed or low-quality content—the screenshot quality matches your source material.
If you’re having trouble finding saved screenshots, check your Pictures folder and look for the Screenshots subfolder. You can also use Windows Search (Windows key + S) to search for recent screenshots by typing “*.png” or “*.jpg” in the search box. If nothing appears, verify that your Pictures folder isn’t being redirected to a different location through folder properties.
For HP notebooks with integrated graphics, certain screenshot tools might conflict with hardware acceleration settings. If you experience crashes or freezing when taking screenshots, try disabling hardware acceleration in your graphics settings. Access this through Settings > System > Display > Graphics settings, then toggle hardware acceleration off.
According to Microsoft’s official Windows documentation, most screenshot issues stem from outdated drivers or Windows versions. Keeping your system updated is the first line of defense against screenshot problems. Additionally, HP’s support documentation provides model-specific guidance if you encounter hardware-related issues.
Frequently Asked Questions
Where do screenshots automatically save on my HP notebook?
Screenshots taken with Windows key + Print Screen automatically save to your Pictures folder in a subfolder called Screenshots. You can navigate there by opening File Explorer, clicking Pictures, then Screenshots. Screenshots captured using Snip & Sketch or other methods require you to manually select a save location.
Can I take a screenshot of just one window on my HP notebook?
Yes, press Alt + Print Screen to capture only the currently active window. This copies the window to your clipboard, and you can paste it into an image editor or document. Alternatively, use Windows key + Shift + S to open Snip & Sketch and select the window capture option.
What’s the difference between Print Screen and Windows key + Print Screen?
Print Screen alone copies the screenshot to your clipboard, requiring you to paste it somewhere to save it. Windows key + Print Screen automatically saves the full-screen capture as a PNG file directly to your Pictures/Screenshots folder without using the clipboard.
Why isn’t my Print Screen button working?
Your keyboard might be in a special mode requiring the Fn key. Try pressing Fn + Print Screen. If that doesn’t work, check for conflicting software or keyboard remapping in your system settings. Some HP notebooks assign Print Screen to other functions, which can be changed in the keyboard settings.
Can I edit my screenshot immediately after capturing it?
Yes, if you use Snip & Sketch (Windows key + Shift + S), the tool opens automatically with editing options. You can crop, annotate, and apply effects before saving. For other methods, you’ll need to open an image editor like Paint or a third-party application to edit after capturing.
How do I access my clipboard history to find old screenshots?
Press Windows key + V to open your clipboard history. This shows recent items you’ve copied or screenshotted. You can click any item to paste it. Note that clipboard history has a limited retention period—older items eventually disappear from the history.
Is there a way to take a screenshot without using keyboard shortcuts?
Yes, you can search for “Snip & Sketch” or “Screenshot Tool” in your Start menu and open the application directly. You can also right-click on your desktop and look for screenshot options in the context menu, though this varies depending on your Windows version.
Can I take screenshots of videos or streaming content?
This depends on the content’s copyright protection. Most streaming services implement DRM (Digital Rights Management) that prevents screenshots. If you try to screenshot protected content, the image will appear black or the screenshot will fail. For personal, non-protected content, screenshots work normally.
Related Posts

How Long to Boil Lobster Tails: Cooking Guide

How Long to Fly from New York to London? Travel Times
