
Sync Your Wii Remote: Expert Tips & Tricks
How to Sync Wii Remote: Expert Tips & Tricks for Perfect Controller Connection
The Nintendo Wii Remote is a iconic wireless controller that revolutionized gaming interaction, but connection issues can frustrate even experienced players. Whether you’re setting up a new console, troubleshooting an unresponsive remote, or adding additional controllers to your gaming setup, understanding the synchronization process is essential for seamless gameplay. This comprehensive guide walks you through every method to sync your Wii Remote, from basic pairing procedures to advanced troubleshooting techniques that resolve stubborn connectivity problems.
Synchronization ensures your Wii Remote communicates properly with your Nintendo Wii console, enabling responsive button inputs and motion controls. Without proper syncing, your remote becomes useless—buttons won’t register, motion detection fails, and your gaming experience suffers. The good news is that syncing a Wii Remote is straightforward once you understand the process, and most connection issues resolve within minutes using the methods outlined below.
Understanding Wii Remote Synchronization
Before attempting to sync your Wii Remote, it helps to understand what synchronization actually accomplishes. When you sync a remote, you’re establishing a secure wireless connection between the controller and your Nintendo Wii console. This pairing process creates a unique digital handshake that allows only your remote to control your console, preventing interference from neighboring devices or unauthorized controllers.
The Wii Remote uses Bluetooth wireless technology, similar to modern smartphones and wireless headsets. During synchronization, the remote and console exchange identification codes that enable encrypted communication. This process typically takes only a few seconds, but several factors can interfere with successful pairing, including low battery power, physical obstructions, and previous sync conflicts.
Understanding the difference between initial syncing and re-syncing is crucial. New Wii Remotes require a specific setup procedure, while previously paired remotes use a simpler re-synchronization process. Additionally, some troubleshooting scenarios require alternative syncing methods similar to those used with Roku remotes, demonstrating how wireless pairing principles apply across different devices.
Standard Syncing Method for New Remotes
Setting up a brand-new Wii Remote follows a straightforward procedure that takes less than five minutes. Start by ensuring your Nintendo Wii console is powered on and the Bluetooth receiver is active. Most consoles have the receiver built into the main unit, but some setups use separate wireless sensors.
Step 1: Prepare Your Console
Turn on your Nintendo Wii and navigate to the main menu. Ensure the console is fully booted and responsive before attempting to sync any remotes. The Wii menu screen indicates your system is ready to accept new controller connections. If you’re using a Wii U, the process differs slightly, so consult your specific console documentation.
Step 2: Insert Fresh Batteries
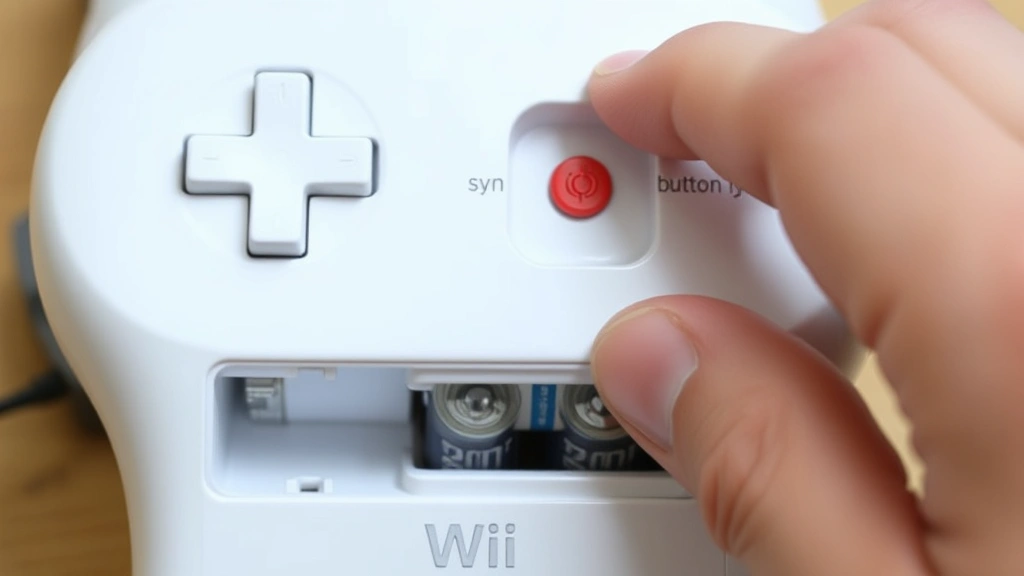
Open the battery compartment on the back of your Wii Remote and insert two AA batteries, ensuring proper polarity (+ side facing the correct direction). Fresh batteries are essential for successful syncing—weak batteries frequently cause pairing failures and connection drops. If you’re re-syncing an existing remote, replace batteries even if they still power the controller, as reduced voltage can prevent proper synchronization.
Step 3: Access the Sync Menu
On your Wii console, navigate to Wii Settings from the main menu. Select Wii Remote Settings, then choose Reconnect or Connect New Remote depending on your menu options. Your console now enters pairing mode and actively searches for nearby Wii Remotes broadcasting sync signals.
Step 4: Press the Sync Button
On your Wii Remote, locate the small red sync button inside the battery compartment (you’ll need to have the battery cover open). Press and hold this button for three seconds until the controller’s LED lights flash. The flashing LEDs indicate the remote is broadcasting its identification code to nearby consoles. Release the button and wait for the console to detect and pair with your remote.
Step 5: Confirm Successful Syncing
Within 20 seconds, your Wii Remote’s LEDs should stop flashing and display a solid light pattern, indicating successful synchronization. Your console’s screen confirms the connection with a message or visual indicator. Test the remote by pressing buttons and performing motion gestures to verify full functionality before proceeding with gameplay.
Re-syncing an Existing Remote
If your Wii Remote loses connection or you’re adding a previously paired remote to a different console, the re-syncing process is even simpler than initial setup. This procedure takes advantage of your remote’s stored connection history, making the process faster and more reliable than first-time pairing.
Quick Re-sync Method
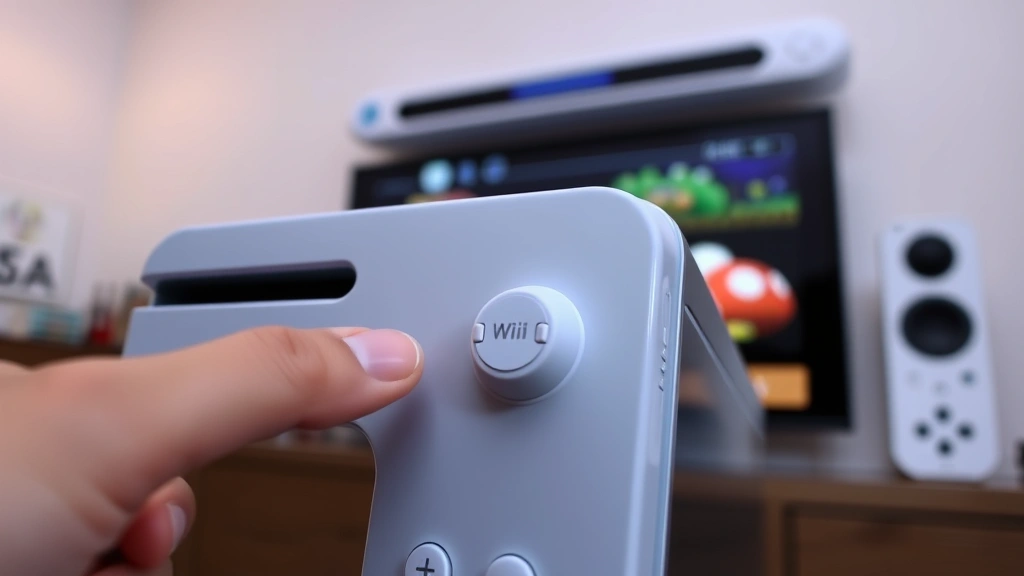
Press the Sync button on your Wii console (located on the front panel, usually near the eject button). Your console enters pairing mode for 20 seconds. Simultaneously, press the Sync button on your Wii Remote. The console and remote exchange their stored identification codes and re-establish their connection within seconds. This method works for reconnecting remotes that previously synced with your console but temporarily lost connection.
Menu-Based Re-sync
For more deliberate re-syncing, navigate to Wii Settings and select Wii Remote Settings. Choose Reconnect and follow the same battery and sync button procedures described in the standard syncing method. This approach works when the quick method fails or when you need to ensure proper pairing before important gaming sessions.
Multiple Remote Syncing
Wii consoles support up to four remotes simultaneously, making multiplayer gaming possible. To add additional remotes, repeat the syncing process for each controller. Press the console’s Sync button, then press each remote’s Sync button individually, waiting for LED confirmation before syncing the next controller. Avoid syncing multiple remotes simultaneously, as this confuses the console’s pairing recognition.
Troubleshooting Connection Problems
Despite straightforward procedures, Wii Remote syncing sometimes encounters obstacles. Identifying the root cause of connection failures enables targeted solutions that restore functionality quickly.
Remote Not Responding After Syncing
If your remote syncs successfully but buttons don’t register during gameplay, check battery power first. Remove the battery cover and inspect batteries for corrosion or leakage. Replace with fresh AA batteries and attempt syncing again. Weak batteries rank as the primary cause of post-sync connection failures, so this step resolves most issues. If problems persist, try the re-sync procedure described above, as occasional connection glitches require re-establishing the wireless link.
Sync Button Not Responding
When pressing the Sync button produces no LED response, your remote likely has dead batteries. Replace both AA batteries with fresh ones, ensuring correct polarity. If LEDs still don’t flash after battery replacement, your remote may have a hardware malfunction, particularly if it’s been dropped or exposed to moisture. Test with another remote to determine if the problem is the controller or your console’s receiver.
Console Not Detecting Remote
If your console’s pairing mode doesn’t detect your remote after pressing the Sync button, verify your Wii is fully powered on and responsive. Navigate through the menu to confirm the system is operational. Check for physical obstructions between the remote and console—walls, furniture, or electronic devices can interfere with Bluetooth signals. Move closer to your console (within 10 feet) and attempt syncing again. If still unsuccessful, power cycle both devices: turn off the console, wait 30 seconds, then power on and retry the syncing procedure.
Intermittent Connection Drops
Remotes that sync successfully but disconnect randomly during gameplay typically suffer from battery degradation or receiver sensitivity issues. Replace batteries immediately, as this resolves most intermittent connection problems. If drops continue, check for Bluetooth interference from cordless phones, wireless routers, or microwave ovens operating near your gaming setup. Relocate these devices away from your console or switch to a different gaming location. Additionally, ensure your console’s firmware is current by checking for system updates through Wii Settings.
Advanced Sync Techniques
For persistent connection issues that resist standard troubleshooting, advanced techniques offer solutions. These methods address deep-level pairing conflicts and require slightly more technical knowledge but remain accessible to patient users.
Factory Reset Sync Procedure
When a remote refuses to sync or maintains unstable connections, performing a factory reset clears corrupted pairing data. Power off your Wii console completely and unplug it from the electrical outlet. Wait five minutes to ensure all power drains from the system. Plug in the console and power it on, allowing it to fully boot. During this clean startup, your Wii’s pairing database resets, clearing any corrupted remote data. Now attempt the standard syncing procedure with your remote, which should pair cleanly without previous conflict data.
Multiple Console Pairing Management
If you own multiple Nintendo Wii consoles, your remote may retain pairing data from a different system, causing confusion during synchronization attempts. To resolve this, access Wii Settings on each console and review connected remotes. Remove your target remote from all consoles except the one you’re currently syncing with. This eliminates conflicting pairing instructions and allows the remote to establish a clean connection with your intended console. Some users maintain separate remotes for each console to avoid this complexity entirely.
Sensor Bar Positioning Optimization
While the sensor bar primarily enables motion control rather than basic syncing, improper sensor bar placement can cause connection instability. Ensure your sensor bar is positioned horizontally above or below your television, centered on the screen, at the same height as your viewing position. The bar should be 5-10 feet from where you hold the remote. Proper sensor bar alignment improves overall remote responsiveness and can resolve subtle connection quality issues that affect gameplay precision.
Preventing Future Sync Issues
Maintaining reliable Wii Remote connections requires ongoing attention to battery health, storage conditions, and environmental factors. Implementing preventive measures eliminates most synchronization problems before they occur.
Battery Maintenance Protocol
Replace Wii Remote batteries every three to four months, even if they still power the controller. This proactive approach prevents the battery degradation that causes connection failures. Store unused remotes in a cool, dry location away from direct sunlight and heat sources. Remove batteries from remotes during extended storage periods (longer than two weeks) to prevent battery leakage that damages internal circuitry. Consider purchasing rechargeable AA batteries designed for gaming controllers, which maintain consistent voltage and reduce long-term costs.
Environmental Optimization
Position your Wii console in a central location with clear line-of-sight to where you hold remotes. Avoid placing the console in enclosed cabinets that block Bluetooth signals. Keep the console away from other wireless devices, particularly cordless phones and older wireless routers that operate on the 2.4GHz frequency shared by Wii Bluetooth. Maintain at least three feet of distance between your console and these interference sources. If you experience persistent connection issues, consider upgrading to a modern wireless router supporting 5GHz frequencies, which eliminates Wii interference entirely.
Regular Sync Verification
Before extended gaming sessions, verify your Wii Remote maintains proper synchronization by navigating to Wii Settings and reviewing connected remotes. Confirm your remote appears in the list with a stable connection indicator. Test button responsiveness and motion controls in the Wii menu before starting demanding games. This brief verification catches connection issues early, before they impact gameplay. Additionally, if you haven’t used your Wii system in several months, perform a fresh sync of all remotes, as long-term storage can degrade wireless connections.
For additional guidance on wireless device syncing, consult Nintendo’s official support documentation, which provides console-specific instructions and troubleshooting resources. iFixit’s repair guides offer detailed internal remote diagrams for users experiencing hardware-level issues. The retrogaming community on Reddit provides peer-to-peer support from experienced users who’ve resolved similar connection challenges.
Frequently Asked Questions
How long does it take to sync a Wii Remote?
Standard syncing typically completes within 20 seconds. Press the Sync button on your console, then press the remote’s Sync button, and wait for LED confirmation. If syncing takes longer than 30 seconds, cancel the process and retry with fresh batteries.
Can I sync a Wii Remote without the sync button?
No, the physical Sync button is the primary method for establishing Wii Remote connections. However, menu-based synchronization through Wii Settings provides an alternative that internally triggers the same pairing process. This method works when the physical Sync button is damaged or inaccessible.
Why does my Wii Remote keep losing connection?
Intermittent disconnections almost always result from weak batteries. Replace both AA batteries with fresh ones immediately. If problems persist, check for Bluetooth interference from nearby wireless devices, or perform a factory reset of your console to clear corrupted pairing data.
How many Wii Remotes can I sync to one console?
Nintendo Wii consoles support up to four remotes simultaneously, enabling four-player multiplayer gaming. Sync each remote individually by pressing the console’s Sync button followed by each remote’s Sync button, waiting for LED confirmation between each pairing.
What should I do if my Wii Remote won’t sync at all?
Start with battery replacement, as dead batteries prevent syncing entirely. If new batteries don’t resolve the issue, power cycle your console by unplugging it for five minutes. Check for physical damage to the Sync button. If the button appears damaged, try menu-based syncing through Wii Settings. If all methods fail, your remote likely has internal hardware damage requiring replacement.
Is syncing a Wii Remote similar to syncing other wireless controllers?
Yes, syncing wireless remotes like Roku controllers uses similar Bluetooth principles, though specific button sequences differ by device. Understanding Wii Remote synchronization provides foundation knowledge applicable to other wireless gaming and entertainment controllers.
Can I sync a Wii Remote to a Wii U console?
Yes, original Wii Remotes are fully compatible with Wii U consoles. The syncing process is nearly identical, though Wii U menus differ slightly. Navigate to System Settings and select Controllers to access Wii Remote pairing options on Wii U systems.
Why should I replace batteries even if they still work?
Battery voltage gradually decreases as cells discharge, even when they still power devices. Weak batteries produce insufficient voltage for reliable Bluetooth communication, causing connection instability. Replacing batteries proactively prevents the frustrating intermittent disconnections that weak batteries cause during gameplay, ensuring consistent connection quality.
Related Posts

Superscript in Google Docs: Expert Tips

Strikethrough in Excel: Easy Steps for Beginners
