
Solder Copper Pipe Like a Pro: Easy Steps
Solder Copper Pipe Like a Pro: Easy Steps
Soldering copper pipe is one of the most valuable skills a homeowner can master. Whether you’re replacing old plumbing, installing a new water line, or tackling a heating system upgrade, knowing how to create a watertight joint with solder can save you hundreds in contractor fees. The good news? With the right tools, materials, and technique, this is absolutely achievable for beginners.
Many people assume soldering requires years of experience, but the reality is far simpler. Modern soldering techniques have become more accessible, and the fundamental steps remain consistent. In this comprehensive guide, we’ll walk you through everything from selecting your materials to completing your first professional-looking joint. By the end, you’ll understand why soldering copper pipe is considered the gold standard for plumbing connections.
Tools and Materials You’ll Need
Before you begin soldering copper pipe, gather all necessary equipment. Having everything within arm’s reach prevents interruptions and ensures consistent results. The primary tool is a torch—either propane or MAPP gas. A propane torch works well for smaller diameter pipes (up to 1 inch), while MAPP gas handles larger pipes more efficiently due to its higher temperature output.
You’ll also need a solder roll (lead-free solder rated for potable water applications), flux paste, a wire brush or emery cloth, a fitting brush, copper fittings, and safety equipment. Safety cannot be overlooked: wear heat-resistant gloves, safety glasses, and ensure your work area is clear of flammable materials. Many professionals keep a fire extinguisher nearby as a precaution.
For quality results, invest in a decent propane torch with an adjustable flame. Budget models often produce uneven heat distribution. A roll of 95/5 tin/silver solder or 50/50 tin/lead solder (if allowed in your jurisdiction) provides excellent wetting and flow characteristics. Always verify local building codes regarding solder composition—many areas now require lead-free options for drinking water applications.
Visit your local home improvement retailer to find soldering kits bundled with torch, solder, and flux. These starter packages are economical and contain everything needed for residential plumbing projects. Alternatively, explore our FixWiseHub Blog for additional how-to guides covering related plumbing topics.
Preparing Your Copper Pipe
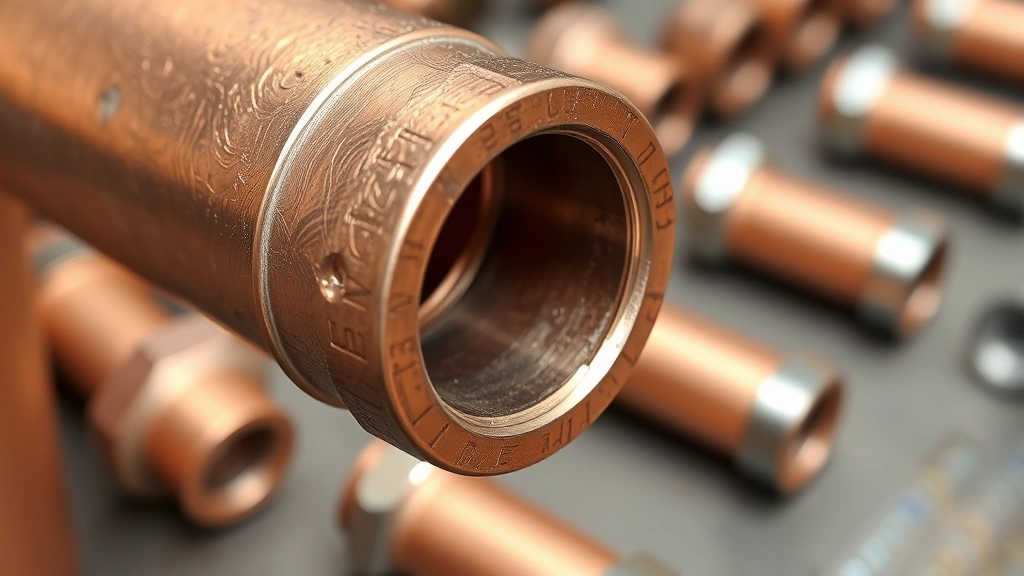
Preparation is where most soldering success begins. Clean copper surfaces are essential for proper solder flow and joint integrity. Start by using a wire brush or fine emery cloth to remove oxidation, dirt, and debris from both the inside of the fitting and the outside of the pipe. The pipe end should be shiny copper, not dull or darkened.
Cut your copper pipe squarely using a hacksaw or pipe cutter. A clean, perpendicular cut ensures the pipe seats fully inside the fitting, creating maximum surface area for the solder joint. Ragged edges prevent proper contact and weaken the connection. After cutting, use a deburring tool or the rounded end of a file to remove any sharp edges inside the pipe opening.
Dry-fit your pipes and fittings before applying heat. This practice identifies any misalignments and ensures all components work together. Dry-fitting also confirms you have the correct fitting size and type. For instance, a coupling joint requires different handling than a tee or elbow connection, though the soldering technique remains fundamentally the same.
Store cleaned pipes and fittings in a clean environment. Even brief exposure to air can create a thin oxide layer, which is why professionals often apply flux immediately after cleaning. If you must wait between cleaning and soldering, cover your materials with a clean cloth to minimize oxidation. This attention to detail separates amateur work from professional results.
Applying Flux Correctly
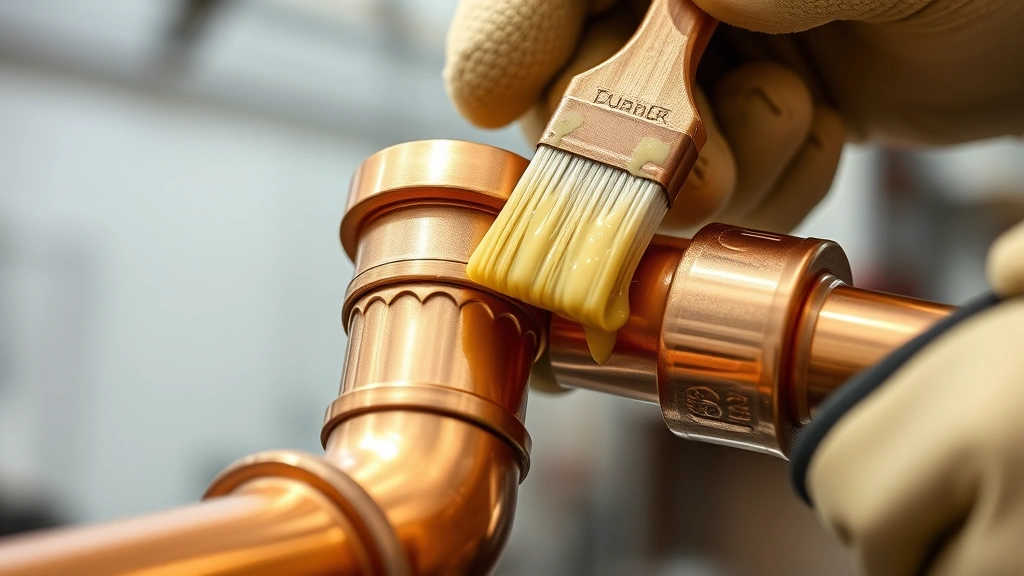
Flux is the unsung hero of soldering. This chemical compound removes oxidation and helps molten solder flow smoothly into the joint. Without proper flux application, your solder won’t wet the copper surfaces, and you’ll end up with a cold joint that leaks. Apply flux generously to both the inside of the fitting and the outside of the pipe using the small brush included in most solder kits.
The correct flux amount is more than you think necessary. A visible coating ensures complete coverage without waste. Some professionals apply flux in a thin spiral pattern, ensuring no spot is missed. The flux will appear to bubble and darken slightly when heated—this is normal and indicates chemical activation.
Different flux types serve different purposes. Water-soluble flux is easier to clean after soldering and is increasingly popular. Acid-based flux, while effective, requires thorough cleaning to prevent corrosion over time. For potable water applications, always choose food-grade or water-soluble flux. Check product labels to confirm suitability for drinking water systems.
Once flux is applied, insert the pipe into the fitting immediately. Delay allows flux to dry and reduces effectiveness. The joint should feel slightly sticky due to flux residue—this is exactly what you want. Proper flux application transforms a challenging task into something manageable, even for first-time soldering attempts.

Heating the Joint Properly
Heating technique determines whether your joint succeeds or fails. The goal is to heat the copper fitting and pipe evenly until solder melts on contact, not to melt solder directly with the flame. This distinction is crucial—direct flame application creates brittle, weak joints prone to failure.
Hold your torch about 2-3 inches from the joint, angling the flame to heat both the pipe and fitting simultaneously. Move the flame in a circular motion, spending slightly more time on the thicker fitting material. After 30-45 seconds, the copper will reach soldering temperature (around 600-700°F). You’ll notice the flux begins to bubble vigorously and turns dark brown or black.
To test readiness, touch your solder to the joint—not the flame. If the copper is hot enough, the solder will melt on contact and flow into the joint. If it doesn’t melt, continue heating for another 10-15 seconds. Patience here prevents the frustration of repeatedly reheating joints. Experienced plumbers develop an intuition for timing, but even they occasionally test readiness before proceeding.
For larger diameter pipes (1 inch or greater), consider using MAPP gas instead of propane. Its higher temperature output reduces heating time and produces more consistent results. Conversely, for small diameter pipes (1/2 inch), propane is typically sufficient and more economical. Adjust your torch distance and flame intensity based on pipe size and material thickness.
Maintain steady hand positioning throughout heating. Jerky movements can disrupt the joint alignment or cause the torch to overheat one side excessively. Some professionals rest their torch hand against a stable surface or brace their arm against their body for better control. This technique becomes second nature with practice.
Adding Solder Like a Pro
Once your joint reaches proper temperature, you’re ready to apply solder. Touch the solder wire to the joint—not the torch flame. The heated copper will melt the solder, drawing it into the joint through capillary action. This is the beautiful part of soldering: if your preparation and heating were correct, the solder almost feeds itself into the connection.
Apply solder gradually in small increments. For a 1/2-inch coupling, you’ll typically need 1-2 inches of solder. For a 3/4-inch joint, 2-3 inches is standard. Oversupply creates messy joints with excess solder dripping everywhere, while undersupply leaves weak spots. The correct amount creates a smooth, shiny bead around the joint perimeter.
Watch the solder flow into the joint. A properly soldered connection will show solder emerging slightly from the fitting opening, indicating the joint is completely filled. The solder should have a smooth, shiny appearance—not dull or grainy, which indicates a cold joint. If you see dull solder, remove it immediately and re-solder the joint after cleaning with the wire brush.
Remove the solder first, then the torch. Keep the torch on the joint for 1-2 more seconds after removing solder to allow capillary action to complete. This final moment of heat ensures solder fully penetrates the joint. Professional plumbers follow this sequence religiously, as it’s proven to produce the most reliable connections.
For multiple joints in sequence, allow adequate cooling between connections. Soldering a second joint too close to the first can reheat and weaken the previous connection. Most professionals wait 30-60 seconds between adjacent joints, working systematically along a run of pipe to maintain proper spacing and prevent rework.
Cooling and Finishing
Never force-cool a freshly soldered joint. Many beginners spray water on the hot joint, thinking this speeds the process. This practice can crack the solder joint and create weak connections. Instead, allow joints to cool naturally for several minutes before handling or applying water pressure.
Once cooled, excess flux residue can be cleaned with a damp cloth or wire brush. Water-soluble flux washes away easily with warm water, while acid-based flux may require commercial flux cleaner. Thorough cleaning prevents corrosion and improves the joint’s appearance. A shiny, clean joint looks professional and indicates proper technique.
Inspect your work carefully. A good joint appears smooth and shiny with solder distributed evenly around the fitting. You should see solder at the seam between pipe and fitting all the way around. If you notice gaps or dull spots, the joint requires re-working. Mark questionable joints for future monitoring, and don’t hesitate to cut them out and re-solder if you’re uncertain.
Before pressurizing the system, allow 24 hours for solder to fully cure. While the joint hardens quickly, complete metallurgical bonding takes longer. Many professionals wait overnight before running water through newly soldered lines, especially in critical applications. This conservative approach prevents potential leaks from developing later.
For detailed guidance on other home improvement techniques, explore our comprehensive how-to guides and tutorials covering various DIY projects and professional-grade methods.
Common Mistakes to Avoid
Understanding what not to do is equally important as knowing correct technique. The most frequent mistake is applying solder directly to the torch flame rather than to the heated copper. This creates a weak joint that fails under pressure. Remember: the flame heats the copper, and the copper melts the solder.
Insufficient cleaning ranks second among common errors. Oxidation prevents proper solder flow, creating joints that appear soldered but fail when pressurized. Spend extra time cleaning—it’s the easiest step to perfect and yields the highest return on effort invested.
Overheating is another pitfall. Excessively high temperatures damage the solder’s metallurgical structure and can weaken copper fittings. If the solder smokes or the flux turns black and crusty, you’ve likely overheated. Conversely, underheating prevents proper solder flow. The sweet spot is when flux bubbles actively and solder flows smoothly.
Poor flux application leaves gaps in coverage, resulting in weak spots within the joint. Apply generous flux to both surfaces, and don’t hesitate to use more than seems necessary. Excess flux is easily cleaned; insufficient flux creates failed joints that require expensive rework.
Disturbing the joint while solder cools is destructive. Even slight movement can crack the joint. Once you remove the torch, keep the joint perfectly still until it cools completely. Some professionals hold the joint in position for 10-15 seconds after torching to ensure stability.
Using incorrect solder type is a critical mistake. Lead-based solder is prohibited in many jurisdictions for drinking water systems. Always verify local plumbing codes and select appropriate lead-free solder. Using the wrong product may violate building codes and create health hazards.
Attempting to solder wet pipes is futile. Water inside the pipe absorbs heat and prevents temperature from rising sufficiently for proper soldering. Always drain the line completely before soldering. If water is present, you’ll hear hissing as it vaporizes—this is a sign to stop, drain the system, and wait for complete drying.
FAQ
What’s the difference between soldering and brazing copper pipe?
Soldering uses solder (typically tin-based) that melts around 400-600°F, while brazing uses brass filler that requires temperatures above 1100°F. Soldering is suitable for water lines and most residential applications. Brazing is stronger and used in high-pressure systems. For most homeowners, soldering is the appropriate choice and easier to master.
Can I solder copper pipe outdoors in cold weather?
Cold temperatures slow the heating process and can affect solder flow characteristics. While possible, soldering in temperatures below 50°F is challenging. If you must work in cold conditions, use MAPP gas instead of propane, allow extra heating time, and protect your work area from wind. Ideally, wait for warmer conditions for best results.
How do I know if my solder joint is watertight?
Proper visual inspection is your first indicator—the joint should appear smooth and shiny with solder visible all around the fitting seam. The true test comes after pressurization. If no water drips from the joint after 24 hours of normal water pressure, it’s watertight. Some professionals use a pressure gauge to test at higher pressures before completing the installation.
What should I do if my solder joint leaks?
Cut out the leaking joint using a hacksaw or pipe cutter, remove old solder with a wire brush, clean thoroughly, apply fresh flux, and re-solder using proper technique. The pipe can usually be salvaged unless the leak is near a joint—in that case, replacing the section is often easier than attempting repairs.
Is lead-free solder as strong as traditional solder?
Modern lead-free solder formulations are comparable in strength to traditional lead-based solder when applied correctly. The key difference is that lead-free solder requires slightly higher temperatures and slightly different handling. Following proper technique ensures equally reliable joints regardless of solder type.
Can I solder PVC or plastic pipe?
No—soldering is exclusive to copper, brass, and similar metals. PVC and plastic pipes use different connection methods. For comprehensive plumbing guidance including various pipe types, consult professional resources. Each pipe material has specific installation requirements that cannot be interchanged.
How much solder do I need for a typical project?
A standard roll of solder (1 pound) contains approximately 1000 linear feet. For residential projects, this lasts through many joints. A single 1/2-inch coupling typically uses 1-2 inches of solder. Calculate based on the number and size of joints, then purchase 20% extra for practice and mistakes.
What’s the best flux for potable water systems?
Water-soluble, food-grade flux is the safest choice for drinking water applications. It’s easy to clean and safe if small amounts remain in the system. Always verify the flux label indicates suitability for potable water. When in doubt, consult your local building inspector or expert soldering resources for guidance.
Should I use flux paste or liquid flux?
Paste flux is easier to control and stays where you apply it. Liquid flux can drip and create messes. For beginners, paste is superior. Both work equally well when applied properly—choose based on personal preference and ease of application. Some professionals use both depending on the joint type and location.
Related Posts

Superscript in Google Docs: Expert Tips

Strikethrough in Excel: Easy Steps for Beginners
