
Shred Cabbage Like a Chef: Easy DIY Steps
Shred Cabbage Like a Chef: Easy DIY Steps
Learning how to shred cabbage is one of the most valuable kitchen skills you can master. Whether you’re preparing coleslaw, stir-fries, tacos, or fermented sauerkraut, properly shredded cabbage makes all the difference in texture, presentation, and cooking consistency. Many home cooks struggle with this task, either ending up with uneven pieces or spending far too much time on manual preparation. The good news? With the right techniques and tools, you can shred cabbage quickly, safely, and like a professional chef in your own kitchen.
This comprehensive guide walks you through multiple methods for shredding cabbage, from using simple kitchen knives to specialized tools. We’ll cover safety tips, technique refinement, and insider tricks that will transform how you prepare this versatile vegetable. By the end, you’ll have the confidence and knowledge to handle any cabbage-shredding task with ease and efficiency.

Choosing the Right Cabbage
Before you begin shredding, selecting quality cabbage is essential. Look for heads that feel firm and heavy for their size, with tightly packed leaves and no soft spots, browning, or visible damage. The outer leaves should be vibrant green or purple depending on variety, and the cabbage should have a fresh smell without any sour odor.
There are several cabbage varieties to consider. Green cabbage is the most common choice for coleslaw and general shredding, offering a mild flavor and crisp texture. Red cabbage provides striking color and slightly earthier taste, perfect for salads and fermented dishes. Napa cabbage has elongated heads with tender leaves that shred beautifully for Asian cuisine. Savoy cabbage features crinkled leaves and delicate texture, ideal for cooking applications.
Smaller to medium-sized heads are easier to handle and shred than massive ones. A head weighing 2-3 pounds is manageable for most home cooks and provides plenty of shredded cabbage for most recipes. Check the stem end—it should be clean and fresh-looking, not dried out or discolored.
Essential Tools for Shredding
Having the right kitchen tools and equipment dramatically improves your shredding experience. Different tools offer varying advantages depending on the quantity needed and your preference for speed versus control.
Chef’s Knife (8-10 inches): The most versatile and cost-effective tool. A sharp chef’s knife gives you maximum control and works for any quantity. Quality knives from brands like Wüsthof or Victorinox are excellent investments.
Mandoline Slicer: A specialized tool that produces uniform, thin slices quickly. Models range from simple plastic versions to adjustable stainless steel designs. The blade is extremely sharp, making it fast but requiring careful technique.
Food Processor: Ideal for large quantities. A standard food processor with a shredding blade attachment can process an entire head of cabbage in seconds. This is the choice for meal prep or batch cooking.
Box Grater: A humble four-sided grater offers both shredding and slicing options. It’s safer than a mandoline and perfect for smaller amounts, though less efficient than a food processor.
Microplane Grater: Designed for fine grating, this tool creates thin, delicate shreds. It’s excellent for garnishing but slower for large quantities.
The Knife Method: Classic Approach
The knife shredding method is fundamental and doesn’t require special equipment. This technique gives you complete control and works beautifully for any quantity. Start by preparing your cabbage properly.
Step 1: Prepare the Cabbage
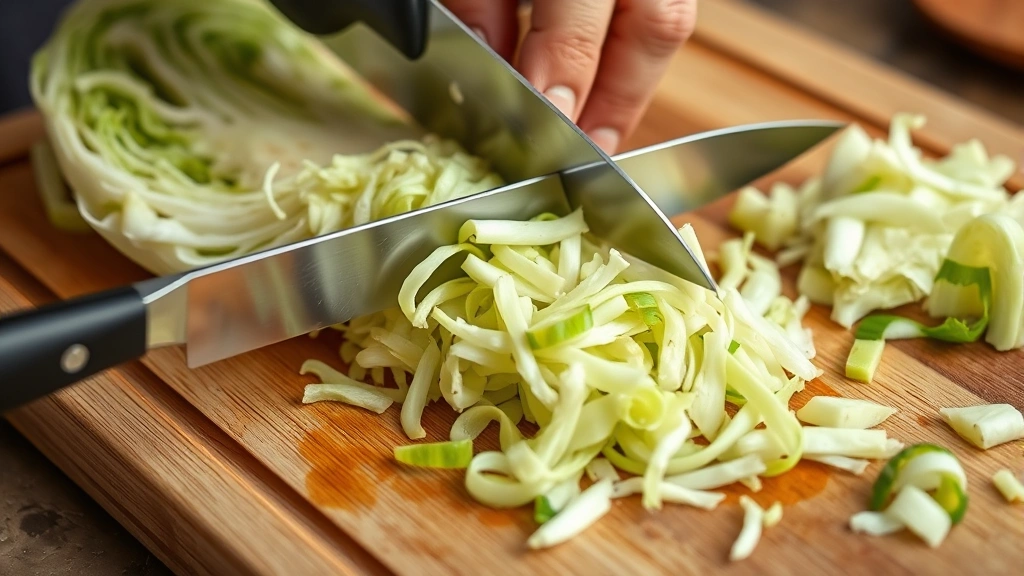
Rinse your cabbage under cool water and pat dry with paper towels. Moisture can cause the knife to slip and makes the vegetable harder to cut cleanly. Place the cabbage on a stable cutting board. Using a sharp chef’s knife, slice the head in half from top to bottom. Remove the hard core from each half by cutting a V-shaped wedge along the center of each section.
Step 2: Cut into Manageable Pieces
Place each cabbage half flat-side down on your cutting board. Slice the cabbage into quarter-sections or smaller pieces, approximately 3-4 inches wide. This makes handling safer and easier than trying to shred an entire half at once.
Step 3: Stack and Roll
Take a quarter-section and place it cut-side down. Stack 2-3 leaves on top of each other, then roll them tightly into a cylinder shape. This technique, called chiffonade when done with leafy greens, creates uniform shreds and keeps your fingers safe from the blade.
Step 4: Slice Thinly
Hold the rolled bundle firmly with your non-knife hand, curling your fingertips inward. Using a rocking motion with your chef’s knife, slice across the roll in thin, even cuts—approximately 1/8 inch thick for standard shreds, thinner for fine shreds. Let the knife do the work; don’t force it through the cabbage.
Step 5: Separate the Shreds
As you finish each section, use your fingers or a fork to gently separate the shreds. They’ll naturally fall apart once they’re no longer held by the core structure. This creates light, fluffy shredded cabbage rather than a compacted mass.
The knife method takes practice but offers superior control. You can easily adjust thickness on the fly and work at your own pace. For precise, controlled results, this traditional approach is unbeatable.
Pro tip: Keep your knife blade angled slightly forward as you slice. This creates a smoother cut and requires less pressure, reducing fatigue during longer shredding sessions.
Using a Mandoline Slicer
A mandoline slicer produces remarkably uniform shreds with minimal effort. This tool is perfect when you need consistent thickness and want to work quickly. However, the extremely sharp blade demands respect and careful technique.
Setup and Safety
Set your mandoline on a stable, flat surface. Adjust the blade to your desired thickness—typically 1/8 inch for standard shreds. Many mandolines include a hand guard; use it without exception. Some models have a vegetable holder that prevents direct finger contact with the blade.
Preparation Steps
Cut your cabbage into manageable pieces. Remove the core and outer damaged leaves. Slice the cabbage into sections that fit your mandoline’s work surface. You want pieces roughly 3-4 inches wide and 2-3 inches tall.
The Slicing Technique
Hold the cabbage piece with the hand guard, keeping your fingers well away from the blade. Push the cabbage straight down with steady, even pressure. Let the blade do the work—don’t force it. The motion should be smooth and controlled, not rushed.
Work slowly and deliberately. Speed comes with practice, but safety always comes first. Once a piece becomes too small to safely hold with the guard, set it aside and start with a fresh piece.
Finishing
As shreds accumulate on the other side of the mandoline, gently push them aside with a wooden spoon or similar tool. Never use your hands to clear shreds while the blade is exposed. When finished, always fold or cover the blade before cleaning.
Advantages and Limitations
Mandolines excel at speed and uniformity. They’re fantastic for meal prep or when you need perfectly consistent shreds for presentation. The main limitation is the learning curve and safety concerns. They’re not ideal for very small quantities, and some people find them intimidating to use.
Food Processor Technique
The food processor is the fastest method for large quantities and requires minimal hands-on work. This is the tool of choice for batch cooking, restaurant-style preparation, or when you’re processing multiple heads of cabbage.
Setting Up Your Food Processor
Install the shredding blade attachment according to your processor’s instructions. Most food processors have both shredding and slicing blades; the shredding blade creates the texture you want. Ensure the blade is securely locked in place and the bowl is properly seated.
Preparing the Cabbage
Wash and dry your cabbage thoroughly. Remove the core and outer damaged leaves. Cut the cabbage into chunks that fit comfortably in your processor’s feed tube—typically 2-3 inch pieces. The goal is pieces small enough to fit but large enough to process safely without your hands getting too close to the blade.
Processing Method
Place cabbage chunks in the feed tube and turn on the processor. Use the pusher tool—never your fingers—to guide pieces down toward the blade. Let the machine do the work; don’t force pieces through aggressively. The processor will handle the shredding automatically.
For an entire head of cabbage, you’ll likely need to process in batches. Fill the bowl, process, transfer to a separate container, and repeat. Some processors have larger capacities, reducing the number of batches needed.
Achieving Your Desired Texture
Food processor shreds tend to be finer and more uniform than knife-cut shreds. If you prefer larger, chunkier shreds, pulse the processor rather than running it continuously. Pulsing gives you more control over the final texture.
Post-Processing
Once shredded, transfer your cabbage to a colander and rinse under cool water if you’ve stored it for a while or if it seems to have released excess moisture. Pat dry with paper towels or a clean kitchen towel before using.
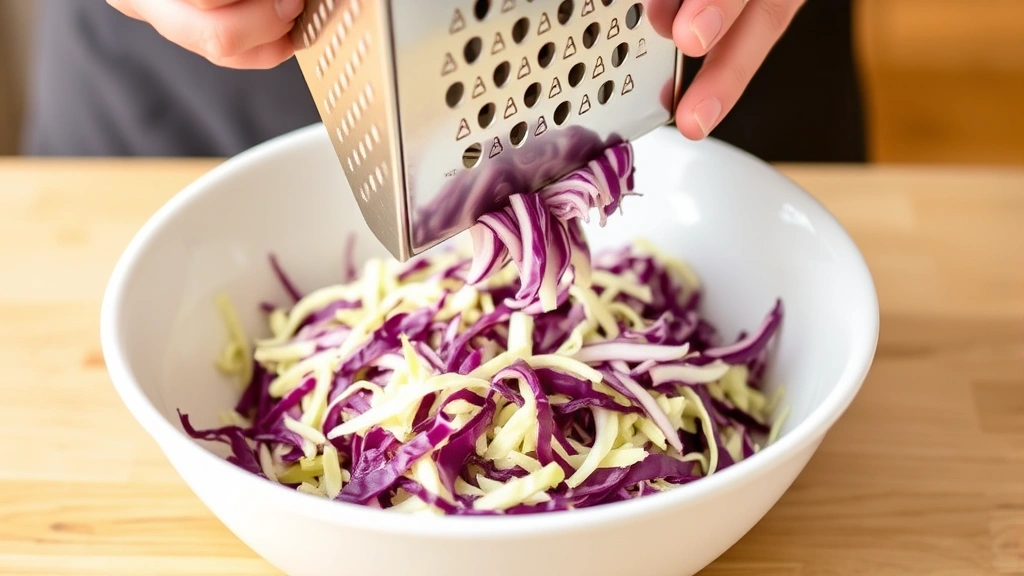
Box Grater Strategy
The humble box grater offers a middle ground between knife work and electric tools. It’s safer than a mandoline, more controlled than a food processor, and perfect for moderate quantities.
Selecting the Right Side
A typical box grater has four sides with different functions. The shredding side has larger holes that create thicker, fluffier shreds. The fine grater side produces almost powdery results. For standard cabbage shredding, use the medium or larger shredding side.
Stabilizing Your Grater
Place your box grater on a stable cutting board or place it on top of a damp kitchen towel to prevent it from sliding. Some cooks place it directly over a large bowl for easier collection. Proper stabilization prevents accidents and makes the work more comfortable.
Shredding Technique
Cut your cabbage into manageable pieces—roughly 3-4 inches long. Hold the piece firmly with your non-grater hand, keeping your fingertips curled inward. Using moderate pressure, push the cabbage downward across the grater’s shredding surface using smooth, even strokes.
Work at a steady pace. Rushing increases the risk of scraped knuckles. Once a piece becomes too small, set it aside. Your safety is more important than using every last bit of cabbage.
Collecting Shreds
If your grater is positioned over a bowl, shreds fall directly into it. Otherwise, you’ll need to scrape accumulated shreds from the grater’s surface periodically using a rubber spatula or similar tool.
Advantages of Box Graters
Box graters are affordable, durable, and require no electricity or special technique. They’re safer than mandolines because your hand is less likely to contact the grater surface. The shreds are light and fluffy, perfect for coleslaw. The main limitation is speed—it’s slower than food processors for large quantities.
Safety Precautions and Tips
Shredding cabbage involves sharp blades and requires attention to safety. Understanding proper technique and precautions prevents injuries and makes the work more enjoyable.
Knife Safety
Always use a sharp knife. Dull blades require more pressure and are more likely to slip. Keep your non-knife hand in the proper claw grip—fingertips curled inward, knuckles forward. This position prevents deep cuts if the knife slips. Never rush or try to shred with a dull blade or improper grip.
Always cut away from your body and keep the blade pointed downward. Maintain focus on your work; don’t get distracted while holding a sharp blade. Store knives properly in a knife block or on a magnetic strip, never loose in a drawer.
Mandoline Safety
Always use the hand guard provided with your mandoline. Never attempt to shred small pieces without the guard. Stop and set aside pieces that become too small to safely process. Keep the blade covered when not actively shredding. Clean the mandoline carefully, keeping your fingers away from the blade.
Food Processor Safety
Never put your hand into the food processor bowl while the blade is moving. Always use the pusher tool to guide food into the feed tube. Ensure the blade is properly locked before processing. Let the processor stop completely before removing the blade or opening the bowl.
General Safety Practices
Work on a clean, dry cutting board to prevent slipping. Wear appropriate clothing—loose sleeves can catch on equipment. Tie back long hair. Take breaks if you’re processing large quantities; fatigue leads to careless mistakes. Keep your work area well-lit so you can see clearly.
Consider wearing a cut-resistant glove on your non-knife hand if you’re new to shredding or uncomfortable with the technique. These gloves are inexpensive and offer genuine protection.
Storage and Preparation
Proper storage extends the life of shredded cabbage and maintains its quality. Understanding storage options helps you plan ahead and make the most of your preparation work.
Refrigerator Storage
Place shredded cabbage in an airtight container or resealable plastic bag. Remove as much air as possible before sealing. Store in the coldest part of your refrigerator, typically the back of the bottom shelf. Properly stored shredded cabbage keeps for 3-5 days, though it gradually loses crispness.
Raw shredded cabbage works best for coleslaw, salads, and fresh applications. For cooking applications like stir-fries and braised dishes, you can use shredded cabbage that’s been stored for several days.
Freezer Storage
Shredded cabbage can be frozen for longer storage, though the texture changes significantly. The cabbage becomes softer once thawed, making it unsuitable for raw applications. However, frozen shredded cabbage works perfectly for cooked dishes, soups, and stews.
Spread shredded cabbage on a baking sheet and freeze for 2-3 hours until solid. Transfer to freezer bags or containers for storage. Frozen shredded cabbage keeps for 2-3 months. Use directly from frozen without thawing for best results in cooked dishes.
Pre-Shredding Strategy
If you’re planning to use shredded cabbage throughout the week, shredding multiple heads at once saves time. Divide the shredded cabbage into meal-sized portions and store separately. This way you’re only opening one container at a time, keeping the rest fresher longer.
Moisture Management
Excess moisture causes shredded cabbage to deteriorate faster. If your shredded cabbage seems wet, place it in a colander and let it drain for 10-15 minutes. Pat dry with paper towels before storing. When storing, include a paper towel in the container to absorb excess moisture.
Using Pre-Shredded Cabbage
If you prefer convenience over freshness, pre-shredded cabbage is available at most grocery stores. However, it contains preservatives and lacks the crispness of freshly shredded cabbage. Many home cooks find that shredding their own takes minimal time and produces far superior results.
FAQ
What’s the fastest way to shred cabbage?
A food processor with a shredding blade is the fastest method. You can process an entire head in 1-2 minutes with minimal hands-on effort. If you don’t have a food processor, a mandoline slicer is the next fastest option, though it requires more careful technique and safety awareness.
Can I shred cabbage in advance?
Yes, shredded cabbage stores in the refrigerator for 3-5 days in an airtight container. For longer storage, freeze it for up to 3 months, though frozen cabbage is best used in cooked dishes rather than raw applications.
How do I keep shredded cabbage crisp?
Store shredded cabbage in an airtight container with a paper towel to absorb excess moisture. Keep it in the coldest part of your refrigerator. For maximum crispness, shred cabbage as close to serving time as possible. You can also soak shredded cabbage in ice water for 15 minutes before draining and drying to restore crispness.
What’s the difference between shredded and sliced cabbage?
Shredded cabbage has thin, uniform pieces created by running the vegetable across a shredding surface. Sliced cabbage is cut into thicker, larger pieces. Shredded cabbage is ideal for coleslaw, stir-fries, and dishes where you want smaller, more uniform pieces. Sliced cabbage works better for braising or when you want larger pieces that maintain their shape during cooking.
Is a mandoline safer than a knife?
Both tools are safe when used properly with correct technique. A mandoline can be safer for some people because your hand is less likely to contact the blade if you use the hand guard. However, the extremely sharp blade means injuries can be more severe if they occur. A knife is safer for people who have good knife skills and proper grip technique. Choose the tool you’re most comfortable with and always use proper safety practices.
Can I use a blender or immersion blender for cabbage?
Blenders aren’t ideal for shredding cabbage. They’re designed for liquids and soft foods, and they’ll turn cabbage into mush rather than creating distinct shreds. Stick with shredding blades, mandolines, knives, graters, or food processor shredding attachments for the best results.
What type of knife is best for shredding cabbage?
An 8-10 inch chef’s knife is ideal for shredding cabbage. The blade length allows you to make long, smooth cuts with a rocking motion. The knife should be sharp—a dull blade requires excessive pressure and is more likely to slip. Keep your knife sharp with regular honing and periodic professional sharpening.
How thin should shredded cabbage be?
Standard shredded cabbage is approximately 1/8 inch thick. For fine shreds suitable for fermentation or delicate dishes, aim for 1/16 inch or thinner. For chunky shreds in soups or stews, 1/4 inch is acceptable. Adjust thickness based on your recipe and personal preference.
Related Posts

Superscript in Google Docs: Expert Tips

Strikethrough in Excel: Easy Steps for Beginners
