

Reupholster a Chair? Expert Tips Inside
How to Reupholster a Chair: Expert Tips Inside
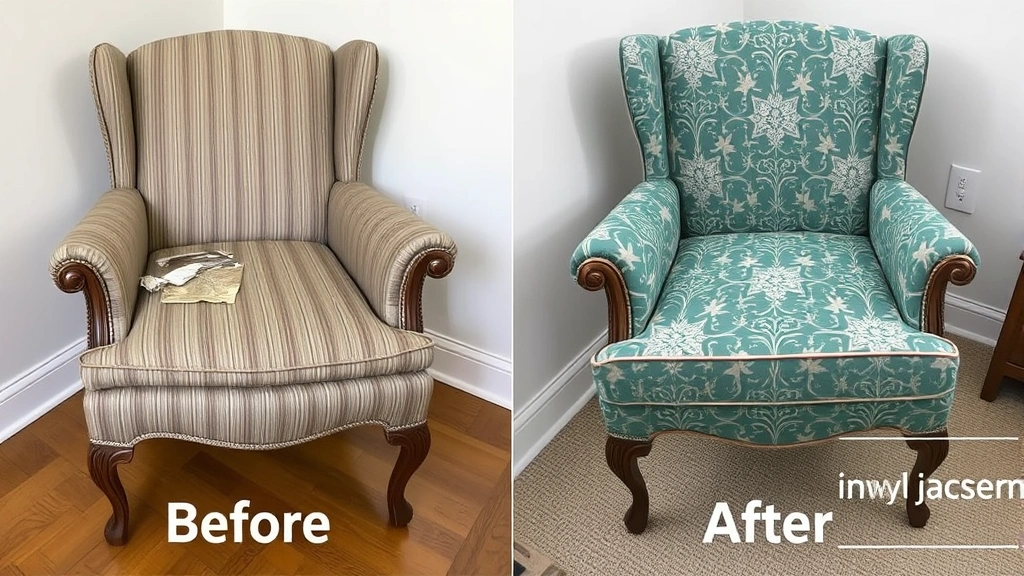
Reupholstering a chair is one of the most rewarding DIY furniture projects you can tackle. Whether you have a cherished heirloom that’s seen better days or a thrift store find with great bones but tired fabric, learning how to reupholster a chair can save you hundreds of dollars compared to professional upholstery services. This comprehensive guide walks you through every step of the process, from selecting materials to the final tack, so you can transform your worn furniture into a showstopper.
Many homeowners assume reupholstering is a job best left to professionals, but with patience, the right tools, and clear instructions, you can absolutely do this yourself. The key is understanding the fundamental techniques and taking your time with each stage. By the end of this guide, you’ll have the confidence to tackle chairs of various styles and complexities, and you’ll understand why proper technique matters more than speed.
Tools and Materials You’ll Need
Before you begin any reupholstering project, gathering the right supplies is essential. You don’t need an expensive professional setup, but having quality tools makes the work significantly easier and produces better results. Here’s what every DIY upholsterer should have on hand.
Essential Tools: A staple gun is your most important tool—invest in a quality pneumatic or electric model rather than a manual one, as you’ll be using it extensively. You’ll also need a staple remover or flat pry bar to remove old staples, a heavy-duty utility knife for trimming fabric, a tape measure, scissors designed for cutting fabric, needle-nose pliers for pulling stubborn staples, and a hammer for occasional adjustments. A FixWiseHub resource guide can help you identify quality tools for home projects.
Materials to Purchase: The most visible component is your upholstery fabric—typically 54 inches wide and measured in linear yards. You’ll also need high-loft batting or foam padding (usually 2-4 inches thick), burlap or muslin for the base layer, upholstery staples (typically 3/8 inch for furniture), and potentially webbing for reinforcement. For finishing touches, consider decorative trim, gimp, or cord that matches your chosen fabric.
Preparing Your Chair for Reupholstering
Proper preparation determines your project’s success. Start by examining your chair thoroughly and taking detailed photographs from multiple angles. These images serve as reference guides when you’re reassembling everything. Document how the original upholstery was attached, where seams were positioned, and how fabric wrapped around corners and legs.
Set up a dedicated workspace with adequate table or floor space. You’ll need room to lay out fabric, remove and organize old materials, and work on the chair from all angles. A well-lit area is crucial—you’ll be working with small staples and need to see exactly what you’re doing. Consider laying down a drop cloth to contain dust and debris from old upholstery.
Measure your chair carefully. Measure the width, depth, and height of the seat, back, and any arms. Add several inches to each measurement for wrapping and stapling. Most chairs require 4-8 yards of 54-inch-wide fabric, though larger pieces may need more. When purchasing fabric, always buy extra—mistakes happen, and you want enough material to work with comfortably.
Removing Old Upholstery and Padding
This stage is where you learn your chair’s construction secrets. Using your staple remover or pry bar, carefully lift one corner of the fabric and begin working the tool under the staples. Pull staples straight out rather than at angles to avoid tearing the wood frame. Work methodically, removing all staples from one section before moving to the next.
As you remove fabric, set it aside—don’t discard it yet. You can use old pieces as templates for cutting new fabric, which is especially helpful for complex shapes and curves. Take photos as you go, documenting how multiple fabric layers were arranged and how corners were handled.
Once fabric is removed, carefully peel away the padding and batting. Old padding may be fragile and crumbly, so work gently to avoid getting debris everywhere. Underneath the padding, you’ll typically find burlap or muslin—this base layer usually stays unless it’s damaged or deteriorated. If the base layer has large tears or weak spots, replace it with new burlap.
Check the webbing—the strips of fabric that support springs or padding from underneath. If webbing is intact and doesn’t sag when you press it, leave it alone. If it’s loose or torn, you may need to reattach or replace it using a webbing stretcher and staples.
Inspecting and Repairing the Frame
Now that old materials are removed, examine the wooden frame closely. Look for cracks, splits, loose joints, or signs of woodworm or other damage. Minor cracks can often be left alone if they don’t affect structural integrity. Loose joints should be tightened—remove the joint, clean old glue from both surfaces, apply new wood glue, reassemble, and clamp until dry.
Check that legs are secure and the frame sits evenly on a flat surface. If a leg is damaged, it may need reinforcement or replacement. Ensure all corners are square by measuring diagonally—both diagonal measurements should be equal. If the frame is out of square, it will affect how fabric sits and how the finished chair looks.
Sand any rough spots on the frame, particularly areas where fabric will be stapled. Smooth wood prevents fabric from snagging during installation. If the frame has old stain or finish, you might consider refinishing it, though this is optional. This is the ideal time to address any frame issues before adding new upholstery.
Adding New Padding and Batting
Begin by laying burlap or muslin over the base of your chair if you replaced it. Pull it taut and staple it to the frame’s underside, spacing staples about 4 inches apart. This base layer provides a foundation for padding and helps distribute stress evenly.
Cut your high-loft batting to size, allowing extra material for wrapping around edges. For the seat, lay batting on top of the burlap and staple it down, pulling evenly to create a smooth, wrinkle-free surface. Work from the center outward, stapling one side halfway across, then the opposite side, then the remaining two sides. This prevents uneven bunching.
For curved areas like chair backs, you may need to make small cuts in the batting at stress points so it conforms smoothly. These cuts should be minimal and hidden under the fabric layer that goes on top. On arms and rounded sections, layer batting carefully, using your hands to shape it as you staple.
The goal is even padding thickness throughout, typically 2-4 inches depending on your preference. Too little padding feels hard; too much makes the chair look bulky and makes fabric difficult to work with. Run your hand over padded surfaces—you should feel even firmness with no lumps or dips.
Cutting and Fitting Your Fabric
This is where precision matters. Using your old fabric pieces as templates, cut new fabric carefully. Mark the grain direction on your pattern pieces—most upholstery fabrics have a nap or directional pattern that should run the same direction on all pieces.
For the seat, cut a piece large enough to wrap completely around the seat base with several inches of overlap for stapling. For the back, cut similarly. Arms require careful measurement—cut pieces that wrap from the underside up and over the arm, meeting the back and seat fabric neatly. Cut corner pieces that will wrap around legs and under the chair.
Before stapling anything permanently, do a dry fit. Lay fabric pieces on your padded chair and check how they align. Ensure pattern matches if your fabric has a repeating design, and verify that seams will be in logical places. Make adjustments to your cuts if needed—this is much easier than removing and restapling.
For patterned fabrics, plan how the pattern will be centered on each surface. A pattern that looks centered on the seat should ideally look balanced on the back as well. This requires more fabric but creates a more professional appearance. When measuring patterned fabric, always buy extra to account for pattern matching.

Stapling Fabric to the Frame
This is the core technique that determines your chair’s final appearance. Start with the seat. Pull fabric taut toward one side of the frame and place a single staple in the center of that side. Don’t fully seat the staple yet—use just enough pressure to hold the fabric in place.
Move to the opposite side, pull fabric equally taut, and place another staple in the center of that side. Now do the same for the front and back. You now have four staples holding the fabric roughly in place. Check alignment and adjust before fully seating all staples.
Once these four center staples are secure, work outward from the center on each side, placing staples every 2-3 inches and pulling fabric consistently tight. This approach prevents wrinkles and ensures even tension. As you work around corners, you’ll need to fold fabric neatly. For outside corners, fold fabric at a 45-degree angle and staple the resulting triangle neatly.
For inside corners (like where seat meets back), you may need to cut away excess fabric to reduce bulk before stapling. Make small cuts that allow fabric to fold smoothly without creating lumps. Test-fold before cutting to ensure you remove only necessary material.
The back and arms require similar techniques. Work from center outward, maintaining even tension. On curved surfaces, you may need to make small cuts at stress points—these should be hidden in seams or under trim. Take your time here; rushing leads to wrinkles and uneven appearance.
When stapling decorative elements like the outside back or bottom, you can use decorative staples or cover staples with trim. Some upholsterers use tack strips—thin wooden strips that cover staples and provide a finished look. Others use decorative gimp or cord glued over staples.
Finishing Touches and Details
Once all fabric is stapled, examine your work carefully. Look for wrinkles, uneven tension, or gaps between sections. Minor imperfections can be addressed by removing staples in that area and restretching fabric. This is normal—even professional upholsterers rarely get everything perfect on the first try.
Install any decorative trim or cord. Upholstery trim comes in countless styles and colors. Measure the perimeter where trim will go and purchase accordingly. Apply trim using fabric glue or a hot glue gun, or staple it underneath where it won’t be visible. Trim serves both decorative and practical purposes—it covers staples and seams, giving your chair a polished appearance.
For the bottom of the chair, you can install cambric—a thin black fabric that covers the underside and staples. This hides all the mechanical details and gives the chair a finished look. Measure the underside, cut cambric slightly larger than needed, and staple it around the perimeter, pulling it taut.
If your chair has legs that were covered in the original upholstery, you can leave them bare (if refinished) or cover them again. Remove any old fabric from legs, clean and refinish if desired, then re-cover if preferred. Some people prefer the look of exposed wooden legs.
Step back and view your finished chair from all angles. Check that fabric is smooth, seams are straight, and everything looks balanced. Make any final adjustments. If you’re happy with the result, congratulations—you’ve successfully completed a complex upholstery project that would cost hundreds of dollars at a professional shop.
For additional home improvement guidance, check out resources like This Old House and Family Handyman, which offer extensive DIY tutorials. You might also explore Lowes and Home Depot for upholstery supplies and materials.
FAQ
How much does it cost to reupholster a chair yourself?
DIY reupholstering typically costs $100-400 depending on fabric quality and chair size. Professional upholstery costs $400-1,500 or more, so DIY saves substantial money. Fabric is usually the largest expense—premium fabrics cost more than basic ones, but they last longer and look better.
What’s the best fabric for reupholstering chairs?
Upholstery-grade fabric is more durable than regular fabric. Microfiber, linen, and performance fabrics resist staining and wear well. Avoid lightweight fabrics—they tear easily and don’t hold up to regular use. Choose fabric with a thread count of at least 200 for durability.
Can I reupholster any type of chair?
Most chairs can be reupholstered, but complexity varies. Dining chairs and simple wingbacks are good starter projects. Chairs with intricate curves, built-in springs, or complex construction are more challenging. If your chair has broken springs or severely damaged frame components, professional help may be necessary.
How long does reupholstering a chair take?
A simple chair takes 8-15 hours spread over several days. More complex pieces might take 20-30 hours. Don’t rush—taking breaks prevents mistakes and produces better results. Most people complete a chair project over 2-4 weekends.
Do I need to remove the old padding?
Yes, you should remove old padding. It may be compressed, lumpy, or deteriorated. Fresh padding improves comfort and appearance. If padding is still firm and even, you can sometimes keep it, but replacing it is usually better practice.
What if I make a mistake while stapling?
Remove the staples and re-staple. A staple remover makes this easy. Don’t panic—mistakes are normal and easily corrected. The beauty of DIY reupholstering is that you can adjust and redo sections until you’re satisfied.
Should I hire a professional or DIY?
DIY works well for straightforward chairs and if you enjoy hands-on projects. Professional upholsterers are worth it for valuable antiques, complex designs, or if your time is very limited. Consider your skill level, available time, and the chair’s sentimental or monetary value.
Related Posts

Superscript in Google Docs: Expert Tips

Strikethrough in Excel: Easy Steps for Beginners
