
How to Remove Scratches from Car: Expert Guide
How to Remove Scratches from Car: Expert Guide
Your car’s paint is constantly under siege. From careless shopping carts to tree branches and road debris, scratches seem inevitable. The good news? Most scratches don’t require an expensive trip to the body shop. Whether you’re dealing with a hairline surface scratch or something more substantial, understanding your options can save you hundreds of dollars and restore your vehicle’s appearance.
The key to successful scratch removal lies in identifying what you’re working with. Not all scratches are created equal, and treating them incorrectly can actually make things worse. We’ll walk you through the entire process, from assessment to application, so you can tackle this project with confidence.
Understanding Scratch Depth and Severity
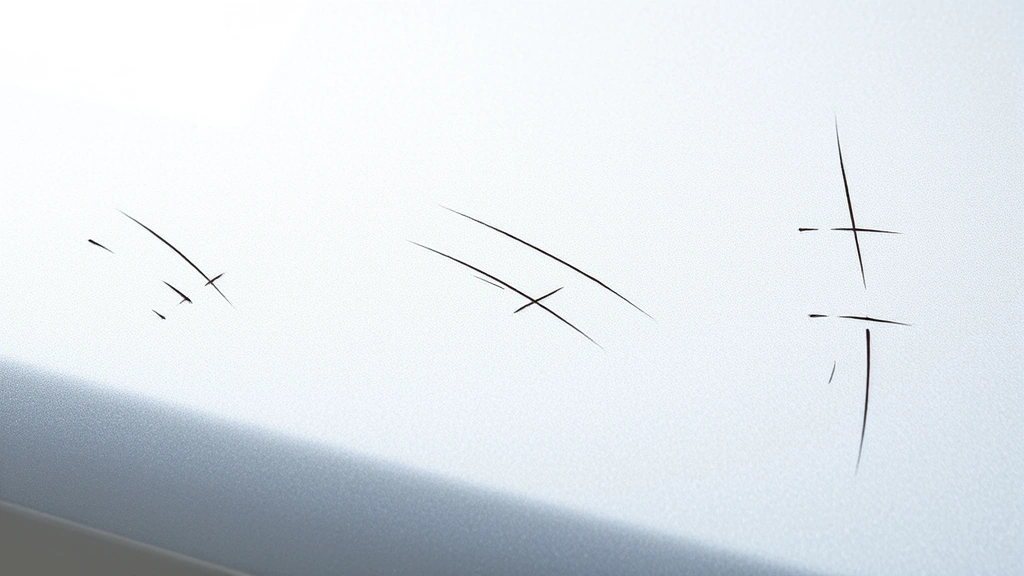
Before you grab any products, you need to understand what you’re dealing with. Scratches fall into three main categories: clear coat scratches, paint scratches, and primer-exposed scratches. Each requires a different approach.
Clear coat scratches are the most superficial. Your car’s clear coat is a protective layer sitting on top of the colored paint. When light scratches occur, they only penetrate this clear layer. You’ll notice these scratches catch light at certain angles, but they don’t expose any color underneath. These are the easiest to fix and often respond well to polishing compounds.
Paint scratches go deeper and expose the colored paint layer beneath the clear coat. You’ll see the actual color of your car’s paint in the scratch. These require more aggressive treatment, typically involving touch-up paint or rubbing compound. The good news is that primer isn’t exposed, so you’re not dealing with rust concerns yet.
Primer-exposed scratches are the most serious. These penetrate all the way through both the clear coat and paint, revealing the gray or white primer underneath. These scratches need immediate attention because exposed primer can lead to rust formation. If you also notice how to remove rust becoming necessary, you’ve waited too long.
Run your fingernail across the scratch. If your nail doesn’t catch, it’s likely a clear coat scratch. If your nail catches slightly, you’re looking at a paint scratch. If your nail catches significantly or the scratch is obviously deep, primer exposure is likely.
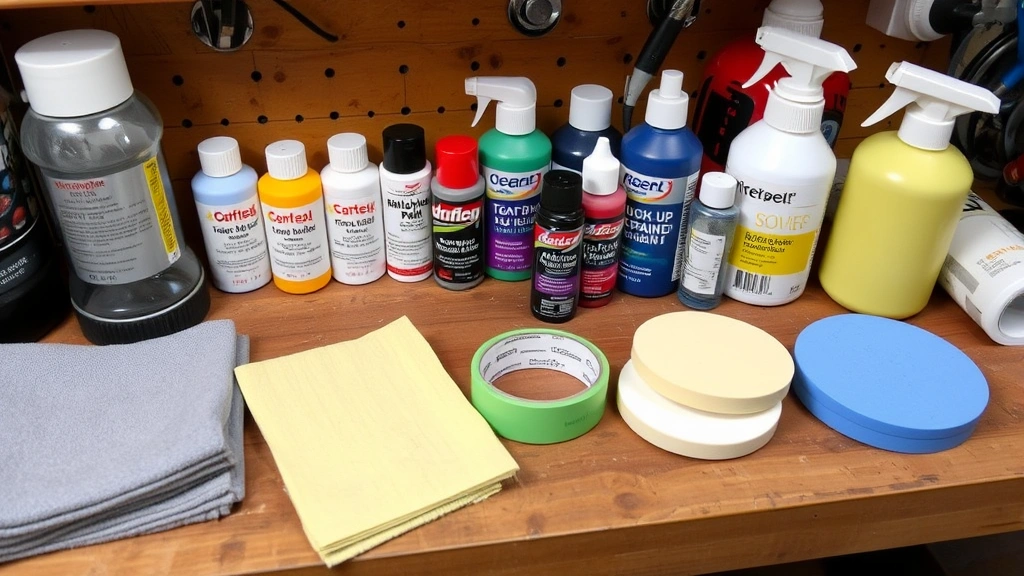
Essential Tools and Materials You’ll Need
Having the right supplies makes the difference between a professional-looking result and a frustrating mess. Here’s what you should gather before starting:
- Microfiber wash cloths – Essential for preventing additional scratches during cleaning
- Car wash soap – Use quality automotive soap, not dish detergent
- Rubbing compound or polishing compound – Choose based on scratch depth
- Touch-up paint – Match your car’s exact color code (found in your owner’s manual or on the driver’s door jamb)
- Fine-grit sandpaper – 2000-3000 grit for primer-exposed scratches
- Primer filler – For deep scratches needing base layer repair
- Polishing pads – Foam or wool pads for orbital sanders
- Orbital sander or buffing machine – Optional but highly recommended for larger areas
- Clear coat spray – To seal and protect your repair
- Masking tape and plastic sheeting – Protects surrounding areas
Quality matters here. Cheap compounds and paint can leave you with visible repair marks. Invest in name brands from reputable automotive suppliers. Home Depot and Family Handyman both offer excellent guides on selecting the right products for your specific situation.
Preparing Your Vehicle for Scratch Removal
Proper preparation is absolutely critical. Skipping this step is the most common reason DIY scratch removal attempts fail. Start by thoroughly washing the affected area with car wash soap and water. You want to remove all dirt, dust, and debris that could interfere with your repair work.
Dry the area completely with a clean microfiber cloth. Any remaining moisture will compromise adhesion and create an uneven finish. Work in a shaded area if possible – direct sunlight can cause products to dry too quickly and unevenly.
Next, mask off the surrounding area using painter’s tape and plastic sheeting. This protects your car’s finish from accidental overspray or compound splatter. Extend the masking at least six inches beyond the scratch in all directions. This might seem excessive, but it prevents costly mistakes.
If you’re dealing with a primer-exposed scratch, use 2000-grit sandpaper to gently smooth the edges around the scratch. This helps the repair blend seamlessly with surrounding paint. Sand in one direction only, using light pressure. You’re not trying to remove paint; you’re just feathering the edges.
Wipe away all sanding dust with a damp microfiber cloth, then let it dry completely. Any remaining dust particles will create bumps in your finish. This tedious step separates amateur results from professional-looking repairs.
Step-by-Step Removal Techniques
For Clear Coat Scratches
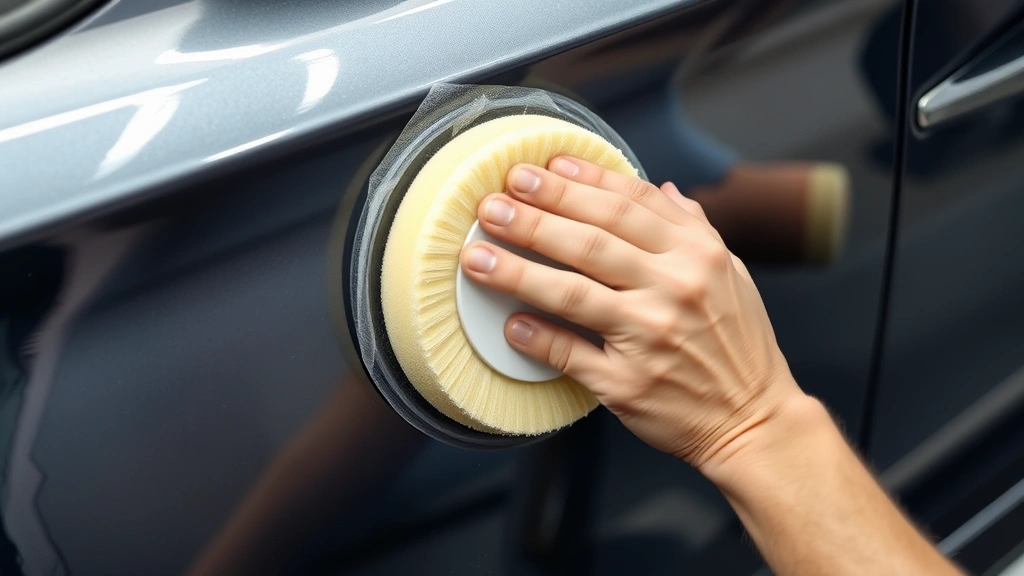
These are your easiest wins. Apply a polishing compound to a microfiber pad and work it into the scratch using circular motions. Don’t press hard – let the compound do the work. You’ll notice the scratch gradually becoming less visible as the compound fills micro-abrasions in the clear coat.
Work the area for 3-5 minutes, then wipe away excess compound with a clean microfiber cloth. Inspect your work. If the scratch is still visible, repeat the process. Most clear coat scratches disappear after 2-3 applications.
Finish by applying a coat of car wax to protect your work and restore shine. This also helps blend the repaired area with surrounding paint.
For Paint Scratches
These require a more involved approach. Start with rubbing compound rather than polishing compound – it’s more aggressive and designed for deeper scratches. Apply it to a foam pad and work it into the scratch using the same circular motion technique.
After 5-10 minutes of working the compound, wipe it away and assess. If the scratch is still visible, you’ll need touch-up paint. Locate your car’s paint code (usually on a sticker inside the driver’s door jamb) and purchase an exact match. Generic “black” or “white” paint won’t work – the shade variation will be obvious.
Apply touch-up paint carefully using the small brush applicator. You want just enough paint to fill the scratch without creating a raised bump. Apply thin layers rather than one thick coat. Let each layer dry completely (typically 15-20 minutes) before adding another.
Once the paint is dry, lightly sand the repair area with 2000-grit sandpaper to smooth any raised edges. Wipe away dust, then apply polishing compound to blend the repair with surrounding paint. Finish with wax for protection and shine.
For Primer-Exposed Scratches
These need the most attention. Start by cleaning the scratch thoroughly and removing any loose paint or primer with a small brush. Use 2000-3000 grit sandpaper to feather the edges around the scratch, creating a smooth transition from damaged to undamaged paint.
Apply primer filler to the scratch using a small brush or applicator. This creates a base layer that prevents rust and provides better adhesion for paint. Let the primer dry completely according to product instructions – typically 1-2 hours.
Once primer is dry, apply touch-up paint in thin layers as described above. This is crucial because you’re building up multiple layers to match the surrounding paint thickness. Patience here prevents visible repair marks.
After paint is completely dry, sand lightly with 2000-grit paper, then apply polishing compound to blend. Follow with clear coat spray to seal and protect your repair. This final clear coat layer is essential – it protects your repair from UV damage and future scratches.
Professional vs. DIY Solutions
You might wonder whether DIY scratch removal makes sense or if you should just visit a professional. The answer depends on several factors.
DIY makes sense when: The scratch is small (under 2 inches), superficial (clear coat or light paint damage), and you have the time and patience to do it properly. You’ll save $100-300 compared to professional repair, and you’ll gain valuable skills for future maintenance.
Professional repair makes sense when: The scratch is large, deep, or involves multiple areas. Professional body shops have color-matching equipment and spray booths that create perfect blends. They also offer warranties on their work. If you’re not confident in your ability or the damage is extensive, professional service is worth the investment.
There’s also a middle ground. Many detail shops offer scratch repair services that fall between DIY and full body shop work. These services are often more affordable than traditional body shops while providing better results than typical DIY attempts.
Regardless of which route you choose, maintaining your vehicle’s finish prevents scratches from becoming major problems. Just as you’d check engine oil regularly for engine health, you should inspect your paint regularly for new damage. Catching scratches early makes removal easier and prevents rust development.
Preventing Future Scratches
Once you’ve invested the effort in removing scratches, preventing new ones makes sense. Here are practical strategies:
- Park away from other vehicles – Shopping carts and careless doors cause countless scratches. Park at the end of the lot when possible
- Use a car cover – If you park outdoors regularly, a quality cover protects from tree branches and environmental damage
- Maintain your wax coating – Fresh wax provides a protective layer that can prevent some scratches and minimize others
- Wash regularly – Dirt particles on your paint can cause micro-scratches when you dry the vehicle. Gentle washing prevents this
- Dry carefully – Use only microfiber cloths and soft materials. Rough towels cause scratches during drying
- Avoid automatic car washes with brushes – Touchless or hand washes are gentler on your finish
Think of paint protection like maintaining other aspects of your vehicle. Just as you’d rotate tires regularly or change transmission fluid on schedule, protecting your paint through preventive measures saves money and frustration long-term.
Consider ceramic coating for long-term protection. While more expensive upfront ($400-1000 professionally applied), ceramic coatings provide superior scratch resistance and can last 2-5 years. They’re particularly worthwhile if you live in harsh climates or park outdoors regularly.
Frequently Asked Questions
Can I use toothpaste to remove car scratches?
While some people claim toothpaste works for minor scratches, it’s not ideal. Toothpaste is too mild for most car scratches and can leave residue. Use proper polishing or rubbing compounds designed for automotive paint. These products are formulated specifically for car finishes and deliver better results.
How long does scratch repair take?
Clear coat scratches can be fixed in 30 minutes to an hour. Paint scratches typically require 2-3 hours including drying time. Primer-exposed scratches need 4-8 hours or even overnight depending on drying times for primer and paint. Professional shops may complete work faster due to specialized equipment.
Will my repair be visible?
Small, well-executed repairs are barely noticeable unless you’re looking for them. Larger repairs may be visible up close, though they’ll be dramatically improved. Professional repairs are nearly invisible. The key is patience – rushing the process leads to visible repair marks.
Can I apply clear coat over my repair?
Yes, and you should for primer-exposed scratches. Clear coat protects your repair and helps it blend with surrounding paint. Use aerosol clear coat designed for automotive use. Apply thin, even coats rather than one heavy coat to avoid drips and runs.
What if the scratch appears again after repair?
If you followed the process correctly, scratches shouldn’t reappear. However, if you repair a clear coat scratch with only polishing compound and no clear coat protection, the scratch may become visible again over time as the compound wears away. Always finish with wax or clear coat for lasting results.
Should I repair scratches myself or hire a professional?
Small, superficial scratches are great DIY projects that save money and build skills. Large, deep scratches or those involving multiple areas benefit from professional expertise. If you’re uncertain about your ability or the damage is extensive, professional service ensures quality results and often includes warranties.
Is it normal for touch-up paint to not match perfectly?
Even exact color matches can appear slightly different due to application technique, lighting, and surrounding paint condition. Professional painters blend repairs seamlessly using specialized techniques. If your DIY repair doesn’t match perfectly, don’t worry – weathering will help it blend over time.
Can I prevent scratches with protective films?
Yes. Clear protective film (paint protection film) can be applied to high-risk areas like the front bumper, hood, and door handles. This preventive measure protects against scratches, rock chips, and minor damage. Professional installation ensures proper application and longevity.
Related Posts

How Long to Boil Lobster Tails: Cooking Guide

How Long to Fly from New York to London? Travel Times
