

Merge 2 Cells in Excel: Beginner’s Tutorial
How to Merge 2 Cells in Excel: Beginner’s Tutorial
Merging cells in Excel is one of the most practical formatting techniques for creating professional-looking spreadsheets. Whether you’re building a report header, organizing data, or designing a template, knowing how to merge 2 cells in Excel will save you time and improve your spreadsheet’s appearance. This beginner-friendly guide walks you through every method available in Excel, from the simplest approach to advanced options that give you maximum control.
Cell merging combines two or more adjacent cells into a single larger cell. This is especially useful when you want to create centered titles, organize sections, or improve the visual hierarchy of your data. While merging cells is straightforward, understanding the implications and best practices will help you use this feature effectively without losing data or creating formatting problems.
What Does Merging Cells Mean
Before diving into the how-to steps, it’s important to understand what merging actually does. When you merge cells, you’re combining the area of multiple cells into one larger cell. If you have cells A1 and B1, merging them creates a single cell that spans across both original cell locations. The resulting merged cell will display whatever content was in the first cell (A1 in this case), and any data in the other cells will be lost unless you copy it first.
Merging is different from combining cells in Excel, which typically refers to concatenating the contents of multiple cells into one. When you merge, you’re creating a visual union of cells; when you combine, you’re joining the actual text or values together. Understanding this distinction helps you choose the right technique for your specific task.
Common uses for merging include creating spreadsheet titles that span multiple columns, designing form templates, organizing report sections, and improving readability in complex data layouts. The key is using merging strategically without overusing it, as excessive merging can make spreadsheets harder to work with and can cause problems when sorting or filtering data.

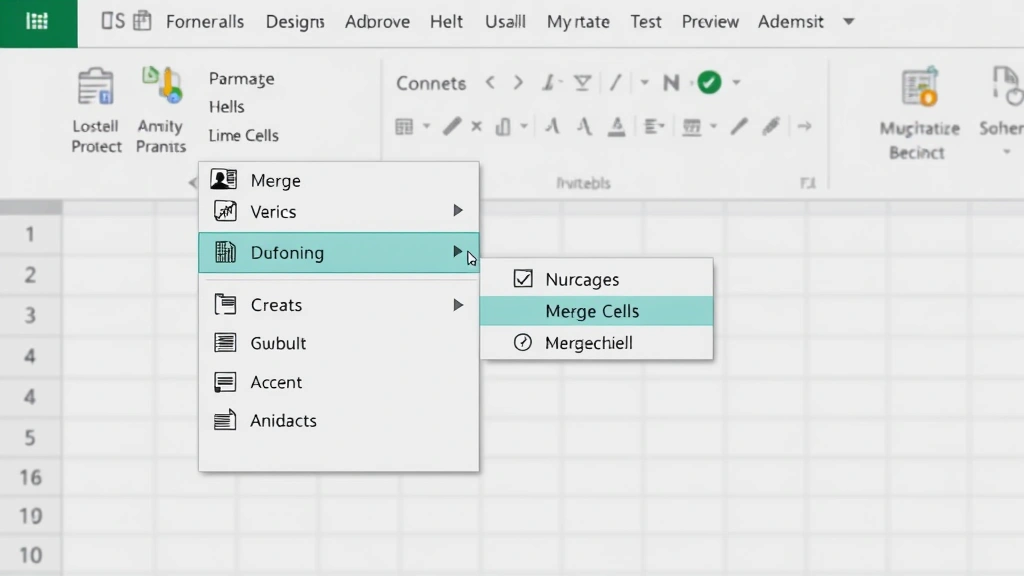
Method 1: Using the Merge Cells Button
The quickest way to merge cells is using the dedicated Merge Cells button in Excel’s ribbon. This method works in Excel 2016 and later versions on both Windows and Mac.
- Select the cells you want to merge: Click on the first cell (for example, A1) and drag to the second cell (B1) while holding down your mouse button. You should see both cells highlighted in blue, indicating they’re selected.
- Locate the Merge Cells button: Go to the Home tab in the ribbon at the top of your screen. Look for the Merge Cells button, which typically appears in the Alignment group. It may have a small dropdown arrow next to it.
- Click the dropdown arrow: Click the small arrow next to the Merge Cells button to see your merging options. You’ll see several choices: Merge & Center, Merge Across, Merge Cells, and Unmerge Cells.
- Select your merge option: Choose “Merge Cells” if you want a simple merge without centering. If you want the content centered in the merged cell, choose “Merge & Center.”
- Confirm the merge: Excel will immediately merge your selected cells. If there was data in the non-first cells, you’ll see a small notification asking if you want to keep the data from the first cell only.
This method is the fastest for most users because it requires just a few clicks and is visually straightforward. The button’s location in the Home tab makes it easy to access repeatedly as you work on your spreadsheet.
Method 2: Using the Format Menu
If you prefer using menus over ribbon buttons, or if you want access to more detailed merging options, the Format menu provides a comprehensive approach.
- Select your cells: Choose the two cells you want to merge by clicking and dragging from the first cell to the second.
- Open the Format menu: Click on “Format” in the menu bar at the top of your Excel window.
- Navigate to Cells: Look for “Cells” or “Format Cells” in the dropdown menu and click it. This opens the Format Cells dialog box.
- Go to the Alignment tab: In the Format Cells dialog, click on the “Alignment” tab. This tab contains all cell alignment and merging options.
- Check the Merge Cells checkbox: In the Alignment tab, you’ll see a checkbox labeled “Merge cells.” Click this checkbox to enable merging.
- Choose alignment options: While you’re in this dialog, you can also set how the content aligns within the merged cell. You can choose horizontal alignment (left, center, right) and vertical alignment (top, middle, bottom).
- Click OK: Click the OK button to apply the merge and close the dialog box.
This method gives you more control because you can set alignment options at the same time you’re merging. It’s particularly useful when you want your merged cell to be centered both horizontally and vertically, creating a polished, professional appearance.
Method 3: Merge and Center Your Data
The “Merge and Center” option is one of the most commonly used merging functions because it automatically centers your content while merging. This is perfect for creating headers and titles.
- Select the cells: Click on your first cell and drag to select all cells you want to merge. For a simple two-cell merge, click A1 and drag to B1.
- Click Merge & Center: In the Home tab, click directly on “Merge & Center” (not the dropdown arrow). This button typically shows an icon with centered lines.
- Review your result: Your cells are now merged with the content centered within the new merged cell. The text will be horizontally centered and positioned in the middle of the merged area.
Merge and Center is particularly effective for spreadsheet titles because it creates visual emphasis and draws attention to important information. Many professional reports use this technique for the main title that spans the width of the data table.
Advanced Merging Options
Excel offers several advanced merging options beyond the basic merge function. Understanding these options helps you use merging more strategically.
Merge Across: This option merges cells horizontally (across columns) but keeps rows separate. It’s useful when you have multiple rows of data and want to merge cells within each row independently. For example, if you have data in rows 1-3 and columns A-B, Merge Across will merge A1 with B1, A2 with B2, and A3 with B3 as separate operations.
Merge Cells (Standard): This is the basic merge option that combines all selected cells into one without any additional formatting. Choose this when you want to merge without automatic centering.
When working with more complex spreadsheets, you might want to freeze rows in Excel while also using merged cells to create a professional header section that stays visible as you scroll through data.
Unmerging Cells When Needed
Sometimes you need to undo a merge after creating it. Perhaps you realize you need to work with individual cells again, or you want to reorganize your spreadsheet structure. Unmerging is just as easy as merging.
- Select the merged cell: Click on the merged cell you want to separate. You only need to click once since it’s now a single cell.
- Open the Merge Cells menu: Go to the Home tab and click the dropdown arrow next to the Merge Cells button.
- Click Unmerge Cells: Select “Unmerge Cells” from the dropdown menu. Your previously merged cell will immediately split back into its original individual cells.
- Check your data: The content that was in the merged cell will appear in the top-left cell of the original merged area. Any data that was in the other cells before merging will still be gone (this is why it’s important to plan your merges carefully).
If you used the Format menu to merge, you can unmerge the same way: select the merged cell, go to Format > Cells, click the Alignment tab, and uncheck the “Merge cells” checkbox.
Common Mistakes to Avoid
Even though merging cells is straightforward, several mistakes can create problems in your spreadsheet.
Losing data: The most common mistake is merging cells without realizing you’ll lose the content from non-first cells. Before merging, copy any important data from the cells you’re about to merge. If the data is important, paste it elsewhere or combine it using formulas before merging.
Over-merging: Merging too many cells or merging cells throughout your entire dataset can create sorting and filtering problems. Excel can’t sort or filter properly when you have merged cells in your data range. Reserve merging for headers, titles, and formatting areas rather than data sections.
Inconsistent alignment: When you merge cells without using Merge & Center, the content might not align as you expect. Always check your alignment settings to ensure the merged cell looks the way you want it to.
Creating uneven rows: When you merge cells vertically (down multiple rows), it can make rows appear different heights. This sometimes creates confusion about where data actually belongs. Be intentional about vertical merges and document your spreadsheet structure clearly.
Related to spreadsheet organization, you might also want to learn how to hide columns in Excel for a cleaner presentation without actually removing data.
Tips for Professional Results
Creating professional-looking merged cells requires more than just using the merge function. These tips help you achieve polished results.
Plan your layout first: Before merging any cells, sketch out your spreadsheet layout on paper or in a new blank sheet. Decide where headers will go, how many columns you need, and which cells should be merged. This planning prevents mistakes and ensures a logical structure.
Use consistent formatting: When you merge cells for headers or titles, apply consistent formatting to all of them. Use the same font, font size, color, and background color for all merged header cells. This creates visual unity and makes your spreadsheet look intentional and professional.
Combine with other formatting: Merged cells work best when combined with other formatting techniques. Add background colors, borders, bold text, and larger fonts to make merged header cells stand out. Make sure to check FixwiseHub’s formatting guides for comprehensive formatting techniques.
Keep data separate from formatting: In professional spreadsheets, separate your data area from your formatting area. Use merging for titles and headers above your data, not within the data itself. This allows you to sort, filter, and analyze your data without complications.
Document your structure: If you’re sharing your spreadsheet with others, add a note or documentation explaining your merged cell structure. This helps other users understand the layout and prevents accidental changes.
Test before sharing: Before you share your spreadsheet with others, test it thoroughly. Verify that all formulas still work correctly, that sorting and filtering function as expected (if you’re using them), and that the merged cells display properly on different screen sizes and when printed.
For more advanced cell manipulation techniques, explore how to split cells in Excel when you need to separate data that’s combined in a single cell.
FAQ
Can I merge more than 2 cells at once?
Yes, absolutely. You can merge any number of cells by selecting all of them before using the merge function. Simply click and drag to select as many cells as you need, then use any of the merging methods described in this guide. You can merge cells horizontally, vertically, or in a rectangular block.
What happens to my data when I merge cells?
When you merge cells, the content from the first cell (top-left in your selection) is preserved, but the content of all other selected cells is deleted. This is why it’s crucial to check what data is in each cell before merging. If you need to keep the data, copy it to another location first or use a formula to combine the values.
Can I sort or filter data with merged cells?
Merged cells can cause problems with sorting and filtering. Excel prefers clean, uniform data structures for these functions. If you have merged cells within your data range, sorting and filtering might not work correctly or might skip rows. It’s best to keep merged cells out of your data area and use them only for headers and formatting.
How do I center content in a merged cell?
Use the “Merge & Center” button for automatic centering, or manually set alignment through Format > Cells > Alignment tab. You can control both horizontal alignment (left, center, right) and vertical alignment (top, middle, bottom) to position your content exactly where you want it.
Can I merge cells in Excel Online?
Yes, Excel Online supports merging cells. The process is similar to desktop Excel: select your cells, go to the Home tab, and click the Merge & Center button or use the Format menu. However, some advanced formatting options might be more limited in the online version.
Is there a keyboard shortcut for merging cells?
There’s no universal keyboard shortcut for merging cells in Excel. However, you can create custom keyboard shortcuts in Excel’s options menu, or you can use Alt+H to access the Home tab and then navigate to the Merge Cells button using arrow keys.
What’s the difference between merging and combining cells?
Merging combines the physical space of multiple cells into one larger cell. Combining typically refers to joining the text or values from multiple cells into a single cell using formulas or the CONCATENATE function. When you merge, you lose data from non-first cells; when you combine with formulas, you preserve all the data.
Related Posts

Superscript in Google Docs: Expert Tips

Strikethrough in Excel: Easy Steps for Beginners
