
Make Mead at Home: Easy Beginner’s Guide
Make Mead at Home: Easy Beginner’s Guide
Mead, often called the drink of the gods, is one of the oldest alcoholic beverages known to humanity. This ancient honey wine has been enjoyed for thousands of years across cultures worldwide, and the good news is that making mead at home is surprisingly simple and rewarding. Whether you’re a fermentation enthusiast or simply curious about crafting your own beverages, mead-making is an accessible hobby that requires minimal equipment and ingredients.
The beauty of mead lies in its versatility and forgiving nature. Unlike beer brewing, which demands precise temperature control and complex processes, mead-making is straightforward enough for complete beginners yet offers endless opportunities for experimentation and refinement. With just honey, water, yeast, and patience, you can create a delicious homemade mead that rivals commercial varieties. This guide will walk you through everything you need to know to start your mead-making journey successfully.
What is Mead and Why Make It at Home?
Mead is an alcoholic beverage created by fermenting honey with water and yeast. The honey provides fermentable sugars, while the yeast converts those sugars into alcohol and carbon dioxide. The result is a wine-like drink that can range from dry to sweet, depending on how much honey you use and how long fermentation continues. Mead has been documented in ancient texts, Viking sagas, and medieval manuscripts, making it a truly historical beverage with modern appeal.
Making mead at home offers numerous advantages. First, it’s remarkably cost-effective compared to purchasing craft meads from specialty retailers. A single batch can yield multiple bottles for a fraction of the retail price. Second, home mead-making gives you complete control over flavors, sweetness levels, and alcohol content. You’re not limited to commercial varieties; instead, you can experiment with fruit additions and natural ingredients to create unique blends. Third, the process itself is therapeutic and educational, teaching you about fermentation science while producing something you can share with friends and family.
Beyond the practical benefits, there’s genuine satisfaction in creating a beverage from scratch. The hobby connects you to centuries of brewing tradition while allowing modern creativity and personalization. Whether you’re interested in historical accuracy or contemporary flavor innovation, mead-making welcomes all approaches.
Essential Equipment and Ingredients
Before you begin your mead-making adventure, gather the necessary equipment. The good news is that most items are inexpensive and readily available. You don’t need specialized brewing equipment to create excellent mead; basic household items work perfectly fine for beginners.
Essential Equipment:
- A glass demijohn or carboy (1-gallon or 5-gallon size)
- Airlock and bung (allows gas to escape while preventing contamination)
- Sanitizing solution (such as Star San or bleach solution)
- Hydrometer (measures specific gravity to track fermentation progress)
- Large stainless steel pot for mixing
- Wooden spoon for stirring
- Funnel for transferring liquid
- Siphon and tubing for bottling
- Glass bottles for storage
- Bottle caps or corks
- Thermometer to monitor temperature
- Strainer or cheesecloth
Key Ingredients:
- Honey: The star ingredient. Use raw, unpasteurized honey when possible, as it contains beneficial wild yeasts. Quality honey produces superior mead. Aim for 2-3 pounds per gallon for standard mead.
- Water: Use filtered or dechlorinated water. Chlorine can interfere with fermentation, so let tap water sit overnight or use a filter.
- Yeast: Wine yeast or ale yeast works well. Popular choices include Lalvin D-47, EC-1118, or Red Star Premier Blanc. Yeast is crucial because it drives fermentation.
- Yeast Nutrient: Helps yeast stay healthy during fermentation. Honey lacks some nutrients that yeast needs, so supplementation ensures robust fermentation.
- Optional Additions: Spices, fruits, tea, or herbs create variations. See the flavor variations section for ideas.
Step-by-Step Mead Making Process
Step 1: Sanitize Everything
This cannot be overstated: sanitization is critical. Any contamination can ruin your batch. Wash all equipment thoroughly with hot soapy water, then sanitize using a solution like Star San or a diluted bleach solution (one tablespoon per gallon of water). Let items air dry or rinse with sanitized water. Contamination is one of the most common reasons batches fail, so don’t skip this step.
Step 2: Mix Your Must
The “must” is your honey-water mixture before fermentation begins. In your large pot, combine honey and water. For a basic one-gallon batch, use three pounds of honey and one gallon of water. Heat the mixture to approximately 160-180°F (70-82°C) for about 15-20 minutes. This gentle heating helps dissolve the honey and kills any unwanted microorganisms without destroying beneficial compounds. Don’t boil aggressively, as excessive heat can damage honey’s delicate flavors. Stir occasionally to ensure even heating.
Step 3: Cool and Transfer
Allow your must to cool to room temperature (around 70°F or 21°C). This is essential because adding yeast to hot liquid will kill it. Once cooled, carefully pour the must into your sanitized carboy using a funnel. Leave a few inches of headspace at the top to accommodate foam during fermentation. This is where the importance of proper cleaning techniques becomes evident—any residue can affect your final product.
Step 4: Prepare and Pitch Yeast
While your must cools, prepare your yeast according to package directions. Most commercial yeasts require hydration in warm water (around 100°F or 37°C) for 15-20 minutes before pitching. This awakens dormant yeast cells and improves fermentation success rates. Once your must reaches room temperature and your yeast is ready, pour the yeast mixture into the carboy. Cap with an airlock and bung.
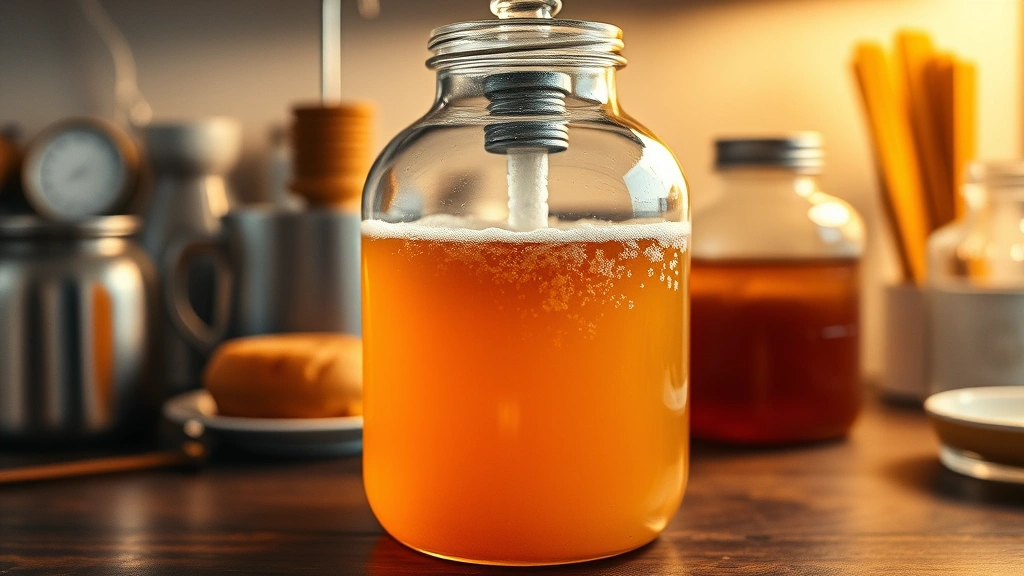
Step 5: Initial Fermentation Setup
Place your carboy in a location with stable temperature, ideally between 65-75°F (18-24°C). Avoid direct sunlight, which can cause off-flavors. Fill the airlock with sanitized water or vodka (vodka prevents mold growth). The airlock allows carbon dioxide to escape while preventing outside air from entering. This is your first line of defense against contamination.
Fermentation and Patience
Now comes the hardest part for beginners: waiting. Fermentation typically takes 4-6 weeks, though some meads ferment for several months. Within 24-48 hours, you should see vigorous bubbling in the airlock as yeast consumes sugars and produces alcohol and CO2.
Monitoring Progress:
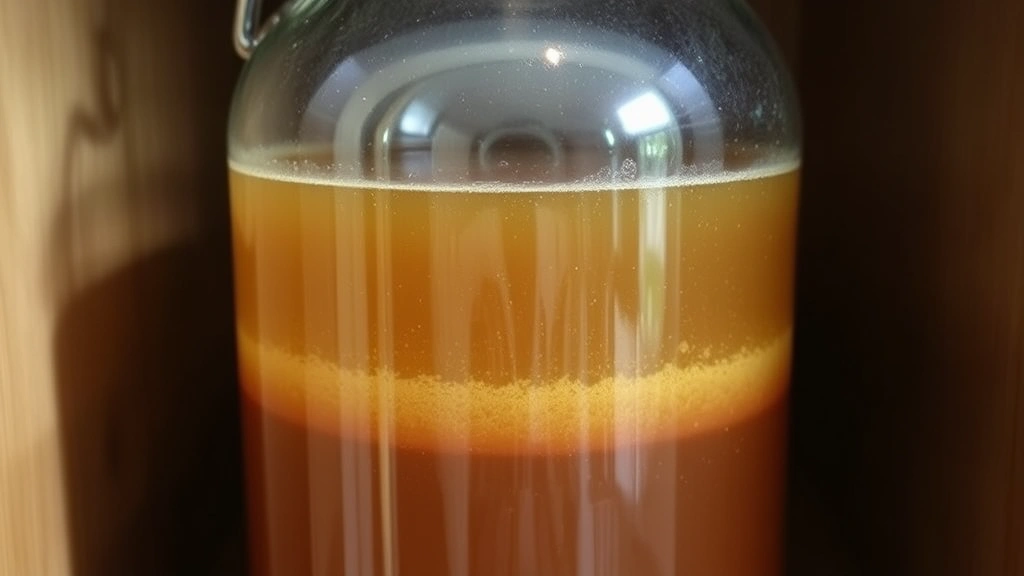
Check your mead every few days without opening the carboy. The airlock tells the story—vigorous bubbling indicates active fermentation. As fermentation slows, bubbling decreases. After 2-3 weeks, the sediment (called “lees”) settles at the bottom. This is normal and desirable. Use your hydrometer to measure specific gravity periodically. When readings stabilize over several days, fermentation is complete. You can also taste small samples to gauge sweetness and alcohol content.
Temperature Considerations:
Maintain consistent temperature throughout fermentation. Temperature fluctuations stress yeast and can produce unwanted flavors. If your home is particularly cold, consider using a heat strip or placing your carboy in an insulated box. Conversely, if temperatures exceed 75°F (24°C), move your carboy to a cooler location. Temperature consistency is as important as the ingredients themselves.
Racking (Optional but Recommended):
After 3-4 weeks, when fermentation significantly slows, consider racking your mead. This means siphoning the clear mead from the carboy into a clean carboy, leaving sediment behind. Racking improves clarity and flavor by separating the mead from dead yeast cells. Use sanitized siphoning equipment and work carefully to avoid introducing air. Many beginners skip this step, and while mead will still turn out fine, racking produces superior results. This process is similar to techniques used when making other fermented beverages at home.
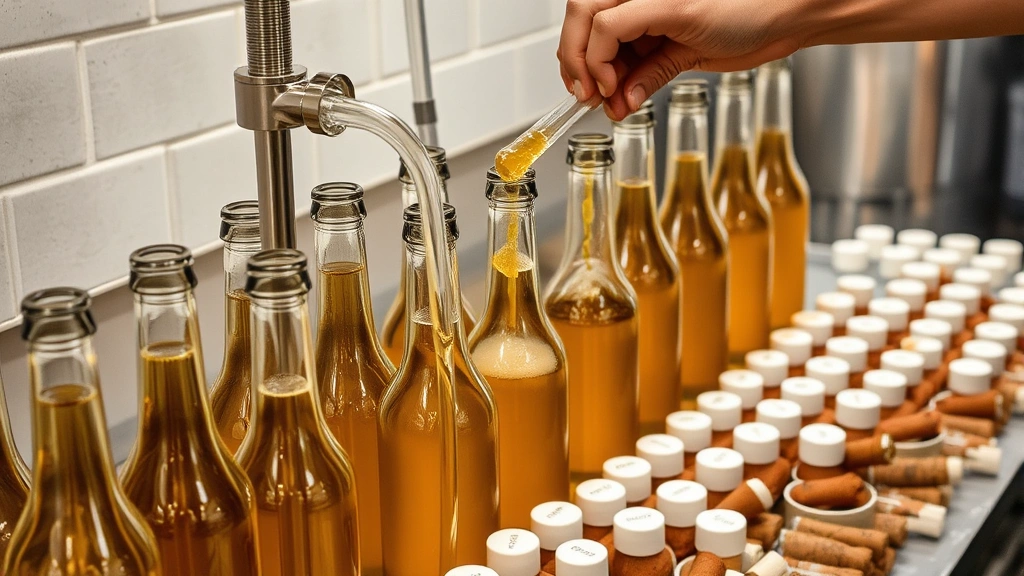
Bottling and Storage
Once fermentation completes and your mead is clear, it’s time to bottle. This is an exciting milestone—your mead is nearly ready to enjoy.
Preparing for Bottling:
Sanitize all bottles, caps, and siphoning equipment. Use glass bottles designed for wine or beer, not regular drinking glasses. Set up your bottling station with the carboy elevated on a table and bottles on the floor below for easy siphoning. Insert the siphon tubing into the carboy, being careful to avoid the sediment layer at the bottom.
Bottling Process:
Fill each bottle to about an inch below the rim. This headspace allows for slight expansion and prevents overflow. Cap or cork each bottle securely. If using caps, a capping tool ensures proper sealing. If using corks, soak them briefly in sanitized water to soften them, then insert using a corking tool.
Storage Guidelines:
Store bottled mead in a cool, dark place. A basement, closet, or wine rack works perfectly. Ideal storage temperature is 50-60°F (10-15°C), though room temperature is acceptable. Keep bottles upright if using caps, or on their side if using traditional corks (corks must stay moist). Most mead improves with age. Young mead may taste sharp or unbalanced, but given 6-12 months, flavors mellow and integrate beautifully. Some meads benefit from 2-3 years of aging. This patience mirrors the dedication required when learning any new craft technique.
Troubleshooting Common Issues
Fermentation Won’t Start:
If no bubbling appears after 48 hours, several factors could be responsible. Temperature may be too cold—yeast becomes dormant below 60°F (15°C). Move your carboy to a warmer location. The yeast might be dead or inactive; ensure you’re using fresh yeast stored properly. Alternatively, your water may contain chlorine that inhibits fermentation; let tap water sit overnight before use. Finally, the must temperature during yeast pitching may have been too hot, killing the yeast.
Fermentation Stops Prematurely:
If bubbling stops but the mead is still sweet, fermentation may have stalled. This usually indicates stressed yeast. Check temperature and adjust if needed. Add yeast nutrient dissolved in a small amount of must, then gently stir the carboy. Sometimes oxygen helps restart fermentation; carefully aerate by stirring gently with a sanitized spoon. If these steps don’t work, repitching with fresh yeast may be necessary.
Off-Flavors or Vinegar Smell:
A vinegar smell indicates acetic acid bacteria contamination. This occurs when the mead is exposed to air during fermentation or when sanitation was inadequate. Unfortunately, infected batches are typically undrinkable. Prevention is key: maintain rigorous sanitation and ensure your airlock stays properly filled. Ensure your equipment is truly clean before use.
Mold Growth:
Mold on the surface indicates contamination. If mold appears only on the surface and hasn’t penetrated the liquid, you might carefully skim it off and ensure the airlock stays filled. However, if mold has spread throughout or the mead smells off, discard the batch. Prevent mold by maintaining the airlock and storing in a location without extreme humidity.
Hazy or Cloudy Mead:
Some cloudiness is normal during fermentation, but it should clear as mead ages. If your mead remains cloudy after several months, it may indicate yeast still in suspension or pectin from added fruits. Patience often resolves this. Alternatively, you can use fining agents like gelatin or isinglass to clarify, though this requires additional knowledge. Most beginners find that waiting simply works.
Flavor Variations and Advanced Techniques
Once you’ve mastered basic mead-making, experimentation opens endless possibilities. The FixWiseHub blog features numerous creative recipes for home fermentation projects that inspire variation.
Fruit Meads (Melomels):
Add fruit juice or fresh fruit to your must. Popular choices include apple, berry, and stone fruits. Use about one pound of fruit per gallon of mead. Add fruit during the initial mix or during secondary fermentation for different flavor profiles. Fruit additions create complex, nuanced flavors that elevate your mead from basic to exceptional. Consider combining apple-based recipes with honey for an interesting variation.
Spiced Meads (Metheglin):
Add spices like cinnamon, clove, nutmeg, or ginger. Start with small quantities—a quarter teaspoon per gallon—and adjust based on preference. Spices can be added during heating, during fermentation, or even post-bottling by creating a spiced syrup and adding it to glasses. Spiced meads evoke warmth and complexity, making them perfect for special occasions.
Herb Meads:
Incorporate herbs like chamomile, lavender, or mint. Use dried herbs sparingly—about one teaspoon per gallon—or fresh herbs at double that quantity. Herbs create subtle, sophisticated flavors. Chamomile mead offers floral elegance, while mint creates refreshing brightness.
Hydromel (Light Mead):
Use less honey (1.5 pounds per gallon) for a lower alcohol, lighter-bodied mead. Hydromels are delicate and refreshing, perfect for warm weather or those preferring lower alcohol content.
Sack Mead (Strong Mead):
Increase honey to 4-5 pounds per gallon for a robust, full-bodied mead with higher alcohol content. Sack meads age beautifully and develop complex flavors over years. They’re excellent for special occasions or long-term cellaring.
Carbonation:
For those wanting fizzy mead, bottle-conditioning adds carbonation. Before final bottling, add a small amount of sugar dissolved in water (about one-quarter teaspoon per bottle). This provides food for residual yeast, which produces CO2 trapped in the sealed bottle. Use sturdy beer bottles and caps, never wine bottles, as they may not withstand pressure. Bottle-conditioned mead requires careful handling and creates a celebratory pop when opened.
Secondary Fermentation with Multiple Additions:
Advanced brewers use secondary fermentation to layer flavors. After primary fermentation completes, rack into a fresh carboy and add new ingredients—different fruits, spices, or even a small amount of fresh honey. Allow secondary fermentation to complete before final bottling. This technique creates sophisticated, layered flavor profiles that impress discerning palates.
FAQ
How long does mead take to make?
Primary fermentation typically takes 4-6 weeks. However, total time from start to drinking depends on your patience. Young mead is drinkable at 2-3 months but often tastes sharper. Most mead improves dramatically after 6-12 months of aging. Some meads benefit from 2-3 years of maturation, developing smooth, complex flavors that are worth the wait.
Can I make mead without yeast?
Technically, yes. Wild yeasts present in raw honey and the environment can ferment mead naturally. However, this is unpredictable and risky—contamination is more likely, and fermentation may not occur at all. Commercial yeast provides reliability and consistency, making it strongly recommended for beginners. Once experienced, you can experiment with natural fermentation if desired.
What’s the alcohol content of mead?
Alcohol content depends on honey quantity and fermentation completion. Basic mead (3 pounds honey per gallon) typically reaches 10-12% ABV. Sack meads with 4-5 pounds honey can reach 15-18% ABV. Use a hydrometer to calculate precise alcohol content by measuring specific gravity before and after fermentation.
Is mead-making legal?
In the United States, home fermentation of beer and wine (including mead) is legal for personal use. Federal law allows up to 100 gallons per adult per year, with a household maximum of 200 gallons. However, laws vary by country and region, so verify local regulations before beginning. Never sell homemade mead without proper licensing.
Why is my mead so dry?
If fermentation completes before all sugar is consumed, the result is dry mead. This occurs when yeast fully ferments all available sugars or when fermentation conditions favor complete sugar conversion. If you prefer sweeter mead, use more honey initially or stop fermentation early (advanced technique requiring careful monitoring). Alternatively, add honey or honey syrup to finished mead before bottling to increase residual sweetness.
Can I use any type of honey?
Yes, but quality varies. Raw, unpasteurized honey produces superior mead with more complex flavors. Pasteurized honey works fine but may lack subtle nuances. Avoid honey blends or honey with additives. Different honey varieties—clover, wildflower, acacia—produce distinctly different meads, so experimentation is encouraged. Buy honey from local beekeepers when possible for best results.
What temperature is best for mead fermentation?
Ideal fermentation temperature is 65-75°F (18-24°C). Most wine yeasts perform well in this range. Temperatures below 60°F slow fermentation significantly; above 80°F can stress yeast and produce off-flavors. Consistent temperature matters more than exact temperature—fluctuations are more problematic than being slightly cool or warm. Monitor your home’s temperature and choose stable storage locations.
How do I know when fermentation is complete?
Fermentation completes when airlock bubbling stops completely and specific gravity readings stabilize over 3-4 days. Use your hydrometer to confirm—when readings don’t change from day to day, fermentation has finished. Additionally, taste a small sample; finished mead should taste balanced with no obvious sweetness if fermentation went to completion, or residual sweetness if you stopped it early.
Can mead go bad?
Properly made mead is remarkably stable. High alcohol content and acidity prevent spoilage. However, exposure to air can cause oxidation, turning mead brown and flat-tasting. Additionally, contamination during fermentation can produce vinegar or off-flavors. Store bottles properly in cool, dark conditions, and ensure caps or corks seal tightly. Well-made mead stored properly remains excellent for years or even decades.
What’s the difference between mead and wine?
Wine is made from fermented grapes; mead is made from fermented honey. While both are fermented beverages with similar alcohol content, their flavor profiles differ significantly. Mead is often sweeter and fuller-bodied, with honey’s distinctive character. Wine tends toward fruity or tannic profiles. Some overlap exists—fruit meads resemble wine—but the fundamental difference is the base ingredient and resulting flavor character.
Related Posts

Superscript in Google Docs: Expert Tips

Strikethrough in Excel: Easy Steps for Beginners
