
How to Make Egg Wash: Easy Step-by-Step Guide
How to Make Egg Wash: Easy Step-by-Step Guide
If you’ve ever pulled a freshly baked pastry, bread, or pie out of the oven with that gorgeous golden-brown shine, you’ve witnessed the magic of egg wash. This simple culinary technique transforms ordinary baked goods into bakery-quality masterpieces with a professional-looking finish. Yet somehow, it remains one of the most misunderstood kitchen basics.
The beauty of egg wash lies in its simplicity. Whether you’re a seasoned baker or someone who just wants their homemade croissants to look Instagram-worthy, mastering this technique takes about two minutes. No special equipment needed. No fancy ingredients. Just eggs, maybe a splash of liquid, and a pastry brush.
In this guide, we’ll walk you through everything you need to know about making and applying egg wash like a pro. From choosing the right eggs to troubleshooting common mishaps, you’ll have all the knowledge to elevate your baking game.
What Is Egg Wash?
Egg wash is a mixture applied to the surface of baked goods before they go into the oven. It’s essentially a glue that creates a shiny, golden-brown exterior on pastries, breads, and pies. When heat hits the egg proteins, they set and form a protective coating that gives your baked creations that coveted bakery finish.
The primary purpose of egg wash is aesthetic—it creates visual appeal and a professional appearance. But there’s more to it than just looks. Egg wash also helps create texture variation on baked goods. It can make certain areas crunchy while keeping others soft, and it helps seal pastry layers so they don’t dry out during baking.
Different baking traditions use egg wash in different ways. French patisseries swear by it for croissants and Danish pastries. Italian bakers use it on focaccia and enriched breads. American home bakers often skip it entirely, which is a shame because the technique is so easy and the results are so impressive.
Basic Egg Wash Recipe
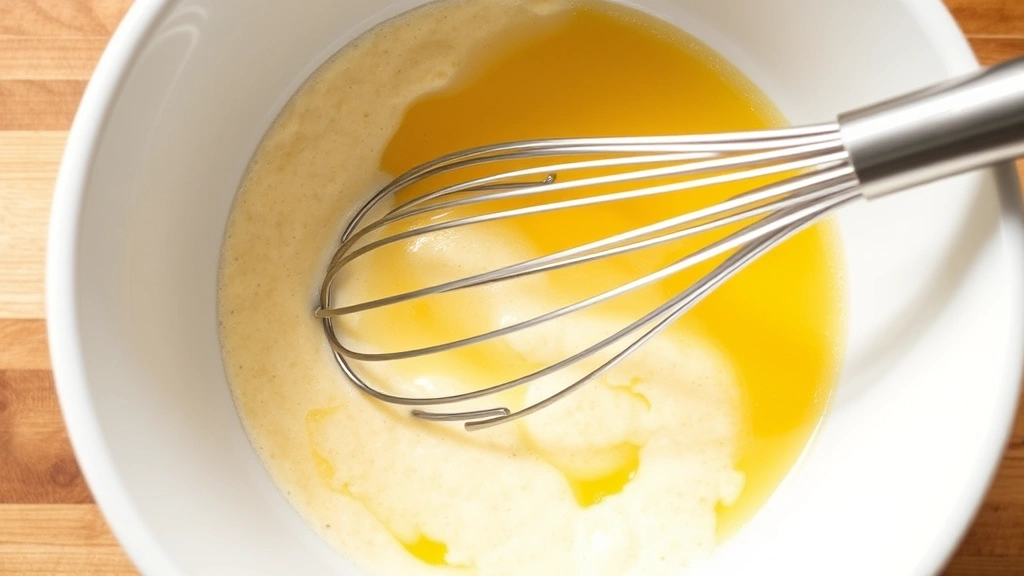
The most straightforward egg wash recipe couldn’t be simpler. You need one egg and one tablespoon of liquid—either water, milk, or cream. That’s it. The liquid helps thin the egg slightly so it spreads evenly without creating thick, uneven patches.
Standard Egg Wash (yields about 3 tablespoons):
- 1 large egg
- 1 tablespoon water, milk, or cream
- Pinch of salt (optional)
Here’s how to make it:
- Crack your egg into a small bowl. If you’re concerned about whether your eggs are fresh, take a moment to check if eggs are bad before proceeding.
- Add your chosen liquid—water creates the shiniest finish, milk adds a slight matte quality, and cream produces a richer golden tone.
- Add a tiny pinch of salt. This helps the mixture combine more smoothly and prevents it from being too slippery.
- Whisk vigorously for about 30 seconds until the mixture is completely homogeneous. You want no streaks of white or yolk visible.
- Strain through a fine-mesh sieve if you want the smoothest possible application. This removes any stubborn bits of egg white that might clog your pastry brush.
The beauty of this basic formula is its flexibility. You can scale it up or down depending on how much egg wash you need. Making a batch of 12 croissants? One egg should be plenty. Preparing a three-tier wedding cake with multiple pastry components? You might want to double it.
Variations and Alternatives
While the basic egg wash works beautifully for most applications, creative bakers have developed variations that produce different effects. Let’s explore some options.
Egg Yolk Only Wash
Using just the yolk produces the most luxurious, deepest golden-brown finish. The yolk contains more fat and pigments than whole egg, resulting in richer color development. This is what professional French pastry chefs typically use for their most important creations. Use one yolk mixed with one tablespoon of cream or water.
Egg White Only Wash
The opposite approach uses just the whites, which create a very shiny, almost glossy finish without as much browning. This works well when you want shine but are concerned about over-browning delicate pastries. Use one white mixed with one tablespoon of water.
Dairy-Free Alternative
If eggs aren’t available or you’re catering to dietary restrictions, a mixture of heavy cream or plant-based milk with a tiny bit of cornstarch or arrowroot powder creates a surprisingly effective substitute. The starch helps the mixture adhere and creates a light sheen. Use two tablespoons of milk or cream with one teaspoon of cornstarch.
Honey or Sugar Wash
For sweet applications, mixing one tablespoon of honey or one tablespoon of dissolved sugar with two tablespoons of water creates a subtle sweetness and gorgeous gloss. This works wonderfully on cinnamon rolls and sweet breads.

Seasoned Egg Wash for Savory Items
When working with savory pastries—think savory hand pies or cheese-filled breads—add a quarter teaspoon of garlic powder, Italian seasoning, or everything bagel seasoning to your basic egg wash. This adds flavor dimension and helps savory applications stand out.
Application Tips for Perfect Results
Making egg wash is one thing; applying it correctly is another. Here’s where many home bakers stumble. The technique matters just as much as the recipe.
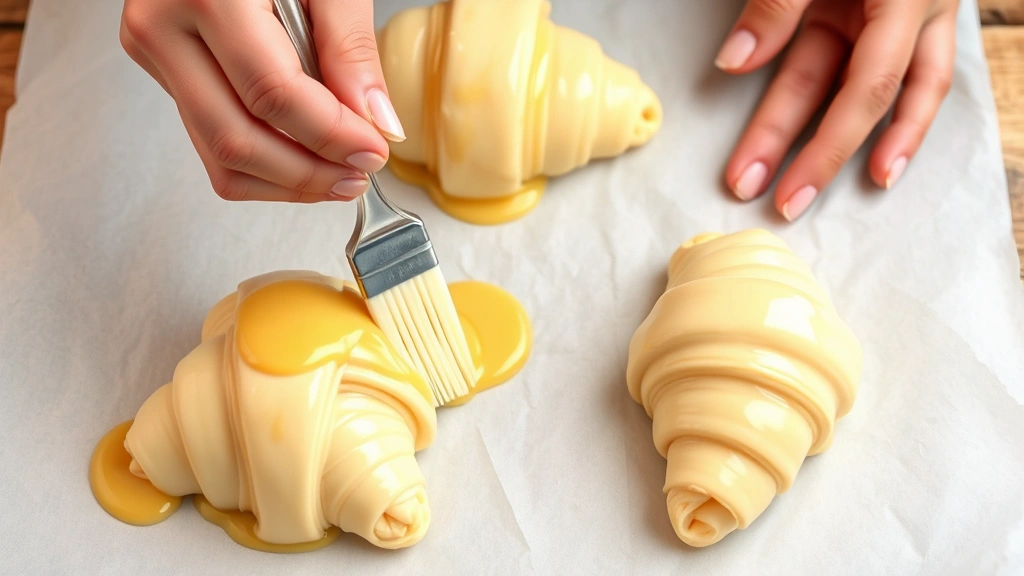
Choose the Right Brush
Use a soft pastry brush or silicone brush with bristles that are at least one inch wide. Avoid stiff basting brushes—they tend to drag and pull at delicate dough. A good pastry brush should feel almost luxurious in your hand.
Apply at the Right Temperature
Always apply egg wash to dough that’s at room temperature or slightly chilled. If your dough is too warm, the egg wash will partially cook and create an uneven finish. If your dough is very cold, the egg wash will sit on top rather than adhering properly.
Timing Is Everything
Apply egg wash immediately before baking, not hours ahead of time. If egg wash sits too long on dough, it can start to dry and create an uneven, blotchy appearance. The exception is laminated dough like croissants—you can apply wash to shaped croissants 30 minutes before baking and refrigerate them.
Less Is More
One of the biggest mistakes home bakers make is applying too much egg wash. You want a thin, even coating, not a thick layer. Dip your brush lightly into the mixture and use gentle, directional strokes. Think of it like painting a watercolor, not slathering on paint.
Create Texture with Technique
For braided breads or decorative pastries, apply one light coat of egg wash first. Let it dry for a minute or two, then apply a second thin coat. This creates depth and visual interest. You can also use egg wash on only the tops of pastries to create contrast with unglazed sides.
Common Mistakes to Avoid
Even with simple ingredients, there are ways egg wash applications can go wrong. Here are the pitfalls to sidestep.
Over-Whisking
While you do need to whisk your egg wash, over-whisking incorporates too much air and creates bubbles. These bubbles pop during baking and create a speckled, uneven finish. Whisk just until combined—about 30 seconds is perfect.
Uneven Application
Applying egg wash with a heavy hand in some spots and a light touch in others creates visible color variations. Practice maintaining consistent pressure and coverage. It’s easier than you think once you’ve done it a few times.
Applying to Wet Surfaces
Never apply egg wash to dough that’s wet from water spray or steam. The moisture prevents adhesion and creates a patchy appearance. If you’re using a spray bottle for steam, do that before egg washing, not after.
Using Cold Egg Wash
Straight from the refrigerator, cold egg wash is thick and hard to apply smoothly. Let your egg wash sit at room temperature for 15 minutes before using it. This makes it thinner and more spreadable.
Forgetting to Strain
While optional, straining your egg wash through a fine-mesh sieve removes particles that can create an uneven finish. This extra 30-second step makes a noticeable difference in the final result.
Storage and Shelf Life
One of the great advantages of egg wash is that you can make it ahead of time. This is particularly helpful when you’re juggling multiple baking projects.
Store egg wash in an airtight container in the refrigerator for up to three days. Before using refrigerated egg wash, let it come to room temperature and whisk it again—the ingredients may have separated slightly.
You can also freeze egg wash for up to three months. Pour it into ice cube trays and freeze, then pop cubes into a freezer bag. Thaw one cube at a time as needed. The texture remains consistent after thawing, and you don’t lose any of the binding properties.
If you’ve made egg wash and realize you won’t use it within three days, don’t waste it. Raw egg wash can be added to scrambled eggs, omelets, or used as the base for sunny side up eggs or other egg preparations. Nothing goes to waste.
Frequently Asked Questions
Can I use egg wash on items other than pastries?
Absolutely. Egg wash works beautifully on savory hand pies, empanadas, meat pies, and even self-rising flour biscuits. You can even use it on homemade pretzels for that bakery-quality shine. The key is that any baked good with a dough exterior benefits from egg wash.
What’s the difference between using water versus milk versus cream?
Water creates the shiniest, most dramatic finish with maximum browning. Milk produces a medium shine with moderate browning and a slightly more matte appearance. Cream creates the richest golden-brown color with a subtle sheen. Choose based on your desired final appearance and the flavor profile of your baked good.
Can I apply egg wash after baking?
No. Egg wash must be applied before baking to set properly and create the desired finish. Applying it after baking won’t adhere to the surface and will just create a sticky coating. However, you can brush hot baked items with melted butter or honey for shine, but that’s a different technique entirely.
Is egg wash safe to eat?
Yes, egg wash is completely safe to eat because it’s baked at high temperatures for long enough to ensure any bacteria are eliminated. The eggs reach temperatures well above the safe minimum during the baking process.
Why is my egg wash creating a speckled appearance?
Speckling usually happens for one of three reasons: over-whisking (which creates air bubbles), applying too thick of a coat, or using cold egg wash straight from the refrigerator. Try straining your egg wash and applying it more thinly at room temperature.
Can I make egg wash without salt?
Yes, the salt is entirely optional. It helps the mixture combine smoothly and prevents it from being too slippery, but it’s not essential. If you’re working with a recipe that specifies no salt, simply omit it.
How long does egg wash take to set?
Egg wash doesn’t technically “set” until the pastry goes into the oven. It will feel slightly tacky to the touch after a minute or two, but it’s the heat that causes the proteins to coagulate and create the final finish. This is why timing matters—apply wash just before baking.
Can I use powdered eggs or egg replacers?
While powdered eggs exist, they don’t work well for egg wash because they don’t have the same binding and browning properties as fresh eggs. Egg replacers designed for baking (usually made from starches and gums) work better but still don’t produce quite the same results. For best outcomes, use fresh eggs.
What if I’m allergic to eggs?
The dairy-free alternative using cornstarch and milk works well, or you can try a mixture of brown gravy base (which often contains egg but in minimal amounts) mixed with cream. For completely egg-free options, a thin mixture of cornstarch and water, or even a light honey-water glaze, creates acceptable shine without eggs.
Can I add food coloring to egg wash?
Technically yes, but it’s not recommended. Food coloring can create artificial-looking results and may affect the browning process. If you want colored pastries, consider brushing items with colored glazes after baking instead.
Why does my egg wash look bubbly?
Bubbles form when you over-whisk the egg mixture or when you whisk too vigorously. These bubbles pop during baking and create an uneven, speckled finish. Whisk gently and only until ingredients are combined. If bubbles form on the surface after applying egg wash, use a soft brush to gently pop them before baking.
For more detailed baking guidance, check out This Old House’s home improvement resources, or explore Family Handyman’s kitchen projects. You can also reference Home Depot’s DIY project guides for broader home and kitchen improvements.
Learning how to make egg wash opens up a world of bakery-quality results from your home kitchen. It’s one of those simple techniques that seems almost too easy to matter, but the difference it makes in the final presentation of your baked goods is genuinely impressive. Start with the basic recipe, practice your application technique, and soon you’ll be creating pastries that look like they came from a professional bakery.
Related Posts

How Long to Boil Lobster Tails: Cooking Guide

How Long to Fly from New York to London? Travel Times
