

Make Clear Ice at Home: Expert Tips & Tricks
Make Clear Ice at Home: Expert Tips & Tricks
Crystal-clear ice cubes elevate any beverage, from whiskey neat to refreshing lemonade. Unlike cloudy ice that forms in standard freezers, clear ice looks professionally crafted and melts more slowly, keeping drinks cold longer without dilution. Whether you’re hosting a dinner party or simply want better-quality ice for your daily beverages, learning how to make clear ice at home is easier than you might think.
The secret lies in understanding why ice becomes cloudy in the first place. Tap water contains dissolved gases and minerals that get trapped during the freezing process, creating that opaque appearance. By using directional freezing techniques and purified water, you can achieve restaurant-quality clear ice in your own kitchen. This guide walks you through multiple methods, from simple to advanced, so you can choose the approach that fits your lifestyle and budget.
Why Does Ice Turn Cloudy?
Understanding the science behind cloudy ice helps you appreciate why certain techniques work better than others. When water freezes uniformly from all directions in a standard freezer, impurities get pushed toward the center as ice crystals form. These impurities—dissolved oxygen, nitrogen, and minerals from tap water—create the white, opaque appearance you see in most homemade ice.
The freezing process happens from the outside in, but in a regular freezer, this occurs slowly and unevenly. Water molecules freeze randomly, trapping air pockets and dissolved gases throughout the cube. Professional ice makers and clear ice enthusiasts use directional freezing, where ice forms from one direction only, pushing impurities out of the way before they get locked inside the crystal structure.
Temperature also plays a role. Slower freezing allows more time for impurities to escape, while rapid freezing locks everything in place. This is why patience matters when making clear ice—rushing the process guarantees cloudy results. Additionally, using distilled or purified water eliminates many minerals that contribute to cloudiness, though directional freezing works even with tap water.
Understanding Directional Freezing
Directional freezing is the foundation of every clear ice method. Instead of allowing water to freeze from all sides simultaneously, you freeze it from one direction only, typically from the top down. As the ice front advances, it pushes impurities downward and outward. Once the ice is mostly solid, you remove the remaining unfrozen water at the bottom—this water contains the concentrated impurities.
The key is creating an insulated environment where only one surface loses heat. A cooler, wooden box, or even a well-insulated container achieves this. You want the sides and bottom heavily insulated so cold air only reaches the top. Commercial clear ice makers use this principle with precision, but you can replicate it at home with basic materials.
Timing matters significantly. Most clear ice methods require 18-24 hours of freezing time. This slow process allows ice to form gradually and impurities to be expelled. Once the ice is about three-quarters frozen, the remaining water becomes increasingly concentrated with minerals and gases. You’ll discard this bottom section, which is why you end up with less ice than the water volume you started with—typically 70-80% yield.
The Boiled Water Method
The boiled water method is the simplest approach for making clear ice at home without special equipment. Start by boiling tap water and letting it cool completely to room temperature. Boiling removes dissolved gases, which significantly reduces cloudiness. While this method doesn’t eliminate all impurities, it produces noticeably clearer ice than regular tap water.
Step-by-step process:
- Boil water in a kettle or pot and let it cool to room temperature (about 1-2 hours)
- Pour the cooled water into ice cube trays
- Place trays in your freezer’s coldest section, typically the back
- Freeze for 18-24 hours
- Remove and run warm water over the tray bottoms to release cubes
This method produces reasonably clear ice, though not as transparent as directional freezing techniques. The boiling step removes oxygen and nitrogen, which account for much of the cloudiness. You’ll notice a significant improvement compared to standard ice, especially in clear beverages where appearance matters.
For even better results with this method, use distilled water instead of tap water. Distilled water has fewer minerals, so combining boiling with distilled water gets you very close to commercial-quality results. Many people find this approach adequate for home use and appreciate its simplicity.
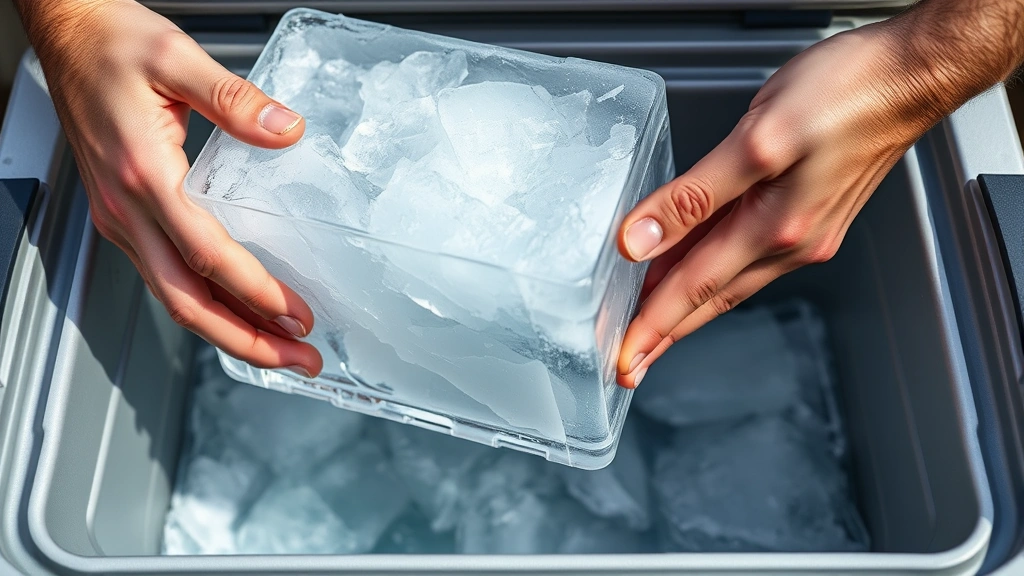
The Cooler Method
The cooler method is the gold standard for home clear ice production. It uses a well-insulated cooler to create directional freezing conditions. This technique produces ice nearly identical to what you’d get from a professional ice maker, and it’s surprisingly affordable to set up.
What you’ll need:
- A small insulated cooler (6-10 quart capacity works well)
- Distilled or purified water (boiled tap water works too)
- A freezer that reaches 0°F or below
- A sharp knife or ice pick
- Warm water for releasing ice
Detailed instructions:
- Fill your cooler with water, leaving about 1-2 inches of space at the top
- Place the uncovered cooler in your freezer
- After 18-24 hours, remove the cooler and examine the ice
- You should see mostly solid ice with possibly some unfrozen water at the bottom
- Carefully pour out or scoop away the unfrozen water (this contains impurities)
- Invert the cooler onto a cutting board or surface
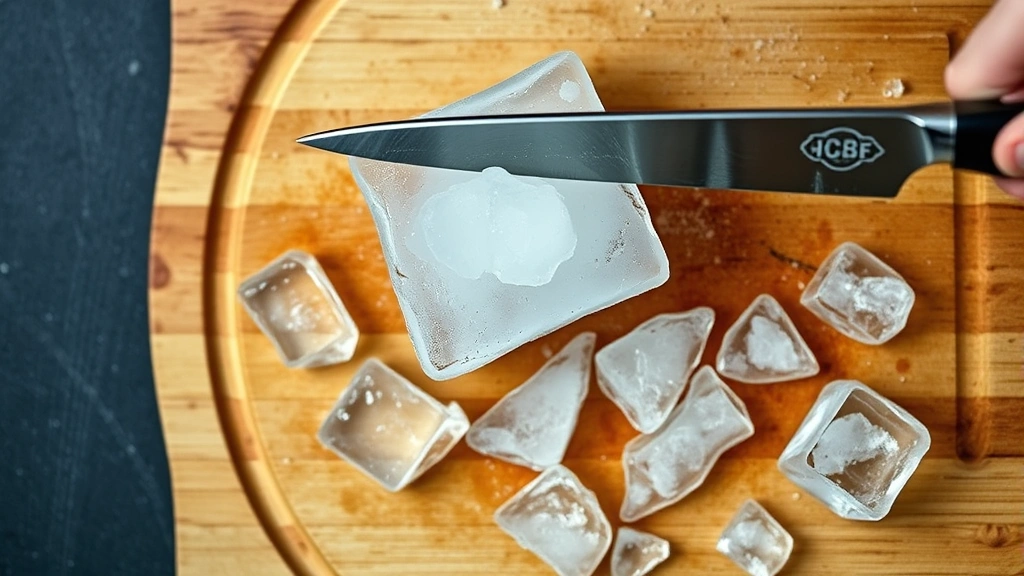
- Let it sit for a few minutes, then push the ice block out
- Use a sharp knife to cut the ice into cubes or desired sizes
The resulting ice should be crystal clear or nearly transparent. The clarity depends on water quality and freezing time. If you see some cloudiness at the bottom of your ice block, that’s normal—simply cut it away and discard it.
Pro tip: Wrap your cooler in a towel or place it in a cardboard box before freezing to enhance insulation. This creates even more directional freezing and can improve results. Some enthusiasts drill a small hole in the cooler bottom to drain unfrozen water, making the process even easier.
Storage tip: Store your clear ice cubes in a regular freezer bag or container. They’ll maintain their clarity for several weeks if kept frozen. Clear ice melts more slowly than cloudy ice, so your drinks stay colder longer without excessive dilution—a real advantage when making specialty beverages at home.
Commercial Clear Ice Makers
If you want the absolute easiest path to clear ice, commercial devices handle everything for you. Several manufacturers produce countertop clear ice makers that automate the directional freezing process. These machines produce clear ice in 15-30 minutes, though they’re more expensive than DIY methods.
Popular options include:
- Opal Ice Maker: Produces 26 pounds of clear ice daily, relatively compact, though pricey
- GE Opal 2.0: Updated version with faster production and quieter operation
- Newair Ice Maker: Budget-friendly option that produces clear ice with less advanced features
These devices use water filtration and directional freezing internally. They’re perfect if you entertain frequently or want ice on demand without waiting overnight. However, they require counter space and a water line connection in some models. For occasional home use, DIY methods offer better value.
When shopping for a commercial ice maker, check reviews specifically about ice clarity. Some budget models don’t produce truly transparent ice despite marketing claims. Read customer photos to verify results match your expectations.
Troubleshooting Common Issues
Ice is still cloudy: This usually indicates impurities in the water or incomplete directional freezing. Try using distilled water and ensure your cooler or container is well-insulated on all sides except the top. You might also need longer freezing time—try 24-30 hours instead of 18.
Ice has white layer at bottom: Perfect! This is exactly what you want. That white section contains concentrated impurities. Simply cut it away and discard it. You’re left with clear ice above. This is why yield is lower than your starting water volume.
Ice won’t come out of cooler: Run warm (not hot) water over the outside bottom of the cooler to help release it. You can also briefly dip the cooler bottom in warm water. Patience helps here—let it sit a minute as the ice loosens.
Freezer isn’t cold enough: Your freezer needs to reach 0°F (-18°C) or colder. If it’s warmer, ice won’t freeze solid enough for directional freezing to work properly. Check your freezer temperature with a thermometer and adjust settings if needed.
Taking too long to freeze: If it’s taking longer than 24 hours, your freezer may be too warm or your cooler insufficiently insulated. Add insulation around the cooler and ensure nothing blocks air circulation around it.
Cracks in ice: Stress fractures happen when ice is cut while too cold. Let ice sit at room temperature for 5-10 minutes before cutting, or use a hot knife (run under warm water first). This creates cleaner cuts with fewer cracks.
FAQ
Can I use tap water to make clear ice?
Yes, you can. Tap water works with directional freezing, though it produces slightly less transparent results than distilled water. Boiling tap water first removes dissolved gases and improves clarity significantly. For best results, use distilled water with directional freezing methods.
How long does clear ice last in the freezer?
Clear ice cubes maintain their clarity for several weeks when stored in a freezer bag in your freezer. They don’t degrade or become cloudy if kept frozen. However, they may develop frost if exposed to temperature fluctuations or humidity.
Why does clear ice melt slower?
Clear ice has fewer air pockets and impurities, creating a denser structure that melts more slowly. This means your drinks stay cold longer without diluting as quickly. It’s especially noticeable in spirits and cocktails where dilution affects taste.
Can I make clear ice in regular ice cube trays?
Standard ice cube trays produce cloudy ice because freezing happens from all directions simultaneously. The cooler method works much better. However, if you freeze very slowly in the coldest part of your freezer and use boiled, distilled water, you might achieve partial clarity in trays—though it won’t match the cooler method results.
Is clear ice safe to eat or drink?
Absolutely. Clear ice made from boiled or distilled water is completely safe. If anything, it’s purer than regular ice since you’ve removed dissolved gases and potentially used filtered water. Just ensure your cooler is food-safe if using that method.
What’s the yield when making clear ice?
Expect to get about 70-80% of your starting water volume as usable clear ice. The remaining 20-30% is the concentrated impurity layer at the bottom that you discard. This is normal and part of the directional freezing process.
Can I make clear ice cubes shaped differently?
Yes! Once your ice block freezes, you can cut it into any shape—cubes, spheres, or rectangular chunks. Use a sharp knife or ice pick. Some people use molds or carving techniques to create specialty shapes. The cooler method gives you a solid block to work with creatively.
Is the cooler method better than boiled water method?
The cooler method produces superior clarity because it uses directional freezing to physically remove impurities. The boiled water method is simpler but relies only on removing dissolved gases. For the clearest possible ice, use the cooler method with distilled water.
Do I need a special freezer?
No. Any standard freezer that reaches 0°F (-18°C) works fine. You don’t need a commercial-grade freezer. A typical kitchen freezer provides adequate cooling for clear ice production using the cooler method.
Making clear ice at home transforms your home beverage experience. Whether you choose the simple boiled water approach or invest time in the cooler method, you’ll notice the difference immediately. Clear ice looks elegant, performs better in drinks, and demonstrates attention to detail that impresses guests. Combined with other homemade beverage projects, clear ice elevates your entire entertaining game. Start with whichever method fits your lifestyle, and you’ll quickly develop a preference for transparent, quality ice over cloudy alternatives.
Related Posts

Superscript in Google Docs: Expert Tips

Strikethrough in Excel: Easy Steps for Beginners
