

Add Page Numbers in Word: Expert Tips
Add Page Numbers in Word: Expert Tips
Page numbers are essential for any professional document, whether you’re formatting a thesis, creating a business report, or organizing a multi-page proposal. Microsoft Word makes it surprisingly easy to insert page numbers, but mastering the nuances—like starting numbering on specific pages, using different formats, or excluding certain pages—requires understanding the software’s layout and section features. This comprehensive guide walks you through every method, from basic insertion to advanced customization techniques.
Whether you’re working with a simple document or a complex manuscript with multiple sections, knowing how to properly add page numbers saves time and ensures your document looks polished and professional. We’ll cover everything from the Header and Footer tools to troubleshooting common issues, so you can confidently format any Word document with the exact page numbering system you need.
Basic Method: Inserting Page Numbers
The most straightforward way to add page numbers in Word involves accessing the Insert menu and selecting the Page Numbers option. This method works for both Windows and Mac versions of Microsoft Word and provides immediate results for most standard documents. Here’s the step-by-step process:
- Open your Word document and click the Insert tab in the ribbon menu
- Locate the Page Numbers button—it typically appears in the Header & Footer group
- Click the dropdown arrow next to Page Numbers to view available positions
- Select your preferred position: Top of Page, Bottom of Page, Page Margins, or Current Position
- Choose a design style from the gallery that appears
- Word automatically inserts the page number field into your document’s header or footer
Once inserted, page numbers update automatically as you add or delete content. This automatic feature ensures your document always displays correct sequential numbering, regardless of how many times you edit the content. When you visit our how-to guides and tips, you’ll find similar step-by-step approaches to various tasks.
The beauty of Word’s page numbering system is its flexibility. You can modify, reposition, or completely remove page numbers at any time without affecting your document’s content. If you’re working on a longer project, understanding these basics provides the foundation for more advanced formatting techniques.
Accessing Header and Footer Tools
Page numbers live within your document’s header or footer area, special regions that appear at the top or bottom of every page. To effectively manage page numbers, you need to understand how to access and edit these areas. Here’s how:
- Double-click at the very top of your document page to access the header area
- Double-click at the very bottom to access the footer area
- Alternatively, go to Insert tab and click Header or Footer buttons
- Select from pre-designed templates or choose to edit the default header/footer
- Once in the header/footer editing mode, the Header & Footer Tools design tab automatically appears
When you’re inside the header or footer editing mode, the main document text appears grayed out, and you’ll see the specialized Header & Footer Tools ribbon. This context-sensitive toolbar contains all the options you need for page number formatting and placement. The design tab includes buttons for page numbers, dates, times, and other field options specific to headers and footers.
Understanding this workspace is crucial because many advanced page numbering techniques require you to work directly within the header or footer area. You’ll notice the cursor operates differently here—it’s confined to the header or footer space, preventing accidental edits to your main document content.
Choosing Page Number Formats and Styles
Word offers multiple page number formats beyond simple Arabic numerals (1, 2, 3). Different documents require different numbering systems, and Word accommodates all of them:
- Arabic numerals: 1, 2, 3, 4 (most common for general documents)
- Roman numerals (uppercase): I, II, III, IV (traditional for front matter)
- Roman numerals (lowercase): i, ii, iii, iv (academic papers and formal documents)
- Alphabetic (uppercase): A, B, C, D (rarely used but available)
- Alphabetic (lowercase): a, b, c, d (specialized academic applications)
To change the page number format, follow these steps:
- Double-click the header or footer area where your page numbers appear
- Right-click directly on the page number field
- Select Edit Field from the context menu
- In the Field dialog box, choose your desired format from the Format list
- Click OK to apply the new numbering style
Many formal documents, particularly those in academic or publishing contexts, use Roman numerals for introductory pages (title page, table of contents, preface) and then switch to Arabic numerals for the main content. This mixed-format approach requires understanding how to use section breaks and field codes, which we’ll cover in detail later in this guide.
Starting Page Numbers on a Specific Page
Sometimes you don’t want numbering to begin on page one. Perhaps your document includes a cover page that shouldn’t be numbered, or you’re combining multiple documents where numbering needs to restart. Word handles this through section breaks and field formatting:
- Position your cursor at the beginning of the page where you want numbering to start
- Go to Layout tab and click Breaks
- Select Next Page under Section Breaks
- Double-click in the header or footer of the section where numbering should begin
- Click Page Numbers in the Insert tab
- Right-click the page number field and select Edit Field
- In the Field dialog, find the Field Codes section and modify the code to set your starting number
For example, if you want the first numbered page to show as page 1 instead of page 3, you’ll use a field code like { PAGE } combined with offset calculations. This technique is particularly useful when creating professional documents that need precise formatting control.
An alternative, simpler method involves right-clicking the page number field and selecting Set Page Number, which opens a dialog allowing you to specify exactly what number should appear on the current page.
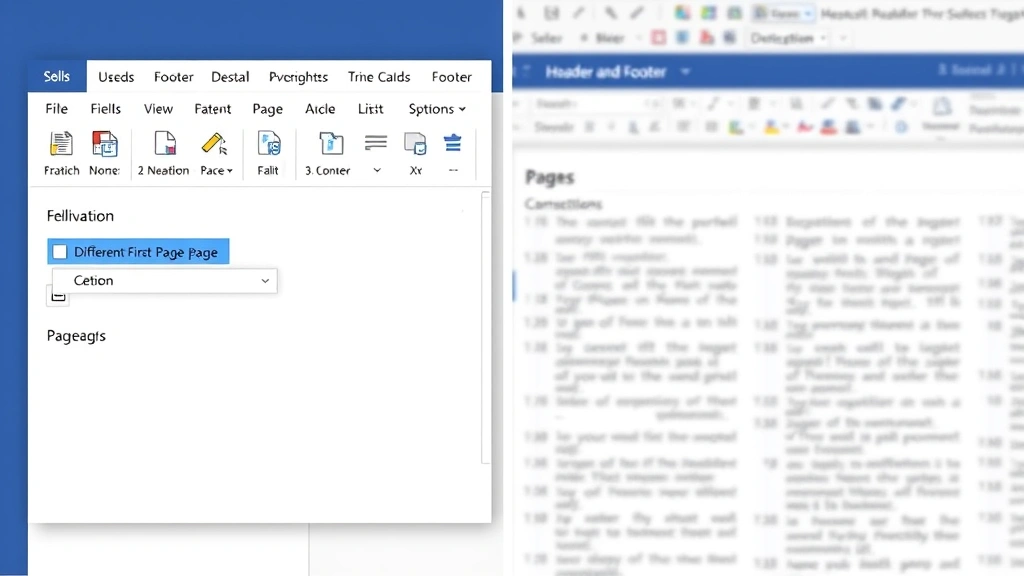
Excluding the First Page from Numbering
The most common page numbering request is removing the number from the first page—typically a title page that shouldn’t be numbered. Word includes a built-in feature specifically for this purpose:
- Insert page numbers using the standard method described earlier
- Go to Insert tab and click Header or Footer
- Select Edit Header or Edit Footer
- In the Header & Footer Tools Design tab, check the box labeled Different First Page
- This automatically removes the page number from the first page while keeping it on all subsequent pages
When you enable the Different First Page option, Word creates a separate header/footer specifically for the first page, allowing you to leave it blank while other pages display numbers. This feature saves significant time compared to manually deleting the page number field from the first page.
If you’ve already inserted page numbers and then enable this feature, Word intelligently handles the transition. The number simply won’t appear on page one, but numbering continues normally on page two and beyond. This approach maintains document integrity and ensures page counting remains accurate throughout your document.

Using Different Numbering in Multiple Sections
Complex documents often require different numbering schemes in different sections. A thesis might use Roman numerals for front matter and Arabic numerals for chapters. A business proposal might restart numbering for each major section. Section breaks enable this flexibility:
- Place your cursor where you want the numbering scheme to change
- Go to Layout tab and click Breaks
- Select Next Page to create a new section
- Double-click the header or footer in the new section
- Right-click the page number field and select Edit Field
- Choose your new numbering format from the Format list
- To restart numbering at 1 (or i, or a), right-click the page number and select Set Page Number
The key to managing multiple numbering sections is understanding that Word treats each section’s header and footer independently. When you edit a header or footer, you’re only modifying that specific section, leaving other sections unchanged. This isolation prevents accidental modifications to numbering in other parts of your document.
If you want page numbers to restart at 1 in a new section, you must explicitly set this using the Set Page Number option. Without this step, Word continues counting from the previous section. This design prevents common mistakes while still allowing sophisticated multi-section documents.
Positioning Page Numbers Strategically
Beyond simply inserting page numbers, their position significantly affects document appearance and readability. Word provides multiple positioning options:
- Top of Page: Places numbers in the header area, either centered, left-aligned, or right-aligned
- Bottom of Page: Places numbers in the footer area with similar alignment options
- Page Margins: Positions numbers in the outer margins, useful for bound documents
- Current Position: Inserts the page number exactly where your cursor is located
For most professional documents, bottom-center or bottom-right positioning works best. Academic papers often use top-right positioning. Legal documents frequently use bottom-center. The choice depends on your document’s purpose and any style guide requirements you must follow.
When positioning page numbers, consider your document’s binding method. If pages will be bound on the left, placing numbers in the outer right margin creates better visual balance. If bound on the top, centering page numbers typically looks more professional. Understanding these design principles ensures your document not only functions correctly but also appears polished and intentional.
Advanced Customization Techniques
Beyond basic insertion, Word allows sophisticated page number customization. You can add text before or after page numbers, include total page count, or create completely custom numbering schemes:
Adding Text with Page Numbers
To include text like “Page 5 of 12” instead of just “5”:
- Double-click the header or footer to enter editing mode
- Click where you want the page number to appear
- Type “Page ” (with a space after)
- Go to Insert tab and click Page Numbers
- After the page number, type ” of ” (with spaces)
- Click Page Numbers again and select Page Count from the dropdown
This creates a professional-looking page reference that automatically updates as your document changes. The page count field recalculates whenever Word recounts your document’s pages, ensuring accuracy even after significant editing.
Using Field Codes for Custom Numbering
Advanced users can directly edit field codes for maximum control. Right-click a page number field and select Edit Field to access the underlying code. Field codes like { PAGE } for current page and { NUMPAGES } for total pages can be combined with text and calculations.
For instance, if you want page numbers to start at 10 on page five, you could modify the field code to { PAGE +5 }. This offset calculation is invisible to readers but provides the flexibility needed for unusual numbering requirements.
Creating Chapter-Based Numbering
In long documents with chapters, you might want page numbers to include the chapter number: “Chapter 2, page 5” displays as “2-5”. This requires:
- Using Heading styles consistently throughout your document
- Creating section breaks between chapters
- Resetting page numbers at each chapter break
- Using field codes to combine chapter identifiers with page numbers
This advanced technique, while complex, creates professional-looking documents that clearly indicate both chapter and page location—particularly useful for readers navigating lengthy manuals or academic works.
FAQ
Why aren’t my page numbers showing up?
Page numbers might be hidden if they’re positioned outside the visible page area or if the header/footer is set to be very small. Double-click the header or footer area to verify the page number field is actually present. If the field exists but isn’t visible, check that the header/footer isn’t formatted with white text or positioned outside the page margins. You can also try deleting and reinserting the page number using the standard method.
Can I use different page numbers in different sections?
Absolutely. Use section breaks (Layout > Breaks > Next Page) to divide your document, then modify the page numbering in each section independently. This is how multi-format documents like theses handle Roman numerals for front matter and Arabic numerals for main content. Just remember to unlink sections if you want them to have completely different numbering schemes.
How do I restart page numbering in the middle of my document?
Create a section break at the point where you want numbering to restart, then right-click the page number field in that new section and select Set Page Number. Enter 1 (or whatever starting number you prefer) and click OK. The new section will begin numbering from your specified number while previous sections maintain their original numbering.
What’s the difference between headers and footers for page numbers?
Headers appear at the top of pages while footers appear at the bottom. Functionally, they work identically for page numbering purposes. The choice depends on document style—academic papers often use top-right headers, while business documents typically use bottom-center footers. Select whichever position best suits your document’s purpose and style guidelines.
Can I remove page numbers from specific pages without removing them from the entire document?
Yes, using the Different First Page option removes numbering from the first page only. For removing numbers from pages other than the first, you’ll need to create separate sections using section breaks, then manually delete the page number field from specific sections while keeping it in others. This requires careful section management but provides precise control.
How do I fix page numbers that are showing incorrectly after editing?
Word occasionally needs to recalculate page numbers after significant edits. Press Ctrl+A to select all content, then press F9 to force an update of all fields. This recalculates page count and page number fields throughout your document. If numbers still appear incorrect, check that you haven’t accidentally created multiple section breaks or set conflicting page number values.
Mastering page number insertion in Word transforms how professionally your documents appear. Whether you’re preparing a simple report or a complex multi-section manuscript, these techniques ensure your page numbering is accurate, properly formatted, and perfectly positioned. Start with the basic insertion method, then explore advanced features as your documents become more sophisticated. For additional formatting guidance, explore our FixWiseHub blog with more how-to guides that cover document preparation and professional formatting techniques.
Related Posts

Superscript in Google Docs: Expert Tips

Strikethrough in Excel: Easy Steps for Beginners
