
How to Grow Onions: Expert Gardening Guide
How to Grow Onions: Expert Gardening Guide
There’s something deeply satisfying about growing your own onions. Whether you’re a seasoned gardener or someone who’s never planted anything beyond a succulent, onions are forgiving, rewarding, and incredibly practical. Unlike fussy vegetables that demand constant attention, onions are the reliable friends of the garden—they show up, do the work, and deliver genuine results.
The beauty of growing onions lies in their simplicity. You don’t need fancy equipment, a sprawling garden, or even a green thumb. What you do need is a basic understanding of timing, spacing, and soil conditions. In this guide, we’ll walk through everything from selecting the right varieties to harvesting and storing your bounty. By the end, you’ll have the confidence to fill your kitchen with homegrown onions that taste infinitely better than anything from the grocery store.
Growing onions also opens doors to cultivating other alliums—if you master onions, you’ll find that how to grow garlic follows surprisingly similar principles. The same soil preparation and patience apply, making it natural to expand your homegrown collection.
Understanding Onion Varieties
Before you dig into the soil, you need to know which onions to plant. Not all onions are created equal, and choosing the right variety makes the difference between a mediocre harvest and an exceptional one. The primary distinction comes down to day length—onions are classified as short-day, intermediate-day, or long-day varieties, and this determines whether they’ll actually form proper bulbs in your climate.
Long-day onions require 14-16 hours of daylight and thrive in northern regions. Varieties like Walla Walla, Ailsa Craig, and Candy are excellent choices if you’re gardening in cooler climates. These onions tend to be sweeter and larger, perfect for fresh eating and storage.
Short-day onions need only 10-12 hours of daylight and perform best in southern regions. Texas 1015, Vidalia, and Red Burgundy are popular short-day varieties. These typically mature faster and are ideal if you’re in a warmer zone.
Intermediate-day onions split the difference and work in most U.S. climates. Varieties like Copra and Cortland offer flexibility and reliable storage potential.
You can start onions from seeds, sets (small bulbs), or transplants. Seeds offer the widest variety selection but require more time and planning. Sets are convenient and faster, making them perfect for beginners. Transplants provide a middle ground—they’re already established but still offer variety choices.
Preparing Your Garden Space
Onions aren’t particularly fussy about soil, but they do appreciate preparation. Start by testing your soil’s pH—onions prefer slightly acidic to neutral soil, ideally between 6.0 and 7.0. If your soil runs too acidic, add lime; if it’s too alkaline, add sulfur.
Work in compost or well-rotted manure before planting. Onions need nutrient-rich soil, and organic matter improves both drainage and water retention. Aim for 2-3 inches of compost worked into the top 8-10 inches of soil.
Drainage is critical. Onions hate waterlogged conditions and will rot if sitting in soggy soil. If your garden tends to hold water, consider raised beds or mounding your rows slightly to improve drainage.
Choose a location with full sun—onions need at least 6-8 hours daily, though more is better. Good air circulation also matters; it helps prevent fungal diseases that thrive in humid conditions.
Timing varies by region, but generally, you’ll plant onion sets or transplants in early spring as soon as the soil is workable. In warmer zones, fall planting in September or October is common. Check your local USDA hardiness zone to determine the best planting window for your area.
Planting Your Onions
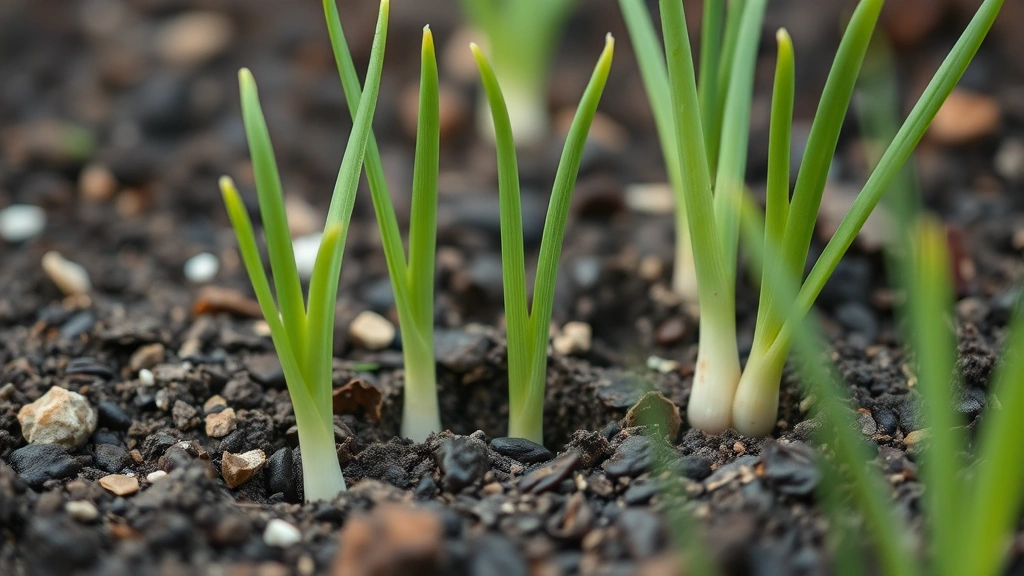
Spacing is where many home gardeners stumble. Crowded onions produce smaller bulbs, so don’t skimp on distance. Space sets or transplants 4-6 inches apart in rows that are 12-18 inches apart. This spacing allows each bulb room to expand as it grows.
If you’re planting sets, push them into the soil so just the tip shows above the surface. Planting too deep can prevent proper bulbing. For transplants, set them at the same depth they were growing in their containers, with the soil line at the base of the leaves.
Water gently after planting to settle the soil. Don’t water heavily—you’re just establishing contact between roots and soil. A light, consistent moisture is your goal during the first week.
For gardeners interested in expanding their vegetable garden, the principles of onion planting translate well. Once you’ve mastered this technique, you’ll find similar success with other crops. If you’re curious about diversifying beyond vegetables, how to propagate pothos introduces you to plant propagation techniques that deepen your overall gardening skills.
Mulch around your onions with 1-2 inches of straw or shredded leaves. Mulch suppresses weeds (which compete with onions for nutrients), moderates soil temperature, and retains moisture. Keep mulch an inch away from the stems to prevent rot.
Watering and Feeding
Onions need consistent moisture, particularly during their first month and when bulbs are actively swelling. Aim for 1-1.5 inches of water per week, either from rain or irrigation. Inconsistent watering leads to splitting, tough bulbs, and poor flavor.
Water at soil level rather than overhead. This reduces fungal disease pressure and directs moisture where it’s needed. Early morning watering is ideal, allowing any splash to dry quickly.
For feeding, apply a balanced fertilizer (like 10-10-10) every 3-4 weeks during the growing season. Alternatively, side-dress with compost every month. As bulbs approach maturity (roughly 6-8 weeks before harvest), reduce nitrogen to encourage bulb formation rather than leaf growth. A low-nitrogen fertilizer like 5-10-10 works well in the final growth phase.
Some gardeners swear by fish emulsion or kelp spray for mid-season boosts. These organic options provide micronutrients and promote overall plant vigor. Apply every 2-3 weeks if you choose this route.
Watch for signs of nutrient deficiency. Yellow lower leaves suggest nitrogen depletion—apply a quick nitrogen boost. Purple-tinged leaves might indicate phosphorus deficiency, which calls for a phosphorus-rich fertilizer.
Managing Pests and Diseases
The good news: onions face fewer pest problems than most vegetables. The bad news: when problems do occur, they can be serious if ignored.
Onion maggots are the most common pest. These larvae tunnel into bulbs, causing rot and making the plant inedible. Prevent them by covering young plants with floating row covers until mid-summer. Remove covers once flowering begins. If maggots appear, remove affected plants immediately and dispose of them far from your garden.
Thrips are tiny insects that cause stippled, discolored leaves. They’re particularly problematic in dry conditions. Increase humidity with regular watering, and consider insecticidal soap if infestations become severe. Neem oil also works as an organic control option.
Downy mildew appears as gray, fuzzy coating on leaves and thrives in cool, wet conditions. Improve air circulation by spacing plants properly and avoiding overhead watering. Remove affected leaves promptly. Sulfur dust or copper fungicides provide organic control.
Pink root causes reddish discoloration at the bulb base. There’s no cure once established, so prevention is critical: rotate crops (don’t plant onions in the same spot for 3-4 years), use disease-resistant varieties, and sterilize tools between plants.
Regular monitoring catches problems early. Walk through your garden weekly, checking for pest damage, yellowing leaves, or unusual discoloration. Catching issues at the start means easier management.
Harvesting and Storage
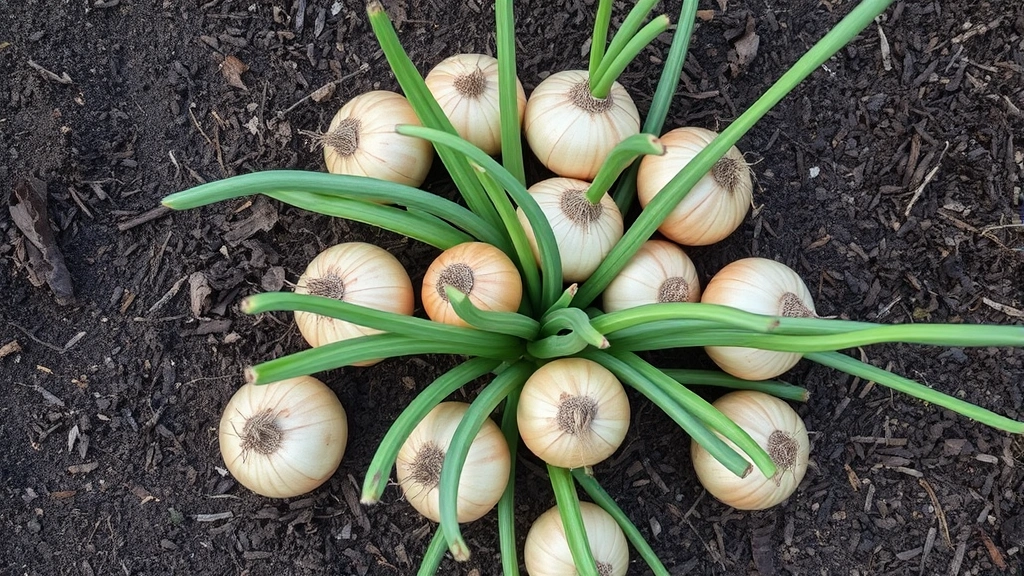
Knowing when to harvest is crucial for long-term storage and flavor. Onions are ready when the tops begin yellowing and falling over naturally—usually 100-120 days after planting, depending on variety and conditions. Don’t wait for all tops to be completely dead; harvest when about 50% have collapsed.
Gently loosen soil around each bulb with a fork, then pull carefully. Handle bulbs gently to avoid bruising, which creates entry points for rot. Leave them in the garden for a few hours to dry if the weather is clear and warm.
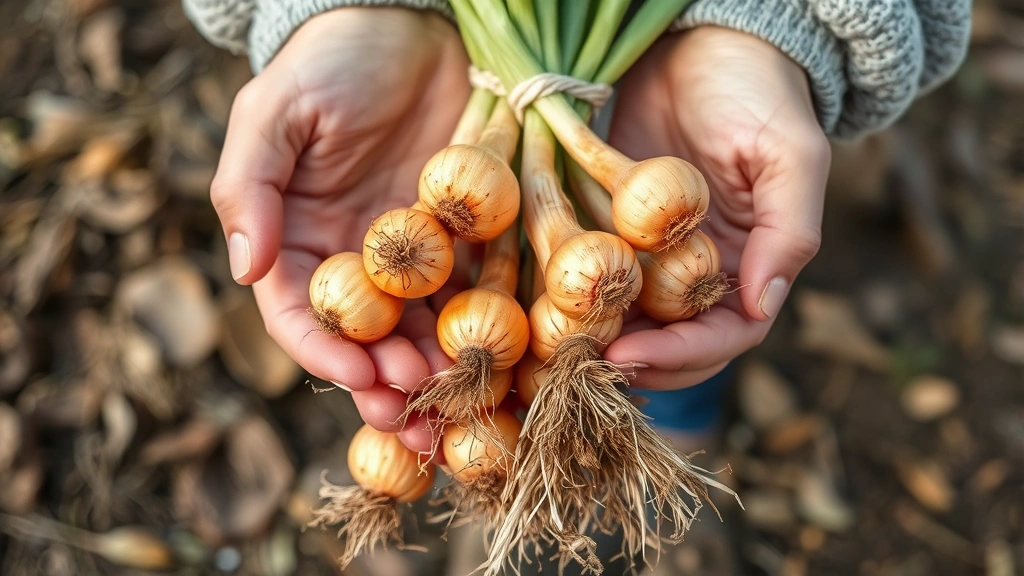
Cure your onions for 2-3 weeks before storing. Spread them in a warm, dry, well-ventilated location—a garage, shed, or covered porch works perfectly. Aim for temperatures between 70-85°F with good air circulation. Trim the roots to ½ inch once the necks are completely dry, but leave the papery skin intact for protection.
Store cured onions in mesh bags, old pantyhose, or crates in a cool (50-60°F), dry location with good ventilation. Properly stored onions keep for 3-6 months, though some varieties store longer than others. Avoid plastic bags, which trap moisture and promote rot.
If you’re planning to use your harvest in the kitchen, you’ll appreciate fresh onions in recipes. Once you’ve mastered growing them, explore culinary applications—whether you’re making how to make brown gravy or preparing how to make yum yum sauce, homegrown onions elevate every dish. For fresh applications, knowing how to keep apples from turning brown teaches food preservation techniques that apply across your kitchen work.
Check stored onions regularly. Remove any that show soft spots or sprouting. Use those first, saving the firmest bulbs for longer storage.
Frequently Asked Questions
How long does it take to grow onions?
Most onion varieties mature in 100-120 days from transplanting or set planting. Seed-grown onions take longer—typically 150-180 days—since you’re starting from scratch. Short-day varieties often mature faster than long-day varieties, sometimes in as little as 80-90 days.
Can I grow onions in containers?
Absolutely. Use containers at least 6-8 inches deep and 12 inches in diameter for 4-6 onion plants. Ensure excellent drainage with holes in the bottom. Use quality potting mix, not garden soil. Container onions need consistent watering since pots dry faster than garden beds. This method works beautifully for balconies, patios, or limited space gardens.
Why aren’t my onions forming bulbs?
The most common cause is incorrect day-length variety for your region. Long-day onions planted in the South won’t bulb; short-day onions in the North won’t either. Check your variety selection against your climate zone. Other causes include overcrowding, excessive nitrogen (which promotes leaf growth over bulb formation), or inconsistent watering.
What’s the difference between onion sets and seeds?
Sets are small bulbs ready to plant—they’re faster and more reliable for beginners but offer fewer variety options. Seeds take longer and require more attention but provide endless variety choices. Transplants are seed-grown seedlings, offering a middle ground: faster than seeds but more variety than sets.
Can I replant the green tops?
Green onion tops (scallions) can technically regrow if you cut them properly, but true bulbing onions are harvested once. Once the bulb has matured and cured, replanting won’t produce another bulb. However, if you want continuous green onions, consider planting bunching onions or scallions specifically for this purpose.
How do I prevent onions from bolting?
Bolting (premature flowering) occurs when onions experience temperature stress or inconsistent conditions. Choose varieties suited to your climate, maintain consistent soil moisture, and avoid planting too early when soil is cold. If bolting occurs, remove the flower stalk immediately and harvest the bulb early rather than waiting for it to finish curing.
What’s the best way to store onions long-term?
Proper curing is essential—dry them for 2-3 weeks in a warm, well-ventilated space. Store cured onions in cool (50-60°F), dry conditions with good air circulation. Mesh bags, old pantyhose, or crates work well. Avoid refrigeration unless you prefer softer onions; cold temperatures shorten storage life. Check regularly and remove any sprouting or soft bulbs.
Related Posts

How Long to Boil Lobster Tails: Cooking Guide

How Long to Fly from New York to London? Travel Times
