
How to Grill Burgers: Expert Tips and Techniques
How to Grill Burgers: Expert Tips and Techniques
There’s something almost spiritual about firing up the grill and crafting the perfect burger. It’s not just cooking—it’s a ritual that brings people together, a moment where technique meets passion, and where the simplest ingredients transform into something genuinely memorable. Whether you’re a seasoned griller or someone who’s been intimidated by the prospect of flipping patties over open flame, this guide will walk you through everything you need to know to create restaurant-quality burgers in your own backyard.
The beauty of grilling burgers lies in its deceptive simplicity. Sure, you need ground beef, heat, and a grill, but the difference between a mediocre burger and an exceptional one comes down to understanding the nuances—the right meat-to-fat ratio, proper seasoning timing, temperature control, and knowing exactly when to resist the urge to press down on your patties. These aren’t complicated concepts, but they’re often overlooked by home grillers who rely on guesswork instead of technique.
In this comprehensive guide, we’ll explore everything from selecting your beef to achieving that perfect crust, handling toppings like a pro, and troubleshooting common mistakes. By the end, you’ll have the knowledge and confidence to grill burgers that’ll make your guests wonder if you’ve secretly opened a burger joint.
Choosing the Right Ground Beef
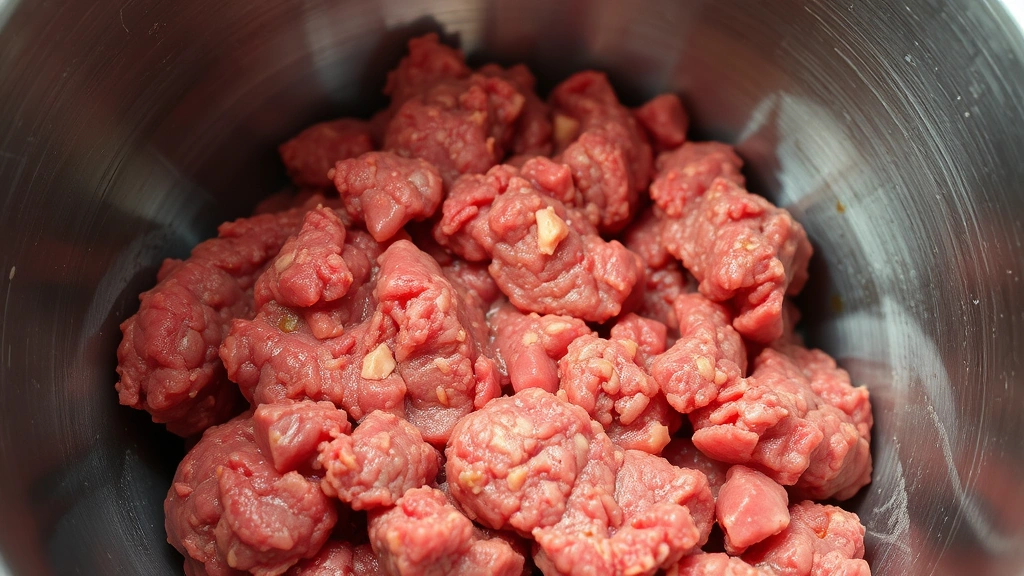
The foundation of an exceptional burger starts at the meat counter. Not all ground beef is created equal, and understanding what you’re looking for makes an enormous difference in the final product. The ideal ground beef for burgers contains a fat content between 15% and 20%—often labeled as 80/20 or 85/15 (lean-to-fat ratio). This percentage might seem counterintuitive if you’re health-conscious, but fat is flavor. It’s also what keeps your burger juicy instead of dry and crumbly.
When shopping, ask your butcher to grind the beef fresh if possible. Pre-packaged ground beef has been sitting under lights and exposure, which oxidizes the meat and compromises quality. Fresh-ground beef has a vibrant red color and noticeably better texture. If you’re serious about burger excellence, consider buying a chuck roast or short rib and grinding it yourself—this gives you complete control over the fat content and ensures maximum freshness.
Avoid beef that’s been ground multiple times or contains additives. You want pure beef, nothing more. Some grocery stores add fillers or binders to their ground beef, which creates a dense, unappetizing texture. Read the label carefully, or better yet, develop a relationship with a local butcher who understands burger quality.
The temperature of your beef matters too. Keep it cold until the moment you’re ready to form patties. Warm meat is difficult to work with and doesn’t hold together as well. If your hands warm the meat too much while shaping, it can become mushy and lose its structure during cooking.
Preparing Your Burger Patties
Now that you’ve selected premium beef, it’s time to form it into patties. This is where many home grillers go wrong by over-handling the meat. The moment you start squeezing and kneading ground beef, you’re developing gluten strands and breaking down the fat, which leads to dense, tough burgers that taste more like meatballs than burgers.
Start with cold beef straight from the refrigerator. Gently divide it into portions—typically 5-6 ounces for a standard burger, though you can adjust based on preference. Using your hands, loosely form each portion into a ball without compressing it. Then, using your thumbs, create a small indent in the center of each patty. This dimple prevents the burger from puffing up during cooking and ensures even thickness throughout.
Make your patties about three-quarters of an inch thick. Too thin and they’ll dry out; too thick and the outside will char before the inside cooks through. Season the patties generously with salt and freshly ground black pepper immediately before grilling. Seasoning in advance causes the salt to draw out moisture, which can lead to a less-than-ideal crust.
If you’re preparing patties in advance, stack them between parchment paper and refrigerate them. This keeps them cold and prevents them from sticking together. Some grillers prefer to freeze patties for 15-20 minutes before cooking, which helps them maintain their shape and prevents excessive browning before the interior cooks.
Setting Up Your Grill
Your grill setup is crucial for success. Whether you’re using charcoal or gas, the principle remains the same: you want a hot cooking surface with proper temperature zones. For gas grills, preheat for 10-15 minutes with all burners on high. For charcoal grills, you’ll want a good bed of hot coals—aim for a temperature around 400-450°F at the cooking surface.
Create two temperature zones on your grill: a hot zone for initial searing and a medium zone for finishing. This is accomplished by adjusting burners on a gas grill or by arranging coals strategically on a charcoal grill. The hot zone should be around 450°F, while the medium zone sits around 350°F. This setup gives you flexibility to manage flare-ups and ensures even cooking.
Clean your grill grates thoroughly before cooking. Use a grill brush to remove any debris or buildup from previous grilling sessions. A clean grate prevents sticking and promotes better contact between the meat and the heat source, which creates that desirable crust. If you’re using charcoal, consider seasoning your grates with a light coat of oil to prevent rust and improve non-stick properties.
Oil your grates just before adding the burgers. Some grillers oil the patties themselves, but this can cause flare-ups. Instead, dip a paper towel in high-heat oil and quickly wipe the grates. This reduces the chance of flames while still providing enough oil to prevent sticking.
Grilling Techniques and Timing
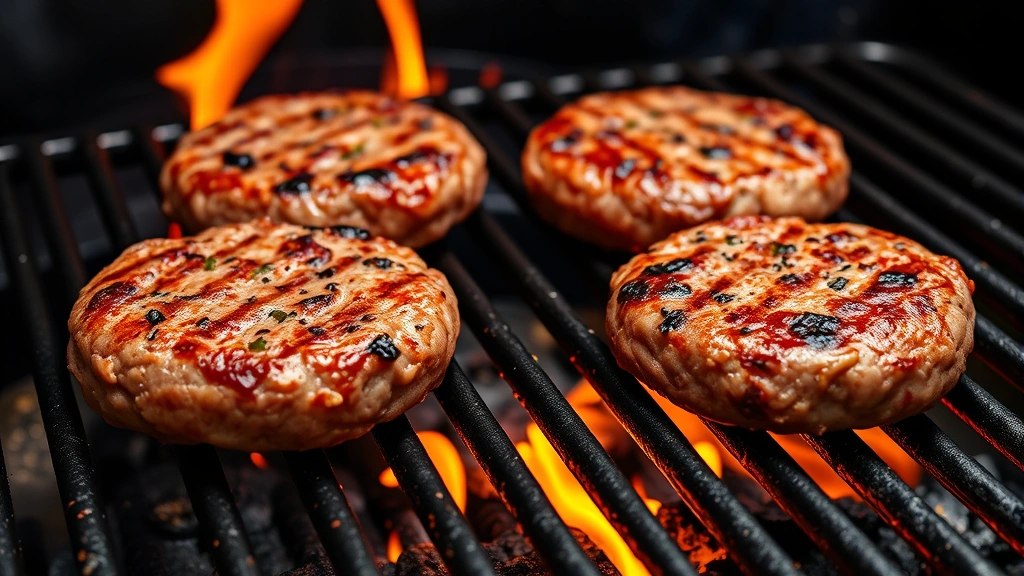
The actual grilling process is where technique and patience converge. Place your patties on the hot zone of your grill and resist the urge to touch them. Let them sit for 3-4 minutes without moving. This allows the bottom to develop a flavorful crust through the Maillard reaction—a chemical process that creates that delicious browning and complex flavors.
After those initial minutes, flip each patty exactly once. Don’t flip multiple times, and definitely don’t press down on them with your spatula. Pressing releases flavorful juices and creates a dry burger. If you’re curious about exact timing, our guide on how long to grill burgers covers the specifics for different thickness levels and doneness preferences.
After flipping, cook for another 2-3 minutes on the hot zone, then move your patties to the medium zone if needed. The total cooking time depends on thickness and desired doneness: a three-quarter-inch patty cooked to medium-rare typically takes 5-6 minutes total. Use an instant-read thermometer to check for accuracy—rare is 125-130°F, medium-rare is 130-135°F, medium is 135-145°F, and medium-well is 145-160°F.
During cooking, watch for flare-ups caused by dripping fat. Have a spray bottle of water handy to quickly extinguish any flames, but use it sparingly—you want to control the fire, not create steam that disrupts cooking. If flare-ups become frequent, move your patties to the cooler zone temporarily.
Cheese application is a matter of timing and preference. If you want melted cheese, add it during the last minute of cooking. The residual heat from the grill will melt it perfectly. Some grillers prefer to remove the burger, add cheese, and let it melt off the heat, which gives more control over the melting process.
Toppings and Assembly
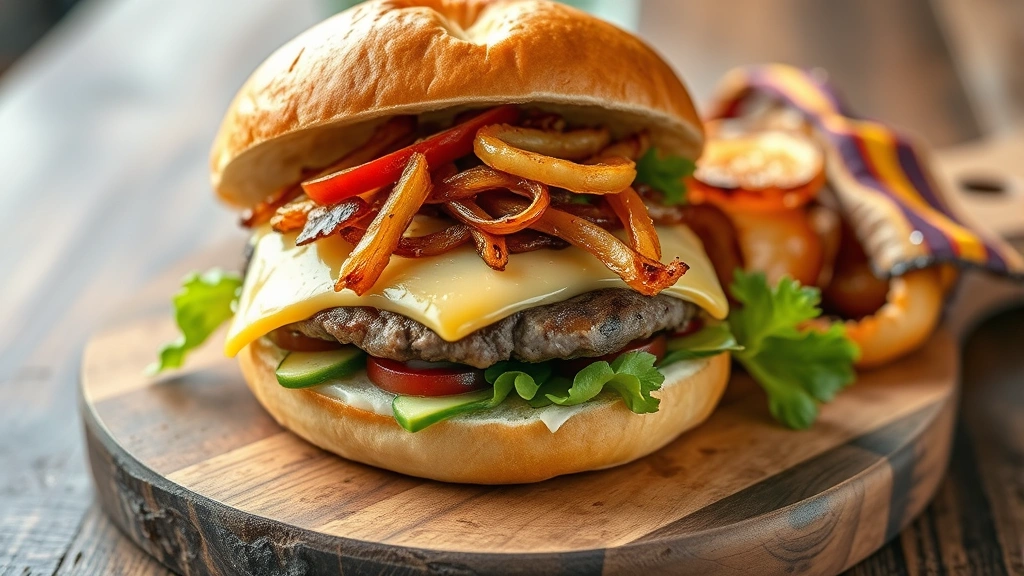
The burger itself is the star, but toppings complete the experience. Toast your buns lightly on the grill—about 30 seconds per side over the cooler zone. This adds texture and prevents sogginess from burger juices. A good burger bun should be sturdy enough to hold everything without falling apart.
Let your cooked patties rest for 1-2 minutes before assembling. This allows the juices to redistribute throughout the meat, ensuring each bite is moist and flavorful. While your burgers rest, you can prepare your toppings. A sharp knife makes quick work of slicing tomatoes, onions, and lettuce cleanly without bruising the produce.
Build your burger from the bottom up: toasted bun, sauce or condiment, lettuce, tomato, patty, cheese (if using), onion, pickles, and top bun. This order prevents the bottom bun from becoming soggy while allowing flavors to layer properly. Fresh, high-quality toppings make an enormous difference—stale lettuce or mealy tomatoes can ruin an otherwise perfect burger.
Consider grilling your onions and other vegetables alongside the burgers. Similar grilling techniques apply to vegetables, and caramelized, grilled onions add incredible depth of flavor that raw onions simply can’t match.
Common Mistakes to Avoid
Even experienced grillers occasionally slip into bad habits. One of the most common mistakes is using meat that’s too lean. While it might seem healthier, 90/10 or 93/7 beef produces burgers that are dry and flavorless. The fat content isn’t negotiable if you want a great burger.
Another frequent error is over-seasoning before cooking. Salt applied too early draws out moisture, creating a less-than-ideal crust. Season just before grilling, and remember that salt enhances flavor without making your burger taste salty if applied properly. Freshly ground black pepper is far superior to pre-ground pepper, which has lost volatile oils that provide peppery complexity.
Resist the temptation to press your burgers with your spatula. This releases flavorful juices and creates a dry, dense patty. Similarly, flipping multiple times disrupts the crust formation and increases the chance of the patty falling apart. Flip once, and only once.
Don’t skip the resting period. Those few minutes after cooking allow the meat’s muscle fibers to relax and reabsorb juices. Cutting into a burger immediately after cooking causes all those flavorful juices to run out onto the plate instead of staying in the meat.
Finally, avoid using a grill that’s too cool. A properly preheated grill is essential for developing that flavorful crust. If your grill isn’t hot enough, you’ll end up steaming the burger instead of searing it, which results in gray meat with no crust. If you’re interested in exploring other outdoor cooking methods, smoking techniques offer different flavor profiles worth exploring.
Frequently Asked Questions
What’s the best ground beef ratio for burgers?
An 80/20 or 85/15 lean-to-fat ratio is ideal. The fat content provides flavor and juiciness without making the burger greasy. This ratio strikes the perfect balance between taste and texture.
Should I add binders or fillers to my burger meat?
No. Pure ground beef is all you need. Binders like breadcrumbs or eggs create a dense, meatball-like texture. The meat’s own fat and protein are sufficient to hold the patty together.
Can I prepare burger patties the day before grilling?
Yes, absolutely. Form patties, stack them between parchment paper, and refrigerate in an airtight container for up to 24 hours. You can also freeze them for longer storage—they’ll last about 3 months in the freezer.
How do I know when my burger is done without cutting into it?
Use an instant-read meat thermometer. Insert it horizontally into the center of the patty without touching the grill or bun. Rare is 125-130°F, medium-rare is 130-135°F, and medium is 135-145°F.
Why does my burger puff up while cooking?
The dimple in the center prevents this. Make a small indent with your thumb before grilling—it compensates for the meat’s natural tendency to puff up, resulting in even thickness throughout cooking.
Can I grill frozen burger patties?
You can, but fresh or thawed patties produce better results. Frozen patties take longer to cook and are more likely to have an overcooked exterior and undercooked interior. If you must cook frozen patties, start on medium heat and increase temperature gradually.
What’s the difference between a smashed burger and a traditional burger?
Smashed burgers are pressed flat on the grill to create maximum crust and crispy edges. Traditional burgers maintain their original thickness. Smashed burgers have more crust-to-meat ratio, while traditional burgers are juicier. Both styles are valid—it’s a matter of preference.
Related Posts

How Long to Boil Lobster Tails: Cooking Guide

How Long to Fly from New York to London? Travel Times
