
How to Cut a Brisket? Expert Tips Inside
How to Cut a Brisket: Expert Tips Inside
Cutting a brisket properly is an art form that separates amateur barbecue enthusiasts from true pitmasters. A well-executed brisket slice showcases hours of smoking and preparation, revealing a perfect smoke ring and tender, juicy meat that melts in your mouth. Whether you’re preparing brisket for a backyard gathering or a competitive barbecue event, understanding the correct cutting technique is essential to maximizing flavor and presentation.
The key to perfect brisket slices lies in understanding the meat’s muscle structure, grain direction, and the ideal thickness for serving. Many home cooks struggle with this task because they approach it without proper knowledge of the brisket’s anatomy or the right tools. This comprehensive guide will walk you through everything you need to know about cutting a brisket like a professional, ensuring every slice is tender, flavorful, and visually impressive.
Understanding Brisket Anatomy
A whole brisket consists of two distinct muscles: the flat and the point. The flat, also called the first cut, is the larger, leaner portion with a uniform thickness and consistent grain direction. This muscle is ideal for slicing and serving to guests who prefer leaner meat. The point, known as the second cut or deckle, is smaller, fattier, and more marbled with intramuscular fat, making it perfect for pulling or chopping.
Understanding these two sections is crucial because they require different cutting approaches. The flat’s grain runs in one direction, allowing for straightforward slicing, while the point’s grain is less uniform and more suitable for alternative preparation methods. Many professional barbecue restaurants separate these two muscles before serving, allowing customers to choose their preferred cut. When you purchase a whole packer brisket, you’re getting both sections connected by a layer of fat.
The fat cap on top of the brisket protects the meat during smoking and adds flavor, but it needs to be trimmed before or after cooking depending on your preference. Most pitmasters trim the fat cap to about a quarter-inch thickness before smoking, though some prefer to leave it intact during cooking and trim it afterward for better smoke penetration and bark development.
Essential Tools for Cutting
Having the right equipment makes cutting a brisket significantly easier and produces more consistent results. A sharp brisket knife or long slicing knife with a blade length of 10-12 inches is the most important tool in your arsenal. The blade should be flexible enough to follow the contours of the meat but rigid enough to maintain control during cutting.
A quality knife steel or honing rod should be used before each cutting session to maintain the blade’s edge. Many home cooks underestimate the importance of knife sharpness; a dull knife requires more pressure, leading to jagged cuts that damage the meat fibers and cause moisture loss. Professional pitmasters often sharpen their brisket knives between major cutting sessions to ensure optimal performance.
Additional helpful tools include a cutting board large enough to accommodate a whole brisket, preferably with a groove to catch juices. A meat thermometer helps verify that your brisket has reached the proper internal temperature before resting. A kitchen towel or paper towels keep your hands dry for better grip control. Some advanced techniques benefit from a carving fork to hold the meat steady while slicing, preventing the brisket from shifting during the cutting process.
Preparing Your Brisket
Proper preparation before cutting is just as important as the cutting technique itself. After smoking or cooking, allow your brisket to rest for at least 15-20 minutes before cutting. This resting period allows the muscle fibers to relax and reabsorb moisture, resulting in juicier slices. Many pitmasters wrap their brisket in foil or butcher paper during the resting phase to retain heat and moisture.
Place your rested brisket on a clean cutting board with the fat cap facing up. If the fat cap is thick (more than half an inch), trim it down to about a quarter-inch using a sharp knife. Some cooks prefer to remove the fat cap entirely before slicing, while others leave it for additional flavor. This decision often depends on personal preference and your guests’ dietary preferences.
Examine the brisket’s surface to identify where the flat and point muscles separate. There’s typically a visible seam of fat running between these two sections. This natural separation point is where many professional barbecue restaurants divide the brisket for different serving options. Identifying this separation helps you understand the meat’s structure and plan your cutting strategy accordingly.
Identifying the Grain Direction
Grain direction is perhaps the most critical factor in cutting a tender, appetizing brisket. The grain refers to the direction the muscle fibers run through the meat. When you cut against the grain, you’re slicing through these fibers perpendicular to their length, which shortens them and makes each bite more tender. Cutting with the grain leaves long muscle fibers intact, resulting in chewy, tough bites.
To identify the grain direction, look at the surface of the cooked brisket and observe the lines running through the meat. These lines indicate the direction of the muscle fibers. You can also make a small test cut perpendicular to what you think is the grain, then examine the exposed surface. If the grain appears to run in a different direction than expected, adjust your cutting angle accordingly.
Here’s where brisket anatomy becomes important: the flat and point have different grain directions. The flat’s grain typically runs along the length of the muscle in one consistent direction. The point’s grain is more chaotic and changes direction in different sections. This is why many professionals cut the flat into clean slices against the grain while handling the point differently, such as pulling or chopping it into smaller pieces. Understanding this distinction helps you approach each section appropriately.
Some experienced cooks recommend making a small angled cut first to expose the grain clearly, then adjusting your cutting angle to slice perpendicular to the grain. This technique, sometimes called “cutting on the bias,” can help you achieve optimal tenderness while maintaining reasonable slice thickness.

Step-by-Step Cutting Technique
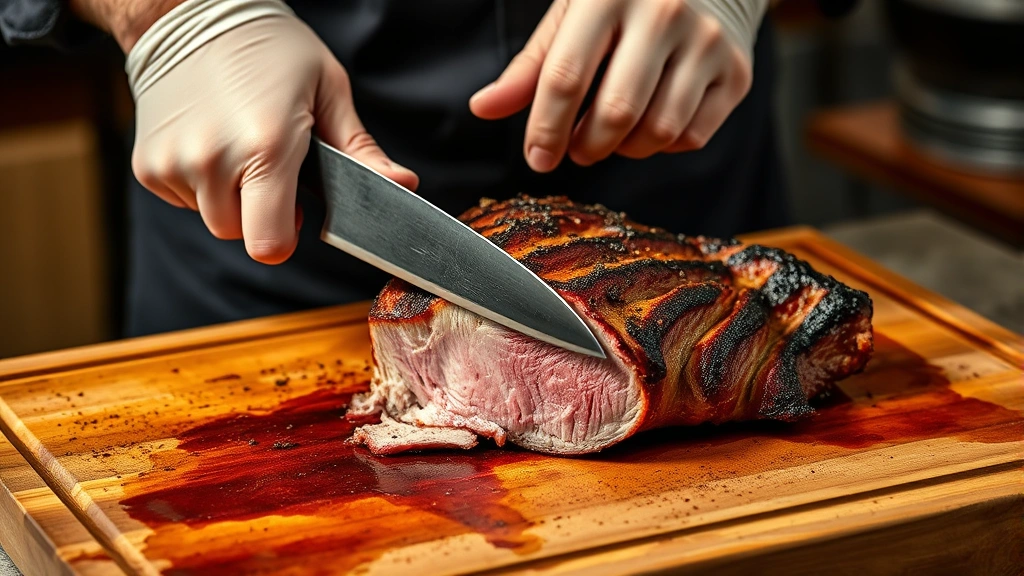
Begin by positioning your brisket on the cutting board with the point facing away from you and the flat section closest to you. This orientation makes it easier to control your knife and maintain consistent slice thickness. Hold the knife at a slight angle, approximately 45 degrees to the cutting board, which helps you achieve longer slices and better leverage.
Start cutting from the flat section first, as it has more uniform grain direction and is easier to slice consistently. Make your first cut perpendicular to the grain, using smooth, deliberate strokes rather than sawing motions. Let the knife do the work; excessive pressure can cause the meat to tear or compress, squeezing out valuable juices. Your goal is to cut through the meat fibers cleanly without crushing them.
Maintain consistent slice thickness throughout the process, typically between quarter-inch and half-inch thick. Thinner slices showcase the smoke ring and are more tender, while thicker slices retain more juices and are more forgiving if slightly overcooked. Professional barbecue restaurants often cut slices around a quarter-inch thick for maximum tenderness and visual impact.
After cutting several slices from the flat, you’ll eventually reach the point section. At this transition, pause and reassess the grain direction. The point’s grain often changes direction, so you may need to adjust your cutting angle. Some pitmasters prefer to separate the point completely from the flat, then handle it separately by pulling, chopping, or slicing at a different angle than the flat section.
Work methodically through the entire brisket, maintaining consistent pressure and knife angle. If you notice the meat becoming harder to cut or the slices becoming ragged, your knife may need honing. Stop and use your knife steel to realign the blade’s edge, then resume cutting.

Thickness and Slice Size
Determining the ideal slice thickness depends on several factors including the brisket’s tenderness, how it will be served, and personal preference. Competition barbecue judges typically prefer slices around a quarter-inch thick, as this thickness showcases the smoke ring, color, and texture while maintaining maximum tenderness. These thin slices are also visually impressive when arranged on a platter.
For casual backyard gatherings, slightly thicker slices of three-eighths to half-inch work well. These slices are more forgiving if the brisket is slightly overcooked, as they retain more moisture. Thicker slices also tend to stay warmer longer, which is practical when serving a crowd.
If you’re serving brisket sandwiches, thinner slices work better as they fit more easily between bread and provide better texture contrast with the bread and toppings. For chopped brisket applications, thickness becomes irrelevant as you’ll be cutting the slices into smaller pieces anyway.
The brisket’s overall tenderness should influence your thickness decision. A perfectly smoked, tender brisket can handle quarter-inch slices and still be enjoyable. A slightly tougher brisket benefits from thinner slicing, which further reduces the muscle fiber length and improves tenderness perception. Conversely, an exceptionally tender brisket can be cut thicker without becoming tough.
Common Mistakes to Avoid
One of the most common mistakes is cutting with the grain instead of against it. This happens when cooks misidentify the grain direction or fail to adjust their cutting angle when transitioning from the flat to the point. Always take a moment to verify grain direction before committing to your cutting angle. If you’re unsure, make a test cut in an inconspicuous area first.
Using a dull knife is another frequent error that compromises both quality and safety. A dull blade requires excessive pressure, leading to crushed meat fibers, moisture loss, and slices that appear gray rather than pink. Additionally, struggling with a dull knife increases the risk of slipping and injuring yourself. Keep your knife sharp using a honing steel before each use and professional sharpening every few months.
Cutting the brisket immediately after cooking without allowing proper rest time causes significant moisture loss. The internal temperature continues rising during rest (carryover cooking), and the muscle fibers relax, reabsorbing juices. Skipping this step results in drier meat that appears less appetizing and tastes less flavorful. Most pitmasters recommend resting for at least 15-20 minutes, with some preferring 30 minutes for larger briskets.
Inconsistent slice thickness makes the brisket appear unprofessional and results in uneven cooking perception. Some slices will seem overcooked while others appear undercooked, even though the brisket was cooked uniformly. Practice maintaining consistent knife angle and pressure to achieve uniform thickness throughout.
Failing to separate the flat from the point before cutting can result in poor slice quality. Since these muscles have different grain directions, trying to slice both sections in the same direction will result in one section being cut with the grain, making it tough. Many professional establishments separate these sections as part of their preparation process.
Storage and Serving
Properly store leftover brisket to maintain quality and food safety. Allow the brisket to cool to room temperature before storing, then place slices in an airtight container. Brisket keeps in the refrigerator for 3-4 days and can be frozen for up to 3 months. For best results, store slices in their own juices or with added beef broth to prevent drying out.
When reheating brisket, do so gently to avoid further moisture loss. The oven method works best: wrap slices in foil with a little broth and warm at 325°F for 15-20 minutes until heated through. Avoid microwaving, which can toughen the meat and create hot spots. Stovetop reheating over low heat with added liquid also works well.
For serving, arrange slices on a platter with the smoke ring facing up to showcase your cooking skill. Serve with a small ramekin of pan drippings or beef broth on the side for guests who prefer additional moisture. Consider serving alongside complementary sides like fresh vegetables, cornbread, or traditional barbecue sides.
If you’re interested in exploring other culinary techniques and food preparation, check out our FixWiseHub Blog with how-to guides and tutorials for additional cooking inspiration. We also have resources on how to make wine and other food preparation methods that complement your barbecue skills.
FAQ
What’s the best knife for cutting brisket?
A long, sharp slicing knife with a 10-12 inch blade works best for cutting brisket. The blade should be flexible enough to follow the meat’s contours but rigid enough to maintain control. Some professionals prefer slightly serrated blades, though a sharp smooth blade is generally superior for clean cuts through cooked meat.
Should I cut brisket while it’s hot or cold?
Cut brisket when it’s warm but not piping hot, typically after a 15-20 minute rest. At this temperature, the meat is still warm for serving but has allowed the muscle fibers to relax and reabsorb moisture. Cutting cold brisket is possible but more difficult, as the fat becomes hard and the meat is less forgiving of knife pressure variations.
How thick should brisket slices be?
Ideal thickness ranges from quarter-inch for competition barbecue to half-inch for casual service. Competition judges prefer quarter-inch slices to showcase the smoke ring and color. For casual gatherings, slightly thicker slices are more practical and forgiving if the brisket is slightly overcooked.
Why is my brisket tough to cut?
Tough brisket is usually difficult to cut due to undercooked meat, a dull knife, or cutting with the grain. Ensure the brisket reached proper internal temperature (around 203°F in the thickest part), use a sharp knife, and cut perpendicular to the grain direction. If you’re still having difficulty, the brisket may need more cooking time or a different cooking method.
Can I separate the flat and point before cooking?
Yes, separating the flat and point before cooking allows you to cook each muscle optimally. The flat typically finishes cooking before the point, so separating them prevents the flat from overcooking while waiting for the point. This also makes cutting easier, as you can handle each section according to its specific grain direction.
What’s the smoke ring and why is it important?
The smoke ring is a pink layer just beneath the brisket’s surface, created by a chemical reaction between smoke compounds and myoglobin in the meat. It indicates good smoke penetration and is highly valued in competition barbecue. Thin, clean slices showcase the smoke ring beautifully, which is why quarter-inch slicing is preferred for competition.
How do I know which direction is the grain?
Look at the cooked brisket’s surface and observe the lines running through the meat. These lines indicate grain direction. You can also make a small test cut and examine the exposed surface. If uncertain, the grain typically runs along the length of the flat muscle and changes direction in the point section.
Related Posts

Superscript in Google Docs: Expert Tips

Strikethrough in Excel: Easy Steps for Beginners
