

How to Crack Lower Back: Safe Techniques Explained
How to Crack Lower Back: Safe Techniques Explained
That satisfying pop or crack in your lower back can feel like instant relief after a long day hunched over a desk or standing on your feet. But let’s be honest—many people are nervous about attempting spinal adjustments on their own. The good news? Understanding the anatomy and learning proper techniques can help you safely achieve that relief without a trip to the chiropractor’s office.
Your lower back (lumbar spine) consists of five vertebrae stacked on top of each other, cushioned by intervertebral discs and supported by muscles, ligaments, and tendons. When these structures get tight or misaligned, they can create tension and discomfort. Cracking your back works by releasing gas bubbles trapped in the synovial fluid surrounding your joints—a phenomenon called cavitation. It’s the same thing that happens when you crack your knuckles.
Before diving into techniques, it’s important to understand that not everyone needs or should attempt self-adjustment. If you have existing back problems, injuries, or chronic pain, consulting a healthcare professional is essential. However, for those with general stiffness and tension, these safe, practical methods can provide genuine relief.
Understanding Your Lower Back Anatomy
Your lumbar spine is a marvel of engineering—it’s designed to support your body weight while allowing flexibility and movement. The five lumbar vertebrae (labeled L1 through L5) bear most of your body’s weight, which is why this area is particularly prone to tension and stiffness.
Between each vertebra sits an intervertebral disc—essentially a cushion made of a tough outer layer (annulus fibrosus) and a gel-like center (nucleus pulposus). These discs absorb shock and allow your spine to bend and twist. Surrounding everything are muscles, ligaments, and tendons that provide stability and facilitate movement.
When you’re sedentary, stressed, or holding poor posture, these supporting structures become tight and fatigued. Synovial fluid in your joints contains dissolved gases like nitrogen, oxygen, and carbon dioxide. When you apply pressure or stretch, the fluid pressure decreases, causing these gases to form bubbles that collapse with an audible crack. This isn’t harmful—it’s actually a normal physiological response.
Understanding this process helps demystify back cracking and shows why proper technique matters. Forcing or twisting aggressively can damage discs or strain ligaments, so patience and gentle pressure are your best friends.
When to Avoid Cracking Your Back
Before attempting any self-adjustment technique, recognize situations where cracking your back could cause harm. If you have diagnosed disc herniation, osteoporosis, arthritis, or previous spinal surgery, speak with your doctor first. Similarly, if you’re experiencing acute pain, numbness, tingling, or radiating sensations down your legs, these could indicate nerve involvement that requires professional evaluation.
Pregnancy is another situation warranting professional guidance. While gentle movement is beneficial during pregnancy, aggressive back cracking isn’t recommended due to hormonal changes affecting ligament laxity and the need to protect your growing baby.
Additionally, if you’re taking blood thinners or have bleeding disorders, aggressive manipulation could potentially cause bruising or complications. When in doubt, it’s always better to consult a healthcare provider, physical therapist, or chiropractor rather than risk injury.

Technique 1: The Seated Spinal Twist
This classic technique is accessible, effective, and can be performed almost anywhere—even at your office desk. Here’s how to do it properly:
- Sit upright in a chair with your feet flat on the ground, hip-width apart. Keep your back straight but not rigid.
- Engage your core by gently tightening your abdominal muscles. This stabilizes your spine and prevents excessive movement.
- Cross your right arm over your chest, placing your right hand on your left shoulder or the left side of your ribcage.
- Wrap your left arm around your torso, placing your left hand on your right thigh or the right side of your body.
- Slowly rotate your upper body to the right, using your arms to gently deepen the twist. Don’t force it—move slowly and controlled.
- Hold for 20-30 seconds, breathing deeply. You may hear a crack or pop. If not, that’s fine—the stretch itself is beneficial.
- Return to center and repeat on the left side.
The beauty of this technique is its subtlety. You’re not forcing anything; you’re simply creating space in your spine through gentle rotation. Many people find this particularly helpful after sitting for extended periods. If you’re familiar with maintaining precision in your daily tasks, think of this technique the same way—controlled, deliberate movements yield the best results.
Technique 2: The Supine Knee-to-Chest Method
This lying-down technique is excellent for lower back relief and can be performed before bed or during a morning routine:
- Lie on your back on a comfortable surface—a yoga mat or carpet works well. Ensure your head is supported and your neck is neutral.
- Bend both knees with your feet flat on the floor, positioned close to your buttocks.
- Wrap your hands around your right knee, interlacing your fingers just below the kneecap.
- Gently pull your right knee toward your chest, feeling a stretch in your lower back and glute area. Hold for 15-20 seconds.
- Release and repeat with your left knee.
- For added effect, after pulling both knees to your chest, gently rock side to side. This creates a self-massage effect on your lower back.
This technique is particularly safe because you’re controlling the pressure entirely—there’s no external force involved. The supine position also removes gravity as a factor, making it gentler on your spine. You can perform this technique multiple times throughout the day without concern.
Many people find this especially helpful when combined with other daily habits. Just as you might monitor important systems to prevent problems, regularly performing this stretch helps prevent lower back issues from developing.
Technique 3: The Child’s Pose Stretch
Borrowed from yoga, the child’s pose is a gentle, restorative stretch that elongates your lower back and reduces tension:
- Start on your hands and knees on a comfortable surface. Your wrists should be under your shoulders and knees under your hips.
- Slowly lower your hips back toward your heels, extending your arms forward and lowering your forehead toward the ground.
- Relax completely in this position, allowing gravity to do the work. Your lower back should feel gently stretched, not strained.
- Breathe deeply for 30-60 seconds. With each exhale, you may notice yourself sinking slightly deeper into the stretch.
- Return to hands and knees carefully, then sit back on your heels.
The beauty of child’s pose is its accessibility—it requires no equipment and can be modified based on your flexibility. If you can’t reach the ground with your forehead, rest it on a yoga block or pillow. If your hips don’t reach your heels, place a cushion between your hips and heels.
This technique works through gentle elongation rather than aggressive cracking, but many people experience that satisfying release even without an audible pop. The focus here is on relaxation and allowing your spine to decompress naturally.
Technique 4: The Standing Back Extension
This technique uses your body weight and gravity to create extension and potential release in your lower back:
- Stand with your feet hip-width apart, knees slightly bent for stability.
- Place your hands on the small of your back, fingers pointing downward. Your palms can face inward or outward—whatever feels comfortable.
- Gently arch backward, using your hands to support your lower back. Move slowly and controlled, not aggressively.
- Hold for 15-20 seconds, breathing steadily. You should feel a mild stretch, not pain.
- Return to neutral and repeat 2-3 times.
This technique is particularly useful when you’ve been sitting or bent forward for extended periods. It counteracts the flexion your spine experiences during most daily activities. However, be cautious if you have existing back issues—excessive extension can sometimes aggravate certain conditions.
Think of it like performing maintenance on different systems. Just as regular maintenance prevents mechanical problems, regularly counteracting forward flexion helps prevent lower back dysfunction.
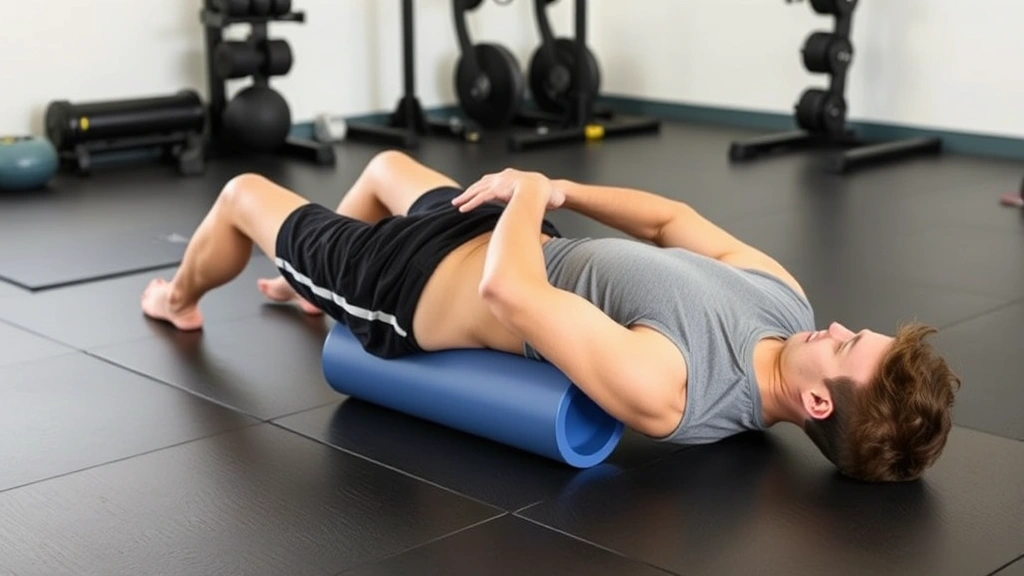
Technique 5: The Foam Roller Release
A foam roller is an affordable tool that can provide significant relief for lower back tension:
- Lie on your back with a foam roller positioned horizontally under your mid-back (not directly under your lumbar spine—slightly higher).
- Support your head with your hands, with your neck in a neutral position. Your knees should be bent with feet flat on the floor.
- Gently rock forward and backward, allowing the foam roller to massage your back muscles. Move slowly and deliberately.
- Pause on tender areas for 15-30 seconds, allowing the pressure to release muscle tension.
- Move the roller up slightly and repeat. Never place the roller directly on your spine.
Foam rolling works differently than the previous techniques—it’s not about creating cavitation but rather releasing muscle tension through sustained pressure and myofascial release. Many people find foam rolling remarkably effective for lower back stiffness, especially when combined with other stretches.
For best results, invest in a high-quality foam roller. Cheaper versions compress quickly and lose effectiveness, while quality rollers maintain their firmness for years. This is one DIY wellness investment that absolutely pays dividends.
Prevention and Maintenance Tips
While knowing how to crack your lower back is useful, prevention is always superior to treatment. Here are practical strategies to keep your lower back healthy and reduce the need for frequent adjustments:
Posture Awareness: Your mother was right about sitting up straight. Poor posture creates chronic tension in your lower back. Whether sitting at a desk, driving, or standing, maintain a neutral spine with your shoulders relaxed and core gently engaged. Set phone reminders every hour to check your posture if needed.
Regular Movement: Sitting is the new smoking, especially for your lower back. Stand and stretch every 30-60 minutes. Even a two-minute walk around your office provides significant benefit. Movement keeps your spinal discs hydrated and your muscles active rather than tight.
Core Strengthening: A strong core supports your spine and reduces strain on your lower back. Planks, bridges, and bird dogs are excellent exercises that don’t require gym equipment. Aim for 10-15 minutes of core work 3-4 times weekly. If you’re detail-oriented about improving your physical performance, apply the same mindset to core training—consistency matters more than intensity.
Proper Lifting Technique: When lifting anything heavier than a few pounds, bend at your knees and hips, not your lower back. Keep the object close to your body and engage your core. Many lower back injuries happen during seemingly simple movements like picking up a dropped pen or a grocery bag.
Sleep Position: Your sleeping position significantly impacts your lower back health. Side sleepers should place a pillow between their knees to keep their spine aligned. Back sleepers should place a pillow under their knees. Avoid sleeping on your stomach, which creates excessive spinal rotation.
Stress Management: Stress causes muscle tension, particularly in your lower back and neck. Regular meditation, deep breathing, or gentle yoga can reduce stress and associated muscle tightness. You don’t need an hour—even five minutes of focused breathing provides measurable benefit.
Hydration and Nutrition: Your intervertebral discs are composed largely of water. Staying well-hydrated helps maintain disc health and flexibility. Additionally, anti-inflammatory foods like fatty fish, berries, and leafy greens support spinal health from within.
For comprehensive guidance on back health, Mayo Clinic’s back pain prevention guide offers evidence-based recommendations. The American Academy of Orthopaedic Surgeons also provides excellent resources on spinal health.
If you’re comfortable with DIY solutions but want professional guidance, This Old House and similar resources demonstrate that thorough research and proper technique make all the difference in any maintenance task—including your own body maintenance.
Frequently Asked Questions
Is it safe to crack your own back?
Yes, with proper technique and awareness of your body’s limits. The key is gentle, controlled movements rather than aggressive twisting or forcing. If you have existing back problems or pain, consult a healthcare professional first. Most people can safely use these techniques without concern.
Why does my back crack so frequently?
Frequent cracking often indicates tight muscles and stiff joints—essentially your body’s way of seeking relief. It’s usually not harmful, but it suggests your spine would benefit from more consistent stretching and movement throughout the day. If cracking is accompanied by pain, that’s worth investigating with a professional.
Can cracking your back cause injury?
Gentle cracking using the techniques described here is very unlikely to cause injury. However, aggressive twisting, forced movements, or cracking when you have existing conditions like disc herniation can cause problems. Listen to your body—if something hurts, stop immediately.
Is the popping sound necessary for relief?
Not at all. The audible pop is just a byproduct of cavitation, not a requirement for relief. Many stretches and techniques provide excellent relief without any sound. If you’re not hearing cracks, you’re still getting the benefits of stretching and muscle release.
How often should I crack my back?
There’s no set limit, but several times daily is generally safe if needed. However, if you find yourself constantly needing to crack your back, that’s a sign to focus on prevention—better posture, more movement, and core strengthening. Address the root cause rather than just treating symptoms.
When should I see a doctor about back pain?
Seek professional help if you experience severe pain, pain lasting more than a few weeks, numbness or tingling in your legs, difficulty controlling bladder or bowels, or pain following an injury. Additionally, if simple techniques aren’t providing relief or if your pain is worsening, professional evaluation is warranted.
Can I crack my back if I’m pregnant?
Gentle stretches are usually safe during pregnancy, but avoid aggressive cracking or twisting. Hormonal changes during pregnancy increase ligament laxity, making your spine more vulnerable. Consult your OB-GYN or a prenatal physical therapist for personalized guidance.
Is foam rolling better than stretching for lower back relief?
They’re complementary rather than competitive. Stretching elongates muscles and increases flexibility, while foam rolling releases muscle tension and improves circulation. Using both techniques provides more comprehensive relief than either alone. Think of them as different tools for the same job, much like how different techniques serve different purposes in complex projects.
Related Posts

How Long to Boil Lobster Tails: Cooking Guide

How Long to Fly from New York to London? Travel Times
