
How to Charge a Car Battery: Expert Guide
How to Charge a Car Battery: Expert Guide
There’s nothing quite like the sinking feeling when you turn the key and hear nothing but silence. A dead car battery can derail your entire day, leaving you stranded and frustrated. But here’s the good news: knowing how to charge a car battery is one of the most empowering skills any car owner can develop. It’s not complicated, doesn’t require expensive tools, and can save you hundreds of dollars in towing and service fees.
Whether you’re dealing with a battery that won’t hold a charge or simply forgot to turn off your headlights, this guide will walk you through everything you need to know. We’ll cover the different charging methods, safety precautions, and troubleshooting tips that’ll have you back on the road in no time.
The beauty of understanding battery charging is that it gives you independence and confidence. You’re not at the mercy of roadside assistance or expensive mechanic visits. Let’s dive into the practical knowledge that will transform you from battery-dependent to battery-savvy.
Understanding Your Car Battery
Before you can effectively charge a car battery, you need to understand what you’re working with. Your car’s battery is essentially a chemical powerhouse that converts chemical energy into electrical energy. It’s typically a 12-volt lead-acid battery (though some modern vehicles use 48-volt systems) that powers your starter motor, ignition system, and all electrical accessories.
The battery sits in your engine bay, usually a rectangular plastic case with two terminals: positive (red) and negative (black). These terminals are where the electrical connections happen. When your battery dies, it simply means the chemical reaction inside has stopped producing sufficient electrical current to start your engine or power your vehicle’s systems.
Understanding battery capacity is crucial. Batteries are rated in amp-hours (Ah), which tells you how much current the battery can deliver over time. A typical car battery might be rated at 50-100 Ah. When you’re charging, you’re essentially reversing the chemical discharge process, replenishing the battery’s ability to produce electrical current.

Tools and Materials You’ll Need
Having the right equipment makes the charging process smooth and safe. Here’s what you should gather before starting:
- Battery charger: Choose between a smart charger (automatic), a manual charger, or a trickle charger depending on your needs and budget
- Jumper cables: Essential for jump-starting from another vehicle (look for heavy-gauge, well-insulated cables)
- Safety glasses and gloves: Battery acid is corrosive, so protection is non-negotiable
- Baking soda and water: For cleaning battery terminals if corrosion is present
- Wire brush or terminal cleaner: Removes oxidation from battery terminals
- Wrench or socket set: For removing battery cables if necessary
- Another vehicle: Only needed if you’re planning to jump-start
Investing in a quality smart charger is worthwhile. These devices automatically adjust charging rates and shut off when the battery is fully charged, preventing overcharging and extending battery life. Brands like NOCO, Schumacher, and Battery Tender are reliable choices.
Safety Precautions Before You Start
Safety isn’t something to skip over when dealing with car batteries. Batteries contain sulfuric acid and produce hydrogen gas, both of which pose real hazards. Here are the essential precautions:
- Wear protective gear: Safety glasses protect your eyes from acid splashes, and gloves keep corrosive materials off your skin
- Work in a well-ventilated area: Never charge a battery in an enclosed space. Hydrogen gas can accumulate and create explosion risks
- Keep flames and sparks away: This ties directly to the hydrogen gas concern. No smoking, no welding, no grinding near the battery
- Disconnect the negative terminal first: If you need to remove the battery, always disconnect the negative (black) cable before the positive (red) cable
- Check battery condition: If the battery case is cracked or leaking, don’t attempt to charge it. Replace it instead
- Remove the battery if necessary: For some charging methods, you may need to disconnect your car battery from the vehicle
These precautions might seem excessive, but they’re based on real risks. Battery acid burns are serious, and hydrogen explosions are no joke. Taking five minutes to prepare safely is always worth it.
How to Charge with a Battery Charger
Using a dedicated battery charger is the most controlled and safest way to charge your car battery. Here’s the step-by-step process:
- Prepare the battery: Open your hood and locate the battery. Inspect it for any visible damage or leaks. Clean any corrosion from the terminals using a wire brush and a paste of baking soda and water
- Position the charger: Place your charger on a flat, stable surface near the battery, but not directly on it. Ensure it’s away from any water or damp areas
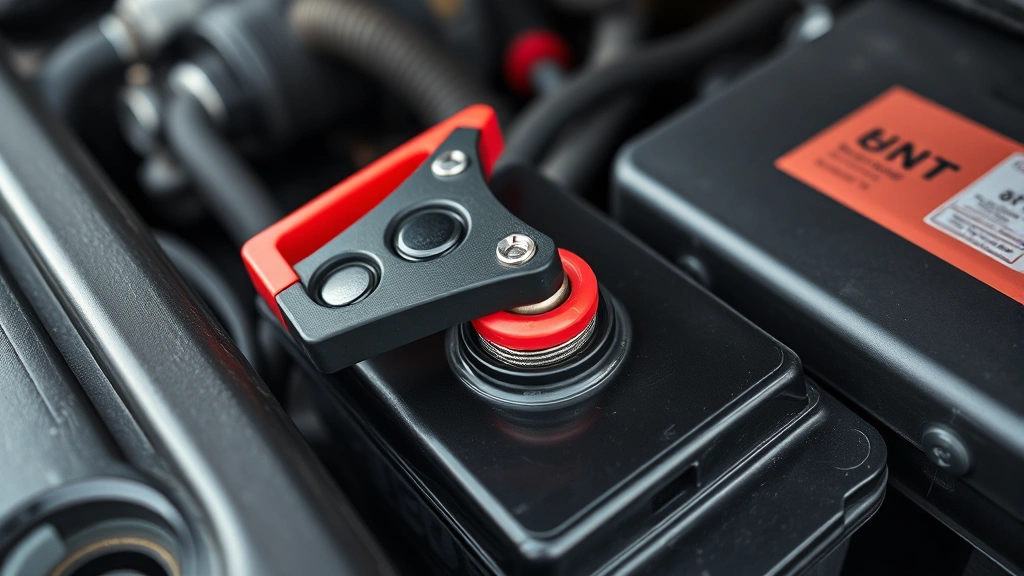
- Connect the positive cable: Take the red clamp from your charger and firmly attach it to the positive terminal (marked with a + or red color) on your battery. Make sure the connection is tight and secure
- Connect the negative cable: Attach the black clamp to the negative terminal (marked with a – or black color). A secure connection is critical for safety and charging efficiency
- Set the charging rate: If using a manual charger, select an appropriate charging rate. For a completely dead battery, start with a lower amperage (2-10 amps) to avoid damage. Smart chargers automatically select the right rate
- Turn on the charger: Activate the charger and monitor the process. Most chargers have indicator lights showing charging progress
- Wait for completion: Charging time varies based on battery capacity and charger output. A typical car battery might take 4-24 hours depending on how deeply discharged it is
- Turn off and disconnect: Once fully charged, turn off the charger first, then remove the black clamp, then the red clamp. Never disconnect while the charger is running
Smart chargers are worth every penny because they eliminate guesswork. They monitor voltage and current automatically, stopping when the battery reaches full charge. This prevents overcharging, which damages batteries and reduces their lifespan.
Jump Starting Your Battery
Sometimes you need to get moving immediately, and jump-starting is your answer. This method uses another vehicle’s battery to provide enough power to start your engine. Here’s how to do it safely:
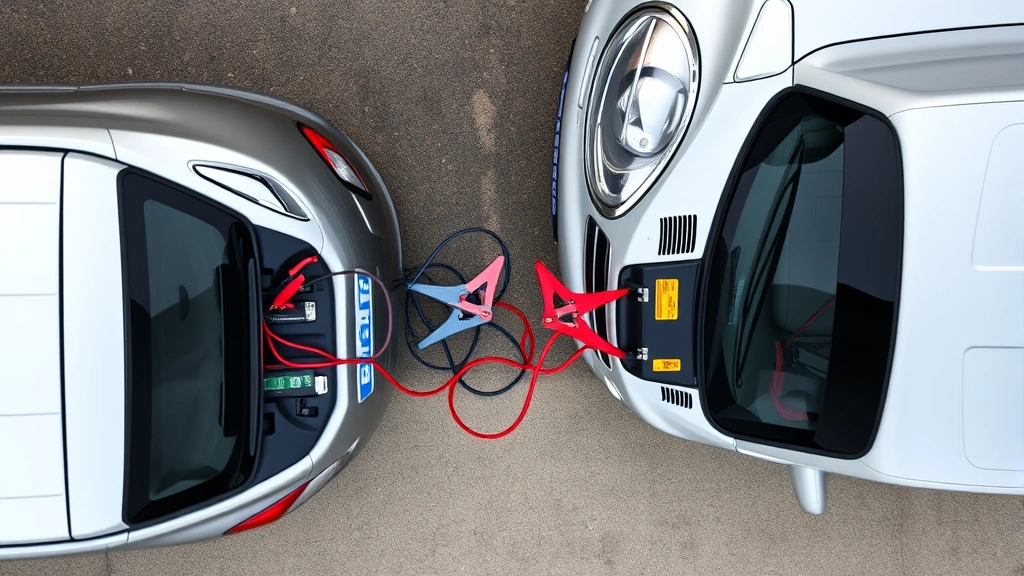
- Position both vehicles: Park the working vehicle within 18 inches of your dead battery vehicle, but don’t let them touch. Turn off both engines
- Prepare the cables: Attach the red clamp to the positive terminal of the working battery, then attach the other red clamp to the positive terminal of your dead battery
- Complete the circuit: Attach the black clamp to the negative terminal of the working battery. This is crucial: attach the other black clamp to an unpainted metal surface on your engine block, NOT the negative terminal of your dead battery. This prevents sparks near the battery
- Start the working vehicle: Let it run for 2-3 minutes to charge your battery before attempting to start your vehicle
- Start your vehicle: Try starting your engine. If it doesn’t start after 30 seconds, wait another minute and try again. Don’t continuously crank
- Disconnect in reverse order: Remove the black clamp from your engine, then from the working battery, then the red clamp from your battery, and finally from the working battery
- Keep running: Drive for at least 20-30 minutes to allow your alternator to recharge the battery
Jump-starting works because you’re borrowing electrical power from another battery to overcome the initial resistance and get your engine turning. Once the engine starts, your alternator takes over and recharges your battery. However, this is a temporary solution. If your battery keeps dying, you’ll need to charge it properly or investigate why it’s not holding a charge.
Alternative Charging Methods
Beyond traditional chargers and jump-starting, you have other options worth knowing about:
Trickle Chargers: These low-amperage chargers are designed for long-term maintenance charging. They’re perfect for vehicles that sit unused for extended periods. Trickle chargers deliver just enough current to keep a battery at full charge without overcharging. If you’re storing a vehicle for winter or an extended period, a trickle charger connected for weeks or months will keep the battery in perfect condition.
Solar Battery Chargers: For the environmentally conscious or those without convenient electrical access, solar chargers are becoming increasingly practical. While they charge slower than plug-in chargers, they’re excellent for maintenance and emergency situations. Modern solar chargers are much more efficient than older models.
Portable Jump Starters: These handheld devices store electrical charge and can jump-start your vehicle without needing another car. They’re incredibly convenient for keeping in your vehicle. Many modern jump starters also include USB ports for charging phones and LED flashlights, making them genuinely useful tools beyond just emergency battery situations.
Before attempting any charging method, consider whether your battery is truly dead or if there’s another issue. Sometimes a completely unresponsive electrical system indicates a problem beyond simple battery discharge. If you suspect alternator issues or other electrical problems, you might want to have a professional diagnose the situation first.
Signs Your Battery Needs Replacement
Not every battery problem can be solved by charging. Sometimes replacement is necessary. Here are the warning signs:
- Age: Car batteries typically last 3-5 years. If yours is approaching this age and experiencing problems, replacement is likely in your future
- Slow cranking: If your engine cranks slowly even after a full charge, the battery is losing its ability to hold power
- Frequent dead batteries: If you’re charging your battery repeatedly within short timeframes, the battery isn’t holding charge properly
- Swollen or bloated case: Heat damage or internal problems cause the battery case to swell. This battery is done and should be replaced immediately
- Visible corrosion: While terminal corrosion can be cleaned, extensive internal corrosion means the battery needs replacement
- Cracked or leaking case: Any physical damage to the battery case means it’s unsafe and must be replaced
- Sulfation: A white or blue crusty buildup on terminals indicates sulfation, a sign of battery degradation
Most auto parts stores offer free battery testing. If you’re unsure whether your battery needs replacement, take it to a store like AutoZone, O’Reilly, or your local dealer. They’ll test it and give you honest recommendations. Remember that maintaining your vehicle with regular engine oil checks and other routine maintenance can indirectly help your battery last longer by reducing overall engine strain.
Maintenance Tips for Battery Longevity
Prevention is always better than cure. Keeping your battery in excellent condition extends its lifespan significantly:
- Keep terminals clean: Corrosion buildup creates resistance and prevents proper charging. Clean terminals monthly with baking soda solution and a wire brush
- Ensure secure connections: Loose terminal connections reduce charging efficiency. Check them regularly and tighten as needed
- Avoid extreme temperatures: Both extreme heat and cold stress batteries. Park in shade during summer and insulate during winter if possible
- Minimize parasitic drain: Leaving lights, radios, or accessories on while the engine is off drains your battery. Develop the habit of turning everything off before leaving your vehicle
- Drive regularly: Your alternator charges the battery while driving. Frequent short trips or extended parking can lead to discharge
- Reduce electrical load: Using high-power accessories like heated seats, sunroofs, and premium audio systems strains your battery. Be mindful of simultaneous usage
- Use a battery maintainer in off-season: If you store your vehicle seasonally, a battery maintainer keeps it charged without overcharging
Regular maintenance of other vehicle systems also helps your battery. When you change your transmission fluid or perform routine maintenance, you’re keeping your vehicle running efficiently, which means less strain on the electrical system and battery.
Understanding your vehicle’s charging system is as important as knowing how to charge the battery. Your alternator is responsible for recharging your battery while the engine runs. If your alternator is failing, no amount of charging will permanently solve the problem. Warning signs of alternator issues include dimming lights while driving, battery warning lights on the dashboard, or a burning smell from the engine bay.
For those who perform their own vehicle maintenance, knowing how to properly maintain your battery pairs well with other essential skills. Just as you’d want to understand how to rotate tires and how often to replace tires, battery knowledge is part of being a responsible vehicle owner.
Frequently Asked Questions
How long does it take to charge a car battery?
Charging time depends on several factors: the battery’s capacity (usually 40-100 amp-hours), the charger’s output (typically 2-200 amps), and how deeply discharged the battery is. A typical scenario with a 10-amp charger on a moderately discharged battery takes 4-8 hours. Fast chargers might do it in 1-2 hours, while trickle chargers might take 24-48 hours. Smart chargers adjust their rate automatically, so they’re efficient across different situations.
Can I overcharge a car battery?
Yes, you can overcharge a battery, particularly with older manual chargers. Overcharging causes excessive heat buildup, which damages the battery’s internal structure and reduces its lifespan. This is why smart chargers are superior—they monitor voltage and automatically stop charging when the battery reaches full capacity. If you’re using a manual charger, set a timer and check on it regularly.
Is it safe to charge a battery in the car?
Generally yes, but with precautions. Most modern vehicles can have their batteries charged while installed. However, ensure the engine is off, remove the negative terminal if you’re concerned about electrical surges (though this is rarely necessary with modern chargers), and make sure the charger is positioned safely. If the battery is old, cracked, or leaking, remove it from the vehicle before charging.
What’s the difference between charging and jump-starting?
Jump-starting provides immediate electrical power to start your engine by borrowing from another battery. It’s a quick fix that gets you moving but doesn’t fully recharge your battery. Charging, on the other hand, slowly restores the battery’s chemical energy through a controlled electrical current. Charging is thorough and proper; jump-starting is emergency and temporary. After jump-starting, you should still charge your battery fully.
Why does my battery keep dying?
Repeated battery discharge indicates either a faulty battery that won’t hold charge, an alternator that isn’t recharging properly, or parasitic electrical drain. Test the battery first—most auto parts stores do this for free. If the battery tests fine, have the alternator tested next. If both are good, you likely have a parasitic drain, which could be anything from a faulty relay to aftermarket electrical components drawing power when the engine is off.
Can I charge a battery below freezing?
It’s not recommended. Cold temperatures significantly reduce battery efficiency and charging effectiveness. Chemical reactions slow down in cold, meaning the battery won’t accept charge as readily. If possible, bring the battery inside or to a warmer location before charging. If you must charge in cold conditions, use a charger specifically rated for cold-weather use and expect longer charging times.
Do I need to remove the battery to charge it?
Not necessarily. Most modern vehicles and chargers work fine with the battery installed. However, if you have an older vehicle, are concerned about electrical surges affecting other components, or need to inspect the battery thoroughly, removal is an option. If you do remove it, remember to disconnect your car battery properly—negative terminal first, positive terminal second.
Charging your car battery is a straightforward skill that pays dividends in independence, confidence, and savings. Whether you invest in a quality smart charger or keep jumper cables in your trunk for emergencies, you’re taking control of your vehicle’s maintenance. The key is understanding the basics, following safety precautions, and knowing when professional help is needed. With this knowledge, you’ll handle battery issues like a pro and keep your vehicle running reliably for years to come.
For more detailed information on battery maintenance and charging best practices, check out resources like This Old House’s battery charger guide, Family Handyman’s comprehensive charging tutorial, and Home Depot’s battery charger selection and guides. Your vehicle’s manufacturer manual is also an invaluable resource specific to your car’s electrical system.
Related Posts

How Long to Boil Lobster Tails: Cooking Guide

How Long to Fly from New York to London? Travel Times
