
Can You Can Peaches at Home? Expert Tips
Can You Can Peaches at Home? Expert Tips for Perfect Preserves
Yes, you absolutely can can peaches at home, and it’s one of the most rewarding preservation methods for home gardeners and fruit enthusiasts. Canning peaches transforms fresh summer fruit into shelf-stable jars that deliver homemade goodness throughout the year. Whether you’re preserving a bumper crop from your backyard tree or sourcing farmer’s market finds, home canning is an achievable skill that combines food safety with culinary satisfaction.
The process of canning peaches has been perfected over generations, and modern guidelines ensure that your preserved peaches remain safe and delicious. Unlike freezing or other storage methods, properly canned peaches require no electricity and develop deeper, more concentrated flavors as they age. This comprehensive guide walks you through every step, from selecting the right peaches to sealing your jars with confidence.
Why Can Peaches at Home?
Canning peaches offers numerous advantages over other preservation methods. When you can peaches, you’re creating a product that maintains its nutritional value, vibrant color, and authentic flavor for 12 to 18 months or longer when stored properly. Unlike frozen peaches that can develop freezer burn or lose texture, canned peaches retain a pleasant firmness and develop richer taste profiles over time.
Home canning also allows you to control sugar levels, avoid commercial additives, and create custom flavor combinations with spices or other fruits. Many home canners report that their preserved peaches taste significantly better than store-bought versions, with a fresh quality that commercial processing cannot replicate. Additionally, the cost-effectiveness becomes apparent when you calculate the price per jar compared to premium jarred peaches at specialty stores.
Beyond the practical benefits, home canning connects you to a time-honored tradition of food preservation. The satisfaction of opening a jar of homemade canned peaches months later, knowing exactly where your ingredients came from and how they were processed, creates a sense of accomplishment that extends beyond the kitchen.
Essential Equipment and Supplies
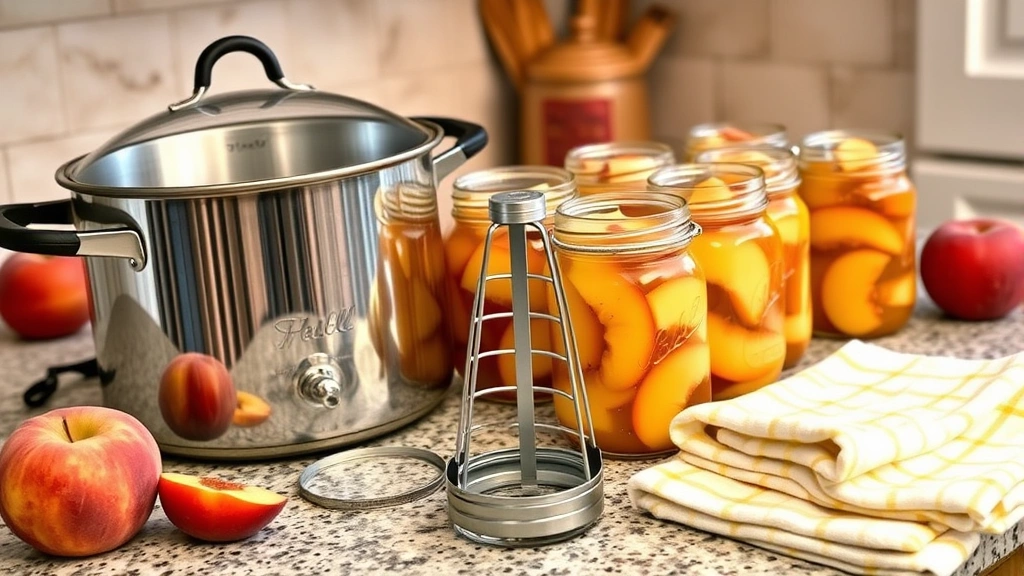
Before learning how to can peaches, assemble the proper equipment to ensure safety and success. The most critical tool is a water bath canner or pressure canner, depending on your chosen method. A water bath canner is essentially a large stainless steel pot with a rack insert that keeps jars elevated during processing.
You’ll also need:
- Mason jars in your preferred size (quart or pint jars are standard for peaches)
- Two-piece lids consisting of flat lids and threaded bands
- Jar lifter for safely removing hot jars
- Bubble remover and headspace measuring tool (a simple plastic wand with dual functions)
- Funnel designed for wide-mouth jars
- Large stainless steel pot for preparing the syrup
- Clean kitchen towels and a cutting board
- Peeler and pitter or a sharp knife
- Large colander for washing and draining peaches
Check that all equipment is clean and free of chips or cracks. Visit Family Handyman’s canning guide for detailed equipment reviews and recommendations. Many retailers like Ball Canning offer starter kits that bundle essential tools together at reasonable prices.
Selecting and Preparing Your Peaches
The quality of your finished product begins with selecting the right peaches. Choose firm, ripe peaches without soft spots, bruises, or mold. Slightly underripe peaches are actually preferable to overripe ones, as they hold their shape better during processing. Plan on approximately 2 to 2.5 pounds of fresh peaches per quart jar.
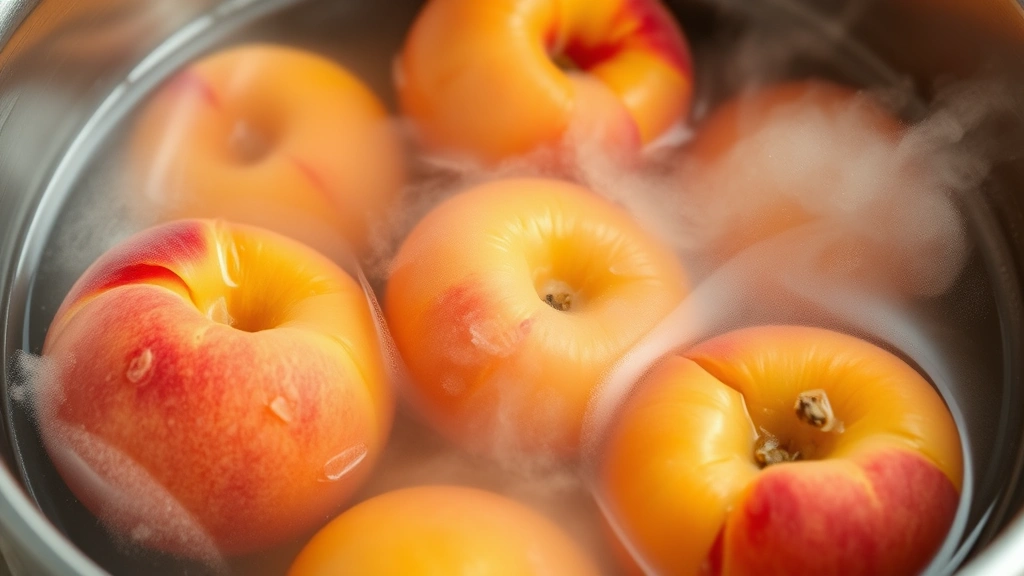
Start by washing your peaches thoroughly under cool running water to remove any dirt or debris. Pat them dry with clean kitchen towels. To peel peaches easily, blanch them in boiling water for 30 to 60 seconds, then plunge immediately into ice water. The skin will slip off effortlessly once cooled. Alternatively, use a vegetable peeler for a more controlled approach, though blanching is faster for large quantities.
After peeling, cut peaches in half and remove the pit. You can leave halves intact, slice them into quarters or eighths, or cut them into smaller chunks depending on your preference and how you plan to use them. To prevent browning, place prepared peaches into a bowl of cold water with a bit of lemon juice or ascorbic acid powder. This step is optional but helps maintain the attractive color of your finished product.
Water Bath Canning Method
Water bath canning is the recommended method for high-acid foods like peaches. This process involves submerging sealed jars in boiling water for a specific duration to create a vacuum seal and eliminate pathogens. Before beginning, review guidelines from the National Center for Home Food Preservation, the authoritative resource for safe canning practices.
Step 1: Prepare Your Syrup
Decide on your syrup concentration. Options range from light syrup (2 cups sugar per 6 cups water) to heavy syrup (3 cups sugar per 6 cups water). Some canners prefer juice or even plain water. Combine your chosen ingredients in a large pot and bring to a boil, stirring until sugar dissolves. Keep the syrup hot throughout the canning process.
Step 2: Sterilize Your Jars
Run clean jars through a hot dishwasher cycle or boil them in water for 10 minutes. Keep them hot in the canner until you’re ready to fill them. Prepare new lids according to manufacturer instructions—most modern lids don’t require pre-heating, but verify your specific brand’s recommendations.
Step 3: Fill Your Jars
Using a jar lifter, remove one hot jar from the canner and place it on a clean towel. Using a wide-mouth funnel, pack hot peaches into the jar, leaving 1/2-inch headspace at the top. Pour hot syrup over the peaches, maintaining the 1/2-inch headspace. Use a bubble remover tool to gently slide around the inside of the jar to release trapped air bubbles, adding more syrup if necessary to maintain proper headspace.
Step 4: Seal and Process
Wipe the jar rim clean with a damp cloth to remove any syrup or peach residue that might prevent a proper seal. Place the flat lid on the jar and screw the band on finger-tight—not overly tight, as steam needs to escape during processing. Lower the filled jar into the boiling water canner using a jar lifter.
Once all jars are loaded, ensure they’re covered by 1 to 2 inches of boiling water. Bring the water to a rolling boil and process pint jars for 20 minutes or quart jars for 25 minutes at sea level elevation. Adjust processing time if you’re at higher altitudes—consult This Old House’s preservation articles for altitude-specific charts.
After processing time is complete, turn off the heat and let jars rest in the canner for 5 minutes before removing them. Place processed jars on a clean towel, leaving space between them for air circulation. Don’t retighten the bands or invert the jars.
Pressure Canning for Safety
While water bath canning works well for peaches due to their acidity, some canners prefer pressure canning for added safety assurance or when modifying recipes significantly. Pressure canning uses steam pressure to reach higher temperatures (240°F versus 212°F for water bath), which can eliminate additional microorganisms.
To pressure can peaches, follow the same preparation steps as water bath canning but use a pressure canner instead. Add 2 to 3 inches of water to the canner bottom and bring to a boil before adding jars. Seal the canner according to your specific model’s instructions and allow pressure to build to 10 pounds per square inch (PSI) at sea level. Process pint jars for 8 minutes or quart jars for 10 minutes.
Allow pressure to return to zero naturally—never rush this process by running cold water over the canner. Wait 10 minutes before opening the lid and removing jars. Pressure canning requires more attention and specific equipment, so ensure you’re comfortable with the process before attempting it. The NCHFP provides detailed pressure canning instructions tailored to different foods and altitudes.
Troubleshooting Common Issues
Jars Not Sealing Properly
If you notice jars didn’t seal after cooling, several factors might be responsible. Check that lids weren’t overheated if your brand required pre-heating. Ensure the jar rim was completely clean before applying the lid—even tiny particles can prevent sealing. Sometimes processing time was insufficient; reprocess the jars within 24 hours using a fresh lid.
Cloudiness or Sediment
Cloudiness in your syrup typically results from mineral deposits in your water or starch from the peaches. This is harmless and won’t affect taste. If sediment appears at the bottom of jars, it’s usually pectin or fruit particles—also harmless. Strain your water if you live in a hard water area, or use distilled water for clearer results.
Floating Fruit
Peaches that float to the top of the jar are still safe but may discolor slightly. Pack jars more tightly and ensure you’re leaving proper headspace. Some floating is normal and doesn’t indicate a problem with the seal or safety of the product.
Discoloration or Browning
Darkening at the top of the jar sometimes occurs and is usually harmless oxidation. However, if discoloration appears throughout the jar or looks unusual, the jar may not have sealed properly. Discard any jars with signs of spoilage like mold, unusual odors, or leaking seals.

Storage and Shelf Life
Store your canned peaches in a cool, dark place like a basement, pantry, or cupboard. Ideal storage temperatures remain between 50°F and 70°F. Avoid storing near heat sources, sunlight, or areas subject to temperature fluctuations. Properly canned peaches remain safe and delicious for 12 to 18 months, though quality gradually declines after the first year.
Check seals before storing by pressing the center of each lid. It should be slightly concave and not flex up and down. Label jars with the contents and canning date using a permanent marker or adhesive labels. This practice helps you rotate stock and use older jars first.
When opening a jar, listen for the distinctive “pop” sound indicating the seal was intact. If a jar didn’t seal properly or shows any signs of spoilage—unusual odors, mold, cloudiness, or leaking—discard it immediately without tasting. The risks of foodborne illness aren’t worth the loss of one jar.
FAQ
Can I can peaches without added sugar?
Yes, you can can peaches in water or juice. However, sugar acts as a preservative and helps maintain texture and color. Unsweetened peaches are safe if processed correctly but may have softer texture and less vibrant color after storage. Use the same processing times as syrup-packed peaches.
What’s the difference between halves and sliced peaches?
Halves maintain their shape better and look more attractive in jars, making them ideal for gift-giving or formal presentations. Sliced peaches are more convenient for baking, smoothies, and quick use. Both process safely using identical methods and timing.
Can I add spices like cinnamon or nutmeg to my canned peaches?
Absolutely. Spices can be added to the syrup before heating. Use whole spices rather than ground for clearer syrup, and strain before filling jars if you prefer. Popular additions include cinnamon sticks, whole cloves, fresh ginger, and vanilla beans. Spices don’t change processing time or safety considerations.
How do I know if my canned peaches have gone bad?
Signs of spoilage include visible mold, unusual odors when opening the jar, cloudiness throughout the product, or leaking seals. If you notice any of these signs, discard the entire jar without tasting. Safe canned peaches maintain their color, smell fresh and peachy, and have an intact seal.
Can I reuse canning lids?
No, the flat portion of two-piece lids cannot be reused. The sealing compound is designed for single use only. Reusing lids significantly increases the risk of seal failure and spoilage. However, the threaded bands can be reused indefinitely if they’re not bent or damaged.
What should I do if I’m at high altitude?
At elevations above 1,000 feet, water boils at lower temperatures, requiring longer processing times to ensure safety. Consult altitude-specific charts from reliable sources. For example, at 3,000 feet elevation, you might need to add 5 minutes to processing time for water bath canning. Pressure canning requires PSI adjustments rather than time increases.
Can I can peaches in a slow cooker or instant pot?
These methods aren’t recommended for home canning peaches. Proper water bath and pressure canners are specifically designed to maintain accurate temperatures and processing conditions necessary for food safety. Using alternative equipment increases the risk of inadequate processing and potential foodborne illness.
How much yield can I expect from fresh peaches?
Typically, 2 to 2.5 pounds of fresh peaches yield one quart jar of canned peaches. A bushel of peaches (about 48 pounds) produces approximately 18 to 24 quart jars, depending on the peach variety and how densely you pack them.
Related Posts

Superscript in Google Docs: Expert Tips

Strikethrough in Excel: Easy Steps for Beginners
