
How to Blanch Green Beans: Expert Guide
How to Blanch Green Beans: Expert Guide
Blanching green beans is one of those cooking techniques that sounds more intimidating than it actually is. Whether you’re prepping vegetables for a dinner party, preserving your garden harvest, or simply trying to nail that perfect crisp-tender texture, understanding the blanching process transforms how you approach vegetable cooking. The beauty of blanching lies in its simplicity: a quick plunge into boiling water followed by an ice bath stops the cooking process and locks in vibrant color, fresh flavor, and optimal texture.
What makes blanching so valuable isn’t just about achieving restaurant-quality results at home. This technique serves multiple purposes—it halts enzyme activity that causes nutrient loss and color fading, it softens vegetables slightly for easier freezing, and it removes surface dirt and pesticides. If you’ve ever wondered why your green beans sometimes turn an unappetizing olive-gray color or lose their snap, blanching is likely the missing piece in your kitchen arsenal.
This guide walks you through everything you need to know about blanching green beans, from selecting the right beans to nailing the timing and beyond. By the end, you’ll have a foolproof method that delivers consistently excellent results.
What Is Blanching and Why It Matters
Blanching is a two-step cooking technique where vegetables are briefly immersed in rapidly boiling water, then immediately transferred to ice-cold water to stop the cooking process. This method has been used in professional kitchens and by home cooks for decades because it delivers remarkable results with minimal effort.
The science behind blanching is actually quite fascinating. When you expose green beans to high heat for just the right amount of time, several things happen simultaneously. The heat breaks down the cell walls slightly, making the beans more tender while maintaining their structural integrity. Chlorophyll, the compound responsible for the green color, becomes more vibrant as the heat deactivates acids that normally dull it. At the same time, enzymes that cause browning, softening, and nutrient degradation are inactivated, essentially hitting a pause button on the aging process.
Beyond the science, blanching offers practical advantages. If you’re planning to boil green beans for a specific dish, blanching first gives you better control over the final texture. For those who freeze vegetables, blanching is essential—it preserves color, flavor, and nutritional value far better than raw freezing. Many professional chefs blanch vegetables before sautéing or roasting them because it ensures even cooking and perfect texture throughout.
Selecting and Preparing Your Green Beans
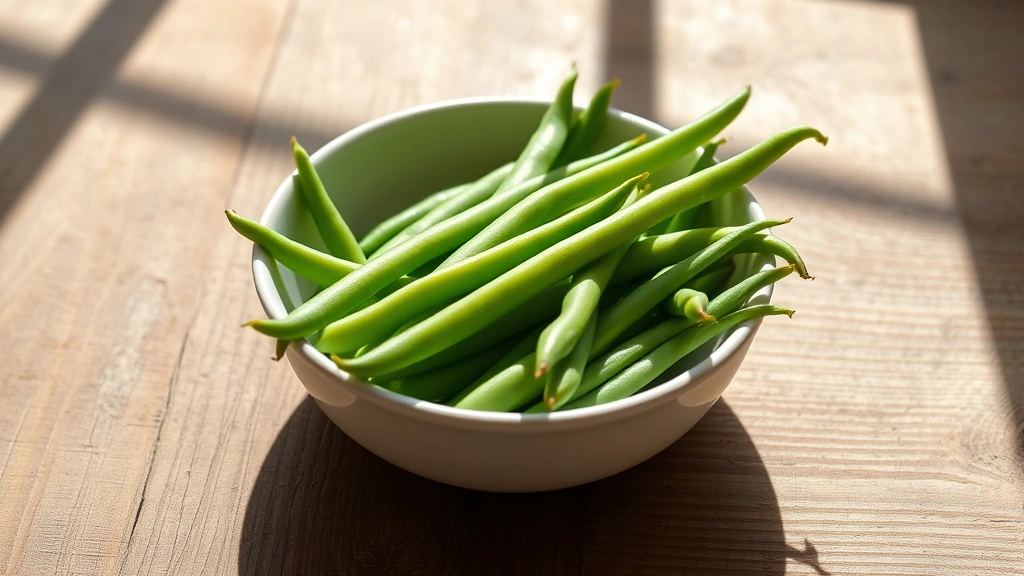
The quality of your final dish begins at the farmers market or grocery store. Choose green beans that are bright green, firm to the touch, and snap cleanly when bent. Avoid beans that are limp, discolored, or have soft spots. The best beans are relatively uniform in size—this ensures they’ll blanch evenly without some becoming mushy while others remain undercooked.
Fresh, younger beans blanch more successfully than older, larger beans. If you’re shopping at a farmers market, don’t hesitate to ask the grower when the beans were picked. Beans harvested within the last day or two will deliver superior results compared to those that have been sitting for a week. Seasonal timing matters too—peak green bean season typically runs from June through September, depending on your location.
Preparation is straightforward but shouldn’t be rushed. Rinse your beans thoroughly under cool running water, rubbing them gently to remove any dirt or debris. Using a clean kitchen towel or paper towels, pat them completely dry. Moisture on the surface can cause splattering when the beans hit the boiling water and can dilute your blanching liquid. Trim the stem ends with a sharp knife, and remove any beans with blemishes. You don’t need to remove the pointed tip end unless you prefer that aesthetic.
Grouping beans by size before blanching is a pro tip worth implementing. If you have a mix of thin, medium, and thick beans, blanch them separately in batches. Thin beans might need only 2-3 minutes, while thicker ones could require 4-5 minutes. Taking this extra step ensures every bean reaches that ideal tender-crisp state rather than having some overcooked and others undercooked.
Essential Equipment and Setup
You don’t need fancy gadgets to blanch green beans successfully, but having the right tools makes the process smoother and safer. A large stainless steel pot is your primary vessel—ideally one that holds at least 4-5 quarts of water. The pot should be tall enough that water doesn’t splash when you add beans, and wide enough to allow beans to spread out without overcrowding.
A slotted spoon or spider strainer is invaluable for transferring beans between the pot and ice bath. These tools allow water to drain away while keeping the beans secure. If you don’t have a spider strainer, a colander works, though you’ll need to be more careful transferring hot beans. A kitchen timer is non-negotiable—even 30 seconds of extra cooking time can shift the texture from perfect to disappointing.
For the ice bath, you’ll need a large bowl or another pot filled with ice and cold water. A 1:1 ratio of ice to water works well. Some people add a pinch of salt to the ice bath, which lowers the temperature slightly and can help maintain bean color. Keep paper towels nearby for draining blanched beans before storage or serving.
Optional but helpful: a thermometer ensures your water maintains a rolling boil (212°F at sea level), and a cutting board dedicated to vegetable prep keeps your workspace organized. If you’re blanching large quantities, having two ice baths ready—one for active cooling and one as backup—prevents the first bath from warming up too quickly.
Step-by-Step Blanching Process
Step 1: Bring Water to a Rolling Boil
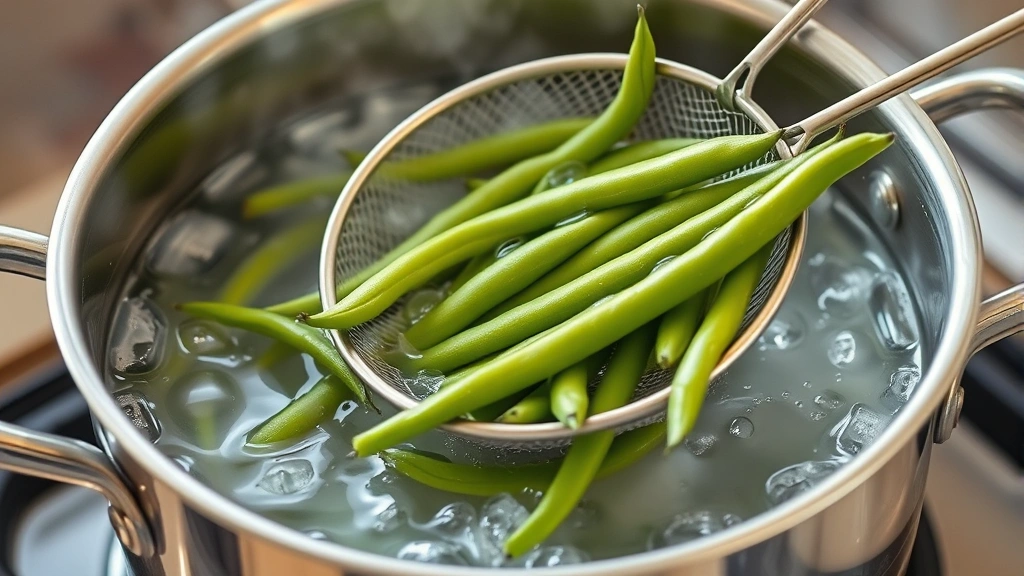
Fill your large pot with enough water to cover the beans by about 2 inches. For most batches, this means 4-6 quarts of water depending on your bean quantity. Bring the water to a vigorous, rolling boil over high heat. This is important—a gentle simmer won’t achieve the same results. The intense heat is what deactivates enzymes and sets the color. Many home cooks underestimate how hot the water needs to be; if you see only occasional bubbles, it’s not hot enough.
Some chefs add salt to the blanching water, using about 1-2 tablespoons per gallon. Salt raises the boiling point slightly and enhances the beans’ natural flavor. It’s optional but recommended if you have the salt on hand.
Step 2: Add Beans Carefully
Once the water reaches a full rolling boil, carefully add your prepared beans. Adding cold beans to boiling water causes the temperature to drop temporarily—this is normal. The key is to add beans in a way that minimizes splattering. Gently lower them into the water rather than dumping them all at once. If you’re working with a large batch, you might need to add them in stages to maintain the water temperature.
Stir the beans occasionally during blanching to ensure even exposure to the hot water. This prevents beans from clumping together or sticking to the pot bottom. Keep the water at a boil throughout the blanching time—if it drops below a boil, add a few more seconds to your total blanching time.
Step 3: Monitor Time Carefully
This is where precision matters most. Set your timer the moment the beans hit the water, and don’t rely on memory or guessing. Blanching times vary based on bean thickness and personal preference for texture, but most green beans need 3-5 minutes. If you’re unsure of your beans’ thickness, start with 3 minutes and adjust in future batches based on results.
Step 4: Remove and Shock in Ice Bath
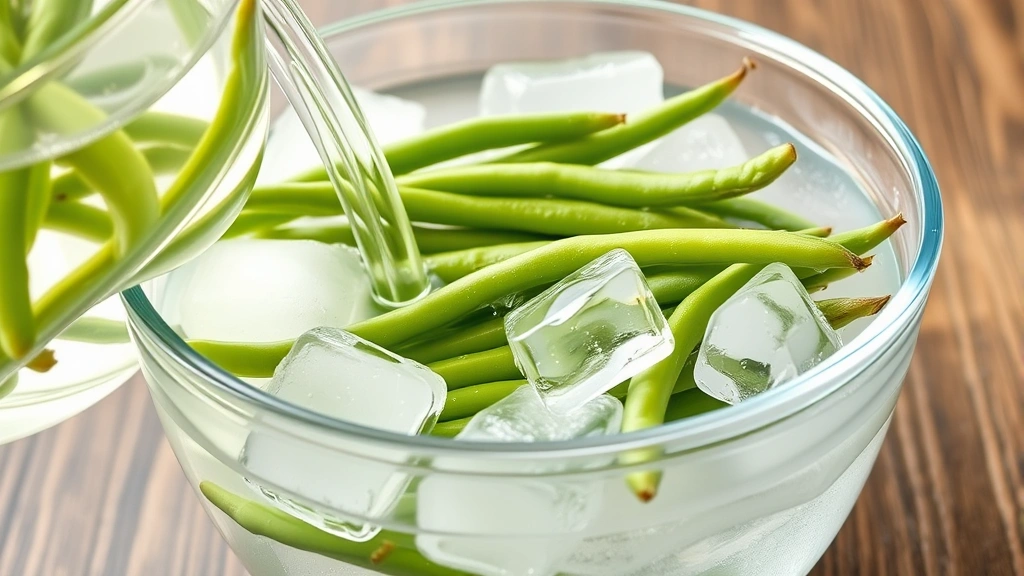
When your timer sounds, immediately remove the beans using a slotted spoon or spider strainer. Transfer them directly into your prepared ice bath. This step is crucial—it stops the cooking process instantly, preventing the beans from becoming mushy. The temperature shock is what preserves that ideal tender-crisp texture and locks in the vibrant green color.
Leave the beans in the ice bath for the same amount of time they spent in boiling water. So if you blanched for 4 minutes, leave them in ice water for approximately 4 minutes. This ensures they’re cooled completely throughout, not just on the surface.
Step 5: Drain and Dry
Once cooled, transfer the beans to a colander and let them drain thoroughly. Spread them on clean kitchen towels or paper towels and pat them dry. Removing excess moisture is important if you’re planning to freeze the beans or use them in dishes where extra water would be problematic.
Timing Guide for Perfect Results
Achieving the ideal texture requires understanding how different bean sizes respond to blanching time. These guidelines assume a rolling boil and standard green bean varieties:
Thin Green Beans (pencil-thin): 2-3 minutes. These delicate beans cook quickly and can become mushy if over-blanched. Check at the 2-minute mark and taste for doneness.
Medium Green Beans (standard size): 3-4 minutes. This is the most common size you’ll encounter and represents the baseline for most recipes.
Thick Green Beans (1/2 inch or larger): 4-5 minutes. Larger beans need extra time for heat to penetrate the center while maintaining the outer texture.
French-Style Haricots Verts (very thin): 1-2 minutes. These premium beans are delicate and can become overcooked quickly. Start with just 1 minute if you prefer maximum crispness.
When comparing this to steaming broccoli or roasting broccoli at 400 degrees, you’ll notice blanching times are significantly shorter. This is because the intense direct heat of boiling water works faster than steam or dry heat.
To test for doneness without relying solely on time, remove a single bean at the minimum time, cool it briefly, and taste it. You’re aiming for a texture that’s tender but still has a slight resistance when you bite down—not mushy, but not raw either. This texture preference is personal, so adjust future batches based on your results.
The Ice Bath: Your Secret Weapon
The ice bath is where blanching magic happens. Many home cooks skip this step or rush through it, but it’s absolutely essential for achieving professional results. The ice bath serves multiple critical functions that can’t be replicated by simply letting beans cool at room temperature.
When you plunge hot beans into ice water, the dramatic temperature drop immediately halts all enzyme activity and stops the cooking process. This is why ice baths are non-negotiable—leaving beans in the hot water for even an extra 30 seconds continues cooking and can turn a perfect texture into mush. Room temperature water won’t work because it cools too slowly and allows cooking to continue.
The ice bath also preserves the beans’ vibrant green color by preventing the breakdown of chlorophyll. If you skip this step and let beans cool gradually, they’ll develop that dull olive-gray color associated with overcooked vegetables. The rapid cooling maintains the bright, fresh appearance that makes blanched vegetables so visually appealing.
Prepare your ice bath before you start blanching. Fill a large bowl or pot with ice and cold water in a 1:1 ratio. If you’re working with a large quantity of beans, prepare two ice baths so the first one doesn’t warm up too much before you finish blanching all your batches. Some water will naturally melt from the ice during the process—this is normal and fine.
For extra-cold baths, you can use ice plus a small handful of salt, which lowers the freezing point and creates an even colder environment. However, regular ice and water works perfectly well for home cooking purposes.
Storage and Preservation Tips
Once your beans are blanched and cooled, you have several storage options depending on your intended use. If you’re serving them immediately, store cooled beans in the refrigerator in an airtight container for up to 3 days. They’ll maintain their texture and color better than raw beans during this period.
For longer-term storage, freezing is your best option. Pat blanched beans completely dry with paper towels, then spread them in a single layer on a baking sheet. Freeze for 2-3 hours until solid, then transfer to freezer bags or airtight containers. Frozen blanched beans keep for 8-12 months and maintain excellent quality. The blanching step is crucial for frozen beans—raw frozen beans develop off-flavors and poor texture over time.
When using frozen blanched beans, you can add them directly to dishes without thawing. They’ve already been partially cooked, so they’ll finish cooking quickly in soups, stir-fries, or side dishes. If you’re unsure about proper storage methods for other vegetables, blanching is particularly valuable for items you want to preserve.
If you’re preparing beans for a specific dish like seasoning salmon with vegetable sides, blanch them a few hours ahead of time. Store them in the refrigerator on paper towels, and they’ll be ready to quickly finish cooking when you’re ready to plate.
Some cooks prefer to blanch beans and store them in a light olive oil with herbs like garlic and thyme. This creates a semi-prepared side dish that’s ready for quick reheating. Store these in the refrigerator and use within 5 days.
Common Mistakes to Avoid
Mistake 1: Water Isn’t Hot Enough
The most common error is starting with water that’s not at a rolling boil. A gentle simmer won’t properly deactivate enzymes or set the color. Always wait for vigorous, continuous boiling before adding beans.
Mistake 2: Overcrowding the Pot
Adding too many beans at once causes the water temperature to drop significantly and prolongs cooking time. Work in batches if necessary. A good rule is to add beans in a single layer without excessive crowding.
Mistake 3: Skipping or Rushing the Ice Bath
Letting beans cool at room temperature or using warm water instead of ice water ruins all your careful work. The ice bath is non-negotiable for stopping the cooking process and maintaining color and texture.
Mistake 4: Incorrect Timing
Blanching for too long is the second most common mistake. Even an extra minute can mean the difference between crisp-tender and mushy. Use a timer and stick to it religiously.
Mistake 5: Not Drying Beans Before Storage
Excess moisture leads to ice crystals during freezing and can cause texture degradation. Always pat beans dry with paper towels before storing or freezing.
Mistake 6: Using Poor-Quality Beans
Starting with limp or old beans means you’re fighting an uphill battle. Blanching can’t transform low-quality beans into excellent ones. Invest in fresh, firm beans for the best results.
Mistake 7: Forgetting About Salt in Blanching Water
While optional, adding salt to blanching water enhances flavor and can help set color. Skip it if you prefer, but it’s a simple step that improves results.
Frequently Asked Questions
Can I blanch green beans without an ice bath?
Technically yes, but you’ll lose significant quality. The ice bath stops cooking instantly and preserves color and texture. Without it, beans continue cooking and develop that unappetizing olive-gray color. If you absolutely must skip the ice bath, use the coldest tap water available and change it frequently, though results won’t match the ice bath method.
How do I know when green beans are done blanching?
The beans should be tender but still slightly crisp when you bite down. Remove a test bean at the minimum recommended time, cool it quickly in cold water, and taste it. You’re aiming for tender-crisp, not soft or mushy. Adjust future batches based on your preference.
Can I reuse blanching water?
Yes, you can reuse blanching water for multiple batches if it remains at a rolling boil. However, water that’s been used for several batches may contain more starch and debris. For the best results, especially if working with large quantities, refresh the water every 3-4 batches.
What’s the difference between blanching and parboiling?
Blanching uses very brief cooking times (usually 2-5 minutes) followed by immediate ice bath cooling. Parboiling cooks vegetables longer—typically 10-15 minutes—and may not always include an ice bath. Blanching is gentler and better for preserving texture and color, while parboiling partially cooks vegetables for later finishing.
Can I blanch green beans in advance?
Yes, blanch them up to 3 days ahead and store in the refrigerator in an airtight container. They’re also excellent candidates for freezing. If blanching for later use, make sure they’re completely cooled and dried before storage.
Why did my green beans turn gray after blanching?
Gray or olive-colored beans result from inadequate or skipped ice bath cooling. When beans cool slowly, chlorophyll breaks down and oxidizes, creating that dull color. Always use an ice bath immediately after blanching to preserve the vibrant green color.
How much water do I need for blanching?
Use enough water to cover the beans by about 2 inches. For most home cooking, 4-6 quarts works well. More water helps maintain boiling temperature when you add cool beans, so err on the side of more rather than less.
Can I blanch other vegetables using the same method?
Yes, blanching works for broccoli, cauliflower, carrots, peas, and many other vegetables. Timing varies by vegetable and size, so research specific blanching times for each variety. The basic technique—boiling water, brief cooking, ice bath—remains the same.
Related Posts

How Long to Boil Lobster Tails: Cooking Guide

How Long to Fly from New York to London? Travel Times
