
Fix a Wall Hole? Expert Tips for Beginners
How to Fix a Hole in the Wall: Expert Tips for Beginners
Wall holes are one of the most common household issues homeowners face, whether from accidental impacts, nail holes, or general wear and tear. The good news? Most wall damage is completely fixable with basic tools and materials you can find at any home improvement store. Whether you’re dealing with a small nail hole or a larger dent, this comprehensive guide will walk you through every step of the repair process.
Knowing how to fix a hole in the wall is an essential DIY skill that saves money and keeps your home looking pristine. Rather than calling an expensive contractor, you can tackle these repairs yourself in just a few hours. From preparation to finishing touches, we’ll cover professional techniques that work for beginners and experienced DIYers alike.
Types of Wall Holes and Damage
Before you start any repair, it’s important to identify what type of damage you’re dealing with. Different holes require different repair approaches, and using the wrong method can result in a sloppy finish. Wall damage generally falls into several categories based on size and cause.
Small nail holes are the tiniest type of damage, typically less than 1/8 inch in diameter. These come from picture hangers, nails, or pushpins and are barely noticeable but still deserve attention for a polished look. Medium holes range from 1/8 inch to 6 inches and might result from doorknob impacts, furniture moving, or installation mistakes. Large holes exceed 6 inches and require more substantial repairs, often necessitating patch materials and reinforcement.
You might also encounter dents and dings that don’t break through the drywall surface, or corner damage where walls meet at angles. Each type of damage has specific repair techniques that work best. Understanding your wall material also matters—drywall is the most common material in modern homes, but older properties might have plaster or other surfaces requiring different approaches.
Tools and Materials You’ll Need
Gathering the right supplies before starting your repair ensures smooth progress and professional results. You don’t need expensive equipment; most items are inexpensive and useful for future projects. Here’s what you should have on hand:
- Spackling compound or joint compound – The primary filler material for small to medium holes
- Putty knife – A 2-3 inch knife for small holes, 6-12 inch for larger repairs
- Sandpaper – 120-grit and 220-grit for smoothing dried compound
- Primer – Essential for proper paint adhesion and coverage
- Paint – Match your wall color exactly for seamless repairs
- Drywall patch kit – For holes larger than 6 inches
- Utility knife – For cutting drywall and shaping holes
- Fiberglass mesh tape – Reinforcement for medium and large repairs
- Drop cloth – Protection for floors and furniture from dust and paint
- Sanding block – For even, controlled sanding of dried compound
Visit your local home improvement retailer like Home Depot or Lowe’s to find these materials. Most are inexpensive, and you’ll use them for future repairs. Having a well-stocked repair kit saves time when new damage inevitably occurs.
How to Fix Small Nail Holes
Small nail holes are the easiest wall repairs and require minimal materials. These tiny blemishes are quick fixes that take just 30 minutes from start to finish, including drying time. This is the perfect starting point for beginner DIYers building confidence.
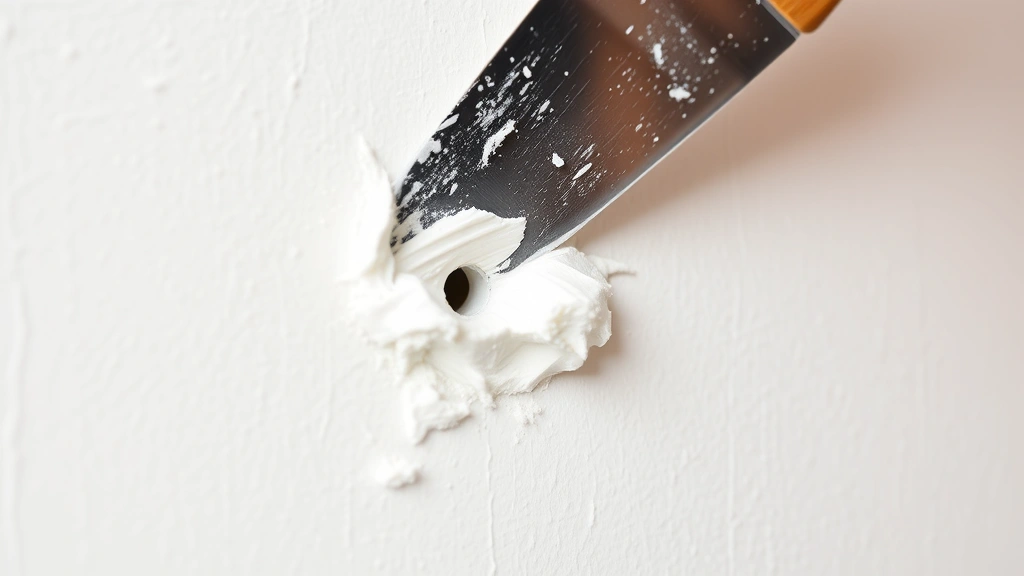
Step 1: Clean the hole – Use a dry cloth or soft brush to remove any loose debris, paint chips, or dust from inside the hole. This helps the spackling compound adhere properly. For extremely small holes, you might skip this step entirely.
Step 2: Apply spackling compound – Load a small amount of spackling compound onto your putty knife. Press the compound firmly into the hole, slightly overfilling it. Use a smooth, downward motion to pack the material in completely. The compound will shrink slightly as it dries, so overfilling ensures a flush finish.
Step 3: Smooth the surface – Wipe your putty knife across the hole horizontally to remove excess compound and create a smooth surface level with the surrounding wall. A single smooth pass works better than multiple passes, which can create ridges.
Step 4: Allow drying time – Most spackling compounds dry in 1-2 hours, though some fast-setting varieties dry in 20 minutes. Check the product instructions for specific timing. Resist the urge to sand or paint before complete drying.
Step 5: Sand lightly – Once completely dry, use 220-grit sandpaper to gently smooth any rough edges. Light pressure is all you need—aggressive sanding can create divots or expose the underlying wall.
Step 6: Paint – Apply primer and paint matching your wall color. For very small holes, you might skip primer and apply paint directly, but primer ensures better coverage and color matching, especially on darker walls.
Repairing Medium-Sized Holes
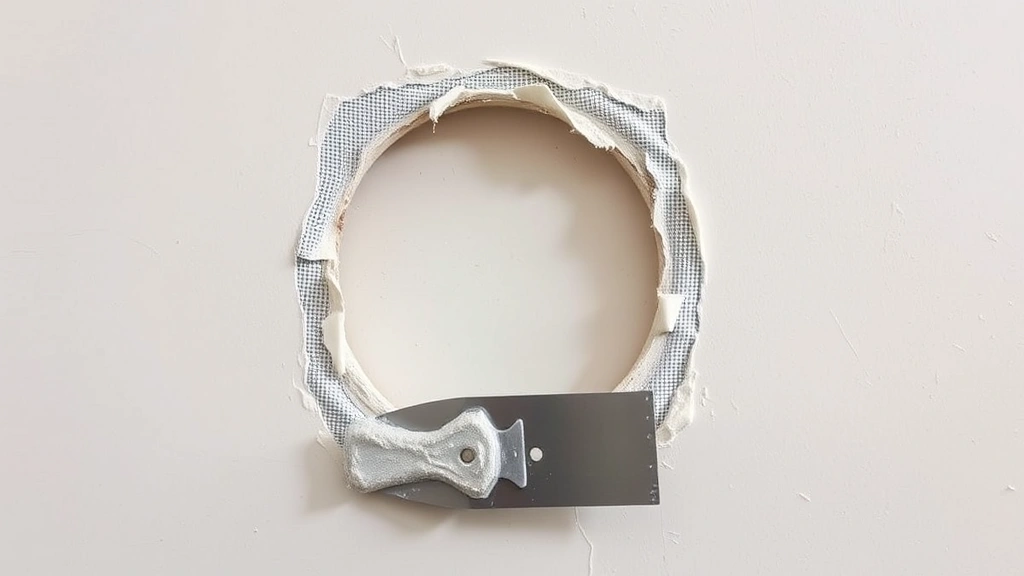
Medium holes require more patience and technique than small repairs, but the process is still manageable for beginners. These 1-inch to 6-inch holes benefit from fiberglass mesh tape reinforcement, which prevents compound from cracking as it dries. The mesh distributes stress across a larger area, creating more durable repairs.
Step 1: Clean and prepare the hole – Remove loose debris using a utility knife to scrape away any torn paper or loose drywall. For ragged edges, carefully cut away damaged material to create a clean perimeter. The hole should have defined edges rather than frayed borders.
Step 2: Apply fiberglass mesh tape – Center the self-adhesive mesh over the hole, pressing firmly to ensure good adhesion. The mesh provides structural support and prevents the compound from sinking into the hole. Smooth out any wrinkles or bubbles by running your putty knife over the tape.
Step 3: First coat of compound – Apply a thin layer of joint compound over the mesh, covering it completely. Use a 6-inch putty knife for even application. This first coat should be thin—thicker is not better and leads to longer drying times and more sanding.
Step 4: Second coat application – After the first coat dries (usually 24 hours), apply a second, slightly wider coat extending 2-3 inches beyond the first coat. This feathering technique helps blend the repair into the surrounding wall. Smooth this coat carefully for a professional appearance.
Step 5: Third coat if needed – Larger repairs often benefit from a third thin coat after the second dries. Each successive coat should extend slightly further, creating a gradual transition between the patch and the surrounding wall. This feathering is the key to invisible repairs.
Step 6: Sand thoroughly – Once completely dry, sand with 120-grit paper first to remove major imperfections, then finish with 220-grit for a smooth surface. Sand in circular motions, checking frequently to avoid over-sanding one area.
Step 7: Prime and paint – Apply primer to seal the compound and ensure even paint coverage. Two coats of paint usually provide complete coverage, especially if you’re matching an existing color.
Fixing Large Wall Damage
Large holes exceeding 6 inches require patching with actual drywall material rather than just compound. This method is more involved but creates stronger, more permanent repairs. This Old House provides excellent guidance on drywall patching, offering professional techniques adapted for home use.
Step 1: Cut a clean opening – Use a utility knife to square off the damaged area, cutting away all loose or damaged drywall. Create a rectangular opening rather than working around the irregular damage. Straight edges are much easier to patch than curved or jagged borders.
Step 2: Measure and cut the patch – Measure the opening precisely and cut a drywall patch slightly smaller than the hole. Test-fit the patch to ensure it fits snugly without forcing. A tight fit prevents gaps that require extra compound.
Step 3: Secure the patch – For small patches, you can use drywall screws driven through the patch into the surrounding drywall studs. For patches without stud support, use a drywall repair kit with backing boards that bridge the hole and provide support for the patch.
Step 4: Tape the seams – Apply fiberglass mesh tape over all seams where the patch meets the surrounding drywall. Press firmly to ensure good adhesion. Smooth out any bubbles or wrinkles.
Step 5: Multiple compound coats – Apply three or four thin coats of joint compound, allowing proper drying time between coats. Each coat should extend slightly further than the previous one, feathering the edges for a seamless blend.
Step 6: Sand and finish – After complete drying, sand progressively with 120-grit and then 220-grit paper. Prime thoroughly and apply two coats of paint matched to your wall color.
Sanding, Priming, and Painting
The finishing steps determine whether your repair looks professional or amateur. Many DIYers rush through sanding and painting, resulting in visible patches. Taking time with these final steps ensures your repair disappears seamlessly into the surrounding wall.
Proper sanding technique is crucial for invisible repairs. Use a sanding block rather than sanding by hand, which creates uneven pressure and divots. Sand in circular motions with light to medium pressure. Aggressive sanding removes too much compound and creates work for additional coats. Between each sanding, wipe away dust with a damp cloth before applying the next compound coat.
Primer selection matters more than many homeowners realize. Quality primer provides better adhesion, coverage, and stain-blocking than cheap alternatives. For repairs over spackling compound, use a primer specifically formulated for drywall and patching. Family Handyman offers detailed guidance on primer and paint selection, helping you choose products that work best for wall repairs.
Paint color matching requires careful attention, especially on older walls where paint has faded. Bring a paint chip from your wall to the store and test it on the actual wall under natural and artificial light before committing. Some stores offer color-matching services using spectrophotometers for precise matches. Two coats of quality paint provide better coverage than three coats of cheap paint.
Common Mistakes to Avoid
Learning from others’ mistakes saves time and frustration. These common errors undermine otherwise good repair efforts:
- Overfilling with compound – While some overfill is necessary, excessive compound requires more sanding and multiple coats to level properly. Use just enough to slightly overfill, then smooth carefully.
- Skipping primer – Primer is not optional for good results. It seals the compound, provides adhesion for paint, and ensures even color coverage. Skipping primer wastes money on extra paint coats.
- Painting before complete drying – Rushing to paint before compound fully dries traps moisture, leading to bubbling, cracking, and peeling paint. Follow product instructions for minimum drying times.
- Using too much fiberglass tape – While reinforcement is important, overlapping tape excessively creates thick, visible lines. Use one layer of tape, pressing firmly for good adhesion.
- Improper sanding pressure – Too much pressure creates divots requiring additional compound; too little leaves the surface rough. Use light to medium pressure with a sanding block for best results.
- Inadequate surface preparation – Failing to clean holes or remove loose debris prevents compound adhesion and causes repairs to fail. Spend time preparing the surface properly.
- Wrong compound type – Fast-setting compound hardens quickly but is harder to sand; all-purpose compound takes longer to dry but sands more easily. Choose based on your timeline and experience level.
Avoiding these mistakes significantly improves your results. Many experienced DIYers still use these techniques because they work reliably. Your first repair might not be perfect, but each subsequent repair becomes easier as you develop the feel for proper compound consistency and application technique.
FAQ
What’s the best compound for wall hole repairs?
All-purpose joint compound works well for most DIY repairs because it sands easily and provides good workability. Fast-setting compound dries quickly but is harder to sand. For beginners, all-purpose compound is the better choice. Spackling compound works for small holes but isn’t ideal for larger repairs.
How long does spackling compound take to dry?
Standard spackling compound typically dries in 1-2 hours, though this varies by brand, temperature, and humidity. Fast-setting varieties dry in 20-30 minutes. Check the specific product instructions for accurate timing. Cooler temperatures and higher humidity extend drying time significantly.
Can I paint over spackling compound without primer?
While you can paint directly over compound, primer provides better adhesion and coverage. Primer seals the porous compound surface and prevents paint from being absorbed unevenly, which causes blotchy appearance. Using primer ensures professional-looking results, especially on darker wall colors.
What should I do if my repair still shows after painting?
Visible repairs usually result from inadequate feathering, improper sanding, or paint color mismatch. Sand the area lightly and apply another coat of compound extending further from the center. After drying and sanding, apply primer and additional paint coats. Multiple thin coats work better than one thick coat.
Is drywall patching difficult for beginners?
Drywall patching requires more skill than spackling small holes but is definitely manageable for beginners. The key is taking time with compound application, allowing proper drying between coats, and sanding thoroughly. Your first large patch might not be perfect, but you’ll develop better technique with practice. Visit FixWiseHub Blog for more how-to guides to build your DIY skills progressively.
What tools do I absolutely need to start?
At minimum, you need a putty knife, spackling compound, sandpaper, and paint. A sanding block improves results significantly. For larger repairs, add fiberglass tape and a utility knife to your toolkit. Most of these items cost less than $20 total, making wall repair one of the most affordable DIY projects.
How do I match my wall paint color exactly?
Bring a paint chip from your wall to the store and compare it under different lighting conditions. Many stores offer color-matching services using spectrophotometers for precise matches. Test the paint on your wall before committing—what looks right in the store might look different at home due to lighting variations.
Related Posts

Superscript in Google Docs: Expert Tips

Strikethrough in Excel: Easy Steps for Beginners
