
How to Plug a Tire? Expert Tips Inside
How to Plug a Tire: Expert Tips and Step-by-Step Guide
A flat tire can ruin your day, but the good news is that many tire punctures can be repaired quickly and affordably without replacing the entire tire. Learning how to plug a tire is an essential skill for any vehicle owner, whether you’re dealing with a nail, screw, or small puncture on the road. This comprehensive guide will walk you through the process, from identifying the damage to successfully sealing the leak.
Tire plugging is a temporary to semi-permanent solution that works best for punctures in the tread area of the tire. Unlike patching, which requires tire removal and is done from the inside, plugging can be performed roadside or at home with minimal tools. Understanding when to plug, how to do it correctly, and when to seek professional help will save you time, money, and frustration.
When to Plug vs. Replace Your Tire
Not every flat tire warrants a plug repair. Understanding when plugging is appropriate and when you need a replacement is crucial for your safety. Tire plugs work best for punctures smaller than 1/4 inch in diameter located in the tread area of the tire. If the damage is on the sidewall, near the edge, or if the puncture is larger than 1/4 inch, plugging is not recommended and you should replace the tire.
According to Family Handyman, tire plugs are considered a temporary repair by the tire industry, though many drivers successfully use them long-term. For a more permanent solution, This Old House experts recommend professional patching from the inside, which combines a patch and plug for maximum durability.
Additionally, if your tire has multiple punctures, is excessively worn, or shows signs of damage beyond the puncture, replacement is the safer option. Check your tire’s tread depth using the penny test: insert a penny into the tread with Lincoln’s head upside down. If you can see the top of his head, the tread is too worn and the tire should be replaced regardless of the puncture.
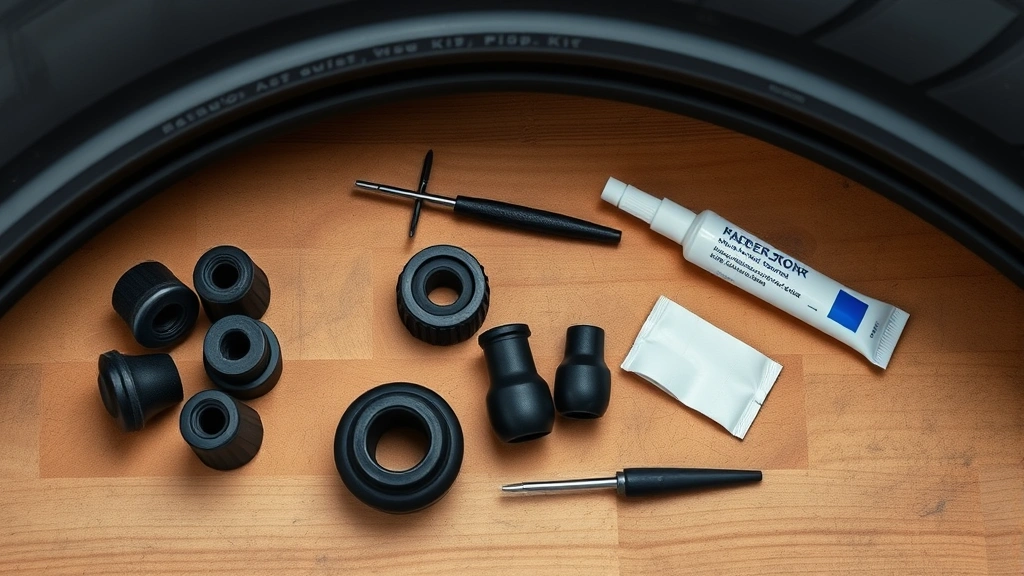
Tools and Materials You’ll Need
Before attempting to plug a tire, gather all necessary materials to ensure a smooth process. Having everything ready prevents frustration and ensures you complete the repair correctly.
- Tire plug kit – Available at automotive retailers and online, typically costing $5-$15
- Tire pressure gauge – To monitor pressure during and after repair
- Air pump or compressor – Portable or stationary to reinflate the tire
- Pliers or tweezers – For handling the rubber plug
- Reamer tool – Usually included in plug kits to clean the puncture
- Rubber cement or adhesive – Comes with most tire plug kits
- Knife or cutting tool – To trim excess plug material
- Flashlight – Helpful for locating the puncture
- Bucket of soapy water – To identify the leak location
- Jack and jack stands – If you need to lift the vehicle
Most automotive stores sell complete tire plug kits that include the reamer, adhesive, and pre-glued plugs. These kits are inexpensive and worth keeping in your vehicle for emergencies. Brands available at major retailers like AutoZone and NAPA typically include everything you need for a successful repair.
Step-by-Step Tire Plugging Process
The tire plugging process is straightforward when you follow each step carefully. This method works for most small punctures and can be completed in 15-30 minutes with practice.
- Locate the puncture – Use the soapy water method by spraying the tire surface and looking for bubbles that indicate the leak location
- Mark the hole – Mark the puncture with chalk or a marker for easy identification
- Deflate the tire partially – You don’t need to remove all air, just enough to work comfortably
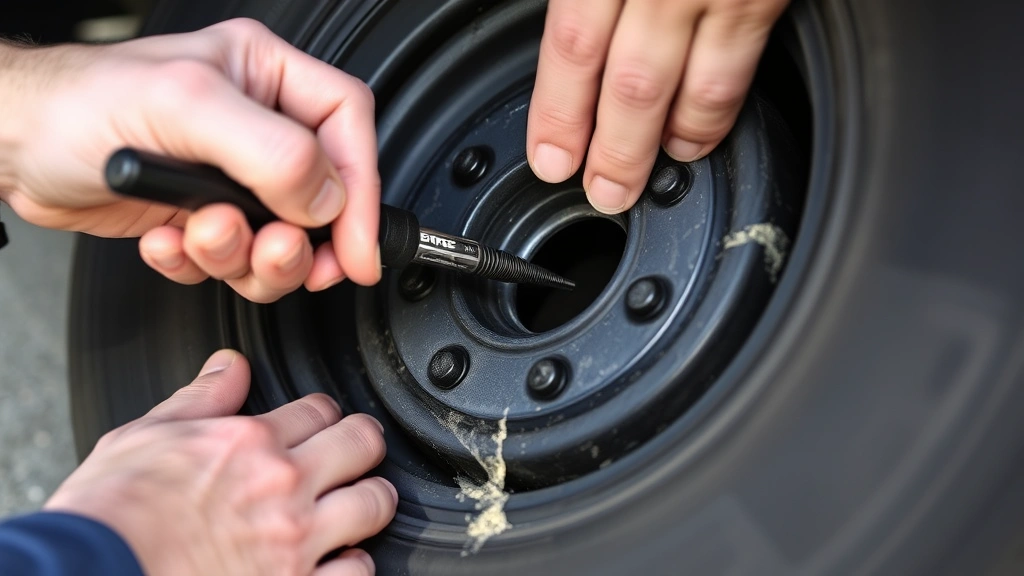
- Clean the puncture area – Use the reamer tool from your kit in a twisting motion to clean and roughen the hole
- Apply adhesive – If your kit includes separate adhesive, apply it to the reamed hole
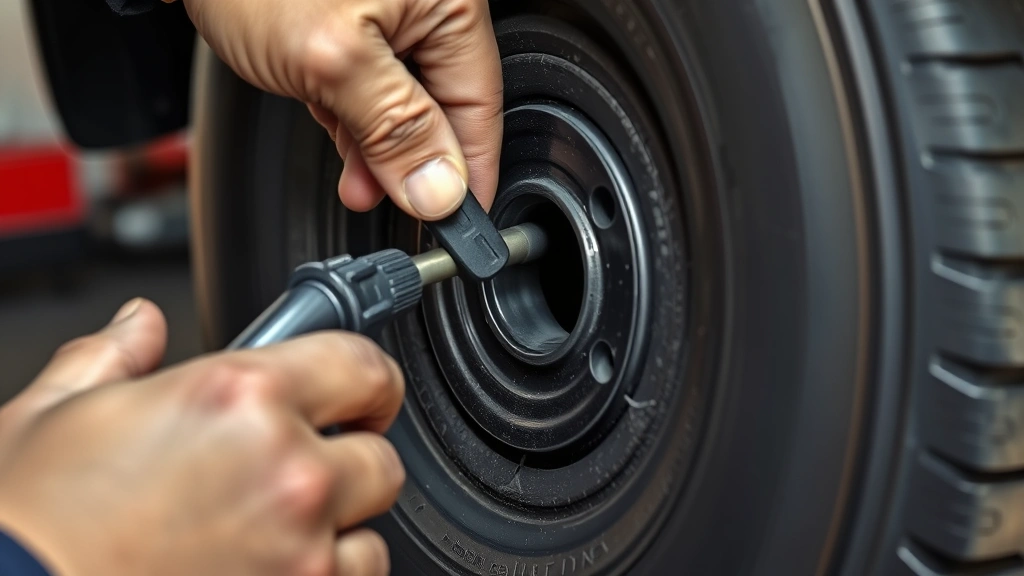
- Insert the plug – Push the rubber plug into the hole using the reamer or insertion tool
- Trim excess material – Cut the protruding plug material flush with the tire surface
- Reinflate the tire – Use your air pump to restore proper tire pressure
- Check for leaks – Spray soapy water again to confirm the repair sealed properly
Locating and Preparing the Puncture
Finding the puncture is the first critical step in the repair process. If the tire is completely flat, you’ll need to partially inflate it first. Most punctures from nails or screws are obvious, but small holes can be tricky to locate.
The soapy water method is the most reliable technique for finding leaks. Mix water with dish soap in a spray bottle and coat the entire tire surface. Watch for bubbles forming, which indicate escaping air. Mark the puncture location clearly with chalk or a permanent marker. This becomes especially important if you’re working in dim lighting conditions.
Once you’ve located the puncture, examine it carefully. Look at the angle and depth of the hole. If the object that caused the damage is still embedded, remove it carefully. Note the puncture’s location relative to the tire’s tread pattern and sidewall. Remember that sidewall damage cannot be safely repaired with a plug, and the tire must be replaced.
Clean around the puncture area with a dry cloth to remove dirt and debris. This ensures the adhesive will bond properly with the tire rubber. Use your reamer tool to clean inside the hole itself. The reamer serves two purposes: it removes any rough edges and debris from the puncture, and it roughens the interior surface so the adhesive and plug adhere more effectively.
Installing the Plug
With the puncture cleaned and prepared, you’re ready to install the plug. This is where precision matters most. Different tire plug kits may vary slightly, but the basic process remains consistent.
Pre-glued plugs, which come in most modern kits, are the easiest option for DIY repairs. If your kit includes separate adhesive, apply a small amount to the cleaned puncture hole. Don’t use excessive adhesive, as it can create a mess and won’t improve the seal.
Insert the rubber plug into the insertion tool or needle that comes with your kit. The plug should be threaded onto this tool securely. Gently push the tool with the plug into the puncture hole. You should feel some resistance as the plug enters the hole. Push firmly until the tool is nearly flush with the tire surface, ensuring the plug is fully seated inside the hole.
Now comes the important part: removing the insertion tool. Twist the tool counterclockwise while pulling outward. This motion helps the tool release from the plug and ensures the plug remains in place. The tool should slide out smoothly, leaving the plug securely inserted in the tire.
Trim any excess plug material that protrudes from the tire surface using a sharp knife or the cutting tool included in your kit. Cut as close to the tire surface as possible for a clean appearance and to prevent the plug from catching on anything. Don’t worry about small amounts of rubber remaining—these will wear away naturally as you drive.
Safety Considerations
While tire plugging is generally safe when done correctly, several safety considerations should guide your work. Understanding these factors helps prevent accidents and ensures your repair holds up during driving.
Never plug a tire if the puncture is larger than 1/4 inch, located on the sidewall, or if the tire has multiple punctures. These situations compromise tire integrity and create safety hazards. A plug in these scenarios may fail suddenly, potentially causing loss of vehicle control.
Ensure proper tire pressure after plugging. Underinflated tires generate excess heat and can fail, especially on highway driving. Overinflated tires reduce traction and can also fail. Check your vehicle’s door jamb or owner’s manual for the correct pressure specification, and use an accurate gauge to verify pressure.
Test your repair before driving at highway speeds. Drive slowly on local roads for the first few miles, then stop to recheck pressure and inspect for leaks. Many drivers apply a second coat of soapy water after driving to confirm the repair remains sealed under operating conditions.
Consider the tire’s age and condition. If your tire is already several years old or showing significant wear, investing in a replacement may be wiser than attempting a repair. A new tire provides better safety and performance than an aging tire with a plug repair.
For extended trips or highway driving, professional tire service providers recommend professional patching as a more reliable long-term solution than DIY plugging. This is especially true if you frequently drive in extreme conditions or at high speeds.
Common Mistakes to Avoid
Even experienced DIYers can make mistakes when plugging tires. Knowing what to avoid helps ensure your repair is successful and safe.
Failing to clean the puncture properly is a common error that leads to plug failure. The reamer tool must thoroughly clean the hole’s interior surface. Skipping this step means the adhesive won’t bond properly, and the plug may fall out during driving. Spend adequate time with the reamer tool, using firm, twisting motions.
Using too much or too little adhesive affects the repair’s success. Too much adhesive creates a mess and can prevent proper plug seating. Too little means inadequate bonding. Follow your kit’s instructions regarding adhesive application—usually a small dab is sufficient.
Not removing the insertion tool correctly can damage the newly installed plug. Always twist counterclockwise while pulling. Don’t yank the tool out suddenly, as this can dislodge the plug. Patient, controlled movements ensure the plug stays in place.
Neglecting to trim excess plug material leaves rubber sticking out that can catch and tear. This not only looks unprofessional but can compromise the seal. Trim as close to the tire surface as possible with a sharp blade.
Ignoring sidewall damage or large punctures is dangerous. These situations require tire replacement, not plugging. Attempting to plug unsuitable damage creates a safety hazard that could fail at high speeds, potentially causing accidents.
Failing to reinflate to proper pressure undermines your repair work. Underinflated tires generate heat and stress the plug. Overinflated tires can blow out. Always use an accurate gauge and match your vehicle manufacturer’s specifications.
Not checking for additional leaks means you might miss multiple punctures. Always spray the entire tire with soapy water after repair to confirm the plug sealed properly and to ensure no other leaks exist.
For complex tire issues or if you’re uncomfortable performing the repair yourself, visit a professional tire shop. Services like those found at major retailers offer affordable professional patching and can assess whether your tire is salvageable. Remember, your safety depends on properly maintained tires.
FAQ
How long does a tire plug last?
A properly installed tire plug can last for the remaining life of the tire, though the tire industry considers plugs a temporary repair. Many drivers successfully use plugged tires for years without issues. However, professional patching (which combines a patch and plug) is more durable for long-term use. The longevity depends on driving conditions, speed, and how well the repair was executed.
Can I plug a tire myself, or should I go to a professional?
You can definitely plug a tire yourself if you have the right tools and follow instructions carefully. Tire plug kits are inexpensive and straightforward to use. However, if you’re uncomfortable working with tires, the puncture is large, or the location is questionable, professional service is recommended. Professionals can also assess whether patching is a better option than plugging.
What’s the difference between a plug and a patch?
A plug is inserted from the outside of the tire into the puncture hole. A patch is applied from the inside of the tire after removal. Patches are more durable and are considered a permanent repair by industry standards. Family Handyman notes that many professionals recommend combination repairs using both methods for maximum longevity.
Can I plug a tire on the sidewall?
No, sidewall plugs are not safe and should never be attempted. Sidewalls flex significantly during driving, and this flexing will cause a plug to fail. Sidewall damage requires tire replacement. Always ensure your puncture is in the tread area before attempting a plug repair.
How do I know if my tire is too old to repair?
Tires older than 10 years should be replaced regardless of tread depth due to rubber degradation. Use the penny test to check tread depth—if Lincoln’s head is visible, the tire is too worn. If your tire shows cracking, bulges, or other damage beyond the puncture, replacement is necessary. When in doubt, consult a tire professional.
What if the plug keeps leaking after installation?
If your repair leaks after installation, the plug likely wasn’t seated properly or the puncture wasn’t cleaned thoroughly. Remove the failed plug using pliers and repeat the process with a fresh plug from your kit. Ensure you use the reamer tool extensively to clean the hole. If problems persist, the puncture may be too large or irregularly shaped for plugging, requiring professional patching or replacement.
Is it safe to drive on a plugged tire at highway speeds?
Most properly installed plugs are safe for highway driving. However, monitor tire pressure closely and watch for signs of leakage. For extended highway trips or if you’re uncomfortable with the repair, professional patching is a safer option. This Old House recommends professional service for critical driving situations.
Can I plug a tire that’s completely flat?
Yes, but you’ll need to partially inflate it first to access the puncture and work on it. Use a portable air pump or compressor to add enough air to make the tire workable. You don’t need full pressure at this stage—just enough to handle the repair. After plugging, you’ll inflate to proper pressure.
Related Posts

Superscript in Google Docs: Expert Tips

Strikethrough in Excel: Easy Steps for Beginners
