
How to Remove Window Tint: Step-by-Step Guide
How to Remove Window Tint: Step-by-Step Guide
Window tint removal might seem like a job reserved for professionals, but here’s the truth: it’s entirely doable as a DIY project if you’ve got patience, the right tools, and a willingness to take your time. Whether you’re dealing with outdated tint that’s peeling at the edges, faded film that’s seen better days, or you simply want a fresh start with new tint, knowing how to remove window tint safely will save you money and give you control over the process.
The challenge isn’t so much difficulty as it is tedium. Window tint doesn’t want to leave your glass without a fight, and rushing the job often leads to scratched windows, adhesive residue, or incomplete removal. The good news? We’re going to walk you through multiple proven methods that work for different situations, skill levels, and available resources.
Before you grab a razor blade and go to town, let’s talk strategy. Different removal methods work better depending on your climate, the age of the tint, and what tools you have on hand. Some approaches are gentler on your windows, while others are faster but require more finesse. By the end of this guide, you’ll know exactly which method suits your situation best.
Why Remove Window Tint?
Your reasons for removing tint matter, and they’ll influence which method you choose. Maybe the tint is deteriorating—peeling, bubbling, or fading to an uneven purple hue that screams “this is old.” Perhaps you’re selling your vehicle and the buyer wants clear windows. Some people remove tint because it’s blocking too much light, or they’re upgrading to a higher-quality film. Whatever your motivation, understanding your end goal helps determine the best approach.
Legal considerations matter too. Some states have strict regulations about how much light window tint can block. If you’ve accidentally crossed into illegal territory or you’re relocating to a stricter jurisdiction, removal becomes necessary. The process itself doesn’t change based on your reason, but knowing why you’re doing it helps you stay committed when the project gets tedious.
Tools and Materials You’ll Need
Success in tint removal depends largely on preparation. Having the right tools makes the difference between a smooth three-hour project and a frustrating all-day ordeal. Here’s what you should gather before starting:
- Heat source: Heat gun, hair dryer, or steamer (heat guns are most effective)
- Scraping tools: Plastic scrapers, old credit cards, or specialized tint removal tools (avoid metal—it scratches glass)
- Cleaning solution: Ammonia-based cleaner, rubbing alcohol, or commercial tint remover
- Spray bottle: For applying liquid solutions evenly
- Microfiber cloths: Won’t leave lint or scratch surfaces
- Soapy water: Simple dish soap and water works as a lubricant
- Safety gear: Gloves, eye protection, and a mask (ammonia fumes can irritate)
- Newspaper or drop cloths: Protect your car’s interior and surrounding areas
You don’t need expensive specialty equipment. A basic heat gun from any hardware store costs $20-40 and works beautifully. The key is having multiple tools available so you can switch methods if one isn’t working as expected.
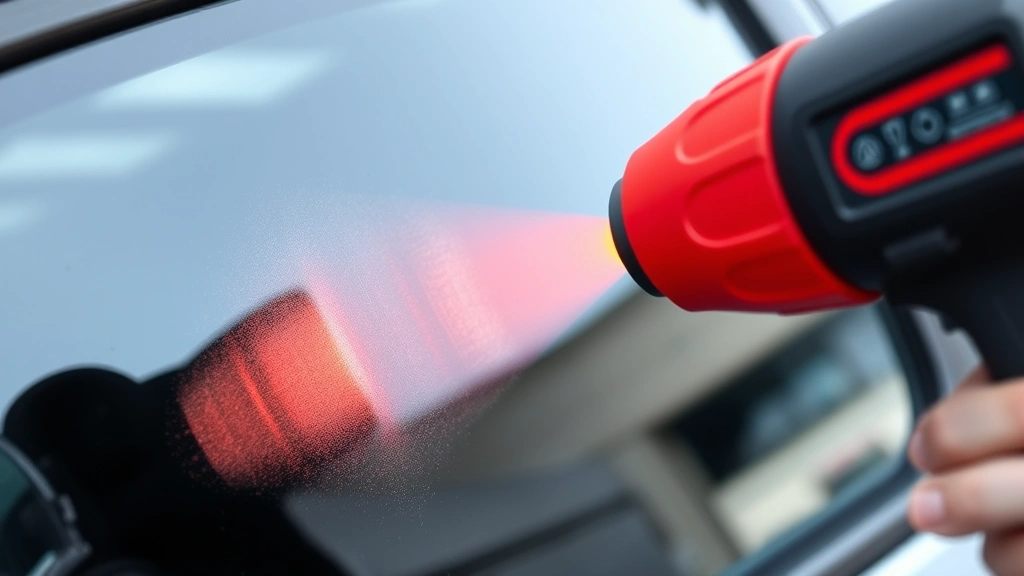
Method 1: The Heat Gun Approach
The heat gun method is the most popular DIY approach, and for good reason—it’s effective, relatively quick, and doesn’t involve harsh chemicals. Heat softens the adhesive holding tint to glass, making the film pliable enough to peel away cleanly.
Step 1: Prepare Your Workspace
Park in a shaded area if possible, or work early morning or late evening. Direct sunlight can heat your windows too much and make the process harder to control. Lay down newspaper inside the car to catch debris and adhesive bits. Open all doors for ventilation and have your trash bag ready for tint scraps.
Step 2: Heat the Tint
Set your heat gun to medium heat (around 300-400°F). Hold it about 3-4 inches from the window, moving it in slow, circular motions. You’re not trying to char the tint—just warm it enough that the adhesive becomes tacky. This usually takes 30-60 seconds per window, depending on tint thickness and heat gun power. You’ll notice the tint starting to bubble slightly; that’s your signal you’re ready for the next step.
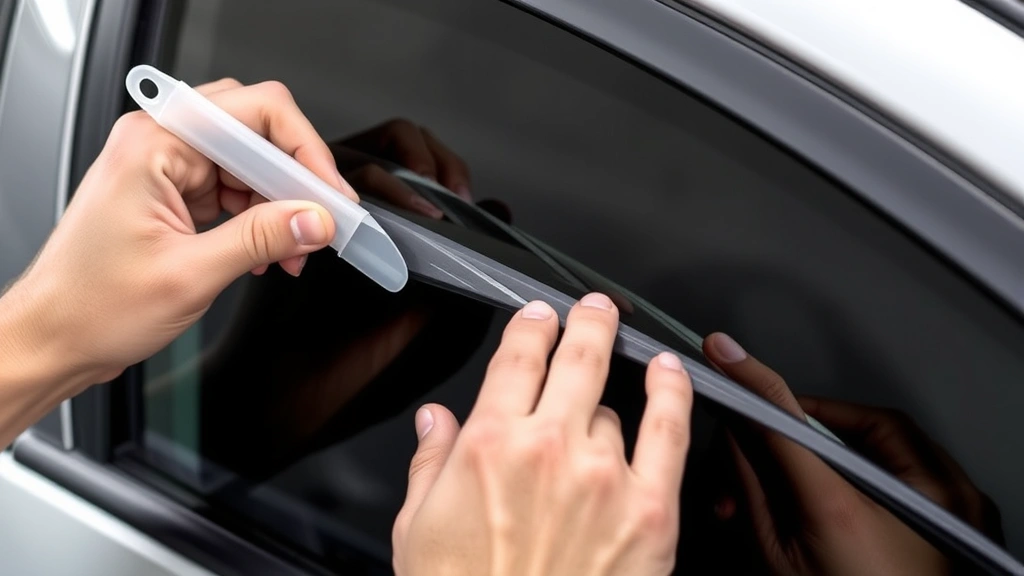
Step 3: Begin Peeling
Starting at a corner or edge, use your plastic scraper or old credit card to gently lift the tint. The goal is to create a small lifted edge you can grip with your fingers. Once you’ve got an edge going, pull slowly and steadily. If the tint resists, stop and apply more heat. Patience here prevents tearing the film into tiny pieces you’ll spend an hour picking out.
Step 4: Remove the Entire Film
As you peel, the tint should come away in one large sheet if you’re lucky, or several large pieces if you’re not. Keep the film warm by directing heat at it as you work. If it cools and becomes brittle, reheat it. This isn’t a race—a 20-minute window removal beats a 45-minute one where you’re fishing out fragments.
Step 5: Tackle the Adhesive Layer
Once the film is gone, you’ll likely have a sticky residue layer remaining. This is the adhesive that bonded the tint to your glass. Apply heat again and use your scraper to gently work the adhesive away. It should come off in strips or flakes. This step requires patience and a light touch—press too hard and you risk scratching the glass.
Method 2: The Ammonia Solution Technique
If you prefer a chemical approach, ammonia-based solutions work remarkably well. This method is ideal for older tint that’s already starting to fail, or if you want to avoid heat altogether. If you’re concerned about how to remove super glue from other projects, you understand how solvents work—ammonia operates on the same principle here.
Step 1: Prepare the Solution
Mix ammonia cleaner with water in a spray bottle (approximately 1 part ammonia to 3 parts water), or use straight rubbing alcohol. Commercial window tint removers work similarly. Ensure your workspace is well-ventilated—ammonia fumes are no joke.
Step 2: Soak the Tint
Spray the ammonia solution generously on the tinted window, saturating the film completely. Let it sit for 15-20 minutes. The solution needs time to penetrate and break down the adhesive. During this wait, you can work on other windows, maximizing efficiency.
Step 3: Scrape and Peel
After soaking, use your plastic scraper to lift an edge. The ammonia will have weakened the adhesive considerably. Peel the film away slowly—it should separate more readily than with heat alone. Reapply solution as needed to keep the surface wet.
Step 4: Remove Residue
Once the film is gone, spray more ammonia solution on the remaining adhesive and let it sit for another 10-15 minutes. Scrape away the softened adhesive gently. You might need to repeat this process several times for stubborn adhesive.
Method 3: The Steam Method
Steam combines the benefits of heat with moisture, creating an ideal environment for adhesive breakdown. If you have a clothes steamer or can borrow one, this method deserves consideration. It’s gentler than direct heat and works well for delicate windows.
Step 1: Heat Your Steamer
Allow your steamer to reach full temperature according to the manufacturer’s instructions. You want hot steam, not just warm moisture.
Step 2: Apply Steam to the Tint
Hold the steamer about 2-3 inches from the window, directing steam across the entire tinted surface. Keep it moving to avoid overheating one spot. After 2-3 minutes, the tint should begin softening.
Step 3: Peel Away the Film
Working from an edge or corner, peel the tint away. The combination of heat and moisture makes this method particularly effective for older tint. The film often comes away in large pieces.
Step 4: Clean Up Adhesive
Apply steam to the remaining adhesive layer and scrape gently. The moisture helps prevent the adhesive from becoming too brittle and cracking into fragments.
Handling Stubborn Adhesive Residue
Even after successful tint removal, adhesive residue is often the most frustrating part. That cloudy, sticky layer won’t budge with water alone. Here’s how to win this battle:
Rubbing Alcohol Approach
Soak a microfiber cloth in rubbing alcohol and press it against the adhesive residue. Let it sit for a few minutes, then gently rub in circular motions. The alcohol breaks down the adhesive’s chemical structure. This method is slower but very effective and won’t damage your windows.
Commercial Adhesive Removers
Products specifically designed for removing adhesive (like Goo Gone) work well on automotive adhesive. Apply generously, wait 5-10 minutes, then wipe with a cloth. These products are stronger than alcohol but follow the manufacturer’s safety instructions carefully.
The Patience Method
Sometimes the best approach is simply repeating your chosen method multiple times. Spray ammonia solution or apply heat, wait, scrape gently, repeat. Each cycle removes more residue. It’s not glamorous, but it works and minimizes the risk of window damage.
Protecting Your Windows During Removal
Your car’s windows are expensive to replace. Throughout this process, treat them with respect. Here are critical protection strategies:
Use Only Plastic Scrapers
Metal scrapers, razors, and steel wool will scratch automotive glass. Invest in plastic scrapers or use old credit cards. Yes, they’re less aggressive, but that’s the point. If you’re worried about how to remove scratches from car surfaces, you already understand why prevention beats cure.
Avoid Extreme Temperature Changes
Don’t spray cold water on a window you’ve just heated with a heat gun. Thermal shock can crack glass. Allow windows to cool gradually or use room-temperature solutions.
Work in Sections
Don’t try to remove an entire window’s tint at once. Work in manageable sections, being thorough with each before moving on. This prevents mistakes and gives you time to assess your progress.
Test Your Technique First
If you’re new to this, practice on a less visible window (rear side window) before tackling the windshield or front windows. You’ll develop a feel for pressure and technique without major consequences if something goes wrong.
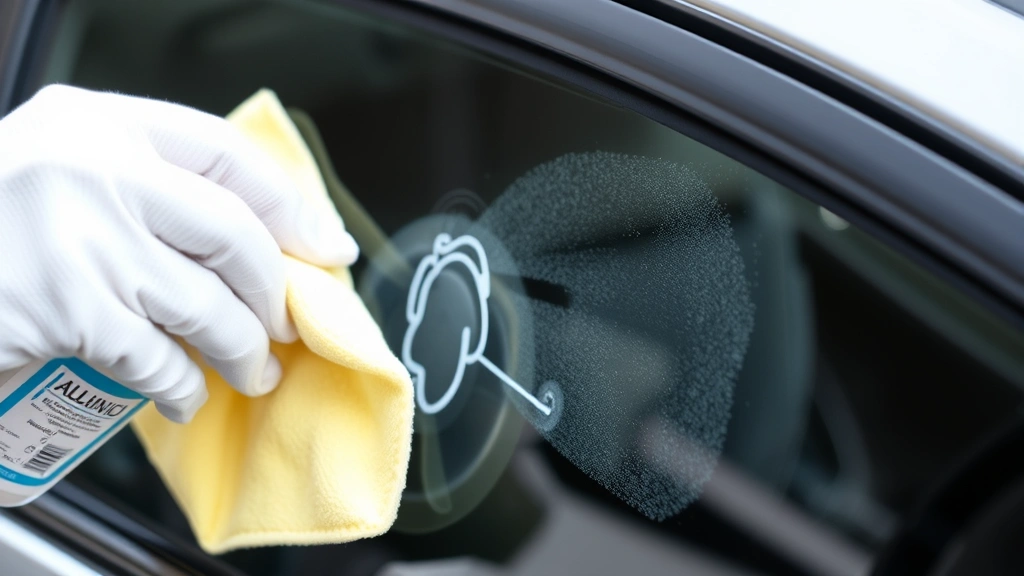
Post-Removal Cleaning and Care
Once the tint and adhesive are gone, your windows need proper cleaning and care. Residual adhesive particles, ammonia residue, and dust accumulate during removal.
Initial Cleaning
Wipe windows thoroughly with a damp microfiber cloth to remove loose particles. Then use glass cleaner to eliminate any remaining film or haze. Newspaper works surprisingly well for streak-free drying—a trick window cleaners have used for decades.
Check for Scratches
Once clean and dry, inspect your windows in good light. Minor scratches are usually unavoidable, but significant damage should be addressed. If you caused a serious scratch, consult your insurance or contact a glass repair specialist.
Protect Your Windows Going Forward
If you’re applying new tint, allow windows to cure properly before rolling them down. If you’re keeping windows bare, apply a water-repellent coating to protect against future adhesive damage if you ever tint again. Regular cleaning with appropriate glass cleaners keeps windows in top condition and makes any future removal easier.
When it comes to maintaining your vehicle’s appearance, consider how window care fits into your overall maintenance routine. Just as you’d how to rotate tires regularly for even wear, maintaining your windows through proper cleaning extends their life.
Frequently Asked Questions
How long does window tint removal typically take?
A single window usually takes 15-30 minutes with the heat gun method, depending on tint age and adhesive stubbornness. All four windows might take 2-4 hours total. The ammonia method is often slower, sometimes taking 4-6 hours for a complete vehicle. Factor in breaks and you’re looking at a half to full day project.
Can I remove window tint without damaging the glass?
Yes, absolutely. The key is patience, proper technique, and using plastic tools rather than metal. Rushing causes most damage. Work slowly, reapply heat or solution as needed, and use minimal pressure when scraping. Your windows should be fine if you take your time.
Is it safe to use ammonia on car windows?
Ammonia is safe for glass but requires ventilation. Open all doors and windows to allow fumes to escape. Wear gloves to protect your skin, and avoid inhaling concentrated fumes. If you have respiratory sensitivity, use the heat gun method instead or wear a respirator mask.
What’s the best time of year to remove window tint?
Spring or fall offer ideal temperatures—warm enough that adhesive softens easily, but not so hot that you’re working in intense heat. Avoid extremely cold weather, as adhesive becomes brittle and shatters into fragments. Summer works but can be uncomfortable; winter makes the job harder.
Will removing old tint damage my car’s interior?
If you work carefully and protect your car’s interior with newspaper or drop cloths, there’s minimal risk. The main concern is adhesive residue or ammonia solution dripping on seats or carpet. Lay down protection before starting and you’ll be fine.
Can I remove tint from the windshield?
Technically yes, but windshields are tempered differently than side windows. The process is more delicate and the risk of damage is higher. If your windshield has factory tint, it’s baked into the glass and can’t be removed without replacing the entire windshield. For applied windshield tint, use extra caution and consider professional removal if you’re uncomfortable with the process.
What should I do if I scratch the glass during removal?
Minor scratches are often buffed out with specialized glass polish or cerium oxide compounds. For deeper scratches, you’ll need professional glass repair. If you caused the damage, your auto insurance might cover it depending on your policy. Report it promptly and get a professional assessment.
Can I apply new tint immediately after removing old tint?
No. Your windows need to be completely clean and free of any adhesive residue or film. Rushing this step causes the new tint to adhere poorly or bubble. Clean thoroughly, let windows cure for at least 24 hours, then apply new tint. Some professionals recommend waiting 48 hours for complete curing.
Is it cheaper to remove tint myself or hire a professional?
DIY removal costs $15-50 for supplies (heat gun, scrapers, cleaning solutions) versus $100-300 for professional removal per vehicle. If you only have one vehicle, DIY makes financial sense. If you’re doing multiple vehicles or you’re uncomfortable with the process, professional removal’s cost becomes more reasonable.
What do I do with the removed tint film?
Window tint film is plastic and should be disposed of in regular trash. It’s not recyclable in most programs. Don’t throw large pieces in the trash—cut them into manageable pieces first. Some recycling centers accept plastic film, so check your local guidelines before tossing.
Related Posts

How Long to Boil Lobster Tails: Cooking Guide

How Long to Fly from New York to London? Travel Times
