
How to Remove Sink Stopper: Step-by-Step Guide
How to Remove Sink Stopper: Step-by-Step Guide
There’s something oddly satisfying about a well-functioning sink, and equally frustrating when that little stopper decides to act up. Whether it’s stuck, leaking, or simply refusing to cooperate, a faulty sink stopper can disrupt your entire bathroom routine. The good news? Removing a sink stopper is one of those DIY tasks that doesn’t require a plumbing degree or a toolbox full of specialized equipment.
Most homeowners assume they need to call a professional for this job, but honestly, it’s one of the most straightforward fixes you can tackle yourself. In this guide, we’ll walk you through the different types of sink stoppers, why you might need to remove one, and exactly how to do it without breaking anything (or yourself).
Before you grab your tools, take a moment to identify which type of stopper you’re dealing with. Sink stoppers come in several varieties, and the removal process varies slightly depending on what you’ve got under there. Spend five minutes understanding your setup, and you’ll save yourself a lot of headaches down the road.
Types of Sink Stoppers
Understanding your sink stopper type is crucial because each one has its own quirks and removal techniques. Let’s break down the most common varieties you’ll encounter in residential bathrooms.
Pop-up stoppers are the most popular choice in modern bathrooms. These work through a lift rod connected to a horizontal rod underneath the sink, which raises and lowers the stopper. You’ll recognize them by the rod sticking up from the back of the faucet. When you lift the rod, the stopper pops up; push it down, and it seals the drain.
Push-pull stoppers are simpler mechanically. These sit directly in the drain and require you to literally push them down to close the drain or pull them up to open it. No rods, no levers, just a straightforward up-and-down motion. They’re often found in older homes or more minimalist bathroom designs.
Flip stoppers (also called toe-touch stoppers) have a lever at the base that you press with your foot or toe to toggle between open and closed. These are less common but still appear in some bathrooms, particularly those with pedestal sinks.
Ball stoppers are less frequently seen but still exist in some vintage or specialty setups. They use a ball mechanism connected to a lever that controls the drain opening.
Why You Might Need to Remove Your Sink Stopper
There are several legitimate reasons to remove your sink stopper, and most of them point to the same underlying issue: buildup and blockage. Hair, soap residue, toothpaste, and mineral deposits accumulate around the stopper mechanism over time, creating a nasty clog that impacts drainage.
A slow-draining sink is often your first clue that the stopper needs attention. If water pools around your feet while brushing your teeth, that’s your sink telling you something’s wrong. Beyond drainage issues, you might need to remove the stopper for cleaning purposes or because it’s leaking. Sometimes the seal wears out and water seeps around the edges, which is both annoying and wasteful.
If you’re planning more extensive plumbing work, like unclogging deeper issues in your drain system (similar to how to unclog a toilet), you’ll definitely need to remove the stopper first to access the full drain pipe.
Tools and Materials You’ll Need
Here’s the beauty of sink stopper removal: you probably already have everything you need sitting in your junk drawer. This isn’t a complicated job that requires specialized plumbing tools.
- Flashlight or headlamp – You’ll be working under the sink, and it gets dark down there
- Adjustable wrench or pliers – For loosening nuts and connections
- Screwdriver – Both flathead and Phillips, just in case
- Bucket or towel – Water will spill; trust us on this one
- Wire brush or old toothbrush – For cleaning the stopper and surrounding areas
- Vinegar and baking soda – Natural cleaning agents that work wonders on buildup
- Penetrating oil (WD-40) – Helps loosen stuck connections
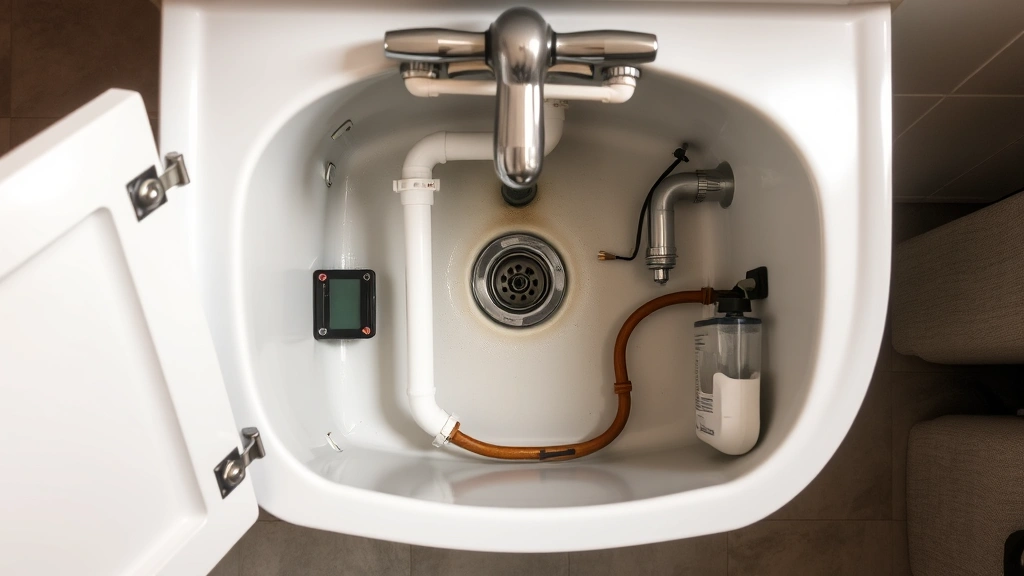
Before you start, turn off the water supply to your sink if possible. Most bathroom sinks have shut-off valves under the sink specifically for this purpose. If you can’t find them, you can always turn off the main water supply to your house. Lay down a towel under the sink because some water will definitely come out when you disconnect things.
How to Remove Pop-Up Stoppers
Pop-up stoppers are the most common type you’ll encounter, so let’s start here. These are connected to the faucet through a series of rods and levers, which makes them slightly more complex than other types.
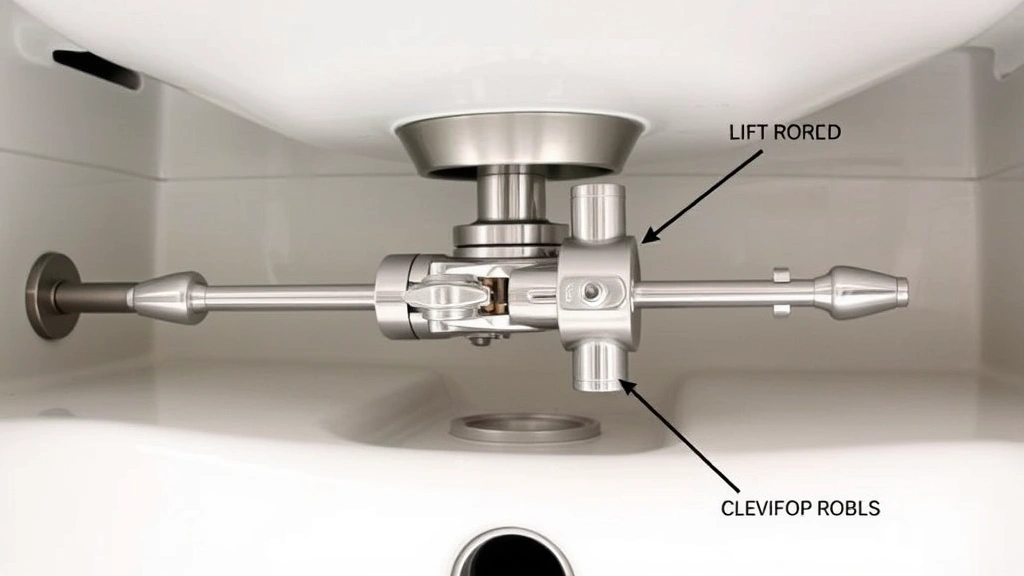
Step 1: Access the underneath – Get under your sink with your flashlight. You’ll see the lift rod coming down from the back of the faucet, connected to a horizontal rod (called the clevis rod) that runs toward the drain. This horizontal rod has a clip that holds it in place.
Step 2: Disconnect the clevis rod – The clevis rod is connected to the lift rod with a spring or clip. Depending on your setup, you might need to unscrew a nut or simply remove a clip. Use your wrench or pliers to loosen the nut. If it’s stuck, apply some penetrating oil and wait a few minutes.
Step 3: Remove the horizontal rod – Once the clevis rod is disconnected from the lift rod, you can pull the entire horizontal rod assembly away from the drain. This should come free relatively easily. If it doesn’t, check for any other connections you might have missed.
Step 4: Pull out the stopper – Now you can simply reach into the drain and pull out the stopper. It might be grimy and disgusting; that’s normal. The stopper has a fitting on top that connects to the lift rod assembly. Once you’ve removed it, you can clean it thoroughly with your wire brush and some vinegar.
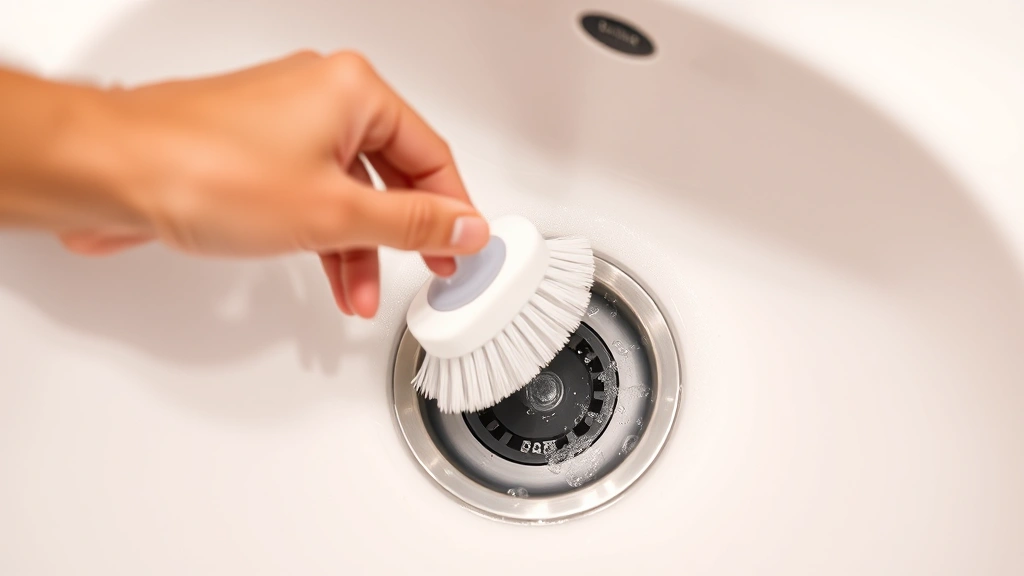
Step 5: Clean the drain opening – While you’ve got the stopper out, take advantage of the access to clean the drain. Use your brush to scrub away any buildup around the drain opening. This is also a good time to address any deeper clogs, much like you would when unclogging a shower drain.
Reinstalling is simply the reverse of this process. Insert the stopper back into the drain, reconnect the clevis rod to the lift rod, and test it to make sure everything moves smoothly.
How to Remove Push-Pull Stoppers
Push-pull stoppers are refreshingly straightforward. These don’t have any rods or complex mechanisms underneath, which makes them one of the easiest types to remove.
Step 1: Simply pull it out – Most push-pull stoppers can be removed by grasping the stopper firmly and pulling straight up. Some might twist slightly as you pull, so try a gentle twisting motion if straight pulling doesn’t work immediately.
Step 2: Check for a setscrew – Some push-pull stoppers have a small setscrew on the side. If yours does, you’ll need to loosen this with a screwdriver before the stopper will come free. Look around the base of the stopper for a small screw.
Step 3: Clean and reinstall – Once it’s out, clean it thoroughly with your brush and vinegar solution. The drain opening should also be cleaned. Reinstalling is just as simple: push it back in, and if there was a setscrew, tighten it back up.
How to Remove Flip Stoppers
Flip stoppers (toe-touch) are less common, but here’s how to handle them if you’ve got one.
Step 1: Locate the lever mechanism – Get under the sink and identify the lever arm connected to the stopper. This is usually a simple metal rod or lever that extends from the drain mechanism.
Step 2: Disconnect the lever – The lever is typically held in place with a nut or clip. Use your wrench to loosen the nut, or simply remove the clip if that’s how it’s secured.
Step 3: Pull out the stopper assembly – With the lever disconnected, you should be able to pull the entire stopper assembly straight up and out of the drain. This might require a bit of twisting or angling to get it free.
Step 4: Clean everything – Clean the stopper, the lever arm, and the drain opening. These mechanisms tend to accumulate more debris because of how they’re designed.
How to Remove Ball Stoppers
Ball stoppers are vintage and uncommon, but if you’re dealing with one, here’s the process.
Step 1: Locate the ball mechanism – Under the sink, you’ll see a ball attached to a lever arm. This ball sits in a socket in the drain pipe.
Step 2: Disconnect the lever arm – The lever arm is connected with a nut or clip. Loosen this connection with your wrench.
Step 3: Remove the ball and stopper – Once the lever is disconnected, you can pull the ball and stopper assembly out of the drain. This might require some wiggling.
Step 4: Clean the assembly – These mechanisms benefit greatly from thorough cleaning. Use your brush and vinegar to remove all the buildup.
Troubleshooting Common Issues
The stopper won’t budge – If you’re dealing with a stuck stopper, don’t force it. Apply penetrating oil around the base and let it sit for 15-30 minutes. Try again gently. If it’s still stuck, you might need to loosen the surrounding nuts or connections to free it up.
Water is still pooling after removal – The slow drainage might indicate a deeper clog further down the drain. Consider using a plunger or drain snake to clear the pipe. If you’re dealing with a shower drain issue, the principles are similar to unclogging a shower drain, though the tools and approach might differ slightly.
You’re losing water from underneath the sink – Check all your connections. You might have accidentally loosened something while working on the stopper. Tighten any loose nuts and see if that solves the problem.
The lift rod is broken – If the rod connecting the faucet to the stopper mechanism is cracked or broken, you’ll need to replace it. These are inexpensive parts available at any hardware store. Take a photo of your setup to the store to ensure you get the right replacement.
The stopper doesn’t seal properly when reinstalled – Make sure the stopper is sitting correctly in the drain opening. Sometimes a small piece of debris prevents a proper seal. Clean the stopper seat thoroughly and try again.
Maintenance Tips
Now that you know how to remove your sink stopper, let’s talk about keeping it in good working order so you don’t have to do this too often.
Clean regularly – Once a month, remove your stopper and give it a quick clean. This prevents major buildup from accumulating. A simple soak in hot vinegar works wonders.
Use drain screens – Install a drain screen to catch hair and debris before they reach the stopper mechanism. This is one of the easiest preventative measures you can take.
Flush with hot water – Weekly hot water flushes help keep your drain clear. Just let hot water run for a minute or two after using the sink.
Avoid chemical drain cleaners – These harsh chemicals can damage your stopper mechanism and pipes. Stick with natural solutions like baking soda and vinegar, or use a mechanical drain snake.
Check connections periodically – Every few months, peek under the sink and make sure all your connections are tight. Loose connections can lead to leaks and performance issues.
If you’re maintaining your bathroom plumbing, it’s worth knowing about other systems too. For instance, understanding how to clean a shower head can help you maintain your entire bathroom’s water flow. Similarly, if you own a home with a water heater, knowing how to flush a water heater is valuable maintenance knowledge.
For those who want comprehensive plumbing guidance, resources like This Old House’s plumbing section offer detailed instructions on various projects. Family Handyman also has excellent guides for faucet and drain maintenance. Home Depot’s plumbing section can help you find replacement parts if needed.
Frequently Asked Questions
How long does it take to remove a sink stopper?
For most people, the entire process takes 15-30 minutes, depending on how stuck the stopper is and whether you run into complications. If you’re doing it for the first time, budget an extra 15 minutes for exploration and figuring out your specific setup.
Do I need to turn off the water before removing the stopper?
It’s not strictly necessary, but it’s a good precaution. If something unexpected happens or you accidentally bump a pipe, you won’t have water spraying everywhere. Most bathroom sinks have shut-off valves directly under the sink, so it only takes a few seconds.
Can I remove a sink stopper without going under the sink?
For push-pull stoppers, yes. You can often remove them by simply pulling them straight up. For other types, you’ll need to work from underneath to disconnect the rods and mechanisms. There’s no way around it for pop-up and flip stoppers.
What if the stopper comes off but there’s still a clog?
The stopper and the clog are separate issues. If water is still draining slowly after you’ve removed and cleaned the stopper, you have a clog deeper in the drain. You’ll need to use a plunger, drain snake, or call a professional plumber to address the deeper blockage.
Is it safe to use chemical drain cleaners on a sink with a stopper?
We don’t recommend it. Chemical cleaners can damage the rubber seals on your stopper and corrode the metal components. They’re also harsh on your pipes. Stick with natural options like baking soda and vinegar, or use a mechanical drain snake for better results.
My stopper keeps getting stuck after I reinstall it. What’s wrong?
This usually indicates that something isn’t aligned properly. Make sure the stopper is sitting in the drain opening correctly and that there’s no debris preventing a smooth fit. Also check that the lift rod and clevis rod are connected properly and moving freely. Sometimes a slight adjustment to the clevis rod position solves the problem.
Can I replace my sink stopper with a different type?
Yes, but it depends on your faucet and drain setup. Pop-up stoppers require a lift rod mechanism at the faucet, so you can’t just switch to a push-pull stopper without modifications. If you want to change types, consult with a plumber or check your faucet manufacturer’s specifications to ensure compatibility.
How often should I clean my sink stopper?
Ideally, once a month. This prevents major buildup and keeps your drain flowing smoothly. If you notice slow drainage, that’s your sign that it’s time for a cleaning, regardless of the schedule.
Related Posts

How Long to Boil Lobster Tails: Cooking Guide

How Long to Fly from New York to London? Travel Times
