

How to Hem Pants: Step-by-Step Guide
How to Hem Pants: Step-by-Step Guide
There’s something deeply satisfying about perfectly fitted pants that kiss the top of your shoe just right. Yet most of us have experienced the frustration of buying pants only to find they’re either pooling at our ankles or hovering awkwardly above them. The good news? Learning how to hem pants is a skill that’ll save you hundreds of dollars and give you that tailored look without the tailor’s price tag.
Whether you’re dealing with new jeans that need a quick adjustment or vintage finds that deserve a second life, hemming is one of those DIY projects that feels intimidating until you actually try it. Once you master the basics, you’ll wonder why you ever paid for alterations. This guide walks you through everything you need to know, from measuring and marking to the actual sewing—no experience required.
The beauty of hemming your own pants is the control it gives you. You’re not at the mercy of a tailor’s schedule or their interpretation of “just a little shorter.” You decide exactly how long your pants should be, and you can experiment with different hem styles to match your personal aesthetic.
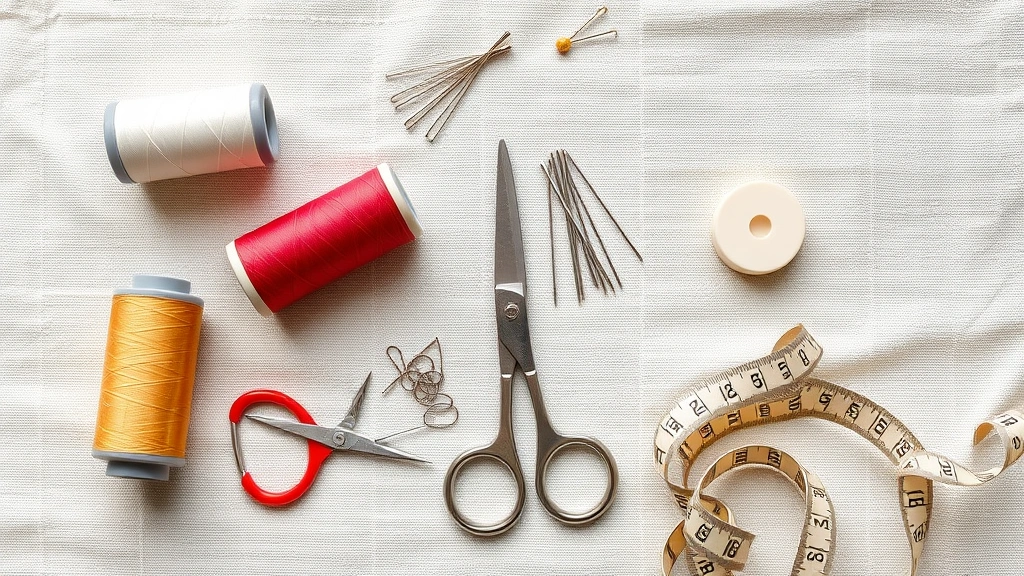
Tools and Materials You’ll Need
Before you dive into hemming, gather your supplies. You don’t need fancy equipment—just the essentials that’ll make the job easier and produce professional results. Think of this as assembling your DIY toolkit for the project.
Start with a needle and thread. Invest in quality thread that matches your pants color as closely as possible. If you’re hemming dark jeans, grab dark thread; for khakis, go with a neutral tan. You’ll also want a sewing needle or two (in case you bend one) that feels comfortable in your hand. Some people prefer hand-sewing needles specifically designed for hemming, which have a slightly larger eye for easier threading.
A measuring tape is absolutely crucial. This is where precision starts. You’ll also need pins or tailor’s chalk for marking your hem line. Tailor’s chalk is fantastic because it washes out completely and won’t leave permanent marks like pen or pencil might.
Then there’s the question of scissors. Regular household scissors won’t cut it (literally). Grab a pair of fabric scissors that you dedicate solely to sewing projects. Using them on paper or other materials will dull them quickly, ruining their effectiveness on fabric.
For a more polished finish, consider hem tape (also called fusible webbing) or a seam ripper for fixing mistakes. A pressing cloth and access to an iron will help you create crisp, professional-looking hems. If you want to go the machine route, you’ll obviously need a sewing machine and the appropriate presser foot.
Measuring Your Inseam Correctly
This is where most people stumble. Getting your measurements right is absolutely non-negotiable because even a quarter-inch difference becomes glaringly obvious once you’re wearing the pants. The good news is that learning how to measure inseam is straightforward once you know the technique.
First, put on the pants with the shoes you’ll typically wear them with. This matters more than you’d think because different heel heights change where the hem should sit. Stand in front of a mirror in your natural posture—not sucking in or standing unnaturally tall.
Measure from the inside seam of your crotch down to where the pant leg should end. For most casual wear, you want a slight break at the shoe, meaning the fabric just barely touches the top of your shoe. For a more modern, tapered look, you might want no break at all, with the hem sitting right at the shoe’s vamp. For a traditional or relaxed fit, a quarter-inch to half-inch break is standard.
Write down this measurement. If your pants are already hemmed and fit perfectly, simply measure from the current hem to where you want the new hem to be. This gives you an exact adjustment length.
Pro tip: Have someone else help you if possible. It’s nearly impossible to accurately measure your own pant legs while wearing them, especially the back seams. A second set of eyes ensures both legs are measured consistently.
Marking Your Hem Line
Now that you know your target length, it’s time to mark where you’ll actually cut and sew. This step requires patience and precision, but it’s where your finished product either looks amateur or professional.
Put the pants on again with your shoes. Using tailor’s chalk or pins, mark the desired hem line on both pant legs. Mark the inside of the leg, the outside seam, and a couple of spots in between to create a reference line. If you’re using pins, place them horizontally so they’re easy to see as you work.
Take the pants off and lay them flat on a table or ironing board. Using your measuring tape and tailor’s chalk, connect your marks with a straight line all the way around each pant leg. This creates your cutting guide. Some people prefer to use a hem gauge (a small measuring ruler specifically for this purpose) to ensure consistency around the entire leg.
Double-check your marks before cutting. Measure from the mark to the current hem to verify you’re removing the right amount of fabric. It’s much easier to add fabric back than to add length to pants you’ve already cut.
Cutting and Preparing the Fabric
With your lines marked, you’re ready to cut. This is the point of no return, so take a breath and make sure everything looks right one more time.
Lay your pants flat with the pant leg you’re hemming stretched out in front of you. Using your fabric scissors, cut along your marked line. Cut slowly and deliberately—rushing here is where mistakes happen. Try to cut as straight as possible; wobbling lines will be visible in your finished hem.
Once you’ve cut both legs, try the pants on to make sure the length is exactly what you wanted. This is your last chance to make adjustments before you start sewing. If one leg is slightly longer than the other, now’s the time to even them out.
Next, fold the raw edge up about half an inch and press it with an iron. This creates a fold line that guides your stitching. Then fold it up again to your desired hem width—typically half an inch to an inch, depending on the pants style and your preference. Press this fold as well. The creases you create act as your stitching guides.
Some people like to use hem tape at this stage. If you’re going that route, understanding fabric behavior helps you choose between different adhesive weights. Fusible webbing creates a permanent crease and can be ironed in place before hand or machine sewing, providing extra stability.
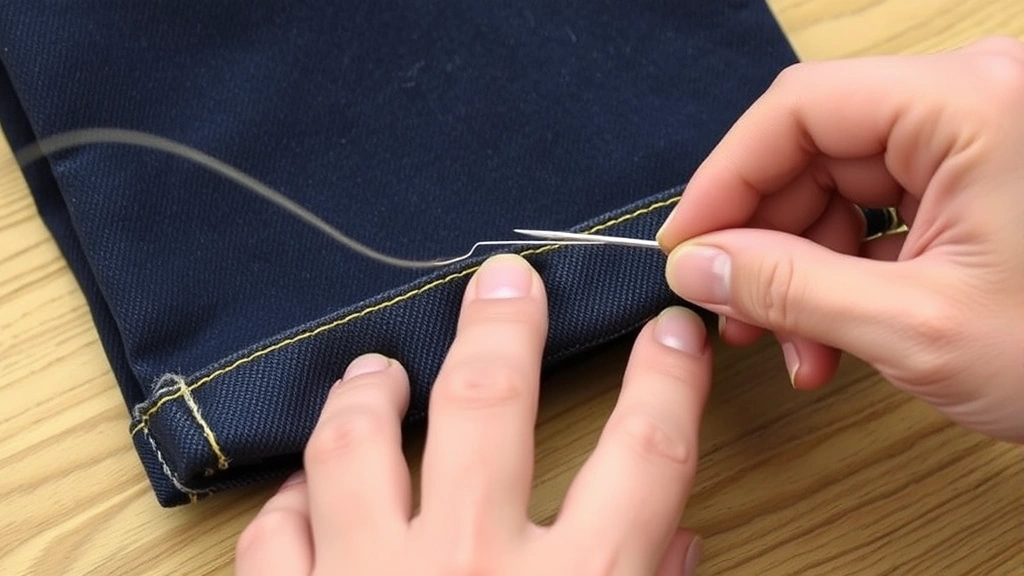
Hand Sewing Your Hem
Hand sewing a hem might sound old-fashioned, but it produces beautiful, nearly invisible results—and it’s actually faster than you’d expect once you get into a rhythm.
Thread your needle and tie a knot at the end. Start on the inside of the pant leg where your stitches will be hidden. Bring your needle up through the fold of your hem, then take a tiny stitch into the pant leg fabric just above the fold—only about a quarter-inch to half-inch wide and barely catching the outer fabric.
Come back down and take another small stitch in the fold of the hem. The key to an invisible hem is keeping your stitches small and taking only the tiniest bit of the outer fabric so your stitches don’t show on the outside of the pants.
Continue this pattern around the entire pant leg. You’re essentially creating a ladder stitch, where each stitch runs perpendicular to the hem line. Work your way around, keeping your tension consistent so the hem lies flat.
When you reach the seams (the side seams and inseams), take a couple of extra stitches to reinforce these high-stress areas. These spots take the most wear, so strengthening them prevents your hem from unraveling later.
Once you’ve gone all the way around, tie off your thread on the inside of the hem and trim the excess. Press your finished hem with an iron to set the stitches and create that crisp, tailored appearance.
Machine Sewing Option
If hand sewing isn’t your thing or you’re working with thick denim that’s tough on fingers, a sewing machine makes quick work of hemming. The process is similar, but faster and potentially more uniform.
After you’ve folded and pressed your hem as described above, thread your machine with matching thread and set it to a straight stitch with medium length. Position your pant leg under the presser foot so the needle will stitch right along the fold of your hem.
Sew slowly and steadily around the entire pant leg, keeping your stitching line as straight and consistent as possible. Remove pins as you approach them—never sew over pins, as this can break your needle or damage your machine.
When you reach a seam, stop with the needle down, lift the presser foot, and manually pivot the fabric to continue around the seam. This prevents puckering and keeps your stitching straight.
Some people prefer to sew a second line of stitching parallel to the first for extra durability, especially on jeans. This creates that classic double-stitch look you see on many store-bought pants.
Finishing Touches
Your hem is sewn, but a few finishing steps elevate it from homemade to professional-looking. First, trim any loose threads and give everything a final press with your iron. This sets the stitches permanently and creates that crisp edge that screams quality tailoring.
Try the pants on with your shoes to verify the length one more time. This is your final quality check. If everything looks perfect, you’re done. If you notice the length is slightly off, now’s the time to make a minor adjustment.
For extra durability, especially if you’re hemming pants you wear frequently, consider applying proper fit considerations to ensure your hemming complements the overall fit. Some people also like to understand garment care techniques to maintain their hems long-term.
If you want to explore other tailoring skills, learning proper garment styling helps you make the most of your wardrobe. The confidence that comes from wearing perfectly fitted pants is worth every minute you invested in this project.
For additional guidance on sewing techniques, check out resources like This Old House for home improvement insights, Family Handyman for practical DIY advice, and Home Depot’s DIY guides for comprehensive project instructions. You might also benefit from Craftsy’s sewing tutorials for video demonstrations of hemming techniques.
Frequently Asked Questions
How much should I add to the hem allowance when cutting?
A standard hem allowance is one to one and a half inches. This gives you enough fabric to fold over twice (creating a clean, finished edge on the inside) while leaving room for adjustment if needed. For thicker fabrics like denim, lean toward the larger measurement. For delicate or lightweight fabrics, you can go slightly smaller.
Can I hem pants with a sewing machine if I’ve never used one before?
Absolutely. A sewing machine actually makes hemming easier for beginners in some ways because the machine does the work of keeping stitches uniform and straight. Practice on scrap fabric first to get comfortable with the machine’s speed and how to guide fabric under the presser foot. Most basic sewing machines are intuitive once you understand the basics.
What thread color should I use?
Match your thread to your pants as closely as possible. If you can’t find an exact match, go slightly darker rather than lighter—dark thread is less visible than light thread against most fabrics. For patterned pants, choose a thread color that matches the dominant color in the pattern.
How do I fix a hemming mistake?
If you’ve sewn the hem too short, you can carefully cut the stitches with a seam ripper and try again. If the fabric is damaged or you don’t have enough length to re-hem, you might need to have a tailor add a patch or extend the pant leg. If you’ve sewn it too long, simply cut off the excess fabric and re-sew the hem shorter.
How long does a hemmed pair of pants last?
A well-executed hem should last as long as the pants themselves. The durability depends on how well you reinforced the seams, the quality of your thread, and how frequently you wear the pants. Pants you wear daily might need re-hemming after a year or two, while occasional-wear pants can go much longer without needing repairs.
Is hand sewing or machine sewing better for hemming?
Both methods produce excellent results. Hand sewing creates nearly invisible stitches and gives you more control, making it ideal for delicate fabrics or visible hems. Machine sewing is faster and produces uniform, durable stitches, making it perfect for everyday pants like jeans. Choose based on your comfort level and available time.
Related Posts

How Long to Boil Lobster Tails: Cooking Guide

How Long to Fly from New York to London? Travel Times
