
How to Fix Stick Drift: Expert Solutions
How to Fix Stick Drift: Expert Solutions for Gaming Controllers
There’s nothing quite like the frustration of settling in for an intense gaming session, only to have your character wander off-screen without touching the controller. Stick drift—that infuriating phenomenon where your analog sticks register input even when you’re not touching them—has become the bane of modern gamers everywhere. Whether you’re playing competitively or casually, stick drift can completely derail your experience and leave you questioning your sanity (and your controller’s reliability).
The good news? You don’t necessarily need to toss your controller in the trash or shell out $70 for a replacement. With the right knowledge and a bit of patience, you can tackle stick drift head-on. This comprehensive guide walks you through everything from understanding what causes stick drift to implementing both quick fixes and permanent solutions that actually work.
Let’s dive into the world of analog stick restoration and get your controller performing like it did on day one.
What Is Stick Drift?
Stick drift occurs when your controller’s analog stick registers movement input without any physical input from you. You might notice your character slowly drifting to one side, or your camera panning on its own. It’s maddening because the controller appears to be functioning normally—the stick moves smoothly, clicks satisfyingly, and looks pristine from the outside.
The problem lies beneath the surface. Modern analog sticks use potentiometers—small electronic components that measure the stick’s position and report it to your console or PC. Over time, these potentiometers wear out, accumulate dust and debris, or develop internal electrical inconsistencies. The result? False readings that convince your system the stick is being moved when it isn’t.
This issue affects virtually every major gaming platform: PlayStation controllers, Xbox controllers, Nintendo Joy-Cons, and even PC gaming peripherals. It’s so widespread that manufacturers have faced lawsuits and warranty claims over stick drift defects.
Why Does Stick Drift Happen?
Understanding the root causes of stick drift helps you both fix it and prevent it from happening again. Several factors contribute to this annoying problem:
- Dust and debris accumulation: Microscopic particles settle into the stick mechanism over months of use, interfering with the potentiometer’s electrical contacts.
- Potentiometer wear: The internal components that measure stick position degrade naturally with use, especially with aggressive gaming or rapid stick movements.
- Manufacturing defects: Some controllers ship with faulty potentiometers or improper calibration from the factory.
- Moisture exposure: Accidental spills or high-humidity environments can corrode internal components.
- Aggressive gameplay: Intense gaming sessions with rapid stick movements accelerate wear on the potentiometer contacts.
- Poor calibration: Occasionally, stick drift stems from software calibration issues rather than hardware failure.
The most common culprit? Dust and potentiometer wear. These account for roughly 80% of stick drift cases, which is good news—they’re often fixable without full replacement.
Quick Fixes to Try First
Before you consider replacing anything, try these simple solutions. Many people resolve stick drift without spending a dime or opening their controller.
Reset Your Controller
The first step should always be a complete controller reset. This clears any software glitches that might be causing false stick readings. The process varies by platform, but most controllers have a small reset button on the back. resetting your remote device follows similar principles if you’re experiencing drift on streaming devices.
For PlayStation controllers, hold the reset button (located in the small indentation on the back) for 3-5 seconds using a paperclip or small tool. For Xbox controllers, press and hold the Xbox button and the Menu button simultaneously for 6 seconds. For Nintendo Joy-Cons, navigate to System Settings, select Controllers and Sensors, then Calibrate Control Sticks.
Recalibrate Your Sticks
Calibration is your second line of defense. Even if you don’t open the controller, most platforms allow software recalibration. This tells your system where the neutral position should be and can sometimes correct minor drift issues.
Navigate to your controller settings and look for calibration options. You’ll typically move the stick in a full circle, then let it return to center. This process remaps the stick’s range and can eliminate drift caused by calibration drift rather than hardware failure.
Give It a Gentle Cleaning
Sometimes stick drift results from surface-level dust around the stick base. Grab a can of compressed air and gently spray around the stick’s edges while moving it in circles. This dislodges surface debris without requiring disassembly. Hold the can upright and use short bursts—never shake it, as this can spray liquid.
Calibration Methods Across Platforms
Each gaming platform offers built-in calibration tools. Let’s walk through the specifics:
PlayStation 4 and 5
Navigate to Settings → Devices → Controllers → Calibrate Control Sticks. Follow the on-screen prompts to move each stick through its full range of motion. The system will establish new baseline measurements.
Xbox Series X|S and Xbox One
Go to Settings → Devices & Connections → Controllers → Controller settings → Calibrate. Move the analog sticks as instructed, completing the full range for each stick.
Nintendo Switch
Open System Settings → Controllers and Sensors → Calibrate Control Sticks. Select the Joy-Con you want to calibrate and follow the on-screen instructions. This is particularly useful for Joy-Cons, which are notorious for drift issues.
PC (Steam)
In Steam settings, navigate to Controller Settings → General Controller Settings. Select your controller and choose Calibrate. This works for most wired and wireless controllers connected via USB.
Deep Cleaning Your Analog Sticks
If quick fixes don’t work, it’s time for deeper intervention. Deep cleaning involves accessing the interior of your controller to remove accumulated debris from the potentiometer itself.
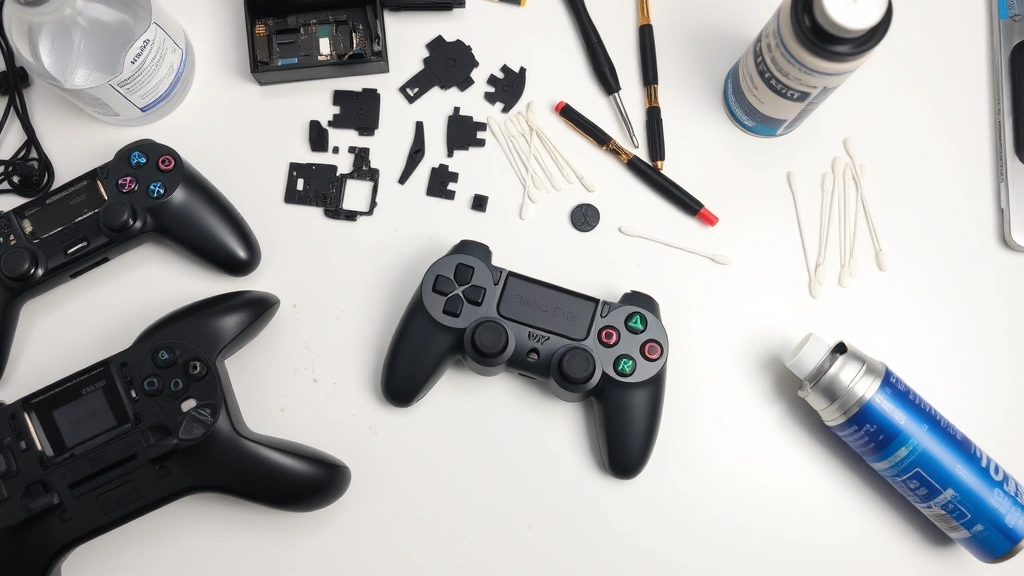
What You’ll Need
- Small Phillips and Torx screwdrivers (T9 or T10 for most controllers)
- Isopropyl alcohol (90% concentration or higher)
- Cotton swabs or small brushes
- Compressed air canister
- Small container for screws
- Optional: Tweezers for precision work
The Cleaning Process
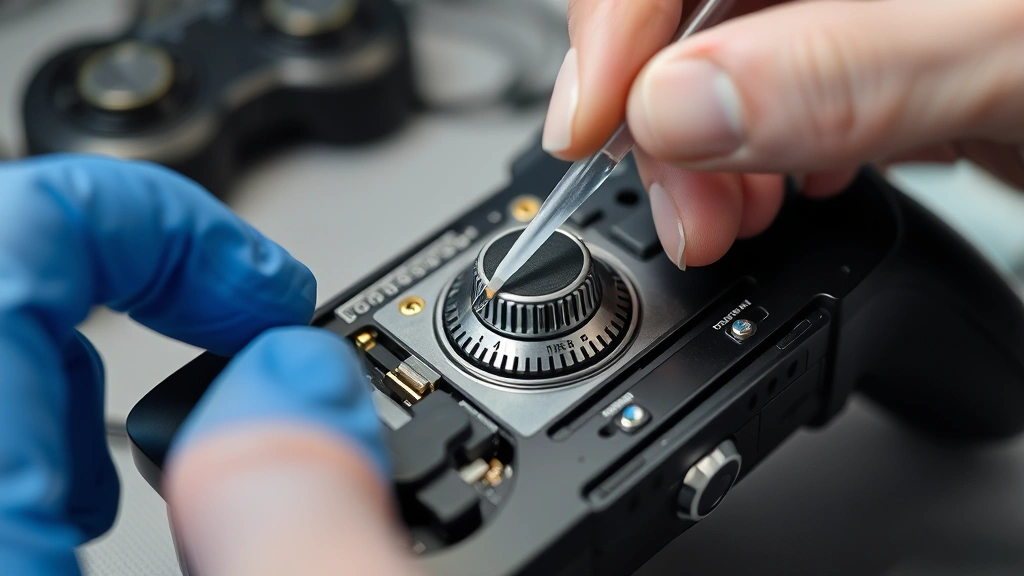
Step 1: Disassemble carefully. Remove all external screws from your controller’s back. Take photos during disassembly so you remember where everything goes. Gently pry open the casing using a plastic spoon or opening tool—metal tools can scratch the plastic.
Step 2: Document your work. As you open the controller, take multiple photos showing component placement. This is invaluable when reassembling.
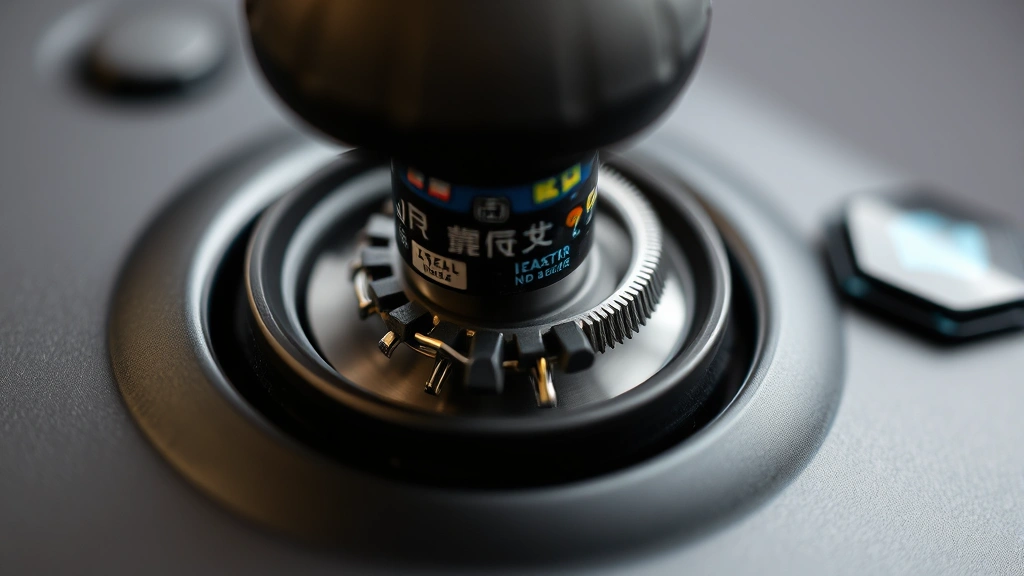
Step 3: Locate the potentiometer. Find the analog stick assembly. You’ll see the stick mechanism connected to the potentiometer—a small circuit board component beneath the stick.
Step 4: Clean the potentiometer contacts. Dip a cotton swab in isopropyl alcohol and gently clean the metal contacts on the potentiometer. Use gentle circular motions. Avoid excessive pressure that might damage delicate components.
Step 5: Clean the stick mechanism. Use compressed air to blow out dust from inside the stick assembly. Follow with another alcohol-dampened cotton swab to remove stubborn debris.
Step 6: Let it dry completely. Before reassembling, wait at least 30 minutes for all alcohol to evaporate. Moisture can cause electrical issues.
Step 7: Reassemble methodically. Follow your photos in reverse order. Start with internal components, then carefully snap the casing back together. Install screws in the same pattern you removed them.
Alternative: The Pencil Eraser Method
Some gamers swear by gently rubbing the potentiometer contacts with a clean pencil eraser. The eraser removes oxidation from the contacts without damaging them. Use light pressure and gentle circular motions for 10-15 seconds. Follow with compressed air to remove eraser residue.
This method is less invasive than alcohol cleaning and works surprisingly well for minor oxidation. However, it’s less effective for dust accumulation issues.
Replacement and Repair Options
If cleaning doesn’t resolve your stick drift, you’re looking at replacement. You have several options, each with different costs and complexity levels.
Professional Repair Services
Many gaming stores and electronics repair shops offer controller repair services. They’ll replace the potentiometer or entire stick assembly for $30-60 depending on your controller type. This is the safest option if you’re uncomfortable with DIY repair.
DIY Potentiometer Replacement
If you’re comfortable with electronics, you can purchase replacement potentiometers online for $5-15 and solder them yourself. This requires a soldering iron, solder, and some electronics experience. The process involves desoldering the old component and soldering the new one in place.
This is significantly cheaper than professional repair but carries risks if you’re inexperienced. One wrong move can damage the circuit board permanently.
Complete Stick Assembly Replacement
Many manufacturers sell replacement stick modules that snap into place without soldering. Nintendo Joy-Con replacements, for example, use this design. You can purchase a stick module for $15-30 and swap it yourself in under 10 minutes. It’s the sweet spot between cost and difficulty.
Controller Replacement
If your controller is out of warranty and repair costs mount up, replacement might be your best option. New controllers cost $60-70, but they come with a fresh warranty and no risk of recurring issues.
Warranty and Manufacturer Support
Check whether your controller is still under warranty. Many manufacturers cover stick drift as a defect, especially on newer controllers. Sony, Microsoft, and Nintendo have all offered replacements or repairs for drift-affected controllers. Contact their support and explain the issue—you might get a free replacement.
Prevention Tips for the Future
Once you’ve fixed stick drift, you’ll want to prevent it from happening again. These practices extend your controller’s lifespan significantly:
Handle with Care
Avoid aggressive stick movements during intense gameplay. While this is easier said than done during competitive moments, being mindful reduces wear on the potentiometer. Try to use smooth, controlled movements rather than rapid, jerky stick inputs.
Keep Your Controller Clean
Periodically use compressed air around the stick bases to prevent dust accumulation. Do this monthly if you’re a heavy gamer. It takes 30 seconds and prevents 80% of stick drift issues.
Store Properly
Store controllers in a clean, dry environment away from extreme temperatures. Excessive heat or cold can degrade internal components. A dedicated controller stand or storage case keeps dust out and protects against accidental drops.
Use Controller Covers
Silicone or rubber controller covers protect against dust ingress and provide better grip during intense gaming sessions. They’re inexpensive ($10-20) and surprisingly effective at extending controller life.
Rotate Multiple Controllers
If you’re a serious gamer, rotate between two or more controllers. This distributes wear across multiple devices, reducing the likelihood that any single controller develops stick drift quickly. It also gives you a backup if one fails.
Avoid Moisture
Keep drinks away from your gaming setup. Even small spills can corrode internal components. If your controller does get wet, disassemble it immediately, dry all components thoroughly, and let it sit for 24-48 hours before reassembling.
Update Firmware Regularly
Manufacturers occasionally release firmware updates that improve stick calibration. Keeping your controller firmware current can prevent calibration-related stick drift. You might also want to pair your remote properly when setting up new devices to ensure optimal calibration from the start.
Frequently Asked Questions
Is stick drift covered by warranty?
Most manufacturers cover stick drift as a defect during the warranty period (typically 1-2 years). Contact your controller’s manufacturer with proof of purchase. Many companies will replace affected controllers free of charge, even outside the official warranty period due to widespread stick drift issues.
Can I fix stick drift permanently?
Deep cleaning resolves stick drift in about 60-70% of cases. If cleaning doesn’t work, replacement is your most permanent solution. The issue is that potentiometers wear out naturally with use, so even after cleaning, drift might return eventually. However, following prevention tips can delay this significantly.
How long does stick drift take to develop?
Stick drift typically develops after 1-2 years of regular use, though some controllers experience it within months. Heavy gamers might see drift within 6-12 months. Manufacturing defects can cause drift immediately, even on new controllers.
Does stick drift affect all controller types equally?
Nintendo Joy-Cons are particularly notorious for stick drift, with some units failing within weeks. PlayStation and Xbox controllers are generally more durable, though they’re not immune. The issue is more about potentiometer design and manufacturing quality than the brand itself.
Can software fixes resolve stick drift?
Software can sometimes help if stick drift is caused by calibration issues, but it can’t fix hardware problems. If cleaning and recalibration don’t work, the issue is hardware-based and requires physical repair or replacement.
What’s the difference between stick drift and stick lag?
Stick drift causes unwanted movement without input. Stick lag means the stick responds slowly to your inputs. They’re different issues with different causes. Stick lag usually indicates connection problems or processing delays, while stick drift is potentiometer-related.
Is opening my controller safe?
Opening your controller voids the warranty in most cases. However, if your controller is out of warranty or you’ve already exhausted other options, opening it is relatively safe if you’re careful. Take photos during disassembly, work slowly, and use proper tools to avoid damaging components.
Should I try the pencil eraser method or alcohol cleaning?
Start with the pencil eraser method—it’s less invasive and works well for oxidation. If that doesn’t help, move to alcohol cleaning, which addresses dust accumulation. Reserve potentiometer replacement for when cleaning fails.
Can humidity cause stick drift?
Yes, high humidity can corrode potentiometer contacts over time. Store your controller in a dry environment, ideally between 30-50% humidity. If you live in a humid climate, consider using a controller storage case with desiccant packets to absorb excess moisture.
What’s the cheapest way to fix stick drift?
The cheapest approach is trying compressed air and recalibration first (free). If that doesn’t work, attempt the pencil eraser method ($0-5 if you have an eraser). Deep cleaning with isopropyl alcohol costs $5-10. Only move to replacement parts ($15-30) or professional repair ($30-60) if these methods fail. Warranty replacement is free if your controller qualifies.
Related Posts

How Long to Boil Lobster Tails: Cooking Guide

How Long to Fly from New York to London? Travel Times
