
Roasting Spaghetti Squash: Expert Tips & Tricks
How to Roast Spaghetti Squash: Expert Tips & Tricks
Spaghetti squash is a versatile and nutritious vegetable that transforms into delicate, noodle-like strands when roasted properly. Whether you’re looking for a low-carb pasta alternative or simply want to expand your vegetable repertoire, mastering the art of roasting spaghetti squash will elevate your cooking skills and open up countless recipe possibilities. This comprehensive guide will walk you through everything you need to know about selecting, preparing, and roasting this unique autumn vegetable to perfection.
Roasting spaghetti squash is easier than you might think, but the technique matters significantly when it comes to achieving the ideal texture and flavor. The key lies in understanding how heat transforms the squash’s flesh into those signature strands while developing a subtle sweetness that pairs beautifully with various sauces and toppings. From choosing the right squash at the market to determining the perfect roasting time and temperature, we’ll cover all the expert tips that will make you a spaghetti squash pro.
Selecting and Preparing Your Spaghetti Squash
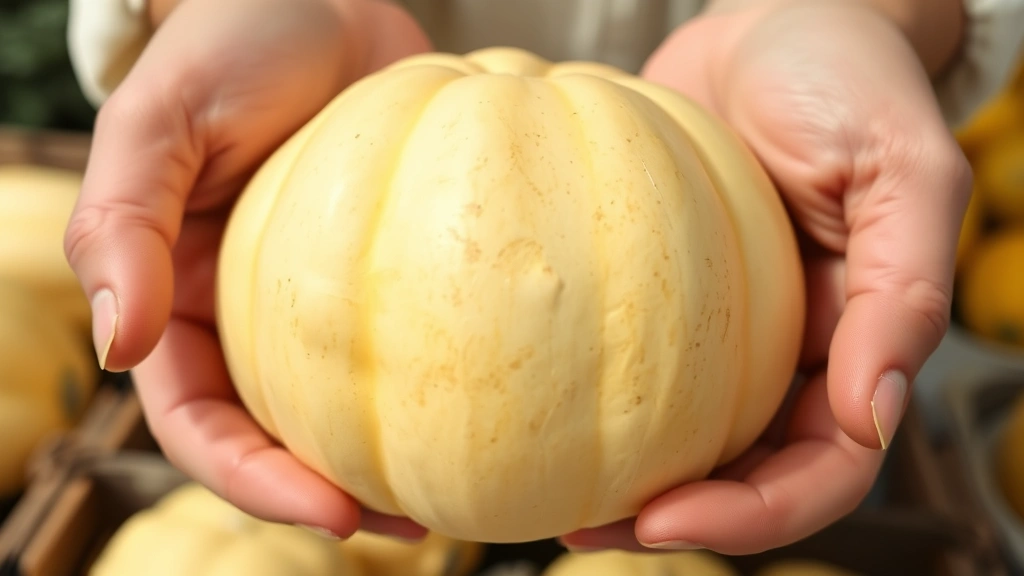
The journey to perfectly roasted spaghetti squash begins long before your oven preheats. Selecting a high-quality squash is the foundation of success. Look for squashes that feel heavy for their size, indicating they’re mature and have developed the proper flesh structure needed for those beautiful strands. The skin should be pale yellow to deep golden, with a hard exterior that resists pressure from your fingernail. Avoid squashes with soft spots, blemishes, or signs of mold, as these indicate deterioration.
When shopping at your local farmers market or grocery store, you’ll notice that spaghetti squash varies in size from about two to four pounds. For most households, a medium squash weighing around three pounds serves two to three people generously. Larger squashes may have thicker walls and slightly less tender flesh, while smaller ones tend to be more delicate. Choose based on your portion needs and cooking capacity. At home, store your raw spaghetti squash in a cool, dark place—not in the refrigerator—where it will keep for several weeks. This storage method allows the starches to convert to sugars, actually improving the flavor over time.
Before you begin roasting, wash your squash thoroughly under cool running water, scrubbing the exterior with a clean kitchen brush or cloth to remove any dirt or debris. Pat it completely dry with a clean towel, as excess moisture can interfere with browning and crisping during roasting. If you’re working with multiple squashes, as you might when preparing vegetables for a large gathering, arrange them on your work surface in order of processing to maintain an efficient workflow.
Essential Equipment and Setup
Having the right tools makes the roasting process significantly safer and more efficient. You’ll need a sharp chef’s knife or serrated knife designed for cutting through tough squash skin—dull knives are dangerous and require excessive force. A sturdy cutting board, preferably one with a non-slip base, provides stability while you work. Consider using a wooden or bamboo board, as the squash won’t slip as easily as it would on glass or marble.
For the actual roasting, invest in quality baking sheets with raised edges to contain any moisture or oil that may escape during cooking. Dark baking sheets absorb more heat and promote better browning, though you may need to reduce oven temperature by 25 degrees if you notice excessive browning. Line your baking sheets with parchment paper or aluminum foil for easy cleanup—spaghetti squash can be sticky, and this simple step saves considerable scrubbing time afterward.
Your oven should be calibrated accurately for consistent results. If you suspect temperature inconsistency, use an oven thermometer to verify the actual temperature matches your dial settings. This simple tool costs just a few dollars and can be the difference between perfectly tender squash and undercooked or overcooked results. Additionally, have ready a sturdy fork or squash shredder for the final step, and several clean kitchen towels for handling hot squash safely.
Cutting and Seeding Techniques
Cutting spaghetti squash safely requires patience and proper technique, as the skin is remarkably tough and the vegetable can roll unexpectedly. Start by making a small cut near the stem end using a sharp knife, applying steady pressure while rocking the blade gently back and forth. Never use a sawing motion, as this can cause the knife to slip. Once you’ve created an initial opening, place the squash flat on your cutting board with the cut side down for stability.
There are two primary cutting methods: lengthwise and crosswise. The lengthwise method, which cuts the squash from stem to bottom, creates two halves that are easier to handle and scoop. This is the preferred method for most home cooks. Position your knife at the stem and carefully press downward with steady, even pressure. Rotate the squash slightly and repeat, working your way around until you’ve cut completely through. The crosswise method, cutting the squash into rings, works well for smaller squashes and creates more uniform pieces for even roasting.
After cutting your squash in half, you’ll need to remove the seeds and stringy interior. Use a sturdy spoon or ice cream scoop to scrape away the seeds and fibrous material, working from one end to the other. Save these seeds! Like pumpkin seeds, they’re delicious when cleaned, dried, and roasted with your favorite seasonings. Rinse the seeds under cold water, removing all clinging flesh, then spread them on a towel to dry completely before roasting separately at 300 degrees for about 30 minutes. This waste-reduction approach aligns perfectly with sustainable cooking practices similar to those used when preparing ingredients efficiently.
Roasting Methods and Temperature Guide
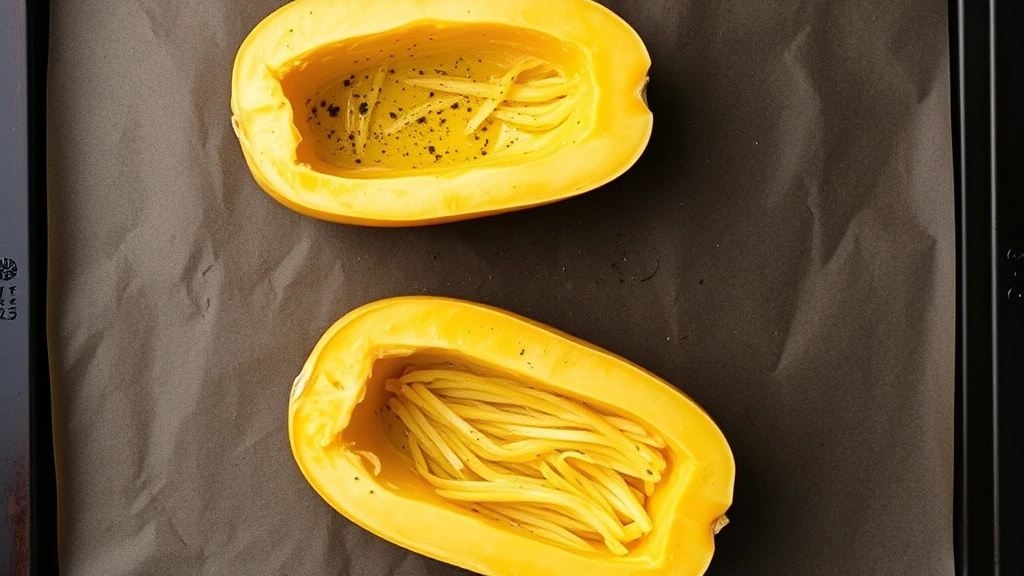
The standard roasting method works beautifully for spaghetti squash and requires minimal attention. Preheat your oven to 400 degrees Fahrenheit, allowing it to reach full temperature before placing your squash inside—this ensures even cooking and proper strand development. Place your prepared squash halves cut-side down on your prepared baking sheet. The cut side down method allows the flesh to steam slightly while the exterior browns, creating optimal texture.
Roast for 35 to 45 minutes, depending on your squash size and oven characteristics. The flesh is done when a fork easily pierces it and the strands separate naturally. You can check for doneness by gently pressing the flesh with a fork—it should feel tender throughout, not firm or rubbery. The skin may darken slightly around the edges, which indicates proper caramelization and enhanced flavor development.
For those who prefer a slightly different approach, you can roast cut-side up instead. This method takes slightly longer, approximately 45 to 50 minutes, but offers the advantage of allowing you to add toppings, seasonings, or a light oil coating directly to the flesh before roasting. Some cooks prefer this method because it allows the cut surface to brown more evenly. Whichever direction you choose, consistency matters most—stick with one method to develop reliable timing intuition.
If you’re roasting multiple squashes simultaneously, arrange them in a single layer without crowding your oven racks. Overcrowding restricts air circulation and results in uneven cooking. If necessary, use two oven racks, positioning one in the upper third and one in the lower third, and rotate the baking sheets halfway through cooking. This ensures both batches roast evenly and finish at the same time.
Seasoning and Flavor Enhancement
While spaghetti squash has a subtle, naturally sweet flavor, strategic seasoning transforms it from simple to spectacular. The most basic approach involves brushing the cut surfaces with olive oil and sprinkling with salt and black pepper before roasting. This allows the natural flavors to shine while the oil promotes browning and adds richness. Use about one tablespoon of oil per squash half, distributed evenly across the flesh.
For more adventurous flavor profiles, consider these seasoning combinations: Italian herbs with garlic and Parmesan create a Mediterranean vibe perfect for pairing with marinara sauce. Cajun spices with paprika and cayenne add a spicy kick ideal for southwestern preparations. Sesame oil, soy sauce, and ginger create an Asian-inspired version that pairs beautifully with stir-fried vegetables and proteins. Fresh herbs like rosemary, thyme, or basil can be added before roasting, though delicate herbs like basil work better added after cooking to preserve their bright flavor.
Some cooks swear by roasting spaghetti squash with the cut-side up, allowing them to create a seasoning mixture directly on the flesh. Combine softened butter with minced garlic, fresh herbs, and a pinch of red pepper flakes, spreading this mixture over the squash flesh before roasting. This creates an herb-infused crust that’s absolutely delicious. Alternatively, brush the flesh with balsamic vinegar mixed with a touch of maple syrup for a sweet and tangy profile that complements hearty fall dishes.
Don’t overlook the finishing touches applied after roasting. A squeeze of fresh lemon juice brightens the entire dish, while a sprinkle of fresh Parmesan cheese adds savory depth. Crispy bacon bits, toasted nuts, or caramelized onions add textural contrast and sophisticated flavor dimensions. These additions transform basic roasted spaghetti squash into a memorable side dish worthy of your best dinner table.
Shredding and Serving Your Roasted Squash
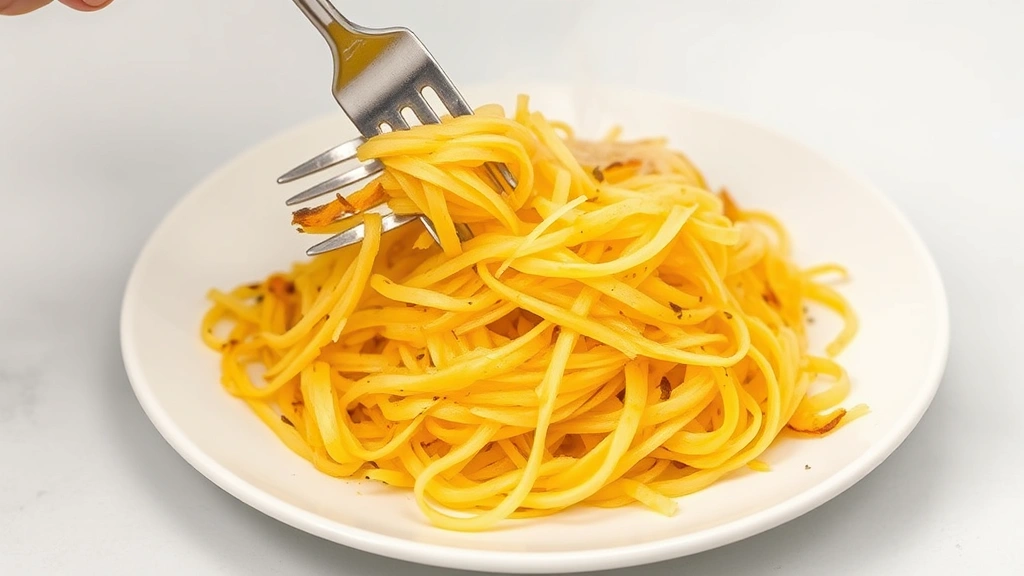
Once your spaghetti squash emerges from the oven, let it cool for five to ten minutes—this makes handling safer and easier. The squash will be extremely hot, so exercise caution to avoid burns. Using a sturdy fork, gently rake it across the flesh from one end to the other. The cooked flesh will naturally separate into long, delicate strands that remarkably resemble spaghetti pasta. This magical transformation never gets old, even for experienced cooks.
Work methodically from the outer edges toward the center, using gentle pressure to avoid pressing the strands into the skin. You’ll notice some strands release more easily than others—this variation is normal and depends on the squash’s maturity and your roasting time. If strands aren’t separating easily, return the squash to the oven for another five minutes, then try again.
Transfer your shredded squash to a serving bowl or plate, draining any excess liquid that accumulated during roasting. This liquid is normal and simply represents moisture released from the vegetable—it doesn’t indicate a problem. If you’re serving the squash as a pasta substitute, treat it similarly to freshly cooked pasta: serve immediately while warm, and toss with your favorite sauce, proteins, and vegetables. The warm strands absorb flavors beautifully and provide a lighter, lower-carbohydrate alternative to traditional wheat pasta.
For creative serving ideas, consider stuffing the roasted squash halves with your favorite ingredients: a mixture of ground turkey, vegetables, and tomato sauce creates a complete meal in one squash boat. Alternatively, top roasted squash with crispy chicken, a drizzle of tahini dressing, and roasted vegetables for a nutritious grain-free bowl. The possibilities are nearly endless, limited only by your imagination and pantry staples.
Storage and Make-Ahead Tips
Roasted spaghetti squash stores remarkably well, making it an excellent choice for meal preparation. After shredding, transfer your squash to an airtight container and refrigerate for up to five days. The strands will remain tender and flavorful throughout this period. Before serving refrigerated squash, gently reheat it in a skillet over medium heat with a small amount of butter or oil, stirring occasionally until warmed through—about three to five minutes.
For longer storage, freeze roasted spaghetti squash for up to three months. Spread shredded squash on a baking sheet and freeze until solid, then transfer to freezer bags, pressing out excess air to prevent freezer burn. This method prevents clumping and allows you to remove only the amount you need for individual meals. Thaw frozen squash in the refrigerator overnight before reheating, or reheat directly from frozen over low heat, adding a splash of water to prevent drying.
You can also freeze roasted squash in its halves before shredding. Allow the halves to cool completely, wrap them tightly in plastic wrap and then aluminum foil, and freeze for up to three months. This method works well if you prefer to shred your squash fresh rather than storing it pre-shredded. Thaw in the refrigerator and reheat in a 350-degree oven for about 15 minutes before shredding.
For ultimate convenience, roast your spaghetti squash on your scheduled meal prep day, shred it, and portion it into individual containers for grab-and-go meals throughout the week. This approach works particularly well if you’re following a low-carb or keto diet and want quick vegetable options readily available. Pair your pre-roasted squash with different sauces and proteins each day to prevent meal fatigue while maintaining nutritional goals. This efficient approach mirrors the time-saving benefits discussed in our comprehensive how-to guides, where preparation and planning ensure consistent success.
FAQ
How do I know when spaghetti squash is fully roasted?
Spaghetti squash is fully roasted when a fork easily pierces the flesh and the strands separate naturally with gentle pressure. The flesh should feel tender throughout, not firm or rubbery. Roasting typically takes 35 to 45 minutes at 400 degrees, though timing varies based on squash size and oven characteristics. When in doubt, roast for an additional five minutes rather than undercooking.
Can I roast spaghetti squash cut-side up instead of down?
Yes, absolutely. Roasting cut-side up takes slightly longer, approximately 45 to 50 minutes, but allows you to season and oil the flesh directly before roasting. This method also promotes browning on the cut surface. Choose whichever method you prefer, but maintain consistency for predictable results.
What’s the best way to cut a raw spaghetti squash safely?
Use a sharp chef’s knife or serrated knife, never a dull blade. Make a small initial cut near the stem, then place the squash cut-side down for stability. Apply steady, even pressure rather than sawing motions. Work slowly and carefully—there’s no rush. If the squash is particularly difficult to cut, microwave it for three to four minutes to slightly soften the skin before attempting to cut it.
Can I roast spaghetti squash at a different temperature?
Yes, you can adjust temperatures based on your preferences. Lower temperatures (375 degrees) take longer but may result in more tender flesh—increase roasting time to 50 to 60 minutes. Higher temperatures (425 degrees) cook faster but require careful monitoring to prevent excessive browning—reduce time to 30 to 35 minutes. Experiment to find your ideal balance.
How many servings does one spaghetti squash provide?
A medium three-pound spaghetti squash yields approximately two to three cups of shredded flesh, serving two to three people as a main dish or four to five as a side dish. Larger squashes provide more servings, while smaller ones serve fewer people. Adjust your squash selection based on your serving needs.
Is it necessary to drain the liquid from roasted squash?
Draining excess liquid is recommended but not absolutely necessary. The liquid represents moisture released during roasting and doesn’t indicate a problem. However, draining prevents your finished dish from becoming watery, particularly if you’re serving it with sauce or toppings that add additional moisture.
Can I add toppings before roasting?
Yes, if you roast cut-side up, you can add seasonings, oils, herbs, and even cheese before roasting. This method infuses flavors directly into the flesh. If roasting cut-side down, apply seasonings to the skin side, though they won’t penetrate as effectively. Experiment with both methods to determine your preference.
Related Posts

Superscript in Google Docs: Expert Tips

Strikethrough in Excel: Easy Steps for Beginners
