
Remove Battery Corrosion Safely: Expert Tips
Battery corrosion is one of the most common maintenance issues homeowners and vehicle owners face. That white, blue, or green crusty buildup around battery terminals isn’t just unsightly—it can prevent your battery from charging properly, reduce its lifespan, and even pose safety risks. Whether you’re dealing with corrosion on car batteries, household device batteries, or backup power systems, knowing how to remove battery corrosion safely and effectively is an essential skill that can save you money and frustration.
The good news is that removing battery corrosion doesn’t require expensive professional help or specialized equipment. With the right approach, household materials, and a bit of patience, you can restore your batteries to working condition. This comprehensive guide walks you through everything you need to know about identifying, preventing, and safely removing battery corrosion from any source.
What Causes Battery Corrosion
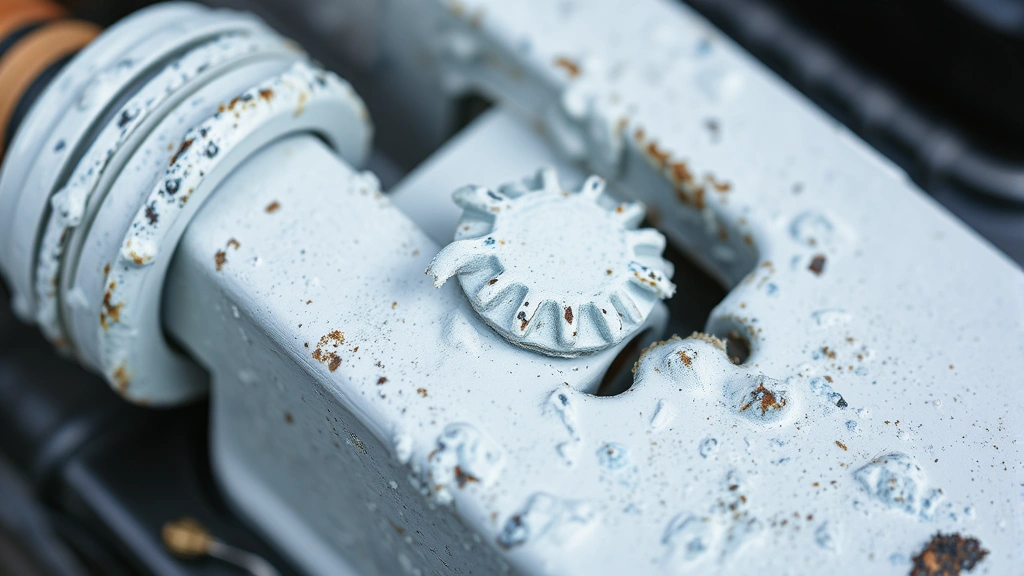
Understanding the root cause of battery corrosion helps you prevent it from returning. Battery corrosion occurs when chemical reactions happen between the battery terminals, the surrounding metal, and moisture in the air. The most common culprit is hydrogen gas released during the charging process, which reacts with oxygen and carbon dioxide to form those characteristic crusty deposits.
In car batteries, corrosion typically forms on the lead terminals and battery cable connectors. The buildup acts as an insulator, preventing proper electrical contact between the battery and the vehicle’s electrical system. This resistance can cause starting problems, dim headlights, and difficulty powering accessories. In household batteries used in remote controls, flashlights, and other devices, corrosion can leak alkaline or acidic compounds that damage the device itself.
Several factors accelerate corrosion formation. Overcharging your battery generates excess hydrogen gas. Poor ventilation around the battery traps moisture and corrosive gases. Damaged or loose battery cables allow air exposure. Extreme temperature fluctuations stress the battery case and seals. Understanding these triggers helps you implement preventive measures specific to your situation.
Safety Precautions Before Starting
Before you begin removing battery corrosion, prioritize safety. Batteries contain corrosive chemicals and can deliver electrical shocks, so proper precautions are non-negotiable. Never skip these steps, regardless of how minor the corrosion appears.
Disconnect the battery properly. For vehicle batteries, always disconnect the negative terminal first, then the positive terminal. This prevents accidental short circuits that could cause sparks or electrical damage. Wait several minutes after disconnection to allow residual electrical charge to dissipate.
Wear appropriate protective equipment. Safety glasses protect your eyes from corrosive particles and splashes. Nitrile or rubber gloves shield your hands from caustic chemicals. For heavy corrosion, consider wearing a face mask to avoid inhaling dust particles. Long sleeves and pants provide additional protection.
Work in a well-ventilated area. Hydrogen gas and other fumes from battery corrosion require proper airflow. If working on a vehicle battery, open the hood and work outdoors or in a garage with doors open. Never work in an enclosed space.
Avoid smoking and open flames. Hydrogen gas is flammable. Keep all ignition sources away from the work area, including cigarettes, matches, and welding equipment.
Never mix cleaning solutions. Some cleaners contain incompatible chemicals that create toxic fumes. Stick to one cleaning method at a time, and rinse thoroughly between different approaches.
Tools and Materials You’ll Need
Gathering supplies before you start makes the job smoother and safer. Most items are inexpensive and likely already in your home.
Cleaning agents: Baking soda mixed with water creates an effective, non-toxic paste. White vinegar dissolves corrosion through mild acidity. Commercial battery terminal cleaners offer convenience. For stubborn buildup, a small amount of lemon juice or cola (phosphoric acid) works surprisingly well. Distilled water rinses away residue without leaving mineral deposits.
Battery terminal cleaners come in spray and brush formats, offering quick solutions for car batteries.
Cleaning tools: An old toothbrush or soft-bristled brush scrubs away loose corrosion without damaging terminals. For heavier buildup, a brass wire brush works effectively. Avoid steel wool on some battery types, as it can scratch protective coatings. Cotton swabs reach tight spaces around terminal posts. Lint-free cloths or paper towels dry components thoroughly.
Safety equipment: Safety glasses, nitrile gloves, and a dust mask are essential. A small plastic container holds your cleaning solution. Newspaper or cardboard protects work surfaces from drips and spills.
Additional items: A wrench or socket set disconnects cable terminals from the battery. A flashlight illuminates work areas. A small spray bottle applies cleaning solution evenly. Have a trash bag nearby for corrosion debris.
Step-by-Step Removal Process
This systematic approach works for most battery types. Adapt steps based on your specific situation and battery design.
Step 1: Prepare Your Workspace
Lay newspaper or cardboard under and around the battery to catch drips and debris. Ensure adequate lighting—use a flashlight or work lamp to see all corrosion clearly. For vehicle batteries, open the hood and position yourself comfortably with full access to both terminals.
Step 2: Disconnect the Battery
For car batteries, use your wrench to loosen the negative terminal clamp first—this is the black cable marked with a minus sign. Remove the cable completely and set it aside where it won’t accidentally touch the positive terminal. Next, loosen and remove the positive terminal cable (red, marked with a plus sign). If the clamps are severely corroded and won’t budge, apply your cleaning solution and wait five minutes for it to soften the corrosion.
Step 3: Assess the Corrosion Severity
Light corrosion appears as a thin white, blue, or green layer. Moderate corrosion forms thick crusty deposits. Severe corrosion completely encases terminals and may have caused cable damage. This assessment determines your cleaning approach—light corrosion needs gentle treatment, while severe corrosion requires more aggressive scrubbing.
Step 4: Apply Your Cleaning Solution
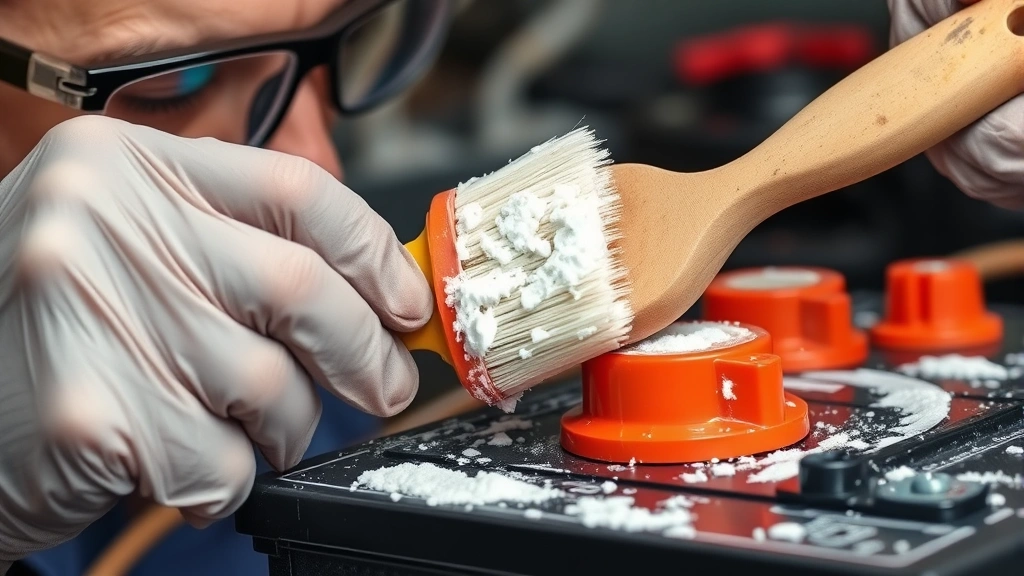
Mix baking soda with water to create a paste consistency—roughly three parts baking soda to one part water. Apply this paste generously to all corroded areas. The mixture will fizz slightly as it reacts with corrosion, which is the chemical action breaking down the buildup. Let it sit for 5-10 minutes on heavy corrosion.
Alternatively, pour white vinegar directly onto the corroded terminals. The acidic reaction dissolves corrosion effectively. Again, allow 5-10 minutes of contact time for stubborn buildup.
Step 5: Scrub Away the Corrosion
Using your soft-bristled brush or old toothbrush, gently scrub the corroded areas. Work in circular motions, gradually increasing pressure as the corrosion loosens. Don’t force it—if corrosion resists, apply more cleaning solution and wait longer. For cable clamps and terminal posts, scrub thoroughly to remove all traces of buildup. Pay special attention to crevices and the underside of clamps where corrosion hides.
For stubborn corrosion that resists brushing, switch to a brass wire brush. Use firm but controlled pressure to avoid damaging the underlying terminal. Never use steel wool on delicate terminals, as it can scratch protective plating.
Step 6: Rinse Thoroughly
Once corrosion is removed, rinse everything with distilled water. This prevents mineral deposits that tap water would leave behind. Use a spray bottle for controlled rinsing, or carefully pour distilled water over treated areas. Make sure no cleaning solution residue remains, as it can continue reacting with metal and cause new corrosion.
Step 7: Dry Completely
Moisture accelerates corrosion formation. Dry all components thoroughly using lint-free cloths or paper towels. Pay particular attention to terminal posts, cable clamps, and the battery top. Use a dry cloth to wipe away any remaining moisture from the battery case itself.
Step 8: Reconnect the Battery
Before reconnecting, inspect cables for damage. Frayed insulation, cracks, or severely corroded sections mean the cable needs replacement. If cables are intact, reconnect in reverse order: positive terminal first, then negative terminal. Tighten clamps firmly but don’t over-tighten, which can crack terminals. You should feel solid resistance when the clamp is properly seated.
Cleaning Different Battery Types
Different batteries require slightly different approaches based on their design and chemistry.
Car and Truck Batteries
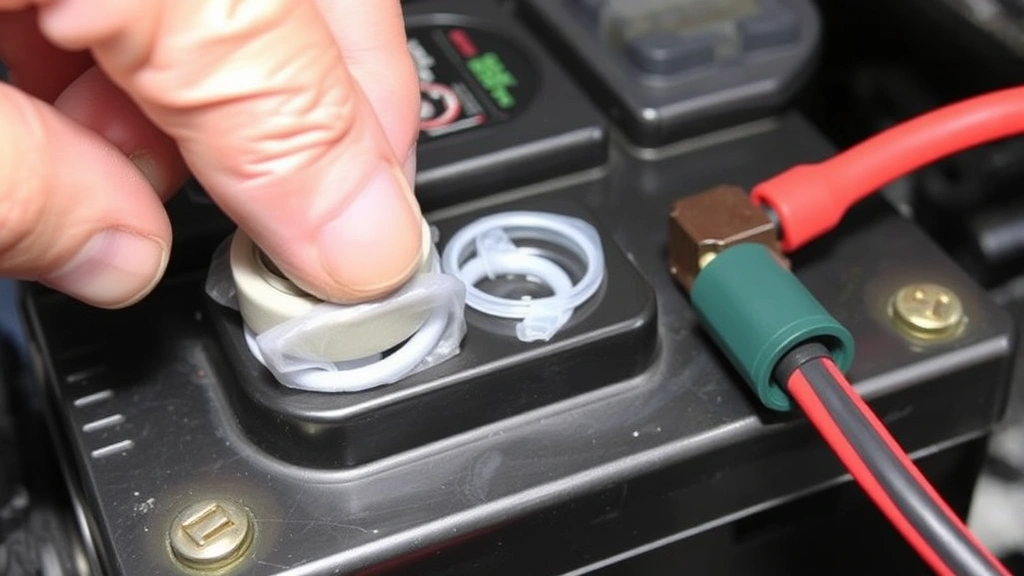
Vehicle batteries are the most common corrosion problem. Follow the complete process outlined above. After cleaning, consider applying a thin coat of petroleum jelly or battery terminal protectant to the clean terminals. This creates a moisture barrier that slows future corrosion. Your local auto parts store carries terminal protectant sprays specifically designed for this purpose.
Household Device Batteries
Corrosion in remote controls, flashlights, and toys requires a gentler touch. Remove the corroded battery from the device. Mix baking soda and water into a paste. Using a cotton swab, apply the paste to corroded terminals and the inside of the battery compartment. Gently scrub with the swab, then rinse with a slightly damp cloth. Dry thoroughly before reinstalling the battery or inserting a replacement.
If corrosion has leaked into the device mechanism, this gentle cleaning approach also works inside the compartment. Never use vinegar or aggressive scrubbing on device interiors, as you might damage delicate components.
Lawn Equipment and Small Engine Batteries
Batteries in mowers, generators, and ATVs often sit unused for extended periods, accelerating corrosion. Disconnect the battery before cleaning. Use the baking soda paste method for light to moderate corrosion. For severe buildup, a brass wire brush removes stubborn deposits. After cleaning and drying, apply terminal protectant before reconnecting.
Backup Power and RV Batteries
Deep-cycle batteries used in RVs and backup systems handle corrosion similarly to car batteries but may have different terminal designs. Identify your specific terminal type—some use stud terminals, others use clamp terminals. Apply the appropriate cleaning method, then dry completely. These batteries often sit in challenging environments, so preventive measures are especially important.
Preventing Future Corrosion
Once you’ve cleaned your battery, implement prevention strategies to avoid repeating this task.
Apply Terminal Protectant
After cleaning and drying, apply a thin coat of battery terminal protectant spray or petroleum jelly to clean terminals. This creates a moisture barrier that significantly slows corrosion formation. Reapply every six months or after cleaning. Many auto parts stores carry battery terminal protectants designed specifically for this purpose.
Check Battery Connections Regularly
Inspect your battery terminals monthly, especially before winter or extended storage. Early detection of light corrosion allows quick cleanup before it becomes problematic. Tighten any loose cable connections, which allow air exposure and accelerate corrosion.
Ensure Proper Battery Ventilation
Batteries need airflow to release hydrogen gas safely. For vehicle batteries, ensure nothing blocks the battery case vents. In enclosed spaces like equipment storage, provide adequate ventilation. Poor ventilation traps corrosive gases and moisture, dramatically accelerating buildup.
Address Overcharging Issues
Overcharging is a primary corrosion cause. If you notice corrosion forming quickly after cleaning, your charging system may be faulty. Have a mechanic test your vehicle’s charging system, or check your charger settings for household devices. Proper charging voltage prevents excess hydrogen gas production.
Keep Batteries Clean and Dry
Wipe down battery cases occasionally to remove dust and moisture. In humid environments, this becomes especially important. For stored equipment, use silica gel packets or a dehumidifier to control moisture around batteries.
Use Quality Cables and Clamps
Damaged or low-quality cables corrode faster. Inspect cable insulation regularly for cracks or fraying. Replace damaged cables immediately. Heavy-duty battery cables with quality clamps resist corrosion better than thin, cheap alternatives.
Consider a Battery Charger with Float Mode
If maintaining a battery over long periods, a smart charger with float mode prevents overcharging. Float mode maintains the correct charge level without overcharging, which is the leading cause of battery corrosion.
FAQ
Q: Is battery corrosion dangerous?
A: Battery corrosion itself isn’t dangerous, but it prevents proper electrical contact, which can damage your vehicle or device. The corrosive compounds can irritate skin and eyes, so wear protection when cleaning. Never taste or ingest battery corrosion.
Q: Can I use vinegar on all battery types?
A: Vinegar works well on most batteries, but test it on a small area first. For delicate household device batteries, baking soda paste is safer. Vinegar’s acidity is generally safe but can damage some protective coatings with repeated use.
Q: How often should I clean battery corrosion?
A: If you implement preventive measures, you may never need to clean again. Without prevention, inspect monthly and clean when corrosion becomes visible. Light corrosion can be addressed immediately; don’t wait for heavy buildup.
Q: What if corrosion has damaged the cable?
A: Severely corroded cables with frayed insulation or cracks must be replaced. Damaged cables are safety hazards and don’t conduct electricity properly. Battery cables are inexpensive and replaceable at any auto parts store.
Q: Can I clean the battery while it’s still connected?
A: No. Always disconnect both terminals before cleaning. Cleaning a connected battery risks electrical shock and accidental short circuits that can damage your vehicle’s electrical system or cause fires.
Q: Why does corrosion form so quickly sometimes?
A: Rapid corrosion usually indicates overcharging, poor ventilation, or a faulty charging system. Have your charging system tested by a professional. For household devices, use a quality charger with proper voltage settings.
Q: Is baking soda safe for all batteries?
A: Yes. Baking soda is non-toxic, non-corrosive, and safe for all battery types. It’s the gentlest cleaning option and works effectively on light to moderate corrosion.
Q: What’s the best way to maintain household batteries to prevent corrosion?
A: Store batteries in cool, dry places. Remove batteries from devices during extended storage. Keep devices clean and dry inside. Replace batteries promptly when they start leaking.
Q: Can I use cola to clean battery terminals?
A: Yes. Cola contains phosphoric acid that dissolves corrosion effectively. Pour it directly on corroded terminals, let it sit for 10 minutes, then scrub and rinse thoroughly. This method works surprisingly well for moderate corrosion.
Q: Should I replace my battery if it has heavy corrosion?
A: Not necessarily. Even heavily corroded batteries can function normally after cleaning if the corrosion is only external. However, if the battery won’t hold a charge after cleaning, or if the case is cracked, replacement is necessary. Heavy internal corrosion requires professional diagnosis.