
Planting Carrots: Expert Tips for Beginners
Planting Carrots: Expert Tips for Beginners
Growing carrots from seed is one of the most rewarding gardening projects for beginners. Unlike many vegetables that require transplanting seedlings, carrots thrive when planted directly into the soil where they’ll mature. This straightforward approach eliminates much of the guesswork and equipment needed for other crops. Whether you’re starting your first vegetable garden or expanding an existing one, carrots offer reliable results with minimal fuss.
Carrots are incredibly versatile vegetables that adapt well to various growing conditions and climates. From sweet orange varieties to colorful purple, red, and yellow types, there’s a carrot for every palate and garden size. The key to success lies in understanding the fundamentals: proper soil preparation, correct planting depth, appropriate spacing, and consistent moisture management. This guide walks you through every step of how to plant carrots, ensuring you harvest crisp, delicious roots in just 60-80 days.
Choosing the Right Carrot Varieties
Before you begin planting, selecting the appropriate carrot variety ensures compatibility with your climate, soil conditions, and harvest timeline. Carrots fall into several categories based on root length and shape, each suited to different garden environments.
Nantes carrots are excellent for beginners because they’re forgiving, disease-resistant, and produce uniform, cylindrical roots about 6-7 inches long. Popular varieties include ‘Nantes Half Long’ and ‘Touchon,’ which mature in approximately 70 days. These perform well in most soil types and offer exceptional sweetness and tenderness.
Chantenay carrots feature shorter, wider roots (4-5 inches) and perform exceptionally well in clay-heavy or shallow soils where longer varieties struggle. ‘Red Cored Chantenay’ and ‘Chantenay Royal’ are reliable choices that resist splitting and cracking. They’re ideal if your garden has compacted soil or limited depth.
Imperator carrots are the long, slender types you see in grocery stores, reaching 8-10 inches in length. These require deep, well-draining soil and take 75-80 days to mature. While visually impressive, they’re less forgiving for beginners with less-than-ideal soil conditions.
Mini or finger carrots mature quickly (50-60 days) and are perfect for containers or small spaces. Varieties like ‘Thumbelina’ and ‘Parisian’ produce bite-sized roots ideal for snacking and adding whole to dishes.
When selecting seeds, check the seed packet for your USDA hardiness zone and days to maturity. This information helps you plan succession plantings and ensures varieties suited to your local climate. Consider growing multiple varieties to discover your preferences and extend your harvest season throughout spring, summer, and fall.
Soil Preparation and Garden Setup
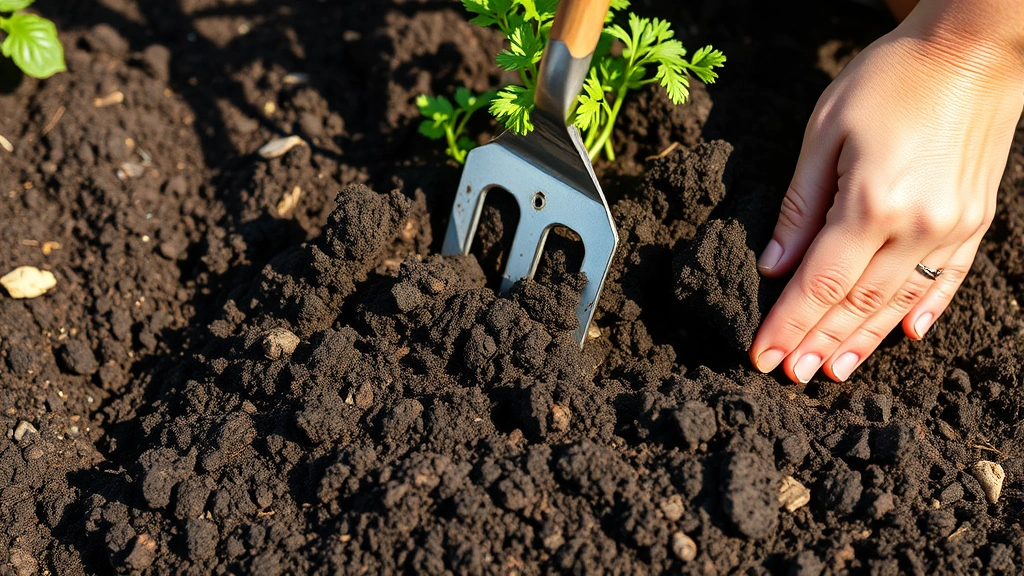
Carrot success depends critically on soil quality. These root vegetables require loose, well-draining soil free from rocks, clay clumps, and debris that obstruct root development and cause forking or distortion. Begin soil preparation at least 2-3 weeks before planting to allow amendments to integrate fully.
Soil texture is paramount. Carrots develop best in sandy loam or loamy soil with a pH between 6.0 and 6.8. If your garden has heavy clay soil, amend it generously with compost, aged manure, and coarse sand. Mix these amendments 8-12 inches deep to create an environment where roots elongate smoothly without resistance. For clay soils, consider building raised beds filled with quality garden soil and compost—this approach guarantees optimal growing conditions regardless of native soil quality.
Remove all rocks, sticks, and debris from the top 12 inches of soil. Even small obstacles cause roots to split, fork, or grow sideways. Take time to hand-pick larger items and break up compacted soil with a garden fork or tiller. If tilling, avoid working wet soil, which can damage soil structure and create hard-packed layers.
Incorporate organic matter extensively. Mix 2-3 inches of well-aged compost or decomposed manure into your planting area. This improves drainage in heavy soils, increases water retention in sandy soils, and adds nutrients carrots need. Avoid fresh manure, which promotes forking and can harbor harmful pathogens.
Test your soil pH using a home kit or professional laboratory test. Most carrots prefer slightly acidic to neutral pH. If your soil is too acidic (below 6.0), add lime; if too alkaline (above 7.0), add sulfur. Allow 2-3 weeks for pH adjustments to take effect before planting.
For container growing, fill pots at least 12 inches deep with quality potting mix combined with compost. Carrots in containers need consistent moisture and good drainage, so use a mix that balances water retention with aeration. This approach works wonderfully if you’re interested in learning more about how to germinate seeds and starting vegetables from scratch.
Planting Carrot Seeds
Carrot seeds are tiny—nearly impossible to see without close inspection—making proper planting technique essential. Unlike larger seeds, carrot seeds require shallow planting and consistent moisture for germination. Most gardeners find success using one of several proven methods.
Direct seeding is the standard approach. Sow seeds directly into prepared garden beds 2-3 weeks before your last spring frost, or 12-14 weeks before your first fall frost. Create shallow furrows ¼-inch deep using your finger or a thin stick. Space rows 12-18 inches apart depending on your variety and available space. This spacing allows comfortable access for thinning and harvesting.
Sprinkle seeds thinly along the furrow—aim for one seed every ½ inch, though spacing needn’t be perfect since you’ll thin seedlings later. Carrot seeds germinate slowly (14-21 days), so some gardeners mix them with radish seeds. Radishes germinate quickly and mark the row, then are harvested before carrots need space.
Gently cover seeds with fine soil or a mixture of soil and compost. Press lightly to ensure good seed-to-soil contact, which is critical for germination. Water gently using a misting spray or fine nozzle to avoid washing seeds away. Keep the soil consistently moist (not waterlogged) throughout the germination period.
Paper tape seeding simplifies spacing. Some gardeners glue seeds to biodegradable paper tape at proper spacing intervals. This method eliminates tedious thinning but costs more than bulk seed. Simply lay the tape in your furrow, cover with soil, and water. As seedlings grow, the paper dissolves naturally.
Succession planting extends your harvest. Rather than planting all seeds at once, sow new batches every 3-4 weeks from early spring through midsummer. This approach provides continuous carrot harvests throughout the season rather than one large harvest followed by none. In mild climates, fall plantings produce carrots that mature in cool weather, often developing superior sweetness.
Protect newly seeded areas from heavy rain, which can crust the soil surface and prevent seedling emergence. If crusting occurs, mist the area gently to soften the crust, or cover with burlap until sprouts appear. Once seedlings emerge, remove any protective covers immediately to allow light access.
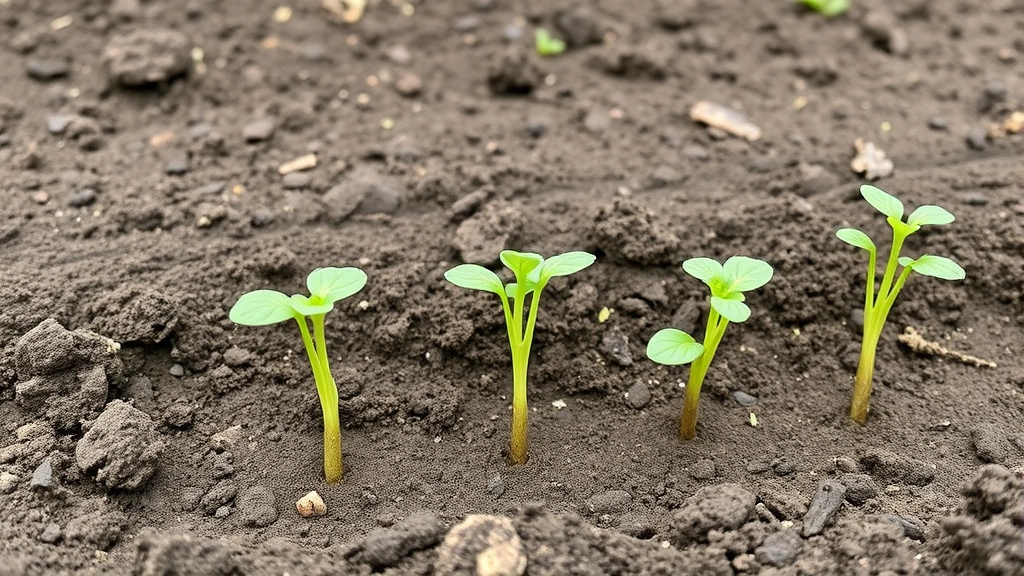
Spacing and Thinning Seedlings
When carrot seedlings develop their first true leaves (the second set of leaves to appear), thinning becomes necessary. Overcrowded carrots compete for nutrients and water, resulting in small, misshapen roots. Proper spacing ensures each plant receives adequate resources to develop fully.
Thin seedlings in stages. When sprouts are about 2 inches tall, remove the smallest or weakest-looking seedlings, spacing remaining plants 1 inch apart. This initial thinning reduces competition while allowing final thinning later. When seedlings reach 4 inches tall, perform final thinning based on your variety: Nantes and Chantenay types need 3-4 inches between plants; Imperators require 4-6 inches; mini varieties need only 2-3 inches.
Use small scissors or pruning shears to cut seedlings at soil level rather than pulling them out. Pulling disturbs soil around remaining plants and can damage their roots. Cutting leaves are safe to discard or compost. The thinned seedlings are edible—young carrot greens add peppery flavor to salads, though most gardeners discard them.
Thinning is admittedly tedious, but it’s non-negotiable for success. Skipping this step results in crowded, stunted roots that fail to develop properly. Some gardeners find the task meditative; others sow more sparingly initially to minimize thinning later.
If you’re growing carrots alongside other vegetables, consider consulting guides on how to plant a grass seed and other garden planning resources to maximize your space efficiently.
Watering and Moisture Management
Consistent moisture is critical throughout carrot development, particularly during germination and the first 4-6 weeks of growth. Inconsistent watering causes roots to split, crack, or develop bitter, woody texture.
Water deeply and regularly. Provide 1-1.5 inches of water weekly through rainfall or irrigation. In hot, dry periods, water more frequently to maintain consistent soil moisture. Water early morning to minimize evaporation and reduce disease pressure. Avoid evening watering, which leaves foliage wet overnight and promotes fungal diseases.
Use drip irrigation or soaker hoses for the most efficient watering. These methods deliver water directly to soil without wetting foliage, reducing disease risk while minimizing water waste. If using overhead sprinklers, water early and ensure soil dries by afternoon.
Mulching conserves moisture and moderates soil temperature. Apply 1-2 inches of organic mulch (straw, shredded leaves, or grass clippings) around plants, keeping mulch slightly away from the stem. Mulch reduces evaporation, maintains cooler soil temperatures during hot weather, and suppresses weeds that compete for water and nutrients. As mulch decomposes, it enriches soil with organic matter.
Monitor soil moisture by inserting your finger 2 inches into the soil. If it feels dry at that depth, water thoroughly. If it feels moist, wait another day or two before watering. This simple technique prevents both overwatering and underwatering.
In late season, as roots mature, you can reduce watering frequency slightly. However, avoid allowing soil to dry completely, which causes roots to become tough and woody.

Sunlight and Temperature Requirements
Carrots are relatively flexible regarding sunlight and temperature, adapting well to various growing conditions. However, optimizing these factors accelerates growth and improves root quality.
Sunlight needs are moderate. Carrots require minimum 6 hours of direct sunlight daily but actually prefer 8-10 hours. In hot climates, afternoon shade helps keep soil cooler and prevents excessive bolting. In cooler regions, maximum sunlight promotes faster growth. Morning sun with afternoon shade in hot climates is ideal.
Temperature preferences favor cool to moderate conditions. Carrots germinate best at soil temperatures of 55-70°F, though germination occurs anywhere from 40-85°F (just more slowly at temperature extremes). Once established, carrots grow well in temperatures between 60-75°F. Cool weather actually improves sweetness by encouraging sugar accumulation in roots.
Spring planting typically produces the best results. Cool spring temperatures promote steady growth, and plants mature before summer heat arrives. Fall plantings also excel in many regions—cool autumn weather produces exceptionally sweet carrots. Summer plantings often struggle in hot climates unless you provide afternoon shade and consistent irrigation.
Carrots tolerate light frost and can overwinter in many regions. Some gardeners leave mature carrots in the ground through fall and early winter, harvesting as needed. This approach works in areas where soil doesn’t freeze solid. In colder climates, mulch heavily to insulate roots and allow winter harvesting.
Pest and Disease Management
Carrots are relatively pest-resistant compared to many vegetables, but several issues can reduce yields or quality. Integrated pest management (IPM) emphasizes prevention through proper cultural practices rather than relying solely on pesticides.
Common pests include carrot rust flies and wireworms. Carrot rust fly larvae tunnel into roots, creating unsightly brown tunnels. Prevent infestations by floating row covers over young plants—these lightweight fabrics exclude pests while allowing light and water penetration. Remove covers once plants flower (if you’re saving seed) or harvest before flowering.
Wireworms damage roots by creating small holes. These pests favor wet soil, so proper drainage and avoiding overwatering helps prevent infestations. Crop rotation—avoiding planting carrots in the same location annually—disrupts pest life cycles.
Diseases are uncommon but possible. Powdery mildew occasionally appears on foliage in humid conditions. Improve air circulation by thinning adequately and avoiding overhead watering. Cercospora leaf spot causes brown spots on leaves; remove affected foliage and avoid wetting leaves when watering.
Beneficial insects and organic practices support healthy plants. Encourage natural predators like ladybugs and lacewings by planting flowering herbs nearby. Neem oil and insecticidal soap control pests organically if infestations become severe. For most home gardeners, proper spacing, sanitation, and crop rotation prevent serious pest problems.
If you’re managing multiple crops, you might benefit from learning how to how to grow carrots alongside complementary vegetables to maximize garden health and productivity.
Harvesting Your Carrots
Carrots are ready to harvest 60-80 days after planting, depending on variety and growing conditions. Unlike many vegetables with precise harvest windows, carrots are forgiving—you can harvest them small for tenderness or allow them to reach full size for maximum yield.
Check maturity by examining root size. Gently brush away soil from the top of the root to see its diameter. Most varieties reach harvestable size when the shoulder (top of the root) is ½-¾ inch in diameter. This indicates the root has developed sufficiently for eating. Smaller roots are more tender; larger roots are sweeter and store longer.
To harvest, loosen soil around the root with a garden fork, then gently pull the carrot from the ground. In loose, well-prepared soil, mature carrots pull easily. If soil is compacted or clay-heavy, loosen it first to avoid breaking roots. For sandy soil, sometimes carrots slip right out with minimal effort.
Harvest timing affects flavor and storage. Carrots harvested in cool weather taste sweeter because plants accumulate sugars. Fall-harvested carrots often taste better than spring or summer varieties. You can leave mature carrots in the ground for weeks or months (in non-freezing climates) and harvest as needed, providing fresh vegetables throughout the season.
Prepare carrots for storage properly. Remove green tops immediately after harvest—they continue drawing moisture from roots, reducing storage life. Cut tops ½ inch above the root. Don’t wash carrots before storage; brush away excess soil gently. Store unwashed carrots in a cool (32-40°F), humid location like a refrigerator crisper drawer or unheated basement. Properly stored carrots keep 3-6 months, providing fresh vegetables through winter.
For extended storage, bury carrots in damp sand or sawdust in a cool location. This method keeps them fresh for months, though checking occasionally for rot is necessary. Some gardeners mulch heavily over carrots left in the ground and harvest throughout winter, which works in climates where soil doesn’t freeze solid.
If you’re expanding your vegetable gardening skills, exploring resources like how to plant an avocado seed and how to propagate succulents broadens your gardening repertoire beyond root vegetables.
FAQ
What’s the best time to plant carrots?
Plant carrots in early spring (2-3 weeks before last frost) or mid-summer for fall harvest. Carrots thrive in cool weather and germinate better at moderate temperatures. Succession plant every 3-4 weeks for continuous harvest.
Can I grow carrots in containers?
Yes, absolutely. Use containers at least 12 inches deep filled with quality potting mix and compost. Shorter varieties like Nantes or mini carrots work best in containers. Ensure excellent drainage and consistent moisture for success.
How deep should carrot seeds be planted?
Plant seeds only ¼-inch deep. Carrot seeds are tiny and require shallow planting. Planting too deep prevents germination or creates weak seedlings that struggle to emerge.
Why are my carrots forked or misshapen?
Forked carrots result from rocky soil, compacted clay, or obstacles blocking root growth. Prepare soil thoroughly by removing rocks and amending with compost. Chantenay varieties tolerate imperfect soil better than Imperators.
How often should I water carrots?
Water carrots 1-1.5 inches weekly to keep soil consistently moist. More frequent watering in hot weather prevents roots from splitting or becoming woody. Use drip irrigation for efficiency and disease prevention.
Can I harvest carrots before they reach full size?
Yes, younger carrots are more tender. You can harvest carrots at any size once they’re large enough to handle. Smaller roots (pencil-thin) are delicate; larger roots are sweeter and store longer.
What’s the difference between carrot varieties?
Nantes carrots are forgiving and uniform; Chantenay types tolerate poor soil; Imperators are long and slender; mini varieties mature quickly. Choose based on soil quality and available space. Most beginners succeed with Nantes varieties.
Do carrots need fertilizer?
Properly prepared soil with compost provides adequate nutrients for carrots. Excessive nitrogen promotes leafy growth at the expense of roots. If soil is poor, apply balanced fertilizer monthly, but avoid over-fertilizing.
Related Posts

Superscript in Google Docs: Expert Tips

Strikethrough in Excel: Easy Steps for Beginners
