
How to Craft DIY Soap? Expert Tips Inside
How to Craft DIY Soap: Expert Tips Inside
Making soap at home is a rewarding craft that combines chemistry, creativity, and practical skill. Whether you’re interested in creating personalized gifts, reducing plastic waste, or simply enjoying a fulfilling hobby, DIY soap making offers endless possibilities for customization and self-expression. This comprehensive guide will walk you through everything you need to know to start crafting beautiful, functional soaps in your own kitchen or dedicated workspace.
Handmade soap provides superior quality compared to commercial alternatives, allowing you to control every ingredient and tailor formulations to your skin type. From cold process to hot process methods, melt-and-pour techniques to rebatching, there’s a soap-making approach suited to every skill level and time commitment. You’ll discover that this ancient craft blends science with artistry, producing results that are both practical and luxurious.
Understanding Soap-Making Basics
Before diving into the craft, it’s essential to understand the chemistry behind soap creation. Soap is produced through a chemical reaction called saponification, where oils or fats combine with an alkaline substance (typically sodium hydroxide or potassium hydroxide) to create soap molecules and glycerin. This fundamental process remains constant across all soap-making methods, though the execution varies significantly.
The concept of soap ratios and lye calculations forms the foundation of successful soap making. Each oil or fat has a unique saponification value (SAP value), which determines how much lye is needed to transform it completely into soap. Understanding these measurements prevents common problems like lye-heavy batches that irritate skin or oil-heavy batches that feel greasy.
Different soap-making methods suit different preferences. Cold process soap takes 24-48 hours to trace (reach proper consistency) and requires 4-6 weeks of curing time. Hot process soap finishes within hours but requires more active heating. Melt-and-pour offers immediate results but provides less creative control over base ingredients. Each method produces quality soap; your choice depends on time availability, equipment access, and desired customization level.
Essential Equipment and Ingredients
Successful soap making requires specific tools and materials. Start by gathering safety equipment first: chemical-resistant gloves, safety goggles, and an apron or protective clothing. Sodium hydroxide (lye) demands respect and proper protective gear without exception.
Basic equipment includes:
- Digital scale (accurate to 0.1 grams for precise measurements)
- Two stainless steel or glass mixing bowls
- Stainless steel or silicone spoon for stirring
- Stick blender (immersion blender)
- Thermometer (digital or glass, reading 0-220°F)
- Soap molds (silicone, wood, or commercial options)
- Spray bottle filled with water
- Paper towels and cleaning supplies
- Dedicated containers for lye water
Regarding ingredients, quality matters tremendously. Invest in high-grade oils like coconut oil, palm oil, olive oil, castor oil, and shea butter. Purchase sodium hydroxide (caustic soda) from reputable suppliers, never from drain cleaners which contain additives. Distilled water ensures consistent results. Optional additions include essential oils, mica colorants, dried botanicals, and natural exfoliants like ground oatmeal or coffee grounds.
Many crafters compare soap making to how to make a latte at home in terms of precision—both require exact measurements and proper technique for optimal results. Just as how to make coffee without a coffee maker offers alternative methods, soap making provides multiple approaches to achieve similar outcomes.
Cold Process Method Step-by-Step
The cold process method represents the most popular soap-making technique among hobbyists and professionals. This approach produces beautiful, creative soaps and allows maximum ingredient customization. Follow these detailed steps for success:
Step 1: Prepare Your Workspace
Set up in a well-ventilated area away from children and pets. Lay out all equipment and ingredients. Ensure your workspace is clean and organized. Have your molds ready and lined with parchment paper if using wooden molds.
Step 2: Calculate Your Recipe
Use a reliable lye calculator to determine exact quantities. Enter your chosen oils, desired superfat percentage (typically 5-7%), and lye type. The calculator provides precise measurements for lye and water. Never skip this step or estimate measurements—accuracy is non-negotiable.
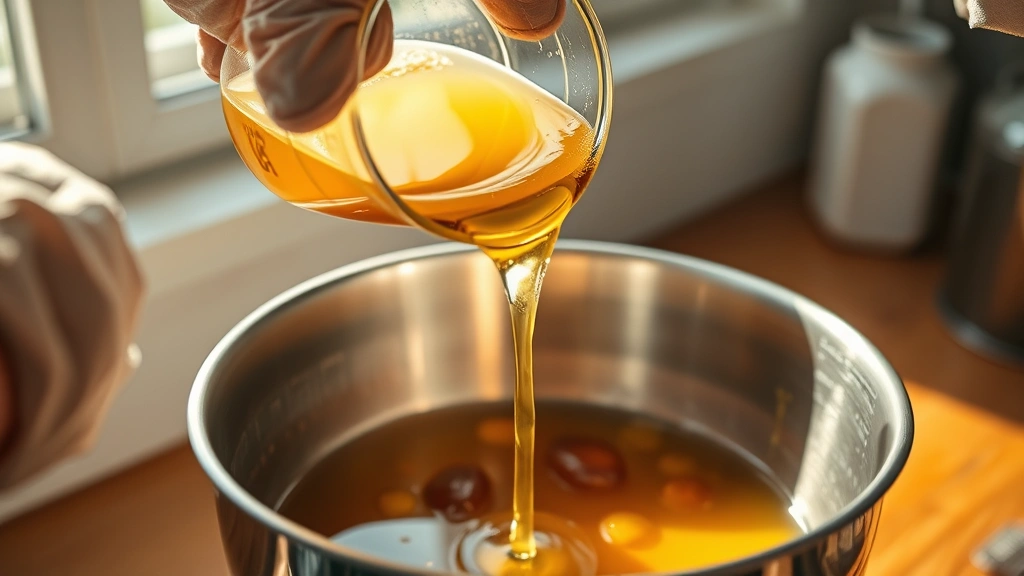
Step 3: Prepare Lye Solution
Wearing gloves and goggles, slowly add lye to distilled water in a glass or stainless steel bowl. Always add lye to water, never water to lye—this prevents dangerous splattering. Stir carefully until fully dissolved. The solution becomes extremely hot (up to 200°F); let it cool to room temperature in a safe location away from curious hands.
Step 4: Melt and Mix Oils
In a separate bowl, combine all solid oils and butters. Heat gently to 170°F, stirring occasionally. Add liquid oils once solids melt. Let the oil mixture cool to 95-105°F. Temperature matching between lye solution and oils is crucial for proper trace.
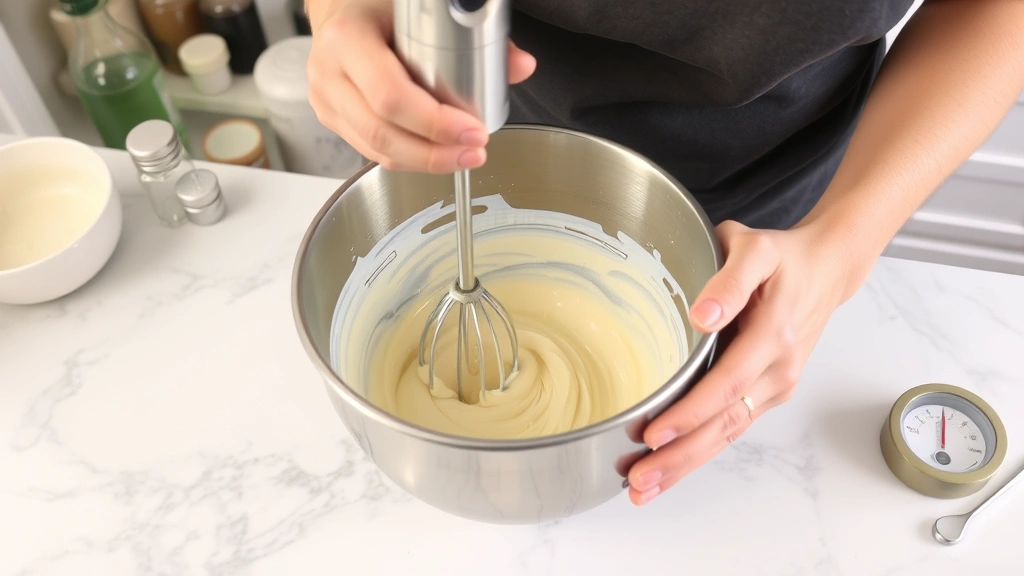
Step 5: Combine and Blend
When both mixtures reach target temperature (within 5°F of each other), slowly pour lye solution into oils while stirring. Use your stick blender, alternating between blending and stirring. Continue until the mixture reaches trace—when it resembles pudding and a line drawn through it briefly holds shape. This typically takes 5-15 minutes.
Step 6: Add Customizations
Once trace is achieved, add essential oils, colorants, and additives. Stir thoroughly to distribute evenly. Work quickly as the mixture continues thickening.
Step 7: Pour and Set
Pour batter into prepared molds. Tap the mold gently on the counter to release air bubbles. Cover with plastic wrap or cardboard. Place in an undisturbed location at room temperature for 24-48 hours. Some makers use insulated boxes to encourage gel phase, which produces darker colors and smoother texture.
Step 8: Unmold and Cut
After 24-48 hours, remove soap from molds. Using a sharp knife or soap cutter, slice into bars. Place on a shelf or rack in a cool, dry location with good air circulation.
Hot Process Soap Making
The hot process method accelerates saponification by applying external heat throughout the process. This technique produces finished soap in 24 hours rather than 6 weeks, making it ideal for impatient crafters or those wanting faster results.
The process mirrors cold process through the lye-oil combination and trace stage. However, once trace occurs, the soap goes into a slow cooker or double boiler set on low heat. The mixture cooks for 30-60 minutes, with occasional stirring. The soap will go through distinct phases: separation, then becomes thick and chunky (resembling mashed potatoes), then eventually smooth and glossy. This indicates saponification is complete.
Once the soap appears smooth and glossy, remove from heat, add fragrances and colorants, and immediately pour into molds. Hot process soap can be unmolded within 24 hours, though it still benefits from several days of curing before use. The texture is typically rustic and slightly crumbly compared to cold process, but the functionality is identical.
Melt-and-Pour Technique
For absolute beginners or those wanting immediate gratification, melt-and-pour soap offers a perfect entry point. This method uses pre-made soap bases that already underwent saponification, eliminating lye handling and lengthy curing times.
Simply cut melt-and-pour base into chunks, place in a microwave-safe bowl, and heat in 30-second intervals, stirring between each, until completely melted. Add colorants and fragrance oils, stir well, and pour into molds. The soap sets within hours and is ready to use immediately or after minimal curing.
While melt-and-pour lacks the customization of scratch-made soap, it provides excellent results for experimentation, gift-giving, and learning proper pouring and design techniques. Many experienced soapers use this method for specialty projects despite preferring cold or hot process for their primary soap production.
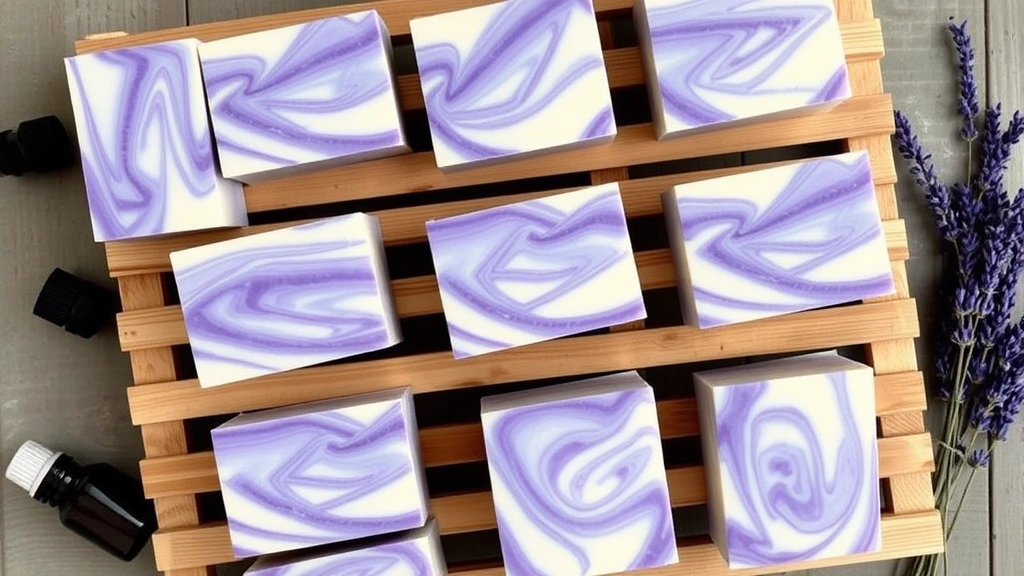
Natural Colorants and Fragrances
Transforming plain soap into visually stunning creations requires understanding colorants and fragrances. Essential oils provide natural scents and offer aromatherapy benefits. Lavender, eucalyptus, peppermint, and lemon are popular choices. Use 0.5-1 ounce of essential oil per pound of soap base.
Fragrance oils offer broader scent options but lack therapeutic properties. These synthetic compounds provide consistent, long-lasting aromas and wider color ranges. Quality fragrance oils cost more but produce superior results.
For natural colorants, consider:
- Oxides and micas for consistent, vibrant colors
- Activated charcoal for black and gray shades
- Turmeric for golden yellow
- Spirulina for blue-green tones
- Madder root for reddish hues
- Cocoa powder for brown shades
- Rose clay for pink coloring
Blend colorants with a small amount of oil before adding to soap to prevent clumping. Add colorants at trace for even distribution. Some natural colorants fade over time or shift in color as soap cures—test batches before committing to large projects.
Safety Precautions and Best Practices
Soap making involves caustic materials demanding serious safety respect. Sodium hydroxide burns severely and can cause permanent damage. Never skip protective equipment: chemical-resistant gloves, safety goggles, and long sleeves are non-negotiable.
Always work in well-ventilated areas. Lye fumes, while not highly toxic, can irritate respiratory systems. Open windows and consider wearing a dust mask when handling dry lye powder.
Keep a spray bottle of vinegar nearby. While not a cure-all, vinegar neutralizes lye on skin. In case of accidental contact, immediately rinse with copious amounts of water for at least 15 minutes, then apply vinegar. Seek medical attention for significant burns.
Never allow children or pets unsupervised access to soap-making supplies. Store lye in clearly labeled, sealed containers away from curious hands. Wash hands thoroughly after crafting, and keep soap away from eyes until fully cured.
For comprehensive safety guidelines, consult The Spruce’s soap-making safety guide or Making Cosmetics’ detailed safety resources.
Curing and Storage Tips
Curing soap properly ensures optimal hardness, lather quality, and longevity. Cold process soap requires 4-6 weeks of curing in a cool, dry location with good air circulation. During this period, water gradually evaporates, and the soap hardens and becomes milder on skin.
Arrange cured soap bars on shelves, ensuring they don’t touch. Flip bars halfway through curing for even moisture loss. Avoid direct sunlight, which can fade colors and degrade fragrances.
Store finished soap in cool, dry conditions away from humidity. Bathroom humidity causes soap to soften and dissolve faster. Consider storing in a linen closet or drawer with cedar blocks for pleasant scent and natural moth deterrent.
Properly cured and stored soap lasts 12-18 months. Use a soap saver pouch or loofah to extend individual bar longevity by reducing water contact during use. Just like how to clean a coffee maker requires proper maintenance, caring for soap extends its usefulness and enjoyment.
Frequently Asked Questions
How long does soap making take from start to finish?
Cold process soap takes approximately 6-8 weeks total: 24-48 hours to trace and set, then 4-6 weeks curing. Hot process takes 24-48 hours total. Melt-and-pour finishes in 24 hours.
Can I use regular kitchen equipment for soap making?
Absolutely not for lye-related items. Once used for lye, containers and utensils should never contact food. Dedicate specific equipment exclusively to soap making, or use disposable items. This ensures safety and prevents accidental lye contamination of food.
What’s the difference between essential oils and fragrance oils?
Essential oils are natural plant extracts offering aromatherapy benefits but may fade during curing. Fragrance oils are synthetic compounds providing consistent, long-lasting scents without therapeutic properties. Both work well in soap; choose based on preference and budget.
Why didn’t my soap trace properly?
Temperature mismatch is the most common cause. Ensure lye solution and oils reach similar temperatures (within 5°F). Cold mixtures trace slowly or not at all. Additionally, some oil blends naturally trace slower than others. Stick blending longer usually resolves the issue.
Is homemade soap safe for sensitive skin?
Yes, when properly made with quality ingredients and full saponification. Handmade soap often suits sensitive skin better than commercial alternatives because you control all ingredients. However, those with severe allergies should patch-test first.
Can I sell soap I make at home?
Regulations vary by location. Many areas allow home-based soap production and sales with minimal licensing. Check local health department requirements, FDA regulations, and any required business licenses. Label requirements typically mandate ingredient lists and proper disclaimers.
What should I do if my soap seized?
Seized soap (hardened too quickly) is still usable. If it happens before pouring, you can use hot process method by cooking the mixture. If already in molds, you can still unmold, cut, and cure it. The texture may be crumbly, but functionality remains intact.
How do I prevent soda ash on my soap?
Soda ash (white powdery coating) forms when lye reacts with carbon dioxide. Prevent it by covering molds immediately after pouring, maintaining consistent temperature, and avoiding temperature fluctuations. Some makers spray soap with isopropyl alcohol to dissolve existing ash, though this is optional as ash doesn’t affect functionality.
Related Posts

Superscript in Google Docs: Expert Tips

Strikethrough in Excel: Easy Steps for Beginners
