
Gravy from Drippings: Chef’s Essential Recipe
Gravy from Drippings: Chef’s Essential Recipe
Making gravy from drippings is one of the most rewarding kitchen skills you can master. Whether you’re preparing a holiday feast or a simple weeknight dinner, learning how to make gravy from drippings transforms those flavorful pan remnants into liquid gold. This technique has been passed down through generations of home cooks and professional chefs alike, and it’s surprisingly simple once you understand the fundamentals.
The beauty of dripping-based gravy lies in its efficiency and flavor depth. Rather than starting from scratch with store-bought broth and artificial seasonings, you’re capturing the concentrated essence of whatever protein you’ve just cooked—whether that’s turkey, chicken, beef, or pork. The rendered fats, caramelized bits, and natural juices create a gravy that tastes authentic and restaurant-quality, yet requires minimal additional ingredients.
In this comprehensive guide, we’ll walk you through every step of creating perfect gravy from drippings, from understanding the science behind the process to troubleshooting common mistakes. By the end, you’ll have the confidence to make silky, flavorful gravy that will elevate any meal.
Understanding the Foundation: What Are Drippings?
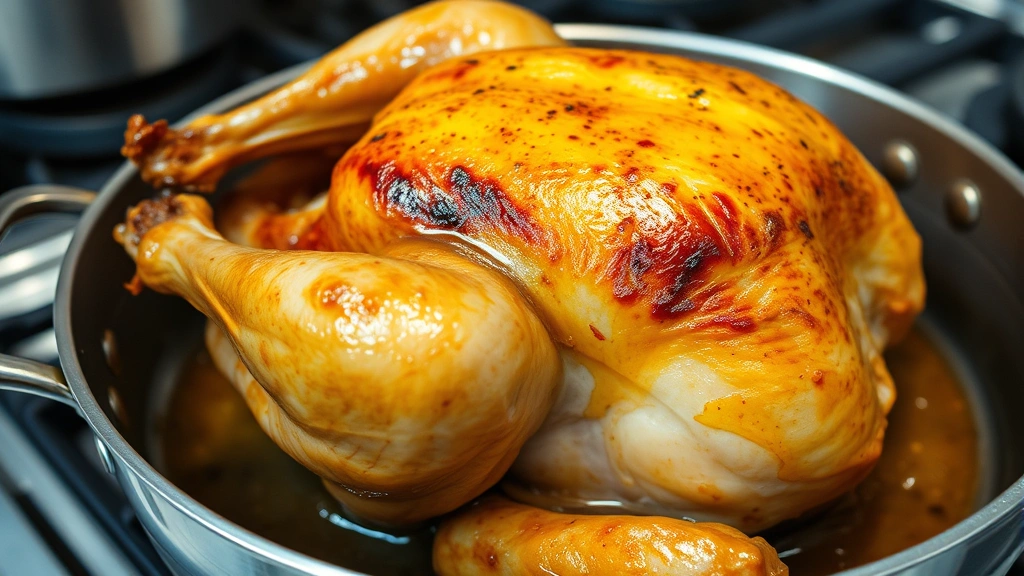
Drippings are the liquid and solid remnants left in your cooking pan after roasting meat. They consist of rendered animal fat, browned meat particles, and concentrated juices that have caramelized during the cooking process. These components are packed with umami flavor—that savory, mouth-filling taste that makes food incredibly satisfying.
When you roast a turkey, chicken, or beef, the heat causes the proteins and fats to break down and recombine, creating hundreds of flavor compounds. The browning process, known as the Maillard reaction, generates even more complex flavors. All of this deliciousness stays behind in your pan, waiting to be transformed into gravy.
Understanding this science helps you appreciate why dripping-based gravies taste superior to those made with plain broth. You’re not just adding seasoning to liquid—you’re extracting and concentrating the very essence of your meal.
The ratio of fat to liquid in your drippings affects how you’ll proceed with gravy-making. Most roasted meats leave behind a mixture that’s roughly 50-70% fat and 30-50% liquid, which is actually the ideal ratio for creating a well-balanced, flavorful gravy. If your drippings seem very fatty, you can skim some off; if they seem thin, you may need to add additional broth.
Essential Tools and Ingredients You’ll Need
Before you begin making gravy, gather your tools and ingredients. Having everything ready streamlines the process and prevents mistakes when you’re working quickly in the kitchen.
Tools Required:
- Roasting pan (the one you cooked your meat in)
- Fine-mesh strainer or cheesecloth for filtering
- Measuring cups and spoons
- Whisk (essential for preventing lumps)
- Small saucepan or medium skillet
- Wooden spoon for stirring
- Fat separator or turkey baster
- Meat thermometer (optional, for testing consistency)
Ingredients You’ll Use:
- Pan drippings from your roasted meat
- All-purpose flour or cornstarch (for thickening)
- Broth or stock (beef, chicken, or vegetable)
- Salt and black pepper
- Optional: fresh herbs, Worcestershire sauce, or red wine
The quality of your broth matters significantly. Homemade or high-quality store-bought broth will produce superior results compared to bouillon cubes or low-sodium varieties. If you have homemade stock on hand from previous cooking projects, this is an excellent opportunity to use it.
Step-by-Step Process for Perfect Gravy
Now that you understand the basics, let’s walk through the complete process of making gravy from drippings. This method works for virtually any roasted meat.
Step 1: Prepare Your Roasting Pan
After removing your cooked meat from the oven, let it rest on a cutting board for 10-15 minutes. This allows the juices to redistribute throughout the meat. Meanwhile, place your roasting pan on the stovetop over medium heat. The pan will be hot, so handle it carefully. You should see the drippings in the bottom of the pan beginning to sizzle slightly.
Step 2: Deglaze the Pan
Deglazing is the process of loosening the browned bits stuck to the bottom of your pan. Pour approximately 1 cup of broth into the hot pan, using a wooden spoon to scrape the bottom and sides. You’ll hear a satisfying sizzle, and the liquid will turn brown as it mixes with all those flavorful caramelized bits. This process takes about 2-3 minutes. The broth should reduce slightly as it heats.
Step 3: Strain Your Drippings
Pour the contents of your roasting pan through a fine-mesh strainer into a measuring cup. Press gently on any solids to extract maximum flavor, then discard them. You should have a mixture of fat and liquid. If you want a clearer gravy, you can line your strainer with cheesecloth for finer filtering, though this isn’t strictly necessary.
Step 4: Separate the Fat (Optional but Recommended)
Use a fat separator or turkey baster to remove some of the fat from the top of your strained drippings. You want to keep about 2-3 tablespoons of fat for making your roux, but excess fat can make gravy feel greasy. If you don’t have a fat separator, you can refrigerate the drippings for 30 minutes until the fat solidifies on top, then lift it off cleanly.
Step 5: Measure Your Liquid
Measure your strained drippings. If you have less than 2 cups, add enough broth to reach 2 cups total. This is your base liquid for the gravy. Having a known quantity helps you calculate the correct amount of thickener.
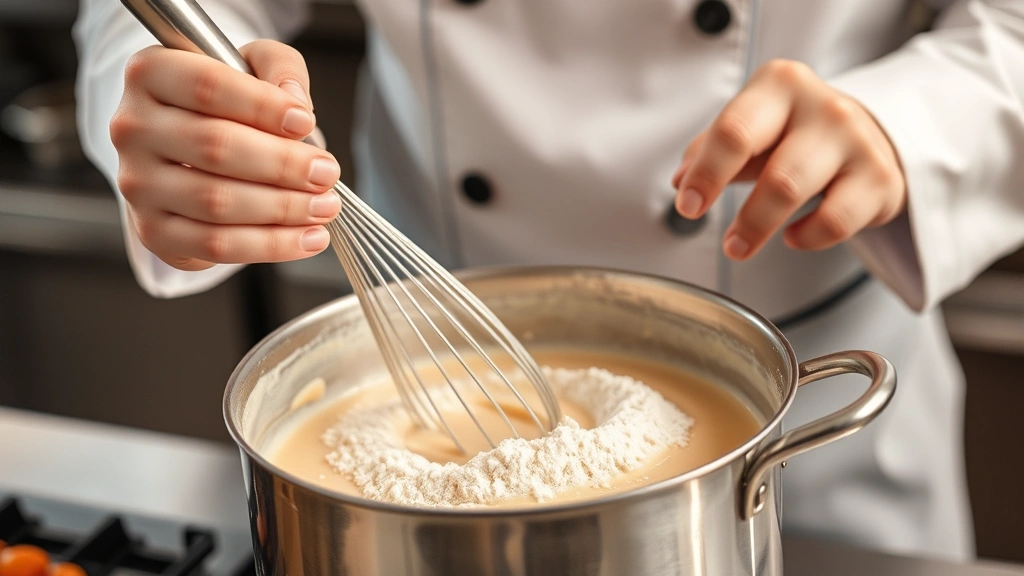
Mastering the Roux: The Secret to Silky Texture
The roux is what transforms your liquid drippings into proper gravy. A roux is a mixture of equal parts fat and flour that, when cooked together, creates a thickening agent. Understanding how to make a proper roux is fundamental to gravy-making success.
Making Your Roux
Heat 2 tablespoons of fat in a small saucepan over medium heat. This fat can come from your drippings or from butter if your drippings are very lean. Once the fat is hot and shimmering, add 2 tablespoons of all-purpose flour. Stir constantly with a whisk for 1-2 minutes. This cooking time is crucial—it removes the raw flour taste and allows the flour to fully absorb the fat.
Your roux should look like wet sand at this point. If it seems too dry, you haven’t used enough fat. If it’s too liquid, add a bit more flour. The consistency matters because it affects how smoothly your gravy comes together.
Cooking the Roux
Continue cooking your roux for another 1-2 minutes, stirring constantly. You’ll notice it beginning to smell slightly nutty and toasted. This is exactly what you want. Don’t let it brown too much or it will taste burnt and bitter. Most gravies benefit from a light blonde roux, though if you prefer darker, richer-tasting gravy, you can cook it a bit longer.
Adding Your Liquid
This is where precision matters. Slowly pour your reserved drippings into the roux while whisking constantly. The key word is slowly—if you pour too quickly, you’ll create lumps. Start with about 1/4 cup of liquid, whisking until smooth, then gradually add the remainder. This gradual addition allows the flour to fully hydrate and dissolve evenly.
Continue whisking as you add liquid until you’ve incorporated all 2 cups. The mixture will go from thick and paste-like to progressively thinner as you add more liquid. Once all the liquid is incorporated, keep whisking for another 30-60 seconds to ensure everything is fully combined.
Simmering and Thickening
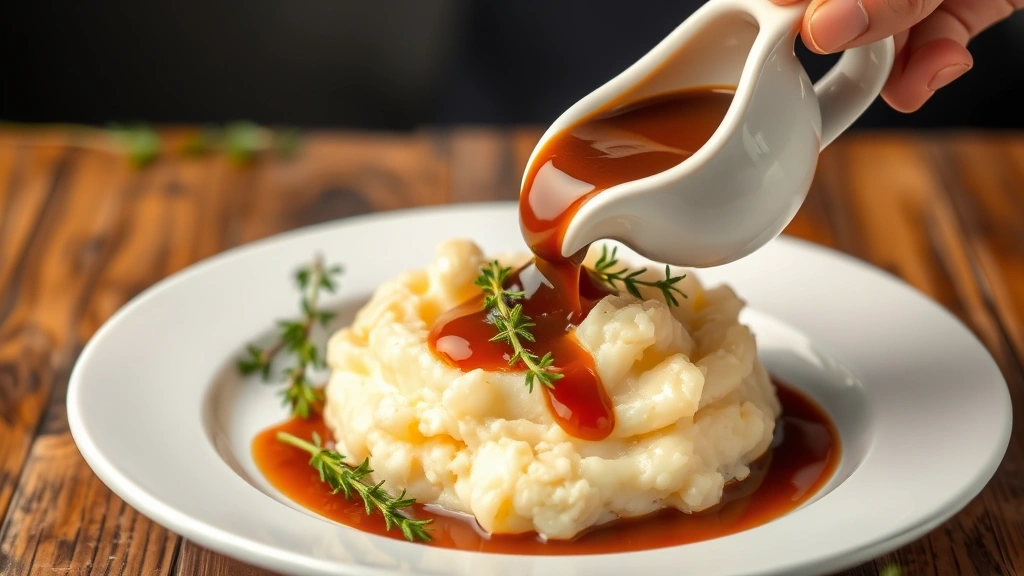
Increase the heat to medium-high and bring your gravy to a gentle simmer. Stir frequently with a whisk or wooden spoon. Within 3-5 minutes, you should notice the gravy beginning to thicken noticeably. It will go from thin and watery to coating the back of a spoon. This is the point at which most gravies reach their ideal consistency.
Test the thickness by dipping a spoon into the gravy and running your finger across the back. If your finger leaves a clear trail, the gravy is ready. If it runs back together immediately, simmer for another minute and test again.
Flavor Enhancement and Seasoning Techniques
Once your gravy reaches the desired thickness, it’s time to enhance the flavor. This is where you can make your gravy truly exceptional.
Basic Seasoning
Start conservatively with salt and freshly ground black pepper. Add 1/2 teaspoon of salt and 1/4 teaspoon of pepper, then taste. Remember that your drippings already contain some salt from the meat, so you may need less than you’d expect. You can always add more seasoning, but you can’t remove it once it’s in.
Herb Additions
Fresh or dried herbs elevate gravy significantly. Consider these options based on what meat you’re serving:
- Turkey: sage, thyme, or poultry seasoning
- Beef: rosemary, thyme, or bay leaf
- Chicken: tarragon, parsley, or chives
- Pork: sage, apple, or fennel
If using fresh herbs, add them in the final minute of cooking so they retain their flavor and color. Dried herbs can be added earlier, as they need time to rehydrate and release their flavors.
Wine and Liquid Enhancements
Adding a splash of wine or other flavorful liquid can add complexity to your gravy. Red wine works beautifully with beef gravies, while white wine suits chicken or pork. Add 1/4 to 1/2 cup of wine during the deglazing step, before you add your broth. The wine will reduce and its alcohol content will cook off, leaving behind concentrated flavor.
Worcestershire and Other Condiments
A teaspoon or two of Worcestershire sauce adds umami depth to gravy. Soy sauce, balsamic vinegar, or hot sauce can also work, depending on your preference and the type of meat. Add these condiments in small amounts and taste frequently, as they’re potent flavoring agents.
Cream and Butter for Richness
For a more luxurious gravy, stir in 1/4 to 1/2 cup of heavy cream or a tablespoon of butter at the end of cooking. This creates an incredibly silky mouthfeel and adds richness. Add cream slowly while stirring to prevent any curdling, though this is rare when the gravy is already hot.
Common Mistakes and How to Fix Them
Even experienced cooks sometimes encounter gravy problems. Here are the most common issues and how to solve them:
Lumpy Gravy
Lumps occur when flour isn’t fully incorporated or when liquid is added too quickly to the roux. If your gravy develops lumps, immediately pour it through a fine-mesh strainer, pressing gently to push the smooth gravy through while leaving lumps behind. Alternatively, use an immersion blender to puree the gravy until smooth. Prevention is easier than correction: always whisk constantly when combining roux and liquid.
Gravy Too Thin
If your gravy isn’t thickening sufficiently, you have two options. First, continue simmering—sometimes gravy just needs more time. Second, make a slurry by mixing 1 tablespoon of cornstarch with 2 tablespoons of cold water, then whisk it into the simmering gravy. Within a minute, you should see significant thickening. Cornstarch thickens more dramatically than flour, so use it sparingly.
Gravy Too Thick
Overly thick gravy is easier to fix than thin gravy. Simply whisk in additional broth, one tablespoon at a time, until you reach the desired consistency. Bring the gravy back to a simmer after each addition to ensure the thickener is fully activated.
Gravy Tastes Bland
This usually means insufficient seasoning or low-quality drippings. Start by tasting and gradually adding salt, pepper, and any complementary seasonings. If the problem persists, your original drippings may have been weak. Add a splash of broth with deeper flavor, or stir in a teaspoon of beef or chicken bouillon for extra savory depth.
Greasy or Oily Gravy
Excess fat creates an unpleasant mouthfeel. If you notice a visible layer of oil on top, skim it off with a spoon or use a fat separator. Going forward, be more aggressive about removing excess fat before making your roux. You only need 2-3 tablespoons of fat per 2 cups of liquid.
Burnt or Bitter Taste
This happens when the roux is cooked too long or at too high a temperature. Prevention is your best strategy: cook roux over medium heat and watch it carefully. If you do burn it, start over with fresh fat and flour—the burnt flavor will permeate your entire gravy and can’t be fixed.
Storage and Reheating Tips
One of the wonderful things about gravy is that it stores beautifully, making holiday meal preparation much less stressful. When you’re planning your holiday cooking strategy, knowing how to store gravy lets you make it ahead.
Refrigerator Storage
Allow your gravy to cool to room temperature, then transfer it to an airtight container. Refrigerate for up to 4 days. The gravy may thicken further as it cools due to the starch and fat solidifying. This is completely normal and actually helpful for storage.
Freezer Storage
Gravy freezes exceptionally well for up to 3 months. Use freezer-safe containers or heavy-duty freezer bags, leaving a bit of headspace for expansion. Flat freezer bags are space-efficient and thaw quickly. Label your containers with the date and type of gravy for easy identification.
Reheating Methods
To reheat refrigerated gravy, place it in a saucepan over medium-low heat, stirring occasionally, until it reaches serving temperature (about 5-10 minutes). If the gravy has thickened too much during storage, thin it with a bit of broth while reheating.
For frozen gravy, thaw it overnight in the refrigerator, then reheat using the same method as refrigerated gravy. Alternatively, you can reheat frozen gravy directly in a saucepan over low heat, stirring frequently. This takes longer (15-20 minutes) but works in a pinch.
Never reheat gravy in the microwave if you can avoid it, as it tends to heat unevenly and may develop hot spots. Stovetop reheating gives you much better control and more consistent results.
Make-Ahead Strategy
If you’re preparing gravy for a holiday meal, make it completely 1-2 days ahead and refrigerate it. On the day of your meal, simply reheat it while your main dish is resting. This frees up stove space and reduces last-minute stress. Your gravy will taste just as good as freshly made, and you’ll have one fewer thing to worry about during meal service.
FAQ
Can I make gravy from drippings without flour?
Yes, you can use cornstarch instead of flour for a gluten-free option. Use the same ratio (2 tablespoons cornstarch to 2 tablespoons fat). Cornstarch creates a slightly glossier, more transparent gravy than flour. You can also use arrowroot powder or tapioca starch as alternatives. Some cooks simply reduce their drippings with broth and herbs for a lighter, less-thickened sauce.
What if I don’t have enough drippings?
This is common with very lean meats or smaller portions. Simply supplement your drippings with additional broth until you have at least 2 cups of liquid. The gravy won’t be quite as rich as it would be with more meat drippings, but it will still be flavorful and satisfying.
How do I make gravy from drippings if I don’t have fresh herbs?
Dried herbs work perfectly well and are often preferred by professional cooks for their concentrated flavor. Use about 1/3 to 1/2 the amount of dried herbs compared to fresh. Dried sage, thyme, and rosemary are pantry staples that work beautifully in most gravies. You can also use spices like garlic powder or onion powder for added depth.
Can I use bacon grease instead of the fat from my drippings?
Absolutely. Bacon grease adds wonderful smoky flavor to gravy, particularly with chicken or pork. Substitute it for all or part of the fat in your roux. Just ensure your bacon grease is strained and free of solids before using it.
What’s the difference between gravy and sauce?
Technically, gravy is a sauce made from meat drippings, while sauce is a more general term for any flavorful liquid served with food. In common usage, gravy typically refers to the thickened sauce made with a roux, while sauce might be thinner or made through other methods. For culinary purposes, the distinction is less important than creating something delicious to serve with your meal.
How can I make my gravy look more professional?
Strain your gravy through fine-mesh cheesecloth for a crystal-clear appearance. Use fresh herbs as garnish for color. Ensure your gravy is perfectly smooth with no lumps. Serve it in an attractive gravy boat or small pitcher. These simple touches make homemade gravy look restaurant-quality.
What temperature should gravy be served at?
Gravy should be served hot, between 160-180°F. This is hot enough to be appetizing and to keep food warm on the plate, but not so hot that it’s uncomfortable to eat. Use a meat thermometer to check if you’re uncertain. Gravy that’s cooled even slightly becomes noticeably less appealing.
Can I make gravy from drippings the day before?
Yes, and it’s actually an excellent strategy for holiday meals. Make your gravy completely, then cool and refrigerate it in an airtight container. The next day, reheat it gently on the stovetop while stirring occasionally. You may need to thin it slightly with additional broth if it thickened during storage. This make-ahead approach reduces stress and frees up stove space on your cooking day.
Related Posts

Superscript in Google Docs: Expert Tips

Strikethrough in Excel: Easy Steps for Beginners
