
How to Remove Gel Nail Polish: Expert Guide
How to Remove Gel Nail Polish: Expert Guide
Gel nail polish looks absolutely stunning, but let’s be honest—removal can feel like you’re defusing a bomb if you don’t know what you’re doing. That glossy, chip-resistant finish that lasts weeks comes with a price: it requires proper removal techniques to protect your nails from damage. The good news? You don’t need to book an expensive salon appointment every time you want a fresh look. With the right approach and a little patience, you can safely remove gel polish at home without turning your nails into brittle disaster zones.
The key to successful gel polish removal lies in understanding that gel polish is cured under UV or LED light, creating a polymer structure that bonds tightly to your nail plate. Simply peeling it off or using acetone haphazardly can cause severe damage, including peeling, thinning, and weakening of your natural nails. This guide walks you through proven methods that professional nail technicians use, ensuring your nails stay healthy and strong throughout the removal process.
Whether you’re dealing with a bold jewel tone or a subtle nude shade, the removal technique remains the same. Let’s dive into the most effective strategies for getting that gel polish off safely and efficiently.
Why Proper Removal Matters
Your nails are living tissues that deserve respect. When gel polish sits on your nails for weeks, the nail plate becomes dehydrated underneath the polymer coating. Rushing the removal process or using aggressive techniques can compromise the protective layer of your nails, leading to peeling, brittleness, and weakened growth.
The damage isn’t always immediately visible. Sometimes your nails look fine after removal, but within days or weeks, you’ll notice they’re softer, more prone to breaking, and slower to grow. This is because improper removal disrupts the nail’s moisture balance and can remove the top layers of the nail plate itself. Professional removal takes time—typically 15-20 minutes—for a reason. It prioritizes nail health over speed.
Additionally, understanding proper removal techniques helps you avoid skin irritation. Acetone is powerful and can dry out the surrounding skin, cuticles, and nail bed. When you use the right method, you minimize contact with acetone while maximizing effectiveness, keeping your hands and nails in better condition overall.
The Acetone Soak Method
The acetone soak method is the most commonly recommended approach for how to remove gel polish at home. It’s straightforward, effective, and doesn’t require specialized equipment. Here’s exactly how to do it:
What You’ll Need:
- 100% pure acetone (not nail polish remover—those contain other ingredients)
- Small glass or ceramic bowl
- Warm water
- Cotton pads or lint-free wipes
- Aluminum foil (cut into squares)
- Cuticle pusher or wooden stick
- Nail file
- Moisturizing cuticle oil
- Hand cream or lotion
Step-by-Step Process:
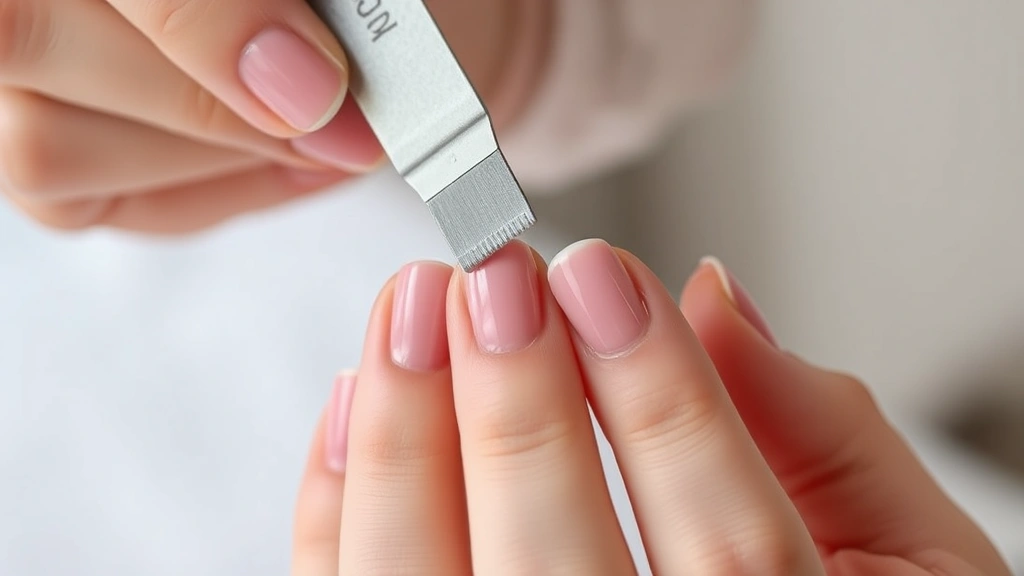
- File the top coat: Use a nail file to gently rough up the shiny top layer of gel polish. This breaks the seal and allows acetone to penetrate more effectively. Don’t file aggressively—you’re just dulling the glossy surface, not removing the entire polish layer.
- Prepare acetone bowls: Pour acetone into your bowl to a depth where you can submerge your fingertips. Some people prefer wrapping individual nails with acetone-soaked cotton pads instead of soaking all nails simultaneously. Both methods work; choose based on your preference.
- Soak your nails: If using the bowl method, soak your nails for 10-15 minutes. If using cotton pads, soak each pad in acetone, place it on your nail, and wrap with foil. Let sit for 15-20 minutes. The gel should begin softening and lifting at the edges.
- Gently remove softened polish: After soaking, use a cuticle pusher or wooden stick to gently push the softened gel away from your nail. Work slowly—if the polish isn’t coming off easily, it needs more soaking time. Never force or scrape aggressively.
- Repeat as needed: Some nails may need additional soaking. Repeat steps three and four until all gel polish is removed.
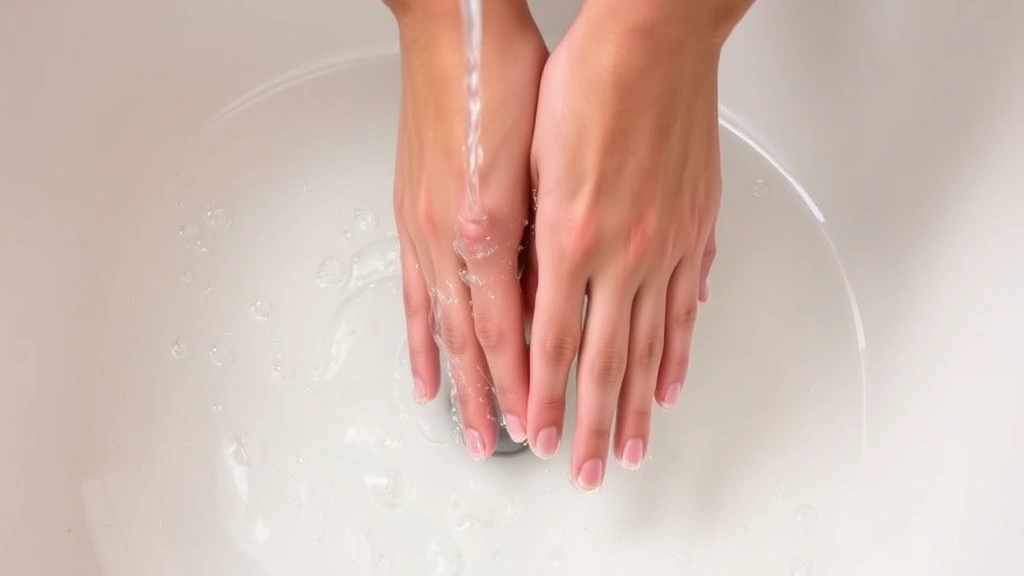
- Clean and moisturize: Wash your hands thoroughly with soap and water to remove all acetone residue. Apply cuticle oil and hand cream generously.
Foil Wrap Technique
The foil wrap method is essentially an enhanced version of the acetone soak and is what many nail professionals use. It’s more targeted and uses less acetone overall, making it gentler on your skin while remaining highly effective.
How the Foil Wrap Works:
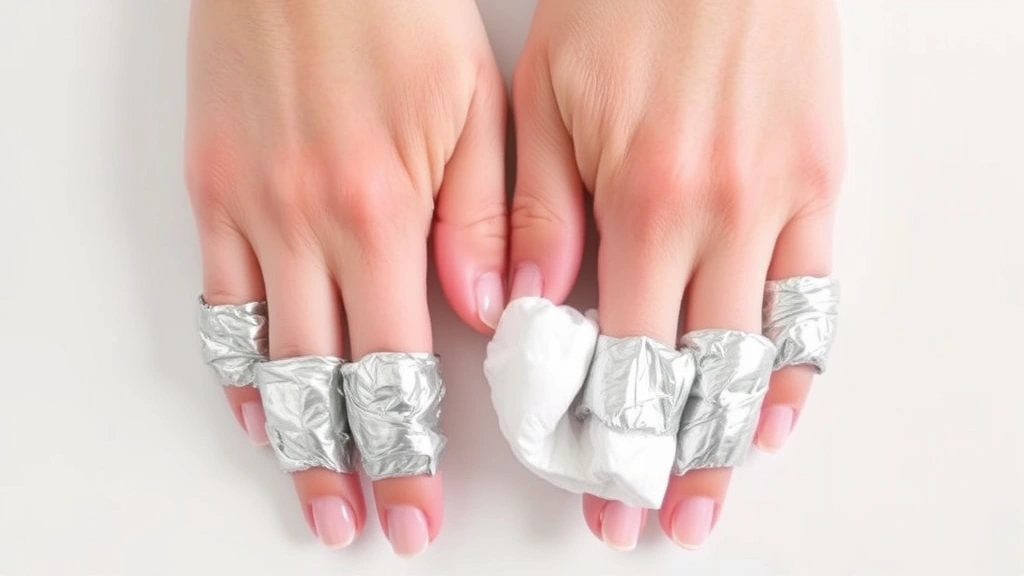
This technique involves wrapping acetone-soaked cotton pads directly on each nail with aluminum foil, creating a mini acetone chamber that keeps the remover concentrated on your nails rather than evaporating into the air. The foil traps heat, which accelerates the softening process.
Detailed Instructions:
- Prep your nails: File the shiny top coat off all nails, just as you would with the soak method.
- Cut cotton pads: Cut regular cotton pads into small squares roughly the size of your nails.
- Soak cotton: Saturate each cotton square with acetone.
- Apply to nails: Place one acetone-soaked cotton pad directly on each nail.
- Wrap with foil: Tear off pieces of aluminum foil (roughly 2×2 inches) and wrap them around each finger, securing the cotton pad in place. The foil should be snug but not painfully tight.
- Set a timer: Leave the foil wraps on for 15-20 minutes. You can read, watch TV, or do other activities while waiting.
- Remove one wrap: After the time is up, unwrap one finger and check if the gel is lifting. If it’s still stuck, rewrap and wait another 5 minutes.
- Push off the gel: Once the gel is sufficiently softened, use a wooden cuticle pusher to gently push the polish off your nail. Work from the cuticle toward the tip.
- Clean up: Remove all foil wraps and cotton pads. Wash your hands with soap and water, then apply moisturizer.
The foil wrap method typically removes gel polish faster than the bowl soak method, and many people find it less messy. Plus, since your hands aren’t submerged in acetone, your skin doesn’t get as dried out.
Using an Electric File
Understanding when an electric file is appropriate:
Professional nail technicians often use electric nail files to remove gel polish quickly and efficiently. However, this method requires skill and the right equipment. If you’re considering this approach, understand that improper technique can damage your nails more severely than other methods.
The electric file process:
An electric nail file uses a rotating bit to file away the gel polish layer by layer. The technician works carefully, starting with a coarser grit to remove the bulk of the polish, then switching to finer grits to smooth the nail plate. The key is maintaining the correct angle and pressure—too much pressure causes heat buildup and nail damage.
Is this right for home use?
Unless you’re experienced with electric files or willing to invest in learning proper technique, we’d recommend sticking with the acetone soak or foil wrap methods. They’re safer for beginners and significantly lower the risk of accidentally damaging your nail bed. If you do opt for an electric file, invest in a quality device and consider watching professional tutorials before attempting removal.
Acetone-Free Alternatives
Some people prefer avoiding acetone due to skin sensitivity, respiratory concerns, or simply wanting a gentler approach. While acetone is the most effective remover, alternatives do exist—though they typically take longer and require more elbow grease.
Isopropyl Alcohol Method:
Isopropyl alcohol (70% concentration) is milder than acetone but still effective. Soak your nails for 20-30 minutes, then gently remove the softened polish. This method works best on thinner gel applications.
Soy-Based Removers:
Commercial soy-based gel removers are gentler and less toxic than acetone. However, they’re typically more expensive and less potent. Follow the product instructions carefully, as effectiveness varies by brand. Many require longer soaking times—sometimes 30-45 minutes.
Rubbing Alcohol and Oil Combination:
Some people swear by soaking nails in warm rubbing alcohol mixed with a small amount of olive oil. The oil helps prevent excessive drying while the alcohol works to break down the gel. This is slower than acetone but considerably gentler.
When to use alternatives:
If you have sensitive skin, respiratory issues, or are pregnant, discuss gel polish removal with your healthcare provider. They might recommend acetone-free alternatives or suggest you visit a professional salon with proper ventilation. Remember, while acetone-free options are gentler, they’re also less efficient, so patience is essential.
Aftercare and Nail Recovery
Removal isn’t the end of the process—proper aftercare determines how quickly your nails recover and how healthy they’ll be moving forward.
Immediate aftercare (first 24 hours):
- Hydrate heavily: Apply cuticle oil multiple times throughout the day. This replenishes moisture that acetone stripped away.
- Avoid water: Try to keep your hands as dry as possible for at least 24 hours. Extended water exposure further dehydrates nails.
- Skip polish: Let your nails breathe for at least a few days before applying new polish or gel.
- Moisturize regularly: Use hand cream frequently, especially on your nails and cuticles.
Recovery phase (first week):
Continue moisturizing your nails and cuticles daily. If your nails feel weak or brittle, consider taking a biotin supplement—studies suggest it can strengthen nails over time. Avoid harsh chemicals and excessive water exposure. When doing dishes or cleaning, wear gloves to protect your recovering nails.
If you’re looking to understand how gel nail polish removal affects your skin and nails, proper aftercare is where the real healing happens. Your nails are resilient and will recover with proper attention.
Long-term nail health:
If you regularly wear gel polish, consider taking breaks between applications. Many nail professionals recommend going gel-free for at least one week every few months to allow your nails to fully recover and regain their natural strength. During these breaks, keep your nails short and maintain them with regular moisturizing and gentle filing.
If you experience persistent nail weakness, peeling, or discoloration after gel polish removal, consult a dermatologist. Sometimes nails need professional attention, especially if removal has caused visible damage.
Related concerns:
If you’ve accidentally gotten adhesive on your skin during the removal process, you might want to reference a guide on how to get nail glue off skin for removal tips. While we’re focusing on gel polish here, similar principles apply to other sticky substances. Just as you’d approach how to get hair dye off skin, patience and the right products matter.
For those interested in maintaining cleanliness across all personal care items, understanding how to clean retainers involves similar principles of gentle handling and proper soaking techniques that apply to many beauty and personal care tasks.
Frequently Asked Questions
How long does gel polish removal take?
Using the acetone soak method, expect 10-20 minutes of soaking time plus an additional 5-10 minutes for gentle removal. The foil wrap technique typically takes 15-25 minutes total. Electric file removal can be faster (5-10 minutes) but requires professional skill. Acetone-free alternatives usually take 30-45 minutes.
Can I use regular nail polish remover instead of pure acetone?
Regular nail polish remover contains acetone mixed with other ingredients like water, oils, and fragrances. While it technically contains acetone, the diluted concentration is far less effective for gel polish removal. You’d need to soak much longer and might not achieve complete removal. For efficiency and effectiveness, use 100% pure acetone.
Is acetone safe for home use?
Yes, acetone is safe for home use when used properly. Ensure good ventilation, avoid prolonged skin contact, and don’t ingest it. If you have sensitive skin or respiratory issues, consider working near an open window or using acetone-free alternatives. Pregnant individuals should discuss acetone use with their healthcare provider.
Will gel polish removal damage my nails?
Proper removal shouldn’t damage your nails. However, aggressive removal techniques, forcing polish off, or skipping the soaking process can cause damage. Follow the methods outlined in this guide, be patient, and prioritize gentle removal over speed. Your nails will stay healthy.
How often can I safely wear gel polish?
Most nail professionals recommend taking breaks between gel applications. A common guideline is wearing gel for 2-3 weeks, then taking 1-2 weeks off to let nails recover. This cycle prevents cumulative damage and keeps your nails strong and healthy long-term.
What if my nails are already damaged from previous gel removal?
If your nails are peeling, thin, or weak, give them extra recovery time. Wear them short, moisturize constantly, and avoid any nail products for several weeks. Consider biotin supplements and consult a dermatologist if damage is severe. Once recovered, be more careful with future removal.
Can I remove gel polish while pregnant?
Many pregnant individuals safely remove gel polish at home, but it’s best to discuss acetone exposure with your healthcare provider first. They might recommend acetone-free alternatives or suggest visiting a well-ventilated salon instead. Each pregnancy is different, so professional medical advice is valuable.
Why is my gel polish not coming off?
Insufficient soaking time is the most common reason. Gel polish needs adequate time to soften before removal. If it’s not coming off after 15-20 minutes, give it another 5-10 minutes rather than forcing it. You might also ensure you’re using 100% pure acetone, as diluted versions are less effective.
Related Posts

How Long to Boil Lobster Tails: Cooking Guide

How Long to Fly from New York to London? Travel Times
