
Debone Chicken Thighs: Chef’s Reliable Method
How to Debone Chicken Thighs: Chef’s Reliable Method
Deboning chicken thighs might seem intimidating at first, but mastering this essential kitchen skill will transform your cooking. Whether you’re preparing a elegant dinner, meal prepping for the week, or creating restaurant-quality dishes at home, knowing how to debone chicken thighs efficiently saves time and reduces waste. This technique opens up countless culinary possibilities, from tender roulades to perfectly portioned servings for soups and stir-fries.
Unlike chicken breasts, thighs contain more connective tissue and bone structure that requires a methodical approach. The good news is that with the right technique and a sharp knife, you’ll become proficient in minutes. This guide walks you through each step with precision, ensuring you develop confidence and consistency in your deboning process.
Essential Tools and Preparation
Before you begin deboning chicken thighs, gather the right equipment. A sharp boning knife—typically 5 to 6 inches—is non-negotiable. The blade should be thin, flexible, and sharp enough to glide through skin and connective tissue without requiring excessive pressure. Dull knives are dangerous because they slip and require more force, increasing injury risk.
Beyond the knife, you’ll need a clean cutting board, preferably one designated for raw poultry to prevent cross-contamination. A paper towel or clean kitchen towel helps you grip the slippery chicken while working. If you’re processing multiple thighs, keep a bowl nearby for bones and trimmings—this keeps your workspace organized and makes cleanup easier.
Pat your chicken thighs dry with paper towels before starting. Moisture makes the skin slippery and harder to control. If your thighs are cold from the refrigerator, let them sit for a few minutes at room temperature; this makes the meat slightly more pliable and easier to work with. Check that your cutting board is stable and won’t slip during the process.
When setting up your workspace, arrange everything within arm’s reach. Having your boning knife sharpened beforehand is crucial—you can use a knife sharpening guide to ensure your blade is in peak condition. This preparation phase takes just two minutes but dramatically improves your deboning experience.
Understanding Chicken Thigh Anatomy
Chicken thighs consist of two main bones: the femur (thighbone) and the tibia (drumstick bone), connected by cartilage at the joint. Understanding this structure helps you navigate the deboning process more efficiently. The thighbone runs lengthwise through the thigh, while the drumstick bone extends downward, creating an L-shaped structure.
The meat surrounding these bones varies in thickness. The outer areas have denser muscle, while the inner sections near the bone are thinner and more delicate. Connective tissue and skin cover the exterior, and a thin membrane separates the meat from the bone. Recognizing these layers helps you work methodically without puncturing the meat or leaving bone fragments behind.
The thigh-drumstick joint is the key to understanding the structure. This connection point, located at the bend where the two bones meet, is where you’ll begin your cuts. Once you understand this anatomy, deboning becomes a logical sequence of cuts rather than a confusing process.
Step-by-Step Deboning Process
Step 1: Identify the Thigh-Drumstick Joint
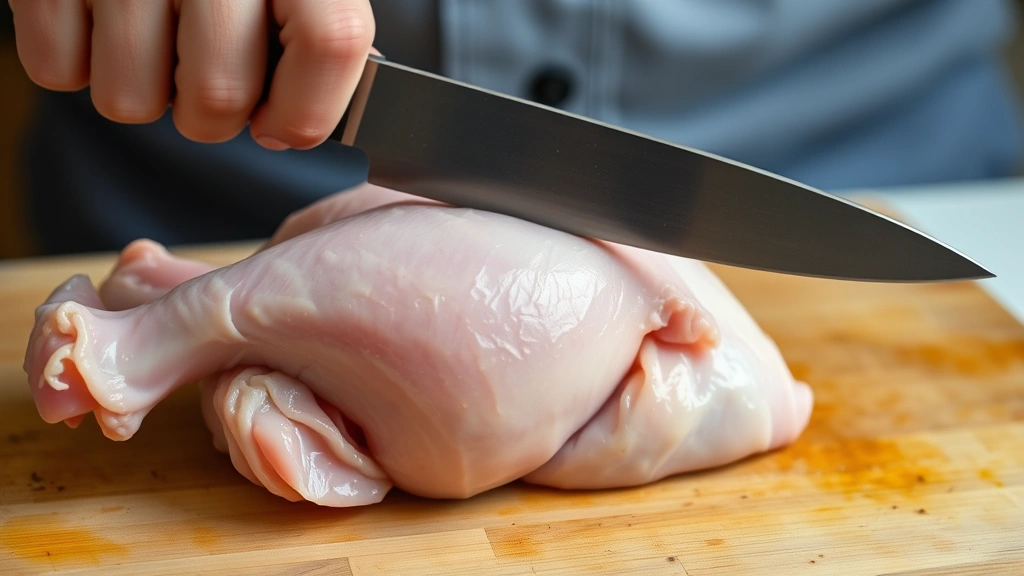
Place the chicken thigh skin-side down on your cutting board. Look for the natural line where the thighbone and drumstick meet—this appears as a thin line of fat or a slight indentation. This is your starting point. Bend the drumstick backward; you’ll hear a subtle pop as the joint separates slightly. This confirms you’ve located the correct position.
Using your boning knife, make a small cut right at this joint line, cutting through the skin and fat layer only. Don’t cut deeply into the meat yet. This initial incision guides your subsequent cuts and prevents you from wandering off course.
Step 2: Separate the Drumstick
Continue cutting along the joint line, gradually separating the drumstick from the thigh. Use short, controlled knife strokes rather than large sawing motions. As you cut, you’ll expose more of the joint cartilage. Keep your knife blade angled toward the drumstick bone, not the thigh meat.
Once you’ve cut around the joint completely, grab the drumstick and pull it backward, away from the thigh. The joint should separate cleanly. If it doesn’t, you haven’t fully severed the connecting cartilage—make additional small cuts until it releases freely. Set the drumstick aside for stock or other uses.
Step 3: Locate and Follow the Thighbone
Now you’re working with just the thigh portion. Flip it skin-side up and examine the surface. You’ll see the thighbone creating a ridge under the skin. Run your finger along this ridge to feel the bone’s exact path. This sensory feedback is invaluable for precise cutting.
Make a long cut along one side of the thighbone, starting from the top of the thigh and working downward. Keep your knife blade against the bone surface, angling slightly toward the bone rather than the meat. This ensures you remove minimal meat while cleanly separating the meat from the bone.
Step 4: Cut Along the Opposite Side
Flip the thigh and repeat the process on the opposite side of the thighbone. Make a parallel cut that mirrors your first incision. As you work, you’ll expose more of the bone. Your two cuts should meet at the bottom, creating a channel along the bone’s length.
Step 5: Separate Meat from Bone
Now comes the critical part. Using short, precise knife strokes, carefully separate the meat from the bone. Start at one end and work methodically, using your fingers to gently pull the meat away from the bone as you cut. The meat should come away cleanly if you’re cutting in the right direction.
When you encounter resistance, stop and adjust your knife angle. You might be cutting against the grain or hitting connective tissue. Rotate the thigh or approach from a different angle. Patience here prevents punctures and ensures maximum meat retention.
Step 6: Remove Remaining Connective Tissue
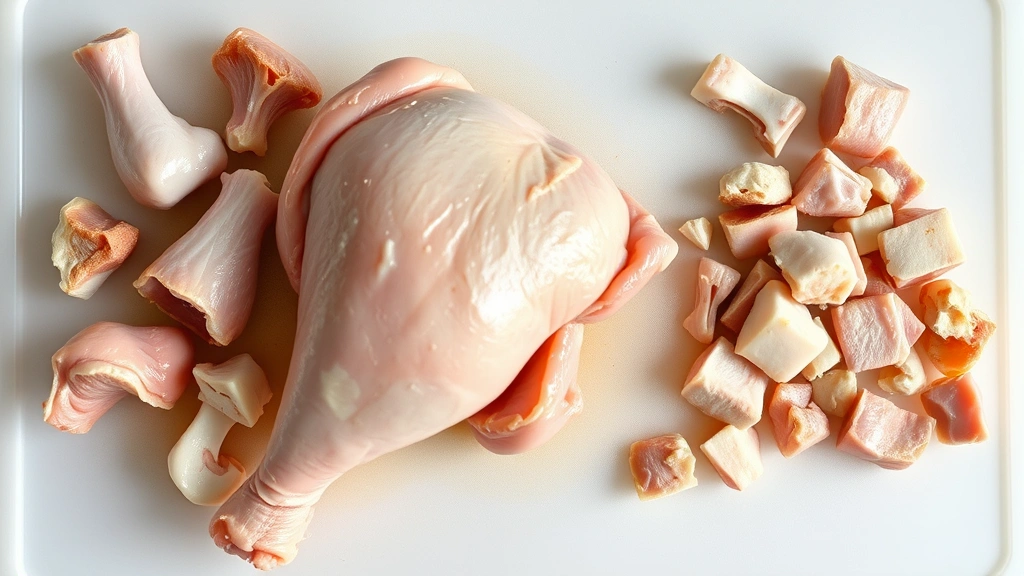
Once the bone is completely removed, examine the deboned thigh for any remaining cartilage, sinew, or tough connective tissue. These tough bits detract from the eating experience. Use your boning knife to trim away any visible white or translucent tissue. This trimming step takes just a minute but significantly improves the final product.
Check the meat for any small bone fragments. Run your fingers over the surface; you’ll feel any remaining pieces. Remove them carefully with tweezers or your knife tip.

Common Mistakes to Avoid
The most frequent error is using a dull knife. This forces you to apply excessive pressure, increasing the risk of slipping and cutting yourself. It also damages the meat texture and creates ragged edges. Maintain your blade sharpness throughout the process.
Another common mistake is cutting too aggressively. Many beginners make large, sweeping cuts that damage meat or miss bone sections. Instead, use short, controlled strokes. This gives you better control and precision, especially when navigating around the joint area.
Failing to properly separate the thigh and drumstick at the joint wastes time and frustrates the process. Don’t skip the initial joint identification—it’s the foundation for everything that follows. When preparing your workspace, make sure you have adequate lighting to see the joint clearly.
Many home cooks remove too much meat while deboning. Remember that the meat directly against the bone is still excellent quality. You don’t need to strip every trace of meat from the bone—some loss is normal and acceptable.
Rushing the process is another pitfall. Deboning takes only a few minutes when done properly, so there’s no need to hurry. Taking your time prevents accidents and produces better results. Treat this as a meditative kitchen task rather than a chore to rush through.
Storage and Food Safety
Once deboned, chicken thighs are highly perishable. Store them immediately in the coldest part of your refrigerator, ideally at 40°F or below. They’ll keep for 1-2 days in the refrigerator. For longer storage, freeze them in an airtight container or freezer bag for up to three months.
Always practice proper food safety when handling raw poultry. Wash your hands, cutting board, and knife thoroughly with hot soapy water after contact with raw chicken. Never let raw chicken juices contact other foods, especially ready-to-eat items. This prevents cross-contamination and foodborne illness.
The bones you’ve removed make excellent stock. Store them in the freezer until you have enough to simmer into rich, flavorful bone broth. This is a zero-waste approach that maximizes the value of each bird. When you’re ready to cook with your prepared ingredients, ensure the meat reaches an internal temperature of 165°F for food safety.
If you’re meal prepping multiple deboned thighs, portion them into individual servings before freezing. This makes weeknight cooking faster and easier. Properly frozen chicken maintains quality for several months.
Creative Uses for Deboned Thighs
Deboned chicken thighs are incredibly versatile in the kitchen. Their higher fat content compared to breasts keeps them moist during cooking, making them ideal for slow-cooked dishes like braises and stews. The meat stays tender even with extended cooking times.
Create elegant chicken roulades by butterflying the thigh and filling it with herbs, cheese, or vegetables. Roll it tightly, secure with toothpicks, and pan-sear for a restaurant-quality presentation. This technique impresses dinner guests and demonstrates your culinary skills.
Deboned thighs are perfect for curry dishes, where the meat absorbs aromatic spices beautifully. They also work wonderfully in Asian stir-fries, Mediterranean braises, and traditional comfort food preparations. The meat’s robust flavor stands up to bold seasonings.
Ground deboned chicken thigh meat makes exceptional burgers and meatballs. The fat content creates juicier, more flavorful results than ground breast meat. You can process the meat at home using a food processor for maximum freshness and control over texture.
Shred cooked deboned thighs for tacos, sandwiches, and salads. The meat shreds easily and maintains its moisture, creating satisfying, delicious preparations. This is also an excellent way to use cooking equipment you may have at home for quick weeknight meals.
Soup and broth benefit tremendously from deboned thighs. The meat adds body and flavor while the bones contribute gelatin and richness. This combination creates deeply satisfying, nourishing broths that form the foundation of countless cuisines.
FAQ
How long does it take to debone a chicken thigh?
Once you develop proficiency, deboning a single thigh takes 2-4 minutes. Beginners might need 5-10 minutes initially, but your speed increases dramatically with practice. The entire process becomes intuitive after you’ve deboned a dozen thighs.
Do I need to remove the skin before deboning?
No, you can debone thighs with the skin intact. In fact, keeping the skin on is easier because it gives you something to grip and provides a visual guide for your cuts. Remove the skin afterward if your recipe requires it.
What’s the best knife for deboning chicken?
A sharp boning knife with a 5-6 inch blade is ideal. The thin, flexible blade allows precise cuts without damaging surrounding meat. A paring knife works in a pinch, but a proper boning knife makes the task significantly easier. Keep your blade sharp using a honing steel or knife sharpener regularly.
Can I use kitchen shears instead of a knife?
Kitchen shears work for some steps, particularly separating the thigh and drumstick at the joint. However, they’re less precise for the detailed work of separating meat from bone. A sharp knife gives you better control and cleaner results.
What should I do with the bones?
Save all bones for making stock or bone broth. Freeze them until you have enough for a batch. Homemade stock is superior to store-bought versions and uses every part of the bird. This approach is economical and sustainable.
Why is my deboned thigh falling apart?
You’re likely cutting too aggressively or using a dull knife, which damages the meat structure. Use controlled, short strokes with a sharp blade. Let the knife do the work rather than forcing it through the meat.
Can frozen thighs be deboned?
Frozen thighs are much harder to work with. Thaw them completely in the refrigerator before deboning. Partially frozen meat is slippery and difficult to control, increasing injury risk and producing poor results.
Related Posts

Superscript in Google Docs: Expert Tips

Strikethrough in Excel: Easy Steps for Beginners
