

Cleaning Silver at Home: Pro Tips Revealed
Cleaning Silver at Home: Pro Tips Revealed
Silver tarnish happens to everyone. Whether you’re dealing with heirloom silverware, jewelry, or decorative pieces, dull and discolored silver can diminish the beauty of your treasured items. The good news? You don’t need expensive professional cleaning services to restore your silver to its original lustrous shine. With the right techniques and common household items, you can learn how to clean silver at home like a pro.
Tarnish forms when silver reacts with sulfur compounds in the air, creating a dark layer on the surface. While this is a natural process, it doesn’t mean your silver is ruined. In fact, many professional jewelers and collectors use simple at-home methods to maintain their collections. This guide reveals professional-grade techniques that anyone can master, from quick polishing methods to deep-cleaning treatments for heavily tarnished pieces.
Whether you’re preparing for a special dinner, storing family heirlooms, or simply want to keep your silver jewelry looking pristine, these proven methods will help you achieve restaurant-quality results without the restaurant-quality price tag.
Understanding Silver Tarnish and Prevention
Before diving into cleaning methods, it’s important to understand what causes silver tarnish. Silver naturally oxidizes when exposed to air and moisture, particularly in environments with high sulfur content. This chemical reaction creates a dark patina that builds up over time. Unlike dirt or dust, tarnish cannot be removed with simple washing—it requires chemical treatment or mechanical polishing.
The speed at which silver tarnishes depends on several factors. Humidity levels, air pollution, and proximity to certain materials all accelerate the tarnishing process. Interestingly, silver that’s regularly used and handled tarnishes more slowly than silver stored away, because the friction from handling naturally polishes the surface.
Understanding this process helps you choose the right cleaning method. Light surface tarnish requires gentle polishing, while heavy black tarnish may need stronger chemical solutions. Additionally, knowing what causes tarnish helps you implement prevention strategies to keep your silver looking beautiful between cleanings.
Essential Supplies for Silver Cleaning
You likely already have most supplies needed for professional-quality silver cleaning in your home. This is one of the biggest advantages of learning to clean silver yourself—minimal cost and maximum convenience. Here’s what you’ll need:
- Baking soda: The most versatile silver cleaning agent available
- White vinegar: Enhances cleaning power and removes residue
- Aluminum foil: Creates a chemical reaction that lifts tarnish
- Soft-bristled toothbrush: Perfect for detailed areas and crevices
- Microfiber cloths: Prevent scratching and leave no lint
- Distilled water: Better than tap water for final rinses
- Dish soap: Gentle cleaning before polishing
- Rubber gloves: Protect your hands during cleaning
- Plastic or glass bowls: Never use metal containers during cleaning
If you’re interested in maintaining other household items, check out our guide on how to clean leather couch for similar professional techniques you can use throughout your home.
The Baking Soda Method: Best for Heavy Tarnish
The baking soda method is the gold standard for removing heavy tarnish from silver items. This gentle yet effective technique works on virtually all silver pieces and requires only two ingredients: baking soda and water. This method is particularly effective because baking soda is slightly abrasive without being harsh enough to scratch precious metal.
Step-by-step process:
- Create a paste by mixing three parts baking soda with one part water
- Adjust consistency until you have a spreadable paste—not too wet, not too dry
- Apply the paste directly to tarnished areas using a soft cloth or soft-bristled toothbrush
- Gently rub in circular motions, working the paste into crevices and detailed areas
- For stubborn tarnish, let the paste sit for 5-10 minutes before continuing
- Rinse thoroughly under running water to remove all paste residue
- Dry immediately with a microfiber cloth to prevent water spots
Pro tip: For silver jewelry with gemstones, be extra cautious with this method. Some stones may be damaged by the abrasive paste, so test on an inconspicuous area first or use a gentler method instead.
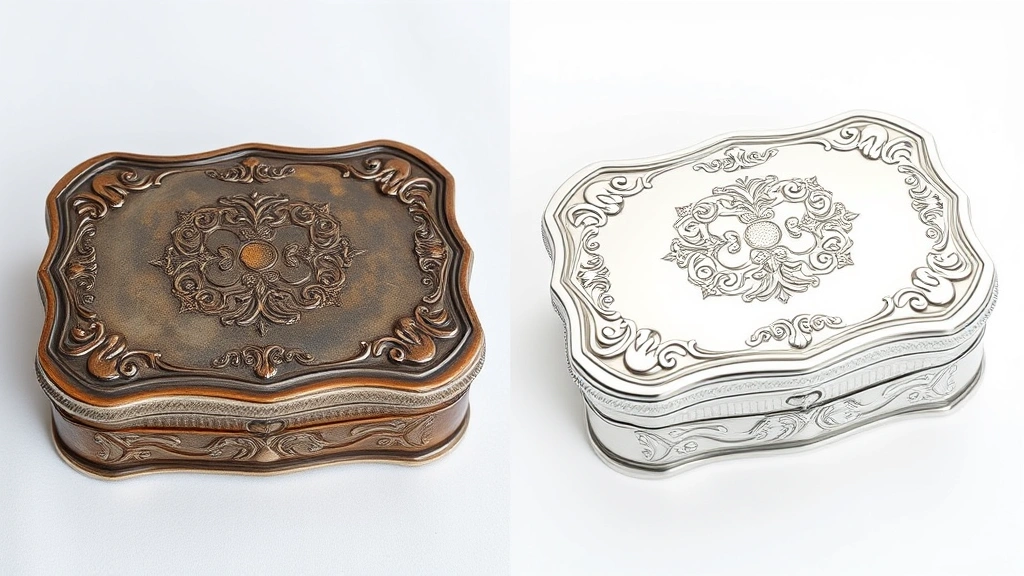
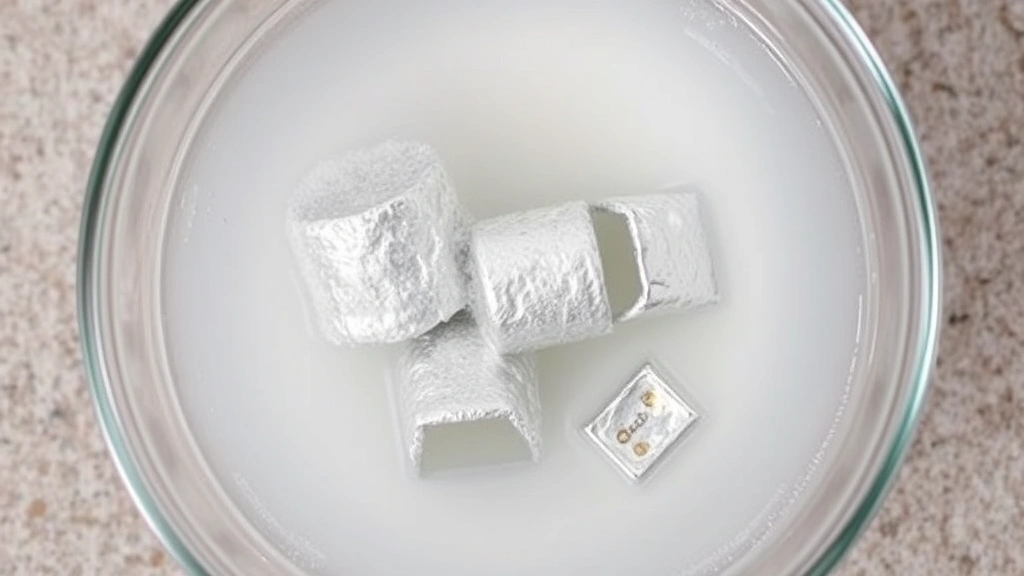
Aluminum Foil and Baking Soda Technique
This method is a game-changer for large quantities of silver or heavily tarnished pieces. The chemical reaction between silver, aluminum, and baking soda lifts tarnish without requiring manual scrubbing. This is the preferred method of many professional conservators because it’s gentle on delicate pieces while being incredibly effective.
Here’s how to perform this technique:
- Line a bowl or sink with aluminum foil, shiny side facing up
- Fill the bowl with hot water (not boiling—just hot from the tap)
- Add one tablespoon of baking soda per quart of water
- Stir gently to dissolve the baking soda
- Place your silver items directly on the foil so they make contact
- Watch as the tarnish transfers to the foil—this usually takes 5-15 minutes
- Remove items and rinse thoroughly with distilled water
- Dry immediately with a soft cloth
Why this works: A chemical reaction called ion exchange transfers the tarnish from your silver to the aluminum foil. This method is so effective that you’ll often see dramatic results within minutes. For extremely heavy tarnish, you can repeat the process or leave items in the solution longer.
This technique is especially valuable when you have multiple pieces to clean at once. Unlike manual polishing methods, you’re not limited by how many items you can handle simultaneously.
Vinegar and Baking Soda Solution
The vinegar and baking soda combination creates a fizzing action that penetrates into crevices and detailed areas of silver items. This method is particularly effective for ornate silverware, decorative boxes, and jewelry with intricate designs where tarnish accumulates in hard-to-reach places.
Preparation and application:
- Pour white vinegar into a glass bowl until it covers your silver items
- Add one tablespoon of baking soda per cup of vinegar
- Watch the fizzing action—this is the cleaning power at work
- Submerge your silver items in the solution
- Let sit for 1-12 hours depending on tarnish severity
- Remove items and gently brush with a soft toothbrush if needed
- Rinse thoroughly under running water multiple times
- Dry completely with a microfiber cloth
The acidic nature of vinegar combined with the mild abrasive properties of baking soda makes this solution particularly effective for removing stubborn tarnish. The longer you soak items, the better the results, though overnight soaking is generally unnecessary for typical tarnish.
Polishing Cloth Method for Light Tarnish
Sometimes the simplest solution is the best one. For light surface tarnish, a high-quality silver polishing cloth can restore shine quickly and easily. These specialized cloths are chemically treated to remove tarnish without requiring water or additional products. This method is ideal for jewelry you wear regularly or silver pieces that need quick maintenance between deep cleanings.
Using a silver polishing cloth correctly:
- Unfold the cloth completely to access the treated surface
- Gently rub your silver item in one direction, not in circles
- Use different sections of the cloth as it becomes darkened with tarnish
- For detailed areas, fold the cloth into a point to reach crevices
- Buff with a clean section of cloth for a final shine
- Never wash the polishing cloth—it loses its chemical treatment
Quality matters with polishing cloths. Invest in cloths specifically designed for silver rather than generic jewelry cloths. Premium cloths contain better chemical treatments and last longer. When you’re done, store the cloth in its original plastic bag to preserve the treatment.
Commercial Silver Polish Options
While natural methods work beautifully, commercial silver polishes offer convenience and sometimes superior results for heavily tarnished items. Popular options from retailers like Lowe’s and Home Depot include Tarn-X, Hagerty Silver Cleaner, and Weiman Silver Polish. Each has different formulations suited to various tarnish levels.
When choosing commercial polish, consider:
- Tarnish severity—light, medium, or heavy formulations available
- Silver type—some polishes are better for sterling versus plated silver
- Application method—liquid, paste, or pre-treated cloths
- Safety features—non-toxic, low-odor options for indoor use
- Cost-effectiveness—bulk quantities for frequent cleaning
Always follow manufacturer instructions carefully. Most commercial polishes require ventilation, as some contain strong chemical odors. Never mix different polishes or combine with other cleaning products, as this can create harmful chemical reactions.
Cleaning Delicate and Antique Silver
Antique silver and pieces with sentimental value require extra care. These items often have patina that collectors value, and aggressive cleaning can remove this character and reduce value. Additionally, antique pieces may have repairs, plating, or fragile construction that makes standard cleaning methods risky.
Best practices for valuable pieces:
- Test any cleaning method on an inconspicuous area first
- Avoid harsh scrubbing that can remove plating or damage delicate surfaces
- Use only soft cloths and soft-bristled brushes—never steel wool or scouring pads
- For items with gemstones, avoid soaking in chemical solutions
- Consider professional cleaning for extremely valuable or damaged pieces
- Document before and after with photos for insurance purposes
For heirloom silver with intricate designs, the aluminum foil method is often the safest choice because it requires minimal physical contact with the item. The chemical process does the work rather than manual scrubbing, reducing the risk of damage.
If you enjoy restoring valuable items, you might also appreciate learning about other restoration techniques from FixWiseHub, which offers comprehensive guides on maintaining household treasures.
Long-Term Storage and Prevention
Preventing tarnish is far easier than removing it. Proper storage techniques can significantly extend the time between cleanings and keep your silver looking beautiful for years. This is where your effort really pays off—a few preventative measures now mean less cleaning work later.
Storage strategies:
- Airtight containers: Store silver in sealed plastic bags or airtight boxes to minimize air exposure
- Tarnish-preventative strips: Place anti-tarnish strips (containing activated charcoal) in storage containers
- Acid-free tissue: Wrap individual pieces in acid-free tissue to prevent direct contact with materials that accelerate tarnishing
- Dry environment: Store in low-humidity areas away from bathrooms and basements
- Away from chemicals: Keep silver away from rubber bands, adhesives, and cleaning products
- Regular use: Wear silver jewelry regularly—handling naturally prevents tarnish buildup
- Climate control: Maintain consistent temperature and humidity levels if possible
If you store silver in display cases or cabinets, ensure adequate ventilation. Sealed spaces with high humidity can actually accelerate tarnishing. Consider using silica gel packets to maintain optimal moisture levels in storage areas.
For those interested in comprehensive home maintenance, learning proper cleaning techniques across different materials helps you maintain all household items effectively.
FAQ
Is it safe to clean all types of silver with these methods?
Most solid silver and sterling silver items are safe to clean with these methods. However, items with gemstones, pearls, or delicate plating require more caution. Always test a small area first, especially with antique or valuable pieces. When in doubt, consult a professional conservator.
How often should I clean my silver?
The frequency depends on storage conditions and usage. Regularly worn silver jewelry may only need cleaning every few months, while stored pieces might go 1-2 years between cleanings. If you notice visible tarnish, it’s time to clean.
Can I use toothpaste to clean silver?
While some people use whitening toothpaste, it’s not recommended. Toothpaste is designed to be abrasive for teeth and can scratch silver. Stick with baking soda paste or dedicated silver cleaning products for better results.
Why does my silver tarnish so quickly?
Quick tarnishing usually indicates high humidity or proximity to sulfur-containing materials. Check your storage area’s humidity levels. Rubber bands, certain plastics, and felt can accelerate tarnishing. Upgrading your storage conditions will slow the process significantly.
Can I use the aluminum foil method on silver jewelry with gemstones?
Use caution with this method on gemstone jewelry. The hot water and chemical reaction may damage some stones. For jewelry with valuable gems, use the gentle baking soda paste method or consult a professional jeweler.
What’s the difference between sterling silver and plated silver?
Sterling silver is 92.5% pure silver and can handle vigorous cleaning. Silver-plated items have a thin silver layer over base metal. Clean plated silver gently to avoid wearing through the plating. Test your method on an inconspicuous area first.
Should I dry silver immediately after cleaning?
Yes, always dry silver immediately after cleaning with a soft cloth. Water spots can form if silver air-dries, and prolonged moisture exposure can cause additional tarnishing. Microfiber cloths work best as they won’t leave lint or scratches.
Are commercial silver polishes better than natural methods?
Both have advantages. Natural methods are safer for delicate items and less expensive. Commercial polishes often work faster on heavy tarnish. Many people use natural methods for regular maintenance and commercial products for deep cleaning when needed.
Related Posts

Superscript in Google Docs: Expert Tips

Strikethrough in Excel: Easy Steps for Beginners
