
How to Boil Sweet Potatoes? Expert Tips
How to Boil Sweet Potatoes: Expert Tips for Perfect Results Every Time
Boiling sweet potatoes is one of the simplest yet most versatile cooking methods in your kitchen arsenal. Whether you’re preparing a weeknight side dish, creating a base for a nutritious bowl, or meal-prepping for the week ahead, mastering this fundamental technique will elevate your cooking game. Sweet potatoes are nutrient-dense powerhouses packed with vitamins, fiber, and natural sweetness that makes them a favorite among health-conscious cooks and families alike.
The beauty of boiling sweet potatoes lies in its simplicity and reliability. Unlike roasting, which requires monitoring and can dry out the flesh, or microwaving, which often yields uneven results, boiling provides consistent, tender results every single time. This method preserves the natural flavors and nutrients while creating the perfect foundation for countless recipes. Whether you’re planning to mash them, cube them for salads, or serve them as a standalone side, understanding the nuances of proper boiling technique will ensure you achieve restaurant-quality results at home.
Why Boil Sweet Potatoes
Boiling sweet potatoes offers distinct advantages over other cooking methods. This technique is energy-efficient, using less electricity or gas compared to oven roasting, and it’s incredibly forgiving for beginners. The moist heat environment ensures that the potatoes cook evenly throughout, eliminating the common problem of burnt exteriors and undercooked centers that can occur with dry-heat methods.
From a nutritional perspective, boiling is a gentle cooking method that preserves more heat-sensitive vitamins compared to prolonged high-temperature cooking. The beta-carotene, potassium, and B vitamins in sweet potatoes remain largely intact when you boil them. Additionally, boiled sweet potatoes are easier to digest than raw ones, making them an excellent choice for meal prep and batch cooking. If you’re interested in other boiling techniques, check out our guide on how to boil shrimp to explore similar steaming and boiling principles.
The versatility of boiled sweet potatoes cannot be overstated. They serve as an ideal base for smoothie bowls, can be mashed into creamy side dishes, diced for grain bowls, or pureed for soups and baby food. This single cooking method opens doors to countless culinary applications across breakfast, lunch, dinner, and dessert categories.
Selecting and Preparing Your Sweet Potatoes
Choosing the right sweet potatoes is the first step toward boiling success. Look for potatoes that are firm, without soft spots or sprouting eyes. Medium-sized potatoes are ideal for boiling because they cook more evenly than extremely large ones. Avoid potatoes with visible blemishes, dark spots, or wrinkled skin, as these indicate age or damage that may affect flavor and texture.
When selecting sweet potatoes, consider that different varieties have slightly different cooking times and textures. Orange-fleshed varieties like Beauregards are the most common and cook relatively quickly. White and purple varieties may have slightly different densities and cooking times, so adjust your expectations accordingly. For consistent results, try to select potatoes of similar size so they finish cooking at approximately the same time.
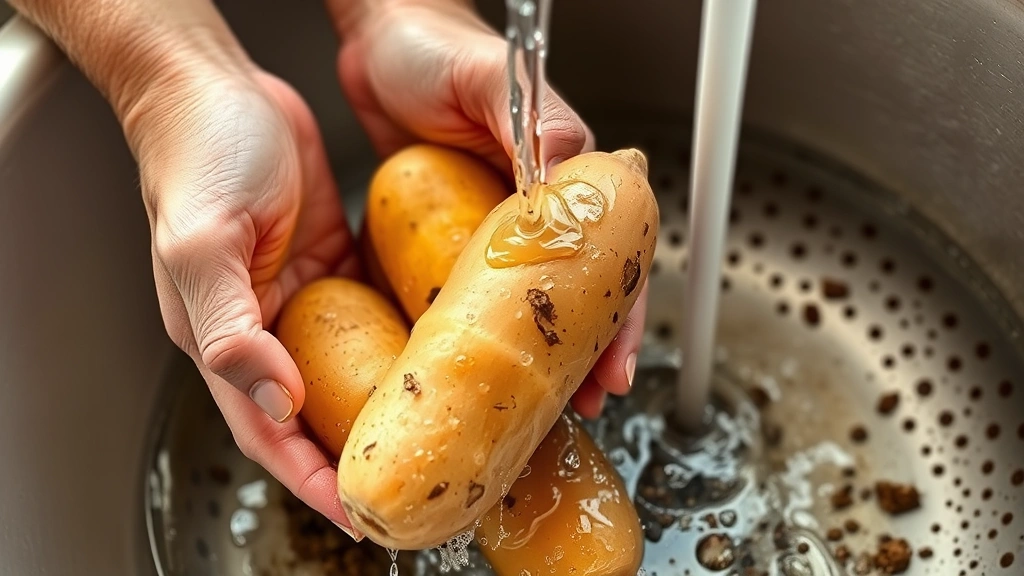
Preparation is straightforward but crucial. Rinse your sweet potatoes thoroughly under cool running water, using a vegetable brush or clean cloth to remove all soil and debris. This step prevents dirt from contaminating your cooking water and ensures a clean final product. Pat the potatoes dry with a clean kitchen towel. Do not peel the sweet potatoes before boiling; the skin acts as a protective barrier that keeps the flesh tender and prevents nutrients from leaching into the water. You can easily peel them after cooking if desired.
Equipment You’ll Need
Boiling sweet potatoes requires minimal equipment, making it accessible to any home cook. You’ll need a large pot with a lid—at least 6-8 quarts capacity is ideal for boiling multiple potatoes. The pot should be deep enough to accommodate potatoes covered with water by at least two inches. Stainless steel or aluminum pots work perfectly; avoid aluminum if you’re sensitive to potential reactivity with certain foods.
A sharp chef’s knife or utility knife is essential for any necessary trimming. Some cooks prefer using a vegetable peeler after cooking, though this is optional. A slotted spoon or spider strainer helps safely remove hot potatoes from boiling water. A colander is useful for draining, though you can also carefully pour the potatoes into a fine-mesh strainer. A fork or skewer for testing doneness rounds out your equipment needs. If you want to explore other vegetable preparation techniques, our article on how to blanch broccoli covers similar equipment and steaming methods.
Optional but helpful items include a kitchen timer to track cooking time accurately, and a thermometer if you want to monitor water temperature. Having a clean kitchen towel or paper towels nearby for drying and handling hot potatoes is also recommended for safety and convenience.
Step-by-Step Boiling Guide
Step 1: Fill Your Pot with Water
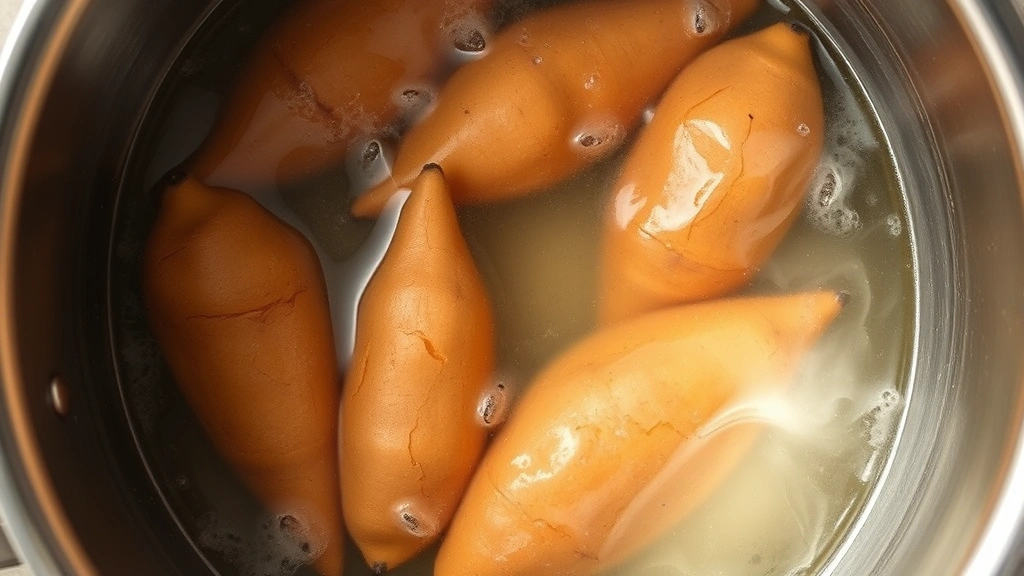
Fill your large pot with enough cold water to cover your sweet potatoes by approximately two inches. Using cold water rather than hot water ensures even cooking from the outside in. The general rule is one part potato to three parts water, though exact ratios are flexible. Cold water takes longer to boil but results in more uniform cooking throughout the potato.
Step 2: Add Salt and Bring to a Boil
Add approximately one tablespoon of salt to the water. Salt serves multiple purposes: it seasons the potatoes subtly, raises the boiling point slightly, and helps maintain the potatoes’ texture during cooking. Bring the water to a rolling boil over high heat. You’ll know it’s at a proper boil when large bubbles rapidly break the surface continuously.
Step 3: Add Your Sweet Potatoes
Carefully place your prepared sweet potatoes into the boiling water. Use tongs or a slotted spoon to lower them gently to prevent splashing and burns. The water temperature will drop when you add the cold potatoes; this is normal. Return the water to a boil, which typically takes 2-3 minutes. Once boiling resumes, reduce the heat to medium or medium-high to maintain a gentle, rolling boil rather than a vigorous rolling boil.
Step 4: Maintain Consistent Heat
Maintain a consistent boil throughout the cooking process. The water should bubble steadily but not violently; vigorous boiling can cause the potatoes to break apart or become mushy. If you’re boiling a large batch, ensure that all potatoes remain submerged. You may need to use a wooden spoon to gently hold them down or place a heat-safe plate on top to keep them under water.
Step 5: Monitor Cooking Progress
Begin checking for doneness around the 15-minute mark if you’re boiling small to medium potatoes. Insert a fork or skewer into the thickest part of the largest potato. The utensil should pierce the flesh with minimal resistance. Continue cooking and checking every 3-5 minutes until the desired tenderness is achieved.
Cooking Times by Size
Cooking time varies significantly based on potato size, which is why selecting similar-sized potatoes matters. Small potatoes (approximately 2-3 inches in diameter) typically require 15-20 minutes of boiling. These are ideal if you want quick results or plan to serve whole potatoes.
Medium potatoes (approximately 3-4 inches in diameter) generally need 20-30 minutes. This is the most common size and represents the sweet spot for most recipes and serving situations. Large potatoes (4+ inches) may require 30-45 minutes depending on exact size and density. Extremely large potatoes sometimes benefit from cutting in half before boiling to ensure even cooking.
If you cut potatoes into chunks or halves before boiling, cooking time decreases significantly. One-inch cubes typically cook in 8-12 minutes, while halved potatoes usually need 15-20 minutes. Keep in mind that cutting potatoes before boiling causes more nutrient loss through leaching into the water, so whole potatoes are preferable when possible.
Remember that these times are estimates. Factors like altitude, water mineral content, starting water temperature, and exact potato density all affect cooking time. It’s always better to check for doneness rather than rely solely on time estimates. Start checking earlier than you think necessary and adjust future batches accordingly.
Testing for Doneness
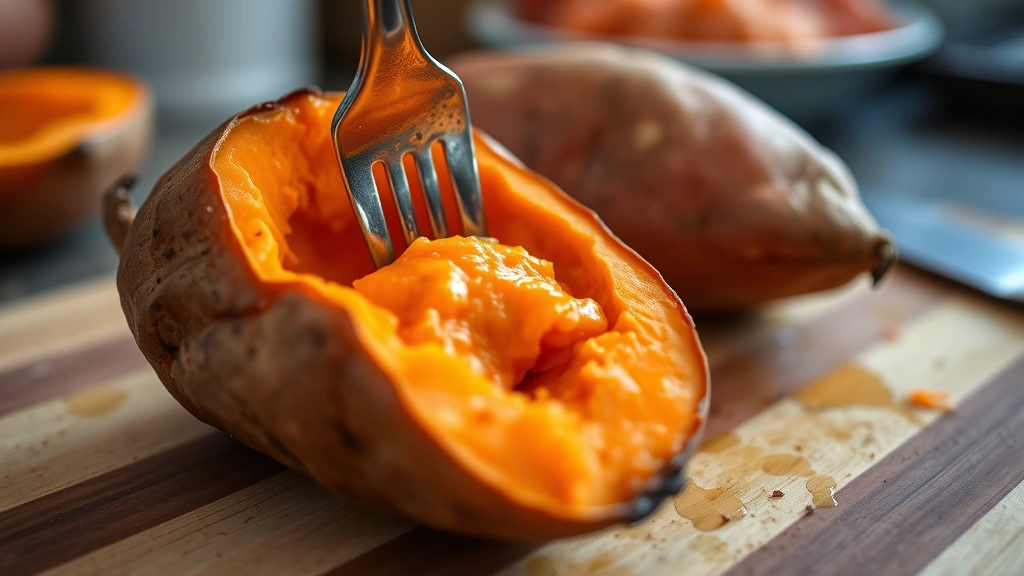
Proper doneness testing ensures you achieve the perfect texture for your intended use. The most reliable method is the fork test: insert a fork into the thickest part of the largest potato. For most applications, the fork should slide through with moderate pressure—not too easily, which would indicate mushiness, but not with excessive resistance, which means the potato needs more time.
The texture should be creamy and tender but still hold its shape. If you’re planning to mash the potatoes, you might prefer them slightly softer. If you want to dice them for salads or grain bowls, aim for potatoes that are tender but still hold their shape firmly. The skin should be easy to pierce but not falling apart.
Another test involves carefully removing a potato with a slotted spoon and cutting it in half. The interior should be uniformly soft and cooked throughout. If you see a firmer ring near the center, the potato needs more cooking time. For whole potatoes, the thickest part is always the last to cook, so always test there first.
Overcooking sweet potatoes results in mushy, waterlogged flesh that falls apart easily. Undercooked potatoes remain firm and may have a slightly grainy texture. Finding the sweet spot requires practice, but once you’ve boiled sweet potatoes a few times, you’ll develop an intuitive feel for the proper doneness.
Cooling and Storage Tips
Once your sweet potatoes reach perfect doneness, remove them from the boiling water using a slotted spoon or spider strainer. Place them on a clean kitchen towel or paper towels to cool. Allowing them to cool at room temperature for 10-15 minutes makes them easier to handle and peel if desired.
For immediate use, you can peel the skin while the potatoes are still warm—the skin slips off easily at this stage. Simply hold the potato with a towel and use a paring knife to gently slide the skin away. Alternatively, let them cool completely and peel them cold, though the skin adheres more firmly after cooling.
For storage, allow boiled sweet potatoes to cool completely before refrigerating. Place them in an airtight container and refrigerate for up to 5 days. Boiled sweet potatoes freeze exceptionally well; place cooled, peeled potatoes in a freezer-safe container or bag for up to 3 months. You can freeze them whole, halved, or cubed depending on your anticipated use. Thaw frozen potatoes in the refrigerator overnight before reheating.
To reheat boiled sweet potatoes, warm them gently in a microwave (covered, 2-3 minutes for individual portions) or in a saucepan over medium heat with a splash of water. Avoid high-heat reheating, which can cause them to dry out or become tough.
Common Mistakes to Avoid
Starting with Hot Water
Beginning with hot or boiling water instead of cold water can cause uneven cooking. The exterior cooks faster than the interior, resulting in mushy outsides and firm centers. Always start with cold water and bring it to a boil after adding the potatoes.
Overcrowding the Pot
Filling the pot too full with potatoes prevents proper water circulation and leads to uneven cooking. Leave space between potatoes and ensure they’re all submerged. If necessary, boil in two batches rather than overcrowding.
Using Inadequate Water
Insufficient water means some potatoes may not be fully submerged, resulting in partially cooked potatoes. Maintain at least two inches of water above the potatoes throughout cooking.
Boiling Too Vigorously
Extremely vigorous boiling can damage potatoes, causing them to split, crack, or disintegrate. Maintain a gentle, rolling boil rather than a violent one. This also saves energy and prevents unnecessary water loss.
Skipping the Salt
While optional, salt significantly improves flavor and texture. Don’t skip this step if you want properly seasoned potatoes. Salt also helps maintain texture and prevents excessive nutrient leaching.
Not Testing for Doneness
Relying entirely on cooking time without checking leads to either undercooked or overcooked potatoes. Always test, especially when boiling for the first time or using potatoes of varying sizes.
Peeling Before Cooking
Peeling sweet potatoes before boiling causes excessive nutrient loss and results in waterlogged flesh. Always boil with the skin on and peel after cooking if desired.
Creative Uses for Boiled Sweet Potatoes
Boiled sweet potatoes are incredibly versatile. Mashed Sweet Potatoes: Peel cooled potatoes and mash them with a fork or potato ricer. Add butter, cinnamon, nutmeg, and a pinch of salt for a classic side dish. For a lighter version, use Greek yogurt instead of butter.
Sweet Potato Salads: Cube boiled potatoes and toss with fresh greens, crumbled feta, toasted nuts, and a vinaigrette for a nutritious lunch. The natural sweetness complements tangy dressings beautifully.
Grain Bowls: Dice boiled potatoes and layer them in bowls with quinoa, roasted vegetables, and your choice of protein and sauce. This creates a satisfying, meal-prep-friendly lunch.
Smoothie Bowls: Blend cooled boiled sweet potatoes into smoothies for natural sweetness, creaminess, and nutrition. Top with granola, coconut, and berries for a complete breakfast.
Soups and Purees: Blend boiled sweet potatoes with vegetable or chicken broth, aromatics, and seasonings to create velvety soups. The natural sweetness pairs beautifully with ginger, curry spices, or sage.
Baby Food: Puree boiled sweet potatoes with a little water or breast milk for a nutritious first food. The natural sweetness appeals to babies and the gentle cooking method preserves nutrients.
Sweet Potato Fries: Cut boiled potatoes into wedges, toss with olive oil and seasonings, then bake at 400°F for 15-20 minutes to create crispy fries without deep frying.
Breakfast Hash: Dice boiled potatoes and pan-fry with onions, peppers, and your choice of protein. Top with a fried egg for a hearty breakfast.
For more cooking technique inspiration, explore our comprehensive guide to FixWiseHub Blog for additional kitchen skills and recipes.
FAQ
How long does it take to boil a sweet potato?
Small sweet potatoes (2-3 inches) take approximately 15-20 minutes, medium potatoes (3-4 inches) require 20-30 minutes, and large potatoes (4+ inches) need 30-45 minutes. Always test for doneness with a fork rather than relying solely on time estimates, as variables like altitude and potato density affect cooking time.
Can you boil sweet potatoes with the skin on?
Yes, and you should! Boiling sweet potatoes with the skin on preserves nutrients, prevents waterlogging, and maintains better texture. The skin acts as a protective barrier. You can easily peel them after cooking when they’ve cooled slightly.
Why are my boiled sweet potatoes mushy?
Mushy sweet potatoes typically result from overcooking, boiling too vigorously, or using potatoes that are too small. Reduce cooking time by 5-10 minutes next time, maintain a gentle boil, and select medium-sized potatoes for better results.
Is it better to boil or bake sweet potatoes?
Both methods are excellent; the choice depends on your needs. Boiling is faster, more energy-efficient, and gentler on nutrients. Baking creates a different texture and caramelizes natural sugars. Boiling is ideal for meal prep and quick weeknight cooking, while baking is better when you want crispy skin or concentrated sweetness.
Can you boil sweet potatoes in advance?
Absolutely! Boiled sweet potatoes keep in the refrigerator for up to 5 days in an airtight container, making them perfect for meal prep. You can also freeze them for up to 3 months. This advance preparation makes weeknight cooking incredibly convenient.
What’s the difference between sweet potatoes and yams?
Despite being called yams in many grocery stores, most orange-fleshed potatoes sold in North America are actually sweet potatoes. True yams are starchy tubers from Africa and have rough, bark-like skin. Both can be boiled using the same method and timing, though true yams may take slightly longer due to their density.
Do you need to add salt when boiling sweet potatoes?
While not absolutely necessary, adding salt is highly recommended. Salt seasons the potatoes subtly, helps maintain texture, raises the boiling point slightly, and reduces nutrient leaching. Use approximately one tablespoon per pot of water.
How do you know when boiled sweet potatoes are done?
Insert a fork into the thickest part of the largest potato. The fork should slide through with moderate pressure. The flesh should be creamy and tender but still hold its shape. If the fork meets resistance, cook longer. If the potato is falling apart, it’s overcooked.
Related Posts

Superscript in Google Docs: Expert Tips

Strikethrough in Excel: Easy Steps for Beginners
